
Tip: View the RMPrepUSB guide which has loads more FAQs!
- WARNING: .\LANG\English.ini file missing! in Windows XP
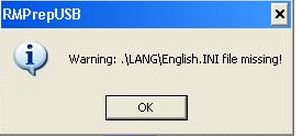
- A) Ensure the SCRRUN.DLL file is registered. Click Start | Run and type cmd in the Open field. A command prompt will open. Type cd c:\windows\system and press Enter. Type regsvr32 scrrun.dll and press Enter. A message will display with the following: DllRegisterServer in scrrun.dll succeeded.
- B) Ensure the Windows Scripting Host, is installed. To reinstall this: Navigate your web browser to http://www.microsoft.com/downloads/en/default.aspx. Search Windows Scripting Host in the search field. Download the current version of Windows Scripting Host associated with the version of Windows XP that you are using.
- C) If running under WinPE instead of full Windows, use a 32-bit WinPE instead of a 64-bit WinPE.
- System error – MSVBVM60.dll was not found
- If running under WinPE, you may need to copy the MSVBVM60.dll file from the WINPE_EXTRA folder to the same folder as RMPrepUSB.exe.
- Why do I get a Write Error – ExitCode 7 error when I try to partition/format my USB drive?
- This is usually due to Windows locking the USB drive. The usual reason for this is that Windows has not assigned a drive letter to the USB drive. Right-Click on My Computer and choose Manage and then click on Storage – Disk Management (or press Ctrl-K in RMPrepUSB). Now locate the USB drive and assign it a drive letter by right-clicking on the large boxed outline for the drive and choosing ‘Change Drive Letter and Paths’. Now add a drive letter for this drive – choose a letter well away from any other drives (including any virtual drives you may have).
- The NTFS format routine used by RMPrepUSB requires Windows to assign a disk letter to the USB drive, so check that a drive letter is assigned (C: to Z: only, A: and B: are not allowed by RMPrepUSB) if you are having problems formatting as NTFS. A drive letter is not required if formatting as FAT16 or FAT32.
- How do I load and save configurations (v2.1.614 and later)
- Let us suppose you want to distribute RMPrepUSB to some users which allows them to create two different kinds of bootable USB pens or USB drives – OR – you just want to choose from a list of your own boot images so you can quickly make any type of boot drive without having to remember what settings you used or where the source files are located…
- A. Place your source OS files in folders on the C: drive of your hard disk (e.g. C:\ACME\RMPrepUSB\SourceFiles\OS2.4, C:\ACME\RMPrepUSB\SourceFiles\OS2.7, etc.) – Note: we use C: because all users will have a C: drive, if you are just saving configs for your own use, you can use any volume or location.
- Now for each USB configuration:
- B. Run RMPrepUSB and actually make your bootable USB drive as you would normally (you do not have to do this, unless you choose Syslinux, but it helps to get it right – if you don’t actually make a USB drive then check the contents of the RMPrepUSB.ini file after making it). If you need to use the syslinux option, you must run through a complete format/syslinux operation to set the Raid/Stupid/Syslinux boot folder options so they are saved to the ini file correctly.
- C. (Optional) After ‘Prepare Drive’ has finished and the file copy has completed, click on Install grub4dos and choose the grub4dos options as normal (this sets the grub4dos option to either MBR or PBR depending on which one you choose). If you don’t need to run grub4dos, then skip this bit as it is not necessary.
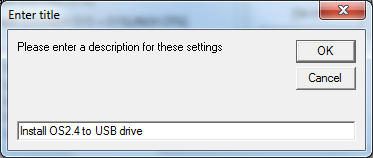
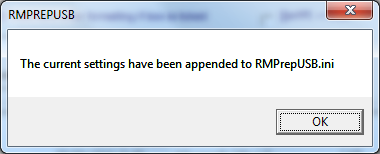
- D. Now press F10 – you should be asked if you want to append the settings to the configuration file RMPrepUSB.ini. F10 merely records all the current settings including the MBR or PBR selection used when grub4dos was run and saves them to RMPrepUSB.ini.
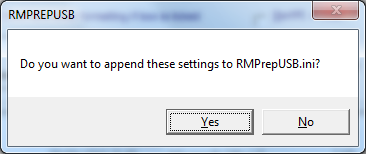
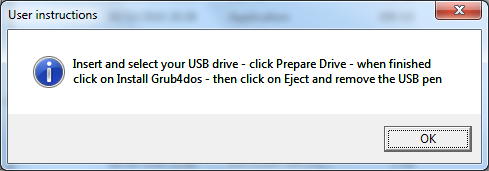
- E. You will be asked to input a title (which will eventually appear in the menu list) and then user instructions

- If you don’t have an RMPrepUSB.ini file then it will be created for you.
- Repeat this (B-E) for all your different types of bootable OS’s.
- If you don’t have an RMPrepUSB.ini file then it will be created for you.
- F. Exit from RMPrepUSB and then restart RMPrepUSB – because an INI file is now present, the user will now see a menu list when RMPrepUSB first runs and can pick one of the preset configurations.
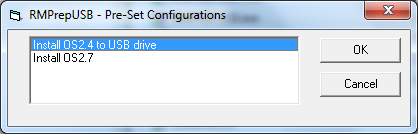
- Clicking Cancel will not set any options, but choosing a configuration and clicking OK will set options which may override any options you choose. The user will now be prompted with the instructions that you previously entered into the configuration file:
- G. When the user clicks on the Prepare Drive button, they will be prompted to accept or refuse the SIZE and VOLUME LABEL that was set in the configuration file:
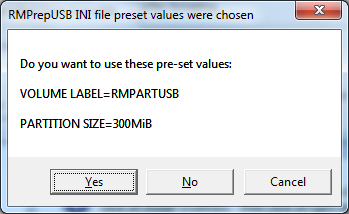
- If the user chooses No then the current settings in RMPrepUSB will be used. Cancel will abort the operation. When the user clicks on Install grub4dos (if instructed), they will not be prompted for the MBR/PBR option as that will already have been chosen for them in the configuration file.
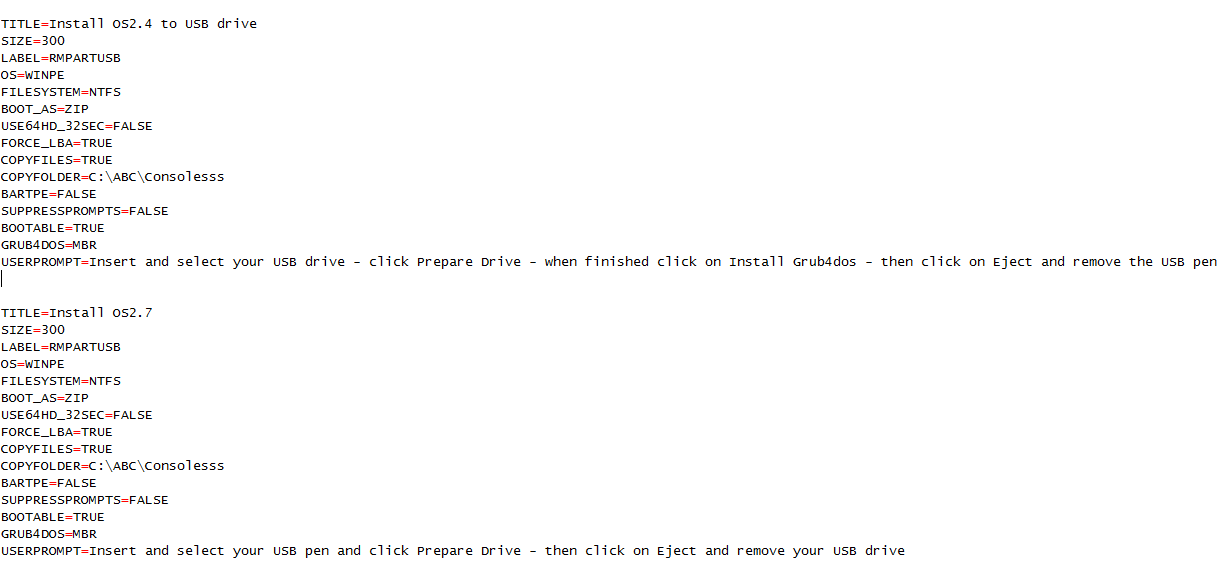
- You can edit the INI file if it is not quite correct or delete any section if you added one by mistake. Here is an example RMPrepUSB.ini file (click to view):
- Note: now with v2.1.614 and later, you can also edit the INI file settings (press F9) to make some buttons invisible to avoid confusing the user with unnecessary options.
- Here is an example of a single config entry with some buttons hidden from the user:
- TITLE=Ylmf Live USB
- SIZE=MAX
- LABEL=Ylmf 3.0
- OS=MSDOS
- FILESYSTEM=FAT32
- BOOT_AS=HDD
- USE64HD_32SEC=FALSE
- FORCE_LBA=FALSE
- COPYFILES=TRUE
- COPYFOLDER=C:\Acme\RMPrepUSB\SourceFiles\Ylmf
- BARTPE=FALSE
- SUPPRESSPROMPTS=FALSE
- BOOTABLE=TRUE
- GRUB4DOS=
- USERPROMPT=Click 6 Prepare Drive, then Install grub4dos and finally click the Create Ext2 FS button
- SYSLINUX_OPT=
- EXT2FNAME=
- EXT2FSIZE=
- GRUBVISIBLE=TRUE
- EXT2VISIBLE=TRUE
- SYSLINUXVISIBLE=FALSE
- INACTIVEVISIBLE=FALSE
- BARTPEVISIBLE=FALSE
- IMAGETOOLSVISIBLE=TRUE
- SPEEDTESTVISIBLE=FALSE
- SIZETESTVISIBLE=FALSE
- CLEANVISIBLE=FALSE
- Check and (if necessary) edit the RMPrepUSB.ini file. Here is an example with all ‘confusing’ buttons disabled:
- Here is an example of a single config entry with some buttons hidden from the user:
FAQ/Issues
You can now ZIP up all source files and RMPrepUSB files and create a self-extracting EXE which will extract the source files to the correct location on the hard disk (i.e. C:\ACME\RMPrepUSB in this case). This is especially useful if you have the same source files but have different systems which need different RMPrepUSB options set (i.e. some systems boot with Force LBA set and some do not – so you can have two configurations but only one set of source files). See also Tutorial 19 for how to make an installer package.
Note: Rather than use preset configurations, you can also distribute an image instead, using the ‘USB->File’ function (make sure the USB partition size is as small as possible – just big enough to hold the OS files to keep the image size small) and use the PALL option.
I have installed grub4dos and get the error “Unregistered Exception Handler” when it tries to boot – This issue is due to the BIOS (e.g. on Acer TravelMate laptops) and is due to the BIOS not recognising the USB drive as a hard disk. It should be fixed in grubinst.exe that is included in v2.1.606a and later releases.
Error 60: File for drive emulation must be in one contiguous disk area – Typically, you will get the non-contiguous error when you have deleted files from the USB drive and then copied over the new file or simply overwritten the old file with the new file. If you get this error when trying to boot an ISO file using grub4dos from a USB Flash Drive, you can run WinContig to fix the ISO file (Ctrl+F2 in RMPrepUSB), but it may not always work due to lack of spare space. A foolproof way to fix the problem is to copy all the files over to your hard disk, run RMPrepUSB again on the UFD to reformat the USb drive (and re-install grub4dos) and then copy all the files back to the USB drive again.
BSOD when booting BartPe from USB – try replacing the ntdetect.com file with the one from W2K3 SP2. Some Dell systems require this.
(Dell) system does not boot to grub4dos menu after using HDD+Force LBA options – Some BIOSes do not ‘like’ the Force LBA option – only try this option if the USB pen will not boot without it. This issue may have been fixed in v 2.1.607 and later.
USB device does not appear in the drive list – To appear in the device list, the USB drive must appear as a \\physicaldrive device in Device Manager, must have a size of greater than 0 bytes and must be classed as a USB device. Drives larger than 128GB are not listed by default (use Ctrl-Z to show large drives). Note that password protected U3 devices will not appear in the menu unless you have enabled the USB storage device using the U3 Launcher software.
Flashing cursor or ‘missing – mbr Helper’ and no grub4dos menu on some systems – If using FAT16/FAT32 this can be fixed by installing grub4dos to the partition boot record (PBR) rather than the master boot record (MBR). Re-partition the USB drive using RMPrepUSB and when using ‘Install grub4dos’ choose the PBR (‘No’) option. PBR installation does not always seem to work on NTFS USB drives however.
What is a GiB or MiB or KiB? – Drive manufacturers use KB to mean 1 thousand bytes, but computers often mean 1024 bytes when they say ‘1KB’. To avoid this confusion the new abbreviation KiB was invented. So 1KiB=1024 bytes, 1MiB=1024×1024 bytes or 1048576 bytes, 1GiB=1024x1024x1024 bytes or 1073741824 bytes. This means that a 160GB hard drive may actually appear as 149GiB in Windows (which it still calls ‘GB’) which is the same as 160GB. RMPrepUSb uses GiB, so a 32GB USB flash drive may appear as 29.8GiB in RMPrepUSB or Windows.
Excel (or OpenOffice) does not load the SpeedTest CSV (comma separated variable) file correctly – why not? – In versions before 2.1.503, the format of the CSV file was that each field was separated by a comma, but the number format would be written in your locale. This means that for non-US/UK countries (e.g. Germany), you could get a CSV file such as:
aaa,bbb,ccc,ddd,5,6,6,2
instead of
aaa,bbb,ccc,ddd,5.6,6.2
To further complicate the problem, the correct CSV format expected by Excel in non-US/UK countries is to use a semi-colon as a separator and a comma as a decimal point.
Version 2.1.503 and later of RMPartUSB, now writes two CSV files:
USBSpeed.csv which writes according to the locale on your computer (e.g. in Germany it writes aaa;bbb;ccc;ddd;5,6;6,2) and
USBSpeedDP.csv which always writes a CSV file with commas as separators and dots as decimal points (aaa,bbb,ccc,ddd,5.6,6.2).
So use USBSpeed.csv if using Excel, or USBSpeedDP.csv if you application always expects commas and decimal points.
Tip: In RMPrepUSB use the F6 or F7 hotkeys to load the correct .csv file.
How do I use RMPrepUSB on a SATA or IDE (non-USB) hard drive?
Use the RMPrepUSB Start Menu entry or type Alt+F5 when running RMPrepUSB. Take care not to format the wrong drive!
or use the Start Menu RMPREPUSB.exe (ALLDRIVES) shortcut. This will then run RMPrepUSB and show all drives (USB and non-USB). You should then have access to all physical storage drives except floppy drives and CD/DVDs. Tip: In RMPrepUSB just hit Ctrl+F5 to see all drives
I used the syslinux option but I cannot get the syslinux.cfg menu to display – I just get a black screen? -This is probably due to the version of syslinux.exe not matching the version of vesamenu.c32. Try using menu.c32 instead in your syslinux.cfg menu file. If that works then it is a vesamenu.c32 issue. Either find another version of the vesamenu.c32 file or try replacing the syslinux.exe file in the RMPrepUSB menu with another version of syslinux.exe and re-running RMPrepUSB so that syslinux is re-applied to the USB drive. COM32R versions of vesamenu.32 that are dated 2010 will probably require syslinux v4.03 or later. Syslinux v4+ needs a vesamenu.c32 file in COM32R format, the version of syslinux included with RMPrepUSB v2.1.600 uses an older version which requires COM32 format files.
Note: RMPrepUSB v2.1.604 and later uses the new version of syslinux which is compatible with COM32R versions of linux (but incompatible with the older COM32 versions).
How can I copy an image onto a USB drive of a different size? – You cannot re-size an image using RMPrepUSB. So you need to follow these steps:
1. Determine the minimum partition size required to hold all the files in the image (e.g. say it is 2.7GiB)
2. Set the size in RMPrepUSB to just larger (say 2.9GiB) and reformat the USB drive to that size (do not set HDD option as this creates a small 2nd partition)
3. Prepare and test the USB drive to make sure it works on all systems
4. Make a USB–>File image using the PALL setting
5. Now use the File–>USB button to copy the image to all your other USB drives (which must be at least 2.9GiB in size)
6. If you want to expand the partition and it is a single NTFS partition (do not use HDD 2PTNS option), then use Windows Diskpart command as follows: DISKPART LIST VOL SEL VOL J: (assuming J: is the volume letter given to your USB drive that you want to expand) EXTEND LIST VOL EXIT
If you have a single FAT16 or FAT32 partition or want to use a GUI, try the free EaseUS Home Partition Master for 32-bit Windows which can be download here.
Note that for better BIOS boot compatibility, it is best to have a small 2nd partition on any USB drive that you want to boot as a hard disk (not a floppy disk). So after re-sizing the 1st partition, use EaSeus to create a small 2nd partition on the USB drive and make it hidden so that Windows does not object to the USB drive.
14. Some text just displays as lines when I select English or German, etc. (e.g. ______) ? – Your system does not support Character Set 238 (maybe WinPE?) – try the English204 language option, or if you want another language, copy the \LANG\xxx.ini file to \LANG\xxx204.ini and change charset=238 to charset=204 in the new file. Then select it in the language box in RMPrepUSB.
15. How do I make a USB drive formatted as exFAT boot to grub4dos? Use version 2.1.702 or later. Choose the BOOTMGR\WinPE option and exFAT. When you click on 6 Prepare Drive you will be prompted to choose a grub4dos bootloader for the Volume Boot Record or BOOTMGR as shown below:
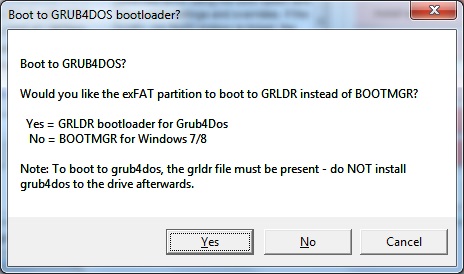
If you answer Yes, then a VBR (aka PBR) boot record will be written to the USB drive and, after formatting has completed, the grldr file will be copied to the USB drive. The USB drive is thus bootable to grub4dos as soon as the Prepare Drive function has completed. If you attempt to then install grub4dos to the exFAT drive PBR it will fail to install. If you install grub4dos to the MBR then booting may fail (or load the PBR boot code successfully after the MBR grub4dos bootloader fails to find the grldr file!). You should use a standard MBR so that the special grldr boot sector will be used to boot grub4dos.
exFAT boot chain: MBR -> PBR -> finds grldr -> runs grldr -> loads grub4dos -> finds and loads menu.lst
16. There is no option to install MSDOS bootloader to a FAT32 volume, so how can I do it without reformatting? As a workaround, install the Wee bootloader instead. It will give you a menu to boot to MS-DOS. If ‘No user prompts’ is left unticked, you can edit the default menu to simply have the single line of:
chainloader /io.sys
and it will always boot to MSDOS immediately.