Table of Contents
RMPREPUSB AND GRUB4DOS YOUTUBE VIDEOS
Using grub4dos with RMPrepUSB
INTRODUCTION TO MAKING A MULTI-BOOT USB DRIVE
If you are looking for a ready-made solution for a multi-boot USB drive. please go to the Easy2Boot website.
You can combine many of the tutorials on this website to make your own USB drive which can do many more things besides just store and transport your files. The basic principles of many of these tutorials are quite simple and consist of four primary steps:
1. Partition and format a USB drive using RMPrepUSB
2. Install the grub4dos boot manager using the Install grub4dos button on RMPrepUSB
3. Add your files. These could be ISO files, disk image files, OS files or even files which are prepared as empty ext2 filesystem volumes
4. Finally, edit your menu.lst file (press F4) to make a user menu so the user can select which OS or program to boot to.
5. (optional) Test that your drive boots using the QEMU button.
For examples of menus and more details, visit the grub4dos tutorial. Also see the sidebar for many more tutorials or watch some YouTube tutorials and don’t forget … have fun!
INTRODUCTION TO RMPREPUSB
RMPrepUSB is a Windows utility that allows you to quickly format your USB drives (or non-USB drives) and install different Operating System bootloaders onto it for XP, Vista/Win7/Win8, MSDOS, FreeDOS, Syslinux or grub4dos at the click of a button. This allows you to ‘roll your own’ bootable USB drives. RMPrepUSB has hotkeys that speed up this process (press F1 to see these). Most of the Tutorials on this site use the grub4dos bootloader. The grub4dos bootloader enables you to create a user menu which can contain a variety of entries. For instance, if you follow some of the tutorials on this site you can create a single USB drive that will boot on most systems and allow you to: install XP onto a system, install Vista onto a system, install Windows 7 onto a system, install Server 2008 onto a system, repair an OS, boot to MD-DOS, boot to FreeDOS, flash a new BIOS, run a memory test, run a hard disk scan test, boot to a number of different linux operating systems, wipe a hard disk, reset or recover Windows user passwords, clone a hard drive, boot to Windows without needing to know the user’s password, crack Windows XP and some Vista/Win7 user passwords, boot to BackTrack to check WiFI security, run Windows 7 or Windows 8 directly from the USB drive, run the Hiren’s Boot CD from a USB drive, recover files/pictures from a corrupt Flash memory card and much more!
INSTALL RMPREPUSB ONTO YOUR WINDOWS COMPUTER
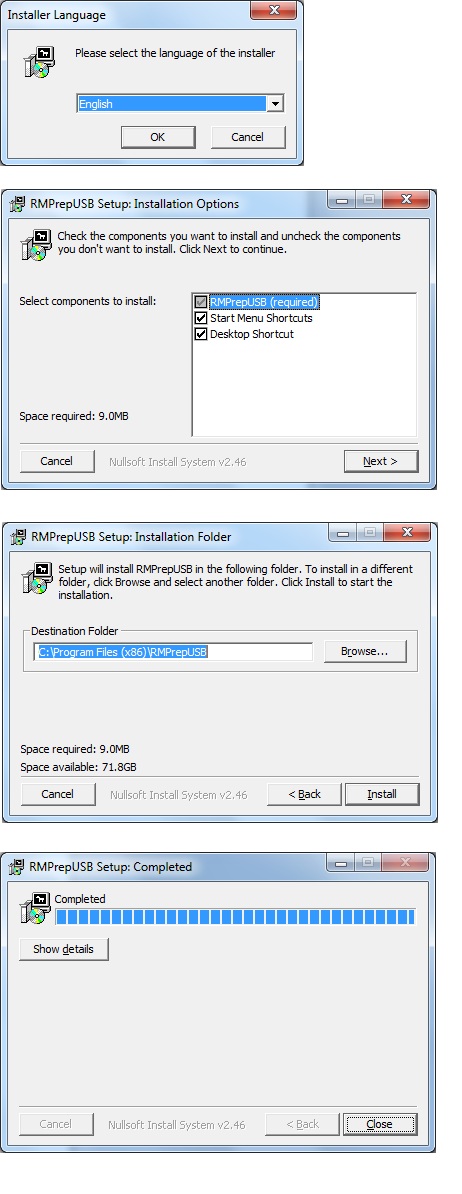
If you want to install RMPrepUSB and all associated files onto your Windows computer, just click on the Download tab at the bottom of the home page – I would recommend the full multilingual installer link. A ZIP file will download to your computer which contains a single .exe file. Unzip the ZIP file and then double-click on the exe file. Then follow the prompts to install RMPrepUSB to your Windows PC. You can untick the Desktop shortcut and Start Menu options if you wish – click on the image below to see a step by step example:
UnInstalling RMPrepUSB
If you wish to uninstall RMPrepUSB, then use the Start Menu uninstall entry – click on the image below for an example:
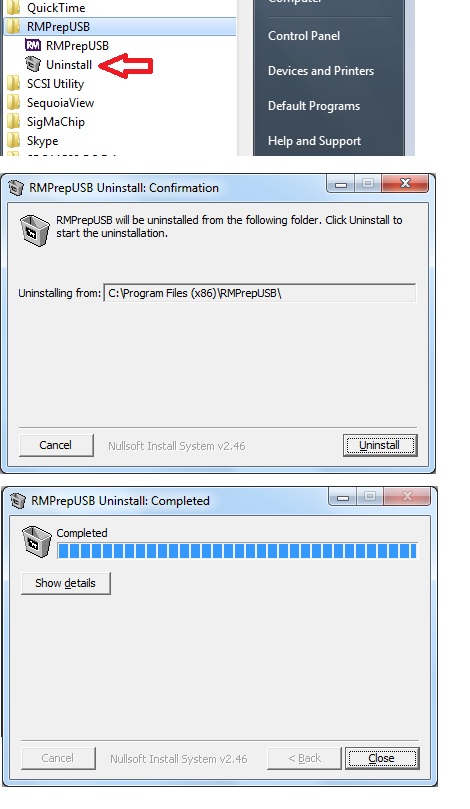
The uninstall process deletes RMPrepUSB registry entries
and will prompt you before it deletes your QEMU virtual disk image (if present).
COPY RMPREPUSB TO ANOTHER DISK (I.E. PORTABLE)
RMPrepUSB does not have to be installed, you can just copy all the files and folders in the main RMPrepUSB folder to any other drive (e.g. USB flash drive or CD) and then run RMPrepUSB under Windows on any other system. You can also download the ‘portable’ version of RMPrepUSB. This is just the same files that would be installed to your hard disk if you used the RMPrepUSB installer, but ZIPped up so you can extract them to any folder or drive you like.
The portable version can be found by clicking on the Download tab at the top of the site page.
WIPE, PARTITION AND FORMAT A USB DRIVE
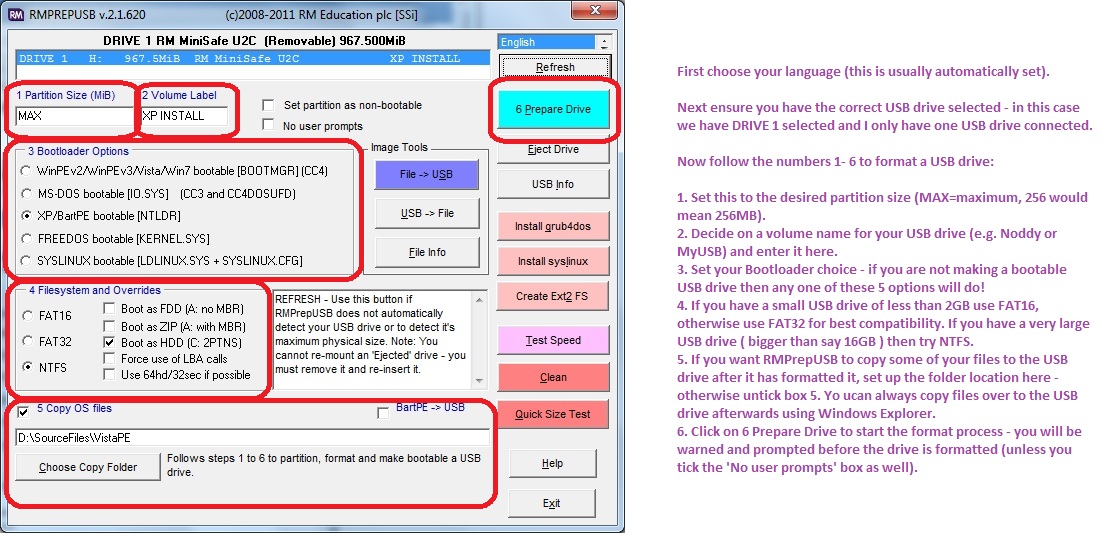
RMPrepUSB was originally written for this job. This is it’s main purpose in life. When you first run RMPrepUSB you may see a lot of buttons and choices to make, but for this job you just need to follow the numbered steps 1 to 6.
MAKE A USB DRIVE THAT WILL BOOT TO DOS (FOR INSTANCE TO FLASH A NEW BIOS ONTO A COMPUTER)
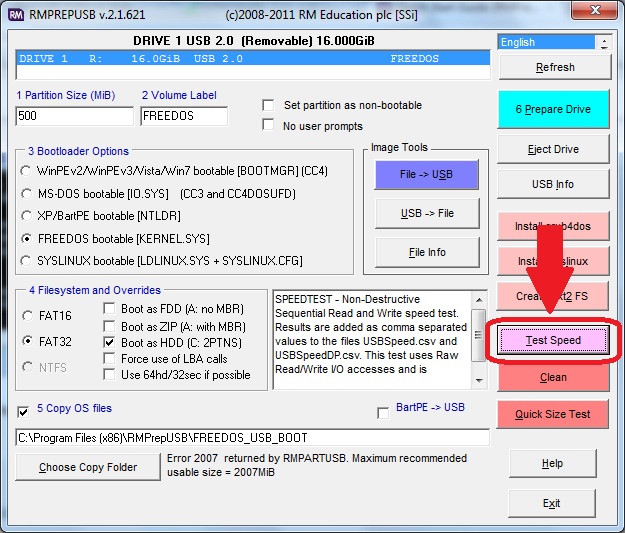
The RMPrepUSB download includes a FreeDOS folder, set up options 1-5 as shown below. Step 5 should be set to the location of the FREEDOS_USB_BOOT folder which is located under the RMPrepUSB main installation folder (press F3 to see where that is). if you have a small <2GB USB flash drive, you will need to select FAT16 instead of FAT32.
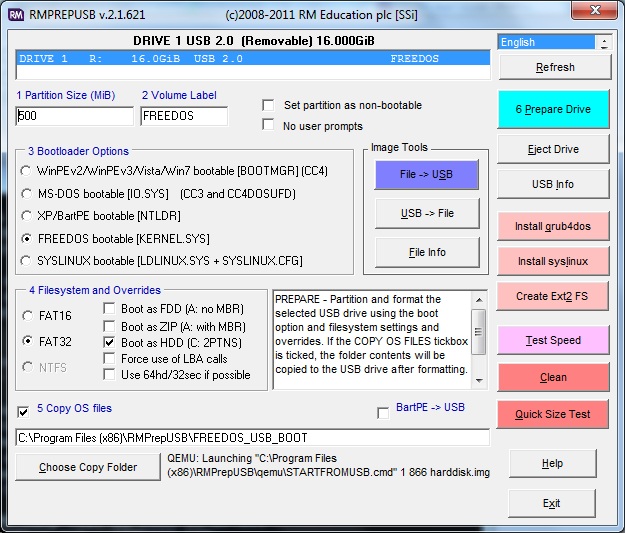
Once formatted, the USB drive should boot as drive C: (you can test this by pressing F11 in RMPrepUSB to emulate booting).

BACKUP AN IMAGE OF A USB DRIVE AND THEN RESTORE IT TO A DIFFERENT USB DRIVE
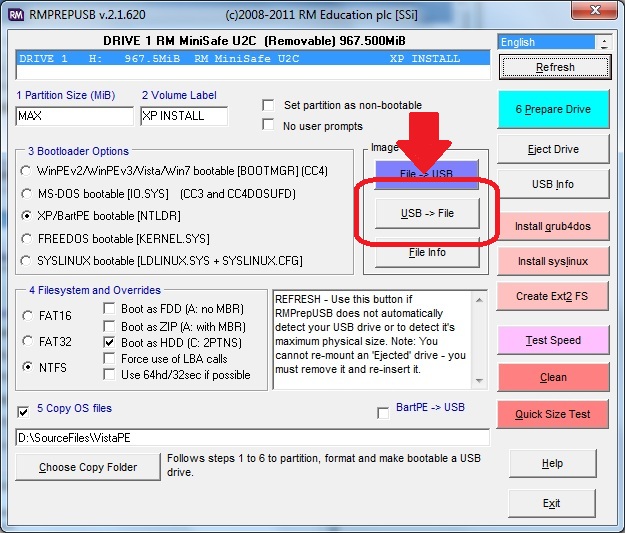
RMPrepUSB can make a backup of any USB drive. It can backup the whole drive, just the partitions on the drive or any portions of the drive. Unless you are experienced with drive partitions, just accept the defaults when prompted.
- Click on the USB->File button to start the process…
- Next choose the location that you want the image file to be stored at and click the Open button to open a new file (or an existing file)
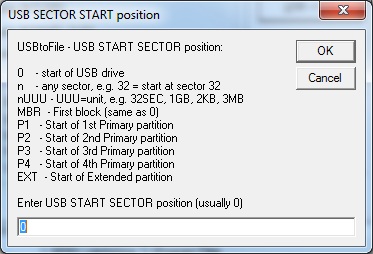
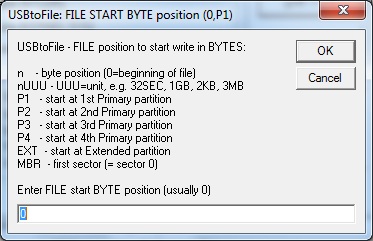
- Next choose which bit of the USB drive you want to start from – usually this is always the first sector, so use the default of 0
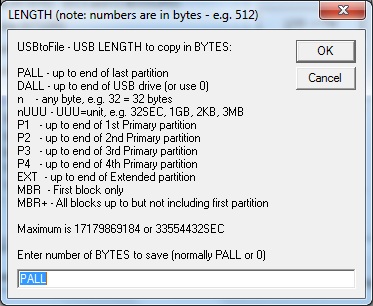
- Next choose the length (size) of the image. The default option is PALL which means all partitions will be copied to the image file.
- Finally, you can choose the point in the image file at which you wish to insert the USB data. This option allows you to overwrite individual portions of an existing image file with data from your USB drive should you wish to do so. Normally, in 99% of cases, this should always be set to 0 (start of file).
- Finally, you will be asked to confirm these settings:
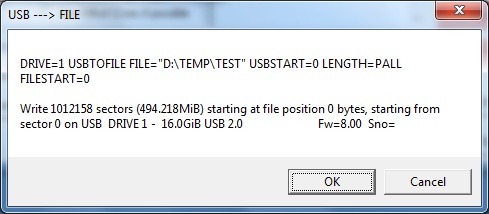
This will make a copy of your USB contents to an image file. The image file is not compressed. If you wish, you can use 7Zip or WinZip to compress the file for storage and delete the original image file, however you will need to unzip the file before RMPrepUSB can use it.
You can then use the image file you have just made to restore the original contents of the USB drive at any time in the future or even to copy the contents of the USB drive to another USB drive (of the same size or larger). Just use the File->USB button. If you have a number of USB drives and you want to apply the same image to all of them, prepare and take an image using the smallest USB drive first and then copy that image onto the other 3 drives. Note: Even if the USB drives are all the same size and same make and model and appear identical, they may actually vary in size slightly! So use the RMPrepUSB Drive Info button to determine the capacity in bytes of each drive (e.g. 17,179,869,184 bytes for one USB pen and maybe 17,179,868,122 for an identical make and model!)
CHECK TO SEE IF A USB FLASH MEMORY DRIVE IS GOOD OR FAKE (E.G. CHINA EBAY OR ‘BARGAIN’ PURCHASE)
You can and should test every new USB flash drive you use with H2TESTW. However, H2TESTW is quite slow and does not test every byte unless you format the USB drive first so that it is empty. It is much quicker and easier to use RMPrepUSB’s – Quick Size Test.
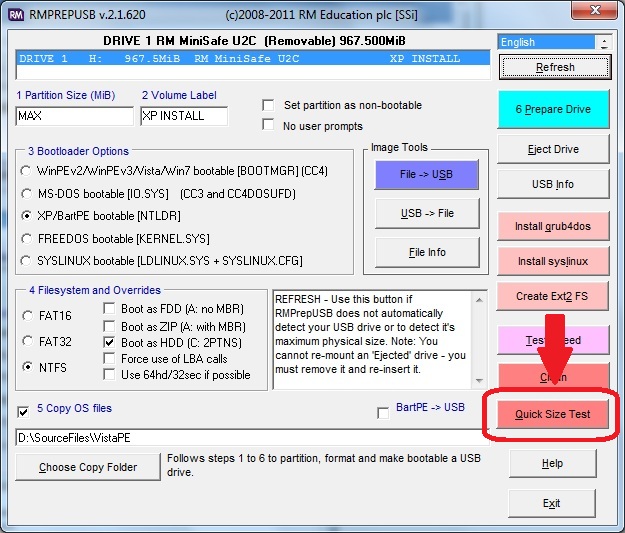
Just click this button and RMPrepUSB will quickly erase and test your USB flash drive. The screenshots below show what happened when I tested a cheap 16GB USB flash drive bought from China on eBay. The RMPrepUSb size test took just 50 seconds, H2TESTW took over 3 hours to test the drive and returned similar results!
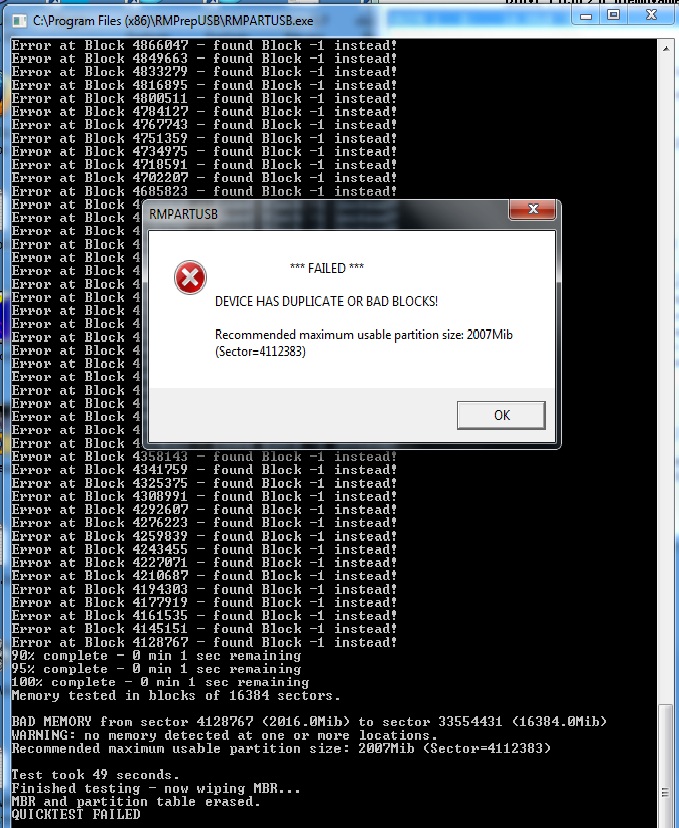
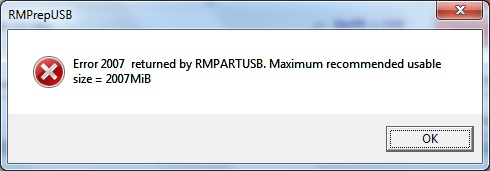
As you can see, it really has less than 2GB of memory even though it appears in Windows to be a 16GB drive. For more information on how to test these devices see here.
CHECK THE READ AND WRITE SPEED OF YOUR USB DRIVE
RMPrepUSB can also perform a quick sequential read and write speed test of your USB drive. This test is non-destructive and RMPrepUSB stores the results in a .csv file which can be viewed in Excel (just press the F6 button afterwards).