
Table of Contents
Note: You may also be interested in a CloneZilla-based Backup/Restore solution for Windows in Tutorial 89 which is much easier to implement.
INTRODUCTION
If you have to install Windows for a friend who is not too computer literate and is likely to trash his copy of Windows, you may want a fast and easy ‘Auto-Restore’ or ‘Reset’ partition.
If anything happens to the OS partition, then the end user can simply pick the ‘Restore’ option from the boot menu to restore the original Operating System in just a few minutes and with no further user interaction (typical restore times are XP OS=2 minutes, Windows 7 OS=10 minutes).
The procedure below will work on any Windows OS from Windows 2000 or later.
You can also take a backup at any time and overwrite the existing backup.
You could adapt this method and modify the restore process to just delete the main Windows folder and a few other folder (e.g. program files, etc.) or just choose to not format the volume and apply the image over the top of the existing Windows installation – however this is often unsuccessful as the system may still not boot or the user may get strange problems. However, it may be useful to do this if you just want to be able to boot to Windows to retrieve valuable files before you do a full clean install. It is up to you to modify the restore.cmd script if you want to do this (e.g. do not run the diskpart script to format the C: drive first).
Note: For a simple F11 to restore free solution, try Aomei One Key Recovery (free).
VERSION HISTORY
Auto_restore.zip
v1 2012-07-01 First version – menu.lst has a typo and your OS may not boot!
v2 2012-07-02 The menu.lst file in the first version may cause problems due to a typo! Please use version 2 (V.2) at the bottom of this page.
If you have already installed the original menu.lst and have a system which will now not boot to Windows, please proceed as follows:
- 1. Boot the target system to the grub4dos menu
- 2. Type P
- 3. enter the password rmprepusb (in lower case letters)
- 4. Type C
- 5. at the command prompt type root (hd0,0)
- 6. Now type chainloader /ntldr if you have an XP system – or – type chainloader /bootmgr if you have a Windows Vista/7/8 system
- 7. Type boot
- 8. Now download the new version of menu.lst and put it on the C:\ drive and D:\ drive.
v3 2012-07-02 Changed restore.cmd and backup.cmd to look for OS.tag to get the correct partition to backup or restore, so that it now works if you have a boot partition and a system partition.
v4 2012-11-13 Changed windows menu again so looks for ntldr or bootmgr and not OS.tag (some Win7 systems have a boot partition and a system partition). Thanks to James for this feedback!
PREPARATION
It is assumed that you have already installed Windows XP, Vista, 7 or 8 onto a clean hard disk and that the OS has been setup correctly for that system and that particular user.
It is assumed that there is only one large partition on the hard disk which is the OS partition. If you have installed Windows 7 or 8, you may have a small partition at the beginning of the disk followed by the larger OS partition.
It is obviously easier if you can pre-partition the target system’s hard disk to leave room for a backup partition at the end, however the instructions below show you how to shrink the last partition in case you have not left any spare unallocated space at the end of the hard disk.
SUMMARY
- Here is a quick summary of what we will do to make this restore partition on an existing Windows system’s hard disk:Make a bootable version of WinPE v3 (Windows 7 WinPE) using the free Microsoft WAIK (no Windows 7 DVD or ISO required)
- Install EaSeus Home partition master (free) – only required if you have a Windows XP target system
- Shrink the last partition (usually this is the OS partition)
- Create a new primary NTFS recovery partition at the end of the hard disk
- Copy the WinPE boot files made in step 1 to the new partition
- Install grub4dos to the MBR of the hard disk
- Hide the new WinPE recovery partition (optional)
- Uninstall EaSeus Home partition master (optional)
- Reboot to WinPE
- Take a backup of the OS
END USER EXPERIENCE
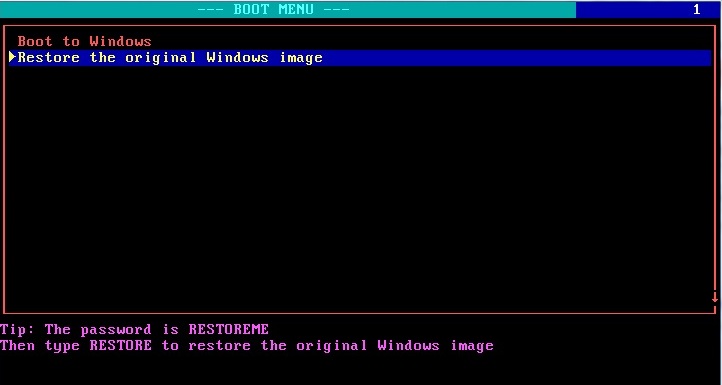
Each time the system boots, the end user will see a menu displayed for 5 seconds:Boot to Windows
Restore the original Windows image
After 5 seconds (this timeout can be changed), the system will boot to Windows if no key is pressed by the user.
If the end user selects the 2nd option by using the cursor keys, and then enters the password RESTOREME, the system will boot to WinPE.

The user can then type D:RESTORE [or possibly E:RESTORE depending on your partition arrangement] (this can be automated so the user does not need to type anything)and it will automatically wipe the original Windows installation and then re-install Windows from the backup.
A typical basic Windows XP system can be fully restored in about 2 minutes, a basic Windows 7 system can be restored in under 10 minutes.
The system will then automatically reboot back to the restored version of Windows.
There are instructions at the end of this tutorial on how to automate the process so that the end user does not need to type D:RESTORE to start the image restore or even enter a password.
You can easily change the user experience by editing the script files and when you are happy that it is all working correctly, you can hide the whole backup partition from the end user.
REQUIREMENTS
- You will need to use a Windows system (I will call this your ‘office PC‘) to make a Windows 7 WinPE bootable OS.
- It is far more convenient if this is not the same system as the target system.
- Install Virtual CloneDrive or ImDisk on your office PC.
- Download the Windows 7 WAIK (this is a LARGE download over 1GB!).
- Download a copy of EaSeus Home Partition master installer onto a USB stick if your ‘target system’ is XP and has no internet access.
- Download RMPrepUSB (full version or portable) and extract it onto a USB stick (copy all files and folders not just the exe file).
- The target system should have already been installed with Windows, all drivers and software. It can have up to 3 primary partitions (or up to 2 primary partitions and any number of logical partitions).
METHOD
WARNING: This is intended to be used on a test ‘target’ system and not on your main Windows PC. I strongly suggest you test it out on a system containing non-essential files first! Please do not hold me responsible for any data loss if things go wrong!
1. Make a bootable version of WinPE v3 (Windows 7 WinPE) using the free Microsoft WAIK
- Using your ‘office‘ Windows XP/Windows Vista®/Windows 7 PC (don’t use the target system that you wish to image/restore):
- Download the Windows 7 WAIK ISO file (e.g. KB3AIK_EN.iso 1.7GB).
- Download and install your ISO mount utility. (e.g. VirtualCloneDrive or ImDisk) and use it to mount the WAIK ISO file
- The WAIK Welcome window should launch. If not, double-click StartCD.exe on the new drive letter in Explorer.
- You must agree to the Terms and Conditions and you should have the correct licenses.
- Install the .Net Framework Setup from the WAIK menu.
- Install the MSXML 6 SP1 Setup from the WAIK menu.
- Install the Windows AIK Setup from the WAIK menu.
- Exit from the WAIK menu. The WAIK is now fully installed. You can optionally install the WAIK v3.1 update files too.
- Follow the next steps carefully to prepare a bootable WinPE OS…
- Click on Start Menu, All Programs, Microsoft Windows AIK, Deployment Tools Command Prompt to open up an Administrator command prompt window.
- Type copy ..\x86\imagex.exe c:\ and press Enter.
- Type COPYPE x86 c:\pe86 and press Enter.
- Type copy c:\pe86\winpe.wim c:\pe86\ISO\sources\boot.wim and press Enter.
- Type copy c:\imagex.exe c:\pe86\ISO and press Enter.
- Download and unzip the files inside AUTO_RESTORE.ZIP and copy them to the C:\pe86\ISO folder
2. Install EaSeus partition master (free version)
This next step is not necessary unless you have Windows XP on your target system. Windows Vista/7/8 Disk Management can be used instead to shrink the partition.
1. On your target system, download and install EaSeus partition master Home Edition
3. Shrink the last partition (usually the OS partition)
You need to make space for a partition that we can boot to at the end of your target system’s hard disk. You need to make the size of the partition large enough to hold the backup image file.
1. On the target system, in Windows Explorer, select all the folders on the C: drive but do not select any of the files in the root of the C: drive and then right-click and select ‘Properties’.
Windows Explorer should report the ‘Size’ (e.g. 6GB for a typical XP install + drivers, etc.).
We will be using ImageX to make the backup and this does compress the Windows files quite a lot (e.g. 6GB XP will produce a 2GB backup file), so if Windows Explorer says that the target systems disk is say 500GB and has 480GB free, then you should probably make room for a 10GB partition.
2. Run the EaSeus partition master application and select ‘Resize/Move partition‘- or use Vista/Win7/8 Disk Manager to shrink the last partition.
3. Slide the blue circle on the right-hand side of the EaSeus partition bar so that the ‘Unallocated Space After’ box reaches the desired partition size.
4. Click on the Apply (tick) icon at the top and follow the instructions to shrink the partition – a reboot may be required.
Note: although you could also partition and format the new space at the same time, I would recommend shrinking the partition first as this is probably safer! Shrinking partitions can sometimes go wrong!
4. Create a new primary NTFS recovery partition at the end of the hard disk
Once the EaSeus partition master has successfully created some space at the end of the hard disk on the target system, use the same application to partition and format the empty space as a Primary NTFS partition. You can use ‘Change label’ to call the Volume ‘Backup’ if you like. If you like you can use Windows Disk Manager instead of EaSeus to create a ‘Simple Volume’.
5. Copy the WinPE boot files to the new partition
Now copy and paste all the files and folders from the C:\pe86\ISO folder prepared in Step 1 above, to the new NTFS (D:) partition which is now at the end of the hard disk (use a USB Flash drive to transfer the files).
6. Install grub4dos to the MBR of the hard disk
The easiest way to install grub4dos onto the target hard disk is to use RMPrepUSB. You can either download the portable version and run it from a USB stick or copy the RMPrepUSB folder from your office PC onto the USB stick or just install RMPrepUSB onto the target system.
1. Run RMPrepUSB on the target system and type CTRL+F5 once to toggle to the ALLDRIVES mode. Select the target system’s hard disk and click on the Install grub4dos button. Follow the prompts and press ENTER to allow RMPrepUSB to copy over the grldr file.
2. Copy the menu.lst file from the new partition (e.g. D:) to the C: partition. Grub4dos will use the menu.lst on C: unless it is accidentally deleted by the user. Keeping a copy of menu.lst on the D: drive acts as a backup.
3. Do not delete or move the file recovery.tag from the backup partition. Ensure the file recovery.tag stays on the new backup partition (e.g. D:\)
4. IMPORTANT: Move the file OS.tag to the root of C:\ (i.e. C:\OS.tag) – ensure that the file OS.tag is NOT on the D: volume or any other volume except the Windows C: system volume. Delete it from any other volume.
The Windows Vista/7/8 Boot partition should be before the added WinPE partition on the disk (the menu assumes that it will always before the WinPE partition on the disk. You can tell where the Windows Boot partition is by looking at the hard disk partitions using the Windows Disk Management tool (RMPrepUSB Crtl-K will launch this). The screenshot below shows that the System and Boot volumes are on the same volume – as long as the Boot volume is before the new WinPE volume then the current menu will work correctly:

If however, you have a Boot partition which is AFTER the added WinPE partition (e.g. for some reason you have placed the WinPE files before the Boot partition), you will need to specify the partition number of the Boot partition in the menu.lst file by changing the Windows menu from:
- title Boot to Windows\n
- errorcheck off
find –set-root /ntldr || find –set-root /bootmgr- chainloader /ntldr || chainloader /bootmgr
- to
- title Boot to Windows\n
- errorcheck off
- root (hd0,1)
- chainloader /ntldr || chainloader /bootmgr
where (hd0,1) is the partition that is the Windows Boot partition – where (hd0,0) is the first partition, (hd0,1) is the 2nd partition, etc. – for instance, if the Windows ‘Boot’ partition is actually the 2nd partition and you have placed the WinPE files on the first partition (which is unusual!), then change the menu entry to root (hd0,1).
5. Copy the C:\grldr file that was put there by RMPrepUSB over to D:\grldr. This is a backup copy that can be used in case the C: partition is destroyed.
Target Hard Disk contents:
- C:\OS.tag – this marks which volume will be backed up or restored to
- C:\menu.lst – this is the main user boot menu file
- C:\grldr – this is the main grub4dos program
- D:\recovery.tag – this marks the volume which contains the WinPE boot files and where the backup image will be stored
- D:\menu.lst – this is not normally used unless there is a problem booting – it should always be an exact copy of the C:\menu.lst file
- D:\imagex.exe – used to make backups and restores
- D:\backup.cmd – script to take a backup of the volume containing the OS.tag file
- D:\reboot.cmd – script to reboot the system
- D:\restore.cmd – script to restore the volume that currently contains the OS.tag file
- D:\auto\startnet.cmd – not actually used and can be deleted
- D:\auto\Autorestore.cmd – not actually used and can be deleted
- D:\bootmgr – the main boot loader file for WinPE
- D:\grldr – the main grub4dos program – only used if the C:\grldr file is missing
- D:\boot folder
- D:\Sources folder – these contain the boot files for WinPE
D:\OS.tag<<<< MUST NOT BE PRESENT!!!!!
7. Hide the new WinPE recovery partition
1. First make sure that on the target system’s C:\ (root) folder you have
- grldr
- menu.lst
- OS.tag
2. Now use EaSeus partition master to hide the new restore partition using the ‘Hide Partition’ menu item. (You can do this later if you prefer, once you have tested that everything is working – it does not have to be done now and will not affect the backup image). Hiding the partition prevents the user from deleting the WinPE OS or the backup image!
An alternative is to use the Windows Disk Management MMC to remove the drive letter from the backup partition, however the end use could easily assign a new drive letter in the same way.
Another alternative is, if you have Vista or Windows 7/8 (or if you boot to the WinPE partition), you can use diskpart to hide the backup partition at any time, as follows:
- Open a Command Console with Administrator rights
- type DISKPART
- type LIS VOL and note the drive letter of the new partition (e.g. D:)
- type SEL VOL X (where X is the new drive letter
- type SET ID=27
- type EXIT
Note: To unhide the partition, set the ID as type 07 for NTFS. You can find the partition that you want to unhide by using the DISKPART commands SEL DIS 0, LIS PAR and then SEL PAR N (where N is the partition number that you want to unhide) and then type SET ID=07 and EXIT.
3. Right-click on the C:\menu.lst file and choose ‘Properties‘ and click on the ‘Hidden’ and ‘Read-only’ tick boxes and then click on ‘OK’
4. Right-click on the C:\OS.tag file and choose ‘Properties‘ and click on the ‘Hidden‘ and ‘Read-only‘ tick boxes and then click on ‘OK’
5. Right-click on the C:\grldr file and choose ‘Properties‘ and click on the ‘Hidden‘ and ‘Read-only‘ tick boxes and then click on ‘OK’.
8. (optional) uninstall EaSeus Home partition master
Now prepare the system for imaging by uninstalling EaSeus partition master and RMPrepUSB and any other applications or files that you do not wish the user to see when he/she restores Windows.
Run the disk cleanup tool and delete all IE browser history, cookies, etc. alternatively run CCleaner or a similar cleanup application.
Imagex will not backup the page file or hibernation file so we don’t need to worry about these.
9. Reboot to WinPE
1. Now reboot the target system. You should see the grub4dos menu appear for 5 seconds as the system boots:

2. Select the 2nd menu entry (as shown above) and then hit the Enter key to select the ‘Restore’ option – enter the password RESTOREME (in uppercase letters) when prompted.
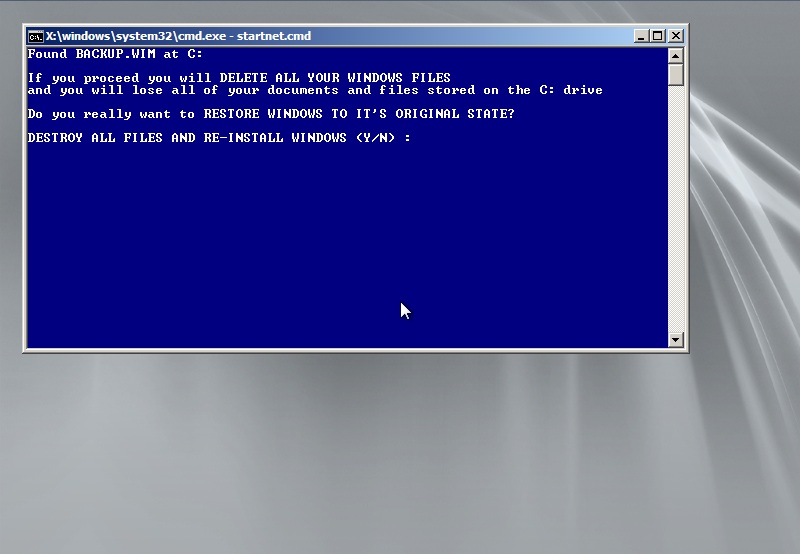
3. The target system should now reboot to WinPE and you should see a black WinPE console window with a command prompt.
4. (optional) Check that the system will still boot to Windows by typing D:reboot (or possibly E:reboot)at the command line and letting the menu timeout so that the system reboots to Windows.
Note: See below if the system does not now boot correctly!
10. Take a backup of Windows
Note: If you have enabled the automated restore feature (as detailed in the section below), then when you are prompted to perform a restore (Y/N) ? type the uppercase letter B to run backup.cmd.
1. We now need to make a backup, so reboot to WinPE (select the Restore option in the grub4dos menu) and type D:backup (or maybe E:backup) and hit the Enter key to start the backup of the OS volume (which may be called D: when booted to WinPE). The Windows volume that contains the file OS.tag will be backed up to a file backup.wim on the backup volume.
2. Once it completes successfully, type D:reboot and hit the Enter key to return to boot to Windows again.
If you don’t want to hide the restore partition so that the user can make use of the unused free space, then I suggest you set the Hidden attributes on all the files, so that the user is unable to see them easily and thus prevent him/her deleting them accidentally.
If you want to maximise the amount of available space on the OS drive and reduce the size of the backup partition to the minimum, you will need to resize the backup partition. This can be done as follows:
- Note the size of all the files (including the backup.wim file) on the backup partition (e.g. say it is 6GB)
- Copy all the files to a folder on the C: drive (e.g. C:\TEMPBAK)
- Delete the backup partition using Disk Manager or EaSeus partition master
- Resize the C: partition to expand it so that it leaves just enough space for the backup files (allow at least 500MB extra just to be safe!) – so leave 6.5GB unallocated in this example
- Create a new NTFS Primary backup partition in the remaining space
- Copy all the files from C:\TEMPBAK to the new volume
- Delete the C:\TEMPBAK folder
- Hide the backup volume if desired or remove it’s volume letter using Disk Manager
WHAT TO DO IF THE SYSTEM DOES NOT BOOT AT STEP 9
Don’t Panic!
If you rebooted the system at Step 9 and it did not show the menu with the two items in it, but you have a prompt like this:
grub>
then you probably do not have a menu.lst file present. You can try booting back to Windows by typing in the grub4dos console:
If you have Windows XP:
- find –set-root /ntldr
- chainloader /ntldr
- boot
- or if you have Windows Vista or later:
- find –set-root /bootmgr
- chainloader /bootmgr
- boot
The target system should then boot to Windows correctly and you can fix the problem.
You can also get to the grub4dos command prompt from within the grub4dos menu, by typing P and then entering the password rmprepusb when prompted. Then type C for the command prompt.
You can examine the hard disk contents by typing
find
and then list the directory contents of each partition by typing
ls (hd0,0)/
ls (hd0,1)/
etc.
If the system always boots to the WinPE shell, check that the Windows Boot partition is before the added new WinPE partition. If not see Step 4 above.
If all else fails, boot WinPE from a USB stick or a Windows installation DVD and check the files.
Note: When testing the target hard disk boot menu and backup and restore, always remove your USB drive from the target system as it may contain OS.tag and Restore.tag files which will confuse the menu system!
If you want to remove the grub4dos boot loader and just go back to booting the hard disk straight to Windows, you can do this using RMPrepUSB as follows: hit CTRL+F5 to show all drives – select the hard disk in the disk list box – CTRL+B to install the standard Windows MBR boot code. To run RMPrepUSB, you can boot from a WinPE USB stick, Windows install DVD or if possible, from the WinPE installed on your hard disk via the grub4dos menu, and then run RMPrepUSB directly from a USB flash drive.
You can make a bootable WinPE USB Flash drive simply by formatting the USB Flash drive using RMPrepUSB with the WinPE v2/v3 [bootmgr] radio button ticked and then copy all the files from C:\pe86\ISO over to the USB Flash drive. This should get you out of any problems if you cannot boot your hard disk at all!
MAKING A NEW BACKUP OF WINDOWS
If for any reason you want to make a new backup, then just boot to the WinPE partition again and type D:backup. The old backup.wim file will be erased and a new one created.
Note: If you have previously made the backup.wim file Read-Only then the operation will fail.Unsupported embed
AUTOMATING THE RESTORE
If you want to make it really simple for the user so that he/she does not have to type d:restore when they get to the command prompt, then you can modify the boot.wim file as follows:
1. On the ‘office’ system, launch the WAIK command shell (right-click – run as administrator) window using the Start Menu. Close all other cmd and Explorer windows.
2. Type mkdir c:\pe86\mount to create an empty folder
3. Type dism /Mount-Wim /wimfile:C:\pe86\iso\sources\boot.wim /index:1 /Mountdir:C:\pe86\mount
4. You can now use Windows Explorer to edit the image which you will find at C:\pe86\Mount. Note: If using Windows XP, you are advised to hold down the SHIFT key if deleting files or folders in the image.
5. Copy the two files startnet.cmd and autorestore.cmd, which can be found in the downloaded AUTO folder, onto the C:\pe86\mount\windows\system32 folder (this overwrites the existing startnet.cmd file).
6. Commit the changes to boot.wim using the command: dism /Unmount-Wim /MountDir:C:\pe86\mount /commit
Note: If you do not want to keep the changes, use /discard instead of /commit. Read the WAIK .chm help files for more information.
7. Now replace the \sources\boot.wim on your target system’s recovery partition with the new version from your office PC’s C:\pe86\iso\sources\boot.wim (transfer it using a USB Flash drive).
When WinPE boots, it will now find and run \restore.cmd on the backup partition automatically.
- If you now want to run a backup and overwrite the current backup.wim file, then type the secret key B when prompted to answer Y or N.
- If you want to get to the command prompt, then type B again when backup.cmd prompts you to make a backup.
If you don’t want any user password for the Restore menu option, simply comment out the password line in C:\menu.lst with a # character as shown below:
- title Restore the original Windows image\nTip: The password is RESTOREME\nThen type RESTORE to restore the original Windows image
- # password RESTOREME
- find –set-root /recovery.tag
- chainloader /bootmgr
MAKING CHANGES
- Make sure that any changes you make to the menu.lst file are also made to the copy of menu.lst on the other partition. As this is a backup menu, it will become active if your other partition becomes corrupt. If you have changed the partitions around, you may find that the other menu.lst is used, so always duplicate any changes by copying the modified menu.lst to overwrite the 2nd copy.
- The menu timeout that appears for 5 seconds is actually derived from C:\menu.lst file. You can add a background image and modify the menu itself. Look at Tutorial #21 for details about grub4dos and on how to change the menu.
- You can change the menu password (or remove it) by editing the C:\menu.lst file.
- The script (.cmd) files are run from the backup/recovery partition, these files are restore.cmd and backup.cmd. Restore.cmd will format the drive that contains OS.tag and then apply the backup image to the same volume. You can edit these files also, if you wish. Do NOT double-click on them if you are running Windows!
- If you have a Windows system with a boot partition and a system partition, the end user will have to type E:RESTORE instead of D:RESTORE – in this case you will need to change the help message in the C:\menu.lst file from D: to E: (see red text in menu below). If your target hard disk has more partitions, you may need to type F:RESTORE or even G:RESTORE.
- Always keep a copy of C:\menu.lst on D:\ in case the C: volume is accidentally wiped, so that you can boot to WinPE and restore the system again. The same applies for the grldr file too.
- The .tag files must not be deleted, as these determine which OS is booted and where the backup image is kept.
- If you have used the startnet.cmd and autorestore.cmd files to modify the \sources\boot.wim file, do not change the name of \restore.cmd because autorestore.cmd looks for this file. If you want to run a different file, then delete the contents of \restore.cmd and then add in a line inside it to call your own script or executable.
- If you want to edit the C:\Menu.lst file and have set the properties to hidden and read-only, you must unset these first before you can change the contents. If you are at the WinPE command console, you can do this using NotePad and then use File – Open and then right-click on the C:\menu.lst file and choose Properties, then untick the read-only checkbox.
- The password rmprepusb statement in the menu.lst file prevents the end user from being able to edit the menu.lst file when the menu is loaded (as grub4dos normally allows this and the end user could see the restore password). If you want to change the menu whilst it is running, then type P and then enter the password rmprepusb – now you can edit the menu using E or gain access to the grub4dos console by typing C. Note that any menu changes you make are made to a copy in memory and so are not permanent, they are just valid for that session and do not actually change the contents of the c:\menu.lst file. In edit mode you can add, delete or change any line in a menu and then hit the ESC key to get back to the user menu and test out the changes. See Tutorial #21 for more details.
- You can encrypt the passwords in the menu.lst so that even if the user can view the menu.lst file, he will just see gibberish text. This is done by finding the md5 hash of your password and using the syntax:
- password –md5 $1$6$ftCQWsyP7jK5sUt/JMHMi/
- see the grub4dos tutorial here for more details.
menu.lst
- write (md)0x220+1 !BAT\necho -n -P:0000 $[0133] — BOOT MENU — \0
- initscript (md)0x220+1
- password rmprepusb
- default 0
- timeout 5
- color white/blue
- color normal=0x0c highlight=0x1e helptext=0x0D standard=0x02 border=0x0c
- title Boot to Windows\n
- errorcheck off
- find –set-root /ntldr || find –set-root /bootmgr
- chainloader /ntldr || chainloader /bootmgr
- title Restore the original Windows image\nTip: The password is RESTOREME\nThen type D:RESTORE to restore the original Windows image
- password RESTOREME
- find –set-root /recovery.tag
- chainloader /bootmgr
GETTING HOTKEYS TO WORK
If you want the grub4dos menu to work with hotkeys, then look at Tutorial 57. Simply download the hotkey file from Tutorial 57 and add it the same folder as the menu.lst file. Then add the line /hotkey to the top of the menu and add the text ^F4 to the restore menu: e.g.
- /hotkey
- write (md)0x220+1 !BAT\necho -n -P:0000 $[0133] — BOOT MENU — \0
- initscript (md)0x220+1
- password rmprepusb
- default 0
- timeout 5
- color white/blue
- color normal=0x0c highlight=0x1e helptext=0x0D standard=0x02 border=0x0c
- title Boot to Windows\n
- errorcheck off
- find –set-root /ntldr || find –set-root /bootmgr
- chainloader /ntldr || chainloader /bootmgr
- title ^F4 F4 Restore the original Windows image\nTip: The password is RESTOREME\nThen type D:RESTORE to restore the original Windows image
- password RESTOREME
- find –set-root /recovery.tag
- chainloader /bootmgr
Click here (OneDrive folder) if you cannot find any file mentioned in the articles on this site or Contact Me.