
Table of Contents
INTRODUCTION
If you have a grub4dos multiboot USB drive, you may find that some linux ISO files require complex menu entries or simply do not support being booted as an ISO file (e.g. BackTrack).
However, if you download and add these 6 files to your grub4dos multiboot drive, you just need to add one menu entry to your menu.lst file and place all your linux ISO files under the \_ISO\Linux folder on your USB drive.
When the user selects the Auto Linux menu option in your menu, a grub4dos batch file will find all ISO files under the \_ISO\Linux folder (inc. subfolders), create a new menu file in memory and then load the new menu. An example of the dynamically generated menu is show below.
Once you have added the 6 files from this tutorial, all you need to do is copy all your linux ISO files to the \_ISO\Linux folder. The next time you run the Auto Linux ISO menu, it will magically appear in the new dynamic menu. If you later delete any ISO in the \_ISO\Linux folder (or below), the menu entry will no longer appear the next time you run it.
Linux ISO filenames can contain spaces and it supports long-filenames.
So it is very easy to add a new linux ISO file to your multiboot drive – just drop it into the \_ISO\Linux folder!
Even BackTrack 5 (BT5) will boot directly from an ISO file using this method!
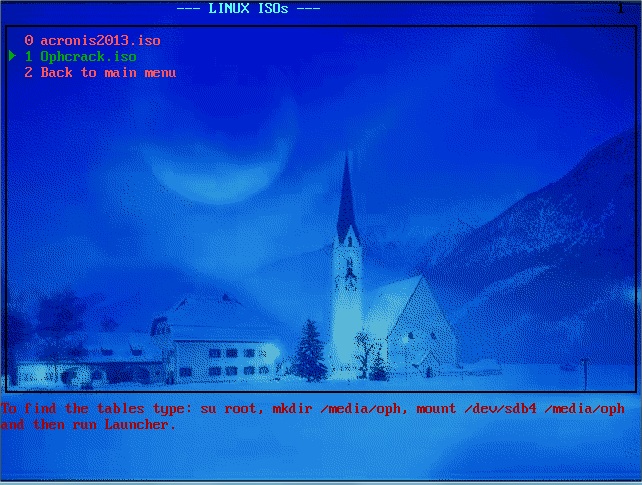
Example of the dynamically generated menu
REQUIREMENTS
- You need a grub4dos bootable drive. You can make a grub4dos USB drive or even use your internal HDD if you already have grub4dos installed on it.
- The AutoLinux files are required
- You will need to add a new menu entry to your grub4dos menu file
- (optional) RMPrepUSB – this makes is easier to load and edit your menu.lst and test the result using QEMU.
METHOD
1. Download the AutoLinux zip file and extract the contents (6 files) to your grub4dos multiboot drive. The contents of the zip file are:
- \grub\BlueLight.xpm.gz – this is the background image which is loaded by the ISO menu – see the grub4dos tutorial on how to make a different one or change the LINUXUSER.mnu to load a hi-res bitmap
- \grub\wenv – this file is a grub4dos utility which is used by the autolinuxmenu.bat batch file
- \grub\AUTOLINUXMENU.bat – this is a grub4dos batch file which dynamically generates the new menu
- \grub\LINUXBACKUP.lst – this file is only overwritten if you set the ELBACKUP=YES variable in your menu – if you delete this file no backup will be made if ELBACKUP=YES
- \grub\LINUXUSER.mnu – this contains the text which is copied to the start of the new dynamic menu, it specifies the background image, text colours, etc. – you can edit this to change the menu
- \_ISO\Linux\PutLinuxISOFilesHere.txt – this file is just a marker file, it can be deleted as it is not used.
2. Add one of the following two menu entries to your menu.lst file (one has comments and one does not, which one you use is up to you!):
- title LINUX ISOs\nRun any linux ISO
- #please see www.rmprepusb.com Tutorial #96 for instructions
- # avoid debug messages
- debug off
- checkrange 20120114:-1 read 0x8278 || echo WRONG VERSION OF GRLDR (grub4d0s)!!!! && pause
- # call the RUN batch file and create a configfile in the ramdrive for all image files
- # if DD=1 then echoes debug statements
- # set DD=1
- # if ELBACKUP=YES then writes the finished menu to /grub/LINUXBACKUP.lst (but doesn’t work under an emulator)
- # set ELBACKUP=YES
- # Search all folders under MFOLDER for ISO files…
- # set MFOLDER=/_ISO/Linux
- # Set name of the menu to go back to (last menu item)
- set LBACKMENU=(bd)/menu.lst
- # now generate the new menu.lst file and specify the Main Folder that will be scanned for .mnu files
- call /grub/autolinuxmenu.bat .automenu /_ISO/Linux
- # echo show menu && cat (md)0x3000+0x50 && pause
- # Load the new configfile
- configfile (md)0x3000+0x50
- # minimal menu (same as above but without the comment lines)
- title LINUX ISOs\nRun any linux ISO
- debug off
- checkrange 20120114:-1 read 0x8278 || echo WRONG VERSION OF GRLDR (grub4d0s)!!!! && pause
- set LBACKMENU=(bd)/menu.lst
- call /grub/autolinuxmenu.bat .automenu /_ISO/Linux
- configfile (md)0x3000+0x50
If your menu file is not called \menu.lst, then change the LBACKMENU line to specify the actual name and path of your calling menu.
3. As this method relies on a blank, unused 4th entry in the boot drive’s partition table, you should add these lines to the top of your main menu.lst file to check that it is safe to use:
- #enable parttype output
- debug 1
- # make empty table entry in 4th position in ptn table
- parttype (hd0,3) | set check=
- debug off
- set check=%check:~-5,4%
- if “%check%”==”0x00” partnew (hd0,3) 0 0 0
- if not “%check%”==”0x00” echo WARNING: PTN TABLE 4 IS ALREADY IN USE! && pause && configfile /menu.lst
- debug 1
Most USB Flash drives do not have more than one or two partitions, however some HDDs may have multiple partitions, so it is wise to include these lines at the top of your menu if you use a boot device which has more than 2 partitions, just in case!
4. Now just copy any linux-based ISO file to the \_ISO\Linux folder. You can also create any number of subfolders under \_ISO\Linux and place ISO files in them too.Unsupported embed
HOW IT WORKS
The menu entry simply calls \grub\autolinuxmenu.bat – this is a grub4dos batch file which enumerates all ISO files under the folder \_ISO\Linux and all sub-folders under that, and then creates a new grub4dos menu in a ram drive. The grub utility wenv is called in this batch file.
The menu entries created in the ram drive (rd) comprise of the following lines (different for each ISO file):
- title xxxx.iso
- partnew (hd0,3) 0x00 /_ISO/Linux/xxxx.iso
- map /_ISO/Linux/xxxx.iso (0xff)
- map –hook
- root (0xff)
- chainloader (0xff)
This uses the grub4dos partnew command to map the ISO file as a partition entry (it uses the fourth partition table entry which MUST be unused on your boot drive) – See Tutorial #93 for more details.
If you wish to change the appearance of the linux ISO menu, you can edit the \grub\LINUXUSER.MNU file. This is a normal grub4dos menu (configfile). It has UK keyboard settings as well as a background image. If you delete the LINUXUSER.MNU file then a basic menu will be created.
Although this technique will work for booting any (most) linux ISO files, very few non-linux OS’s will work as they will not detect the 4th partition as a valid filesystem. Some DOS- or PE-based ISOs may work.
If you wish, you can change the search folder path by changing the last parameter when calling the autolinuxmenu.bat batch file. Alternatively, you can add another menu entry for say WinPE and change the search path to \_ISO\WinPE and place the WinPE ISO files under \_ISO\WinPE. You can even search the whole USB drive for all ISO files by using /grub/autolinuxmenu.bat .automenu /
If you have any questions, please contact me.
ISO FILES THAT HAVE BEEN TESTED SO FAR AND WORK
See here for a list of ISO files that have been tested.
Click here (OneDrive folder) if you cannot find any file mentioned in the articles on this site or Contact Me.