
Table of Contents
Note: For a simple F11 to restore free solution, try Aomei One Key Recovery (free).
For a Tutorial for Windows UEFI systems see Tutorial 142
RMPrepUSB Blog – please leave a comment or feedback on RMPrepUSB or this Tutorial (please mention Tutorial number).
If you want to make a bootable external USB Hard disk so that you can create or restore backups, see Tutorial 118.
INTRODUCTION
This tutorial allows you to add some boot menu options to create a partition backup and restore option for your existing Windows hard disk. You do not have to re-format and re-install Windows to add a recovery partition. This tutorial assumes your disk has MBR partitions not GPT (UEFI).
Note: This system is not compatible with UEFI and GPT-partitioned disk!
Once set up, all the user has to do is press F4 for an automatic restore (with just one confirmation prompt only – but this can be removed if you prefer a fully automatic restore).
It uses CloneZilla and is based on a version posted by ndog37 on reboot.pro. With this tutorial, you can quickly backup your copy of Windows at any time and then later restore any of the previous backup images. An XP backup takes approximately 5 minutes. Restoring an XP image takes approximately 1 to 5 minutes. Windows 7/8/10/11 will obviously take longer!.
The backup is made on the hard disk, so it is not suitable for off-line backups. The backup and restore options can also be fully automated so even your granny could restore Windows if it went wrong! If the hard disk no longer boots, you can always boot to Clonezilla from a USB drive and restore/repair the disk.
This tutorial assumes that your Windows OS is installed onto the first hard disk in your system, is the only copy of Windows on that hard disk and you have a backup partition on the first hard disk that has some free space to store the backup images in. If you have more than one partition containing Windows (e.g. dual-boot), then this tutorial will not work correctly and you will need to modify the menu.lst file substantially.
You can find out more about CloneZilla here. Boot parameters are here.
Because this method installs grub4dos, you will need to ensure your computer boots from the Master Boot Record.
If your Windows 7-11 system uses UEFI booting, you will need to change the BIOS to CSM/MBR mode or follow the UEFI version of this tutorial.
CLONEZILLA REFERENCES
- Live Doc
- Boot parameters
- FAQ
- Restore options
- List of options and switches
- Manual backup/restore instructions
HISTORY
- v1 2012-10-24 – First release – no Auto-Backup\Restore option
- v2 2012-10-25 – 2nd version – added Auto-Backup\Restore option, split up long command line using grub4dos environment variables for easier editing\viewing, suppress keymap menu
- v3 2012-11-01 – Added hotkey to menu, F4 for Restore from any Image, F6 for Auto-Restore
OUTLINE
What we are going to do is to place a copy of Clonezilla on a spare backup partition on your hard disk, add some files and then install the grub4dos bootloader onto your hard disk.
After this has been done, your system will boot to a new grub4dos menu, as shown below (in this example we have a Windows XP system, so the menu shows Windows XP).
The menu.lst will automatically work out what partition is your Windows partition and what partition is the backup partition. When the menu is displayed, you will see which partition has been picked by the menu because the names listed in the menu will be changed automatically – e.g. sda1, sda2, etc. Thus it does not matter what partition arrangement you have as long as both the Windows and Clonezilla partitions are on the first disk (i.e. they can be in any order).
Linux disk notation:
sda1 = First hard disk (a), first partition (1)
sda2 = First hard disk (a), second partition (2)
sdb5 = Second hard disk (b), first Logical partition (5) – 1 to 4 are the primary partitions.
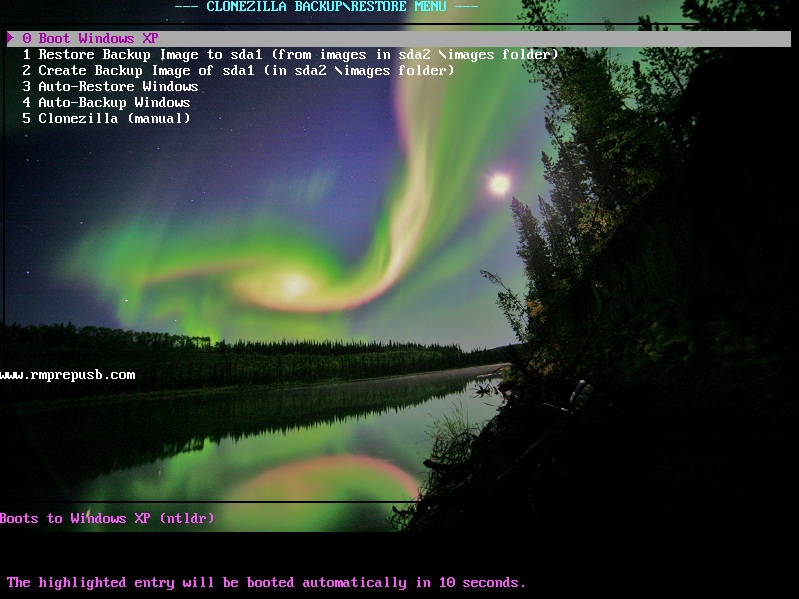
This is the grub4dos boot menu – after a 10 seconds countdown it will boot to Windows unless a key is pressed.
The Auto-xxxx options use a backup image name of ‘IMG’. The other options allow you to define the backup image name yourself and you can make multiple backup images.
METHOD
1. First we need to ensure that you have a spare partition on your hard disk that we can use to store the backup files and CloneZilla. This will appear on your system as D: and you will need to ensure that you have at least several gigabytes of spare space available on it. If you do not have a 2nd partition or you need to create a larger partition then you can use Windows Disk Manager to delete, extend or shrink partitions. The Backup partition can be NTFS (high;y recommended) or FAT32 (max 32GB) and it can be a primary basic partition or a logical partition.
If you have a XP Windows system with no ‘shrink’ option in Disk Manager, you can download and use the free utility EaSeus Partition Master Home Edition.
>>> Before you proceed, check that the target system is a standard Windows system with two or more MBR partitions
and check that the backup partition (e.g. D:) has lots of spare space.
PLEASE NOTE: The menu.lst will only detect the BACKUP partition if it is on the first, second, third or fourth internal hard drive (partitions 1-7).
You can edit the menu.lst if it does not detect the backup drive.
GPT disks: Clonezilla may not recognise or like GPT partitions. If your disk previously contained GPT partitions, CloneZilla may not work even though you delete all partitions and create new MBR partitions using Windows Setup. For this reason, it is highly recommended to use Windows DiskPart from a command shell to wipe the disk before you install a fresh copy of Windows. Typical commands are: SELECT DISK 0 – CLEAN – CONVERT MBR. Thanks to ‘James’ for this tip! See also ‘GPT Partition Fix’ below to save having to re-install Windows.
2. We need some tools, so on any Windows system (it does not need to be the target system), download the zip file CloneZillaBackup.zip from the bottom of this page and extract the contents to a new folder on your hard disk (I will call this new folder c:\xxx).
3. Download the CloneZilla ISO file from here – I used clonezilla-live-20120620-precise.iso. Use 7Zip or some other utility to extract the \live folder from inside the iso and copy it to the C:\xxx\clonezilla folder. Only three files are actually needed but you can copy the whole live folder if you like.
4. You should now have a folder structure like this (where xxx can be any name you choose):
- C:\xxx\menu.lst
- C:\xxx\grldr
- C:\xxx\Hide.cmd
- C:\xxx\UnHide.cmd
- C:\xxx\clonezilla\auroraxx.bmp.gz (two 80×600 compressed .bmp files)
- C:\xxx\clonezilla\grubinst.exe
- C:\xxx\clonezilla\hotkey
- C:\xxx\clonezilla\InstallGrub4dos.cmd
- C:\xxx\clonezilla\live\filesystem.sqashfs
- C:\xxx\clonezilla\live\vmlinuz
- C:\xxx\clonezilla\live\initrd.img
- C:\xxx\clonezilla\images\ (folder)
Installing the CloneZilla files onto a target system:
5. Now copy the the xxx folder contents(via a USB drive or via the network) to the backup partition (D: usually) of your target system – you should now have this folder structure (assuming D: is your backup volume)
- D:\menu.lst
- D:\grldr
- D:\Hide.cmd
- D:\UnHide.cmd
- D:\clonezilla\auroraxx.bmp.gz (two 80×600 compressed .bmp files)
- D:\clonezilla\grubinst.exe
- D:\clonezilla\hotkey
- D:\clonezilla\InstallGrub4dos.cmd
- D:\clonezilla\live\filesystem.sqashfs
- D:\clonezilla\live\vmlinuz
- D:\clonezilla\live\initrd.img
6. To install grub4dos onto your target internal hard disk, right-click on the file D:\clonezilla\InstallGrub4dos.cmd and run as Administrator – If you receive no error message then press Y and hit the <Enter> key. If you see an error message, check that your disk is an MBR disk and not a GPT (UEFI) disk (e.g. using DISKPART – LIST DISK)!
Note: Check that the file C:\bootmgr exists before rebooting. If it does not exist then add the line in bold to the menu.lst file and delete the other two as shown below:
title Windows\nBoot to Windows
find --set-root --devices=h /bootmgr && chainloader /bootmgr
find --set-root --devices=h /ntldr && chainloader /ntldr
find --set-root --devices=h /boot/BCD && chainloader /bootmgr
boot

If your system contains multiple Windows installations, you may need to use the above menu or write a new 'tag' file to mark the correct boot partition - e.g. \clzboot.tag:

title Windows\nBoot to Windows
find --set-root --devices=h /clzboot.tag && chainloader /bootmgr
boot
7. It is time to reboot your system and check that you get the new menu and that you can still boot to Windows.
FIRST REMOVE ALL USB DRIVES in case they contain a copy of /bootmgr – otherwise the menu.lst may boot to a different drive when the ‘Boot to Windows’ option is chosen.
Restart Windows and you should see the new boot menu, if you wait 10 seconds, it should then boot to Windows as normal. You can simply hit <Enter> to avoid the 10 second wait.
Note: If you are just dropped to a grub> command prompt, then try typing the following commands:
find --set-root /menu.lst
configfile /menu.lst
If you need to type this on every boot, then copy the menu.lst file from the backup D:\ drive to the root of the C:\ drive. Note: If, in future, you change this C:\menu.lst file, remember to save a copy of it on your backup drive D: also, in case the C: copy gets deleted.
If your system does not show the menu (no change is seen) then it may be that the system is set up for UEFI booting. In which case you will need are using the wrong tutorial – use the UEFI tutorial instead!
If you cannot boot to Windows from the menu, then press the c key to get to the grub4dos console. Then type various ls commands to find the bootmgr file:
find /bootmgr
ls (hd0,0)/
ls (hd0,1)/
ls (hd0,2)/
ls (hd0,3)/
find /BOOT/bootmgr
etc. etc.
When you find the file, type chainloader <path> where <path> is the full path – e.g. chainloader /BOOT/bootmgr and then type boot. Once Windows loads, edit the menu.lst menu entry so that the correct path for bootmgr is used (see section 6 above).
8. When the system has rebooted to Windows, double-click on the file D:\Hide.cmd to hide the \clonezilla folder and a few of the grub4dos files – only the D:\UnHide.cmd file should now be visible in Windows Explorer (unless you have changed the Folder View default options in Windows Explorer).
Create a Windows Backup Image
9. Finally, we need to create a Windows Backup Image – reboot the Windows system and when you see the grub4dos boot menu, choose ‘2 Create Backup Image‘ (press 2 and the <Enter> or use the Down or Right cursor keys). You will see a blank screen with a flashing cursor for a few seconds and then some linux boot progress text. The current menu does not allow you to select a keymap, if you delete the preseed option (see below) then you will then see a ‘Configuring console-data’ screen heading and be able to choose a keyboard type.
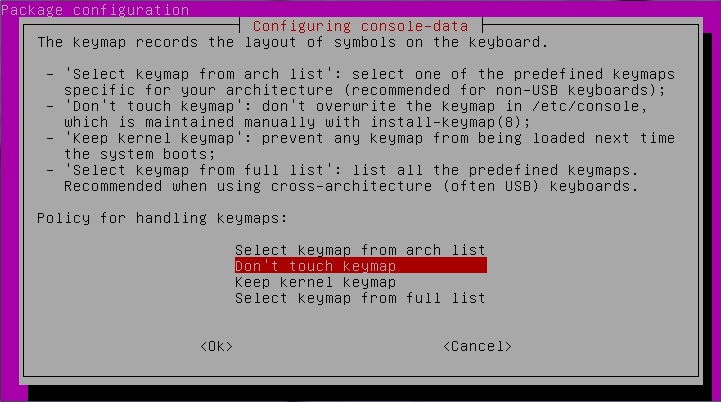
This menu is only seen if you delete live_keymap=”NONE” in the menu.lst file.
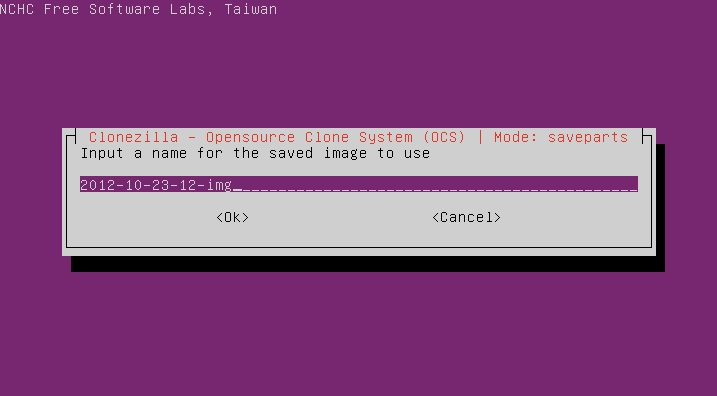
If all is well, you should eventually now be offered a file name to use for the backup that you are about to make – e.g. 2012-20-23-12-img – you can change this name if you like and then click on OK to continue.
Clonezilla should then automatically backup your Windows volume (usually sda1) and then reboot.
If you want to have a simple single-backup option, use the 4 Auto-Backup menu – this is fully automated and always backs up to the file IMG.
Restore from a Backup Image
To restore a previous Windows backup image, reboot and select the ‘1 Restore Backup Image’ option. You will be able to select one of any of the previous backups that you have made and restore that image. When complete Clonezilla will reboot the system automatically.
Tip: to quickly check that the image backup/restore is working, make a backup and then change your Desktop wallpaper and then reboot and restore the original image – your wallpaper should now be changed back again.
The 3 F6 Auto-Restore menu is fully automated and will restore the backup (IMG) made by Auto-Backup (option 4). This means you could remove all other menu options and just leave the F6 menu so that the user could restore the IMG image. If you also deleted the -c option from the menu, the image restore would be completely automatic with no user prompts whatsoever (and all new user data would be lost!). Note that if no IMG backup already exists, it will report an error and reboot.
TROUBLESHOOTING
If Clonezilla does not boot on your system – try the x64 version here.
If you are stuck at a grub4dos prompt and you get no menu and it won’t boot to Windows, to boot to Windows, type:
chainloader (bd)1+1
boot
GPT Partition fix
If a backup does not run, then when you get to the backup name entry field, press ENTER and then press CTRL+S to stop the screen scrolling and CTRL+Q to start it again. Then you can see the error messages. If you see GPT related messages you probably have a GPT partition on the disk somewhere!
You can remove the GPT partition under linux as follows (select cmd to get to the command shell)
- sudo gdisk /dev/sda (press 1 to select MBR)
- Press ‘x’ and enter to reach the eXpert mode
- Now press ‘z’ to delete the gpt
- IMPORTANT: At this step be careful, you will get an option to blank out your MBR,
- Press N for NO Press Ctrl + C when ever you need to exit from gdisk.
- Type exit to reboot (don’t make a backup until you have checked it boots correctly).
If you have blanked out the MBR (LBA0) accidentally, LBA 1 should still contain a backup. You can use dd to copy LBA1 to LBA0 (check it’s contents first!).
Boot issues
If something goes wrong and you can no longer boot to grub4dos or Windows, boot from an Windows Repair DVD (or ISO on a USB drive), drop to the command console (Repair – troubleshooting – Command Prompt) and type bootrec /fixboot and bootrec /fixmbr. If these commands don’t work, try bootsect /nt60 c:.
Once it is booting to Windows again, re-run the InstallGrub4dos.cmd batch file again.
P.S. Don’t forget to re-make your backups so that the new boot code, etc. is backed up
TWEAKING THE SYSTEM
The text file menu.lst controls the menu appearance and the backup/restore optons:
1. If you want to change the background image, use an 800×600 24-bit or 32-bit colour bitmap and change the name in the menu.lst file (see ‘How it Works’ below).
2. If you don’t see a nice bitmap background on the boot menu, it is probably because your system does not support 800x600x32 graphics mode. Please refer to the grub4dos tutorial for information about high-resolution background images and how to make it work for your system.
Use the UnHide.cmd batch file to unhide all the files on the D: volume so that you can easily alter them.
Typically you will need to run vbeprobe inside the grub4dos console shell (press c in the boot menu) to see what graphics modes you have available, then find a suitable bitmap of matching resolution (e.g. 1024x768x24 colours) and then edit the menu.lst file to change to the correct graphics mode and display the correct bitmap. e.g. graphicsmode -1 1024. You will also need to replace the graphics image file – e.g. splashimage /clonezilla/mynew1024x800.bmp
# look for 800x600 modes
cat --locate=", 800x600x16"  (md)0x220+5 > nul &&  set GM=800_16 && echo 800x600x16     supported
cat --locate=", 800x600x32"  (md)0x220+5 > nul &&  set GM=800_32 && echo 800x600x32     supported
cat --locate=", 800x600x24"  (md)0x220+5 > nul &&  set GM=800_32 && echo 800x600x32     supported
# wait 1 second so the user can see the modes supported by the BIOS
pause --wait=1
# now change to the highest resolution supported and load the matching bitmap
if "%GM%"=="800_32"  graphicsmode -1 800  100:1000 24:32 && splashimage /clonezilla/aurora24.bmp.gz
if "%GM%"=="800_16"  graphicsmode -1 800  100:1000 16 && splashimage /clonezilla/aurora256.bmp.gz
graphicsmode -1 1024
splashimage /clonezilla/mynew1024x800.bmp
3. The current menu will not prompt the user to select a keymap, this can be added if you delete the text ocs_live_keymap=”NONE” from the kernel parameter list in the menu entries.
4. You can delete the ‘Auto-Backup’ and ‘Auto-Restore’ menus (starting at title) or you can delete the ‘Restore Backup’ and ‘Create Backup’ options or the manual menu, as you wish. Simply edit the menu.lst file using Notepad.
5. To not prompt the user before an auto-backup or auto-restore is actually performed (i.e. fully automated backup/restore), remove the -c option from the middle of the RUN1 parameters in the menu.lst file.
6. The latest version has the hotkey grub4dos utility added. This allows the user to press a function key to execute a menu item. You can change the function key number by editing the menu. See Tutorial 57 for more details.
7. If you want to protect a menu with a password to prevent unauthorised use, add a single new line immediately below the each title line to set a password like this:
title xxxxxxx
password fred
HOW IT WORKS
Once grub4dos is installed the boot sequence is as follows:
BIOS boots from first sector of Hard Disk 0 -> grub4dos code runs and looks for a grldr file on any partition on hd0 -> grldr loads and looks for a menu.lst on the same partition that grldr was found -> menu is displayed to the user.
The menu.lst file is shown below with extra comments preceded by a # sign (note: some long lines may be wrapped over onto the next line!):
- # next line loads the hotkey utility so the menu will respond to hotkeys
- /clonezilla/hotkey
- # allow vbeprobe command to output text
- debug 1
- # list all available BIOS modes
- vbeprobe > (md)0x220+5
- # turn off text output from future commands
- debug 0
- # clear the display to keep it clean!
- clear
- # look for 800×600 modes
- #This text tries to detect what graphics mode are available and sets a GM variable
- cat –locate=”, 800x600x16″ (md)0x220+5 > nul && set GM=800_16 && echo 800x600x16 supported
- cat –locate=”, 800x600x32″ (md)0x220+5 > nul && set GM=800_32 && echo 800x600x32 supported
- # wait 1 second so the user can see the modes supported by the BIOS
- pause –wait=1
- # now change to the highest resolution supported and load the matching bitmap
- #This sets the graphics mode and then loads the correct bitmap
- if “%GM%”==”800_32” graphicsmode -1 800 100:1000 24:32 && splashimage /clonezilla/aurora24.bmp.gz
- if “%GM%”==”800_16” graphicsmode -1 800 100:1000 16 && splashimage /clonezilla/aurora256.bmp.gz
- #This text finds the Windows partition and the Backup partition
- # find source volume for Windows and our backup volume – use hda instead of sda if IDE HDD
- if exist (hd0,0)/windows/explorer.exe set WDRV=sda1
- if exist (hd0,1)/windows/explorer.exe set WDRV=sda2
- if exist (hd0,2)/windows/explorer.exe set WDRV=sda3
- if exist (hd0,3)/windows/explorer.exe set WDRV=sda4
- if exist (hd0,0)/clonezilla/live/vmlinuz set BAKDRV=sda1
- if exist (hd0,1)/clonezilla/live/vmlinuz set BAKDRV=sda2
- if exist (hd0,2)/clonezilla/live/vmlinuz set BAKDRV=sda3
- if exist (hd0,3)/clonezilla/live/vmlinuz set BAKDRV=sda4
- if exist (hd0,4)/clonezilla/live/vmlinuz set BAKDRV=sda5
- if exist (hd0,5)/clonezilla/live/vmlinuz set BAKDRV=sda6
- if exist (hd0,6)/clonezilla/live/vmlinuz set BAKDRV=sda7
- if exist (hd1,0)/clonezilla/live/vmlinuz set BAKDRV=sdb1
- if exist (hd1,1)/clonezilla/live/vmlinuz set BAKDRV=sdb2
- if exist (hd1,2)/clonezilla/live/vmlinuz set BAKDRV=sdb3
- if exist (hd1,3)/clonezilla/live/vmlinuz set BAKDRV=sdb4
- if exist (hd1,4)/clonezilla/live/vmlinuz set BAKDRV=sdb5
- if exist (hd1,5)/clonezilla/live/vmlinuz set BAKDRV=sdb6
- if exist (hd1,6)/clonezilla/live/vmlinuz set BAKDRV=sdb7
- if exist (hd2,0)/clonezilla/live/vmlinuz set BAKDRV=sdc1
- if exist (hd2,1)/clonezilla/live/vmlinuz set BAKDRV=sdc2
- if exist (hd2,2)/clonezilla/live/vmlinuz set BAKDRV=sdc3
- if exist (hd2,3)/clonezilla/live/vmlinuz set BAKDRV=sdc4
- if exist (hd2,4)/clonezilla/live/vmlinuz set BAKDRV=sdc5
- if exist (hd2,5)/clonezilla/live/vmlinuz set BAKDRV=sdc6
- if exist (hd2,6)/clonezilla/live/vmlinuz set BAKDRV=sdc7
- if exist (hd3,0)/clonezilla/live/vmlinuz set BAKDRV=sdd1
- if exist (hd3,1)/clonezilla/live/vmlinuz set BAKDRV=sdd2
- if exist (hd3,2)/clonezilla/live/vmlinuz set BAKDRV=sdd3
- if exist (hd3,3)/clonezilla/live/vmlinuz set BAKDRV=sdd4
- if exist (hd3,4)/clonezilla/live/vmlinuz set BAKDRV=sdd5
- if exist (hd3,5)/clonezilla/live/vmlinuz set BAKDRV=sdd6
- if exist (hd3,6)/clonezilla/live/vmlinuz set BAKDRV=sdd7
- #The timeout 10 statement determines the number of seconds before the default menu option (default 0) is automatically launched.
- timeout 10
- default 0
- # set menu colors – white normal menu text, purple highlighted, green heading, white console text, black menu border
- color normal=31 highlight=0x75 helptext=0x1D heading=0x0A standard=0x0F border=0x00
- write (md)0x220+1 !BAT\necho -n -P:0000 $[0133] — CLONEZILLA BACKUP\\RESTORE MENU — \necho -n -P:2300 www.rmprepusb.com\0
- initscript (md)0x220+1
- # autonumber menu entries
- write –bytes=2 0x8274 0x2001
- title Windows\nBoot to Windows
- find –set-root –devices=h /bootmgr && chainloader /bootmgr
- find –set-root –devices=h /ntldr && chainloader /ntldr
- boot
- # To set a Function hotkey use ^ and then the key you would like to use – e.g. ^Ctrl+F1, or use [R] to get a keypress of R to work
- # See Tutorial 57 on www.rmprepusb for more details
- title ^F6 F6 Restore Backup Image to %WDRV% (from images in %BAKDRV% \\images folder)\nOverwrites your current Windows installation and all files
- find –set-root /clonezilla/live/vmlinuz
- set BOPT=boot=live quiet live-config noswap nolocales edd=on nomodeset ip=frommedia ocs_live_keymap=”NONE”
- set RUN=ocs_live_run=”ocs-live-general” keyboard-layouts=”NONE” locales=”en_US.UTF-8″ live-media-path=/clonezilla/live bootfrom=/dev/%BAKDRV% toram=filesystem.squashfs ocs_live_batch=”yes”
- set PRERUN=ocs_prerun=”mount /dev/%BAKDRV% /mnt” ocs_prerun1=”mount –bind /mnt/clonezilla/images /home/partimag/”
- set RUN1=ocs_live_run=”ocs-sr –batch -g auto -e1 auto -e2 -j2 -k -p reboot restoreparts ask_user %WDRV%”
- #echo kernel /clonezilla/live/vmlinuz %BOPT% %RUN% %PRERUN% %RUN1%
- #pause
- kernel /clonezilla/live/vmlinuz %BOPT% %RUN% %PRERUN% %RUN1%
- initrd /clonezilla/live/initrd.img
- title Create Backup Image of %WDRV% (in %BAKDRV% \\images folder)\nMakes an image backup of your current Windows installation
- find –set-root /clonezilla/live/vmlinuz
- set BOPT=boot=live quiet live-config noswap nolocales edd=on nomodeset ip=frommedia ocs_live_keymap=”NONE”
- set RUN=ocs_live_run=”ocs-live-general” keyboard-layouts=”NONE” locales=”en_US.UTF-8″ live-media-path=/clonezilla/live bootfrom=/dev/%BAKDRV% toram=filesystem.squashfs ocs_live_batch=”yes”
- set PRERUN=ocs_prerun=”mount /dev/%BAKDRV% /mnt” ocs_prerun1=”mount –bind /mnt/clonezilla/images /home/partimag/”
- set RUN1=ocs_live_run=”ocs-sr -q2 –batch -j2 -z1 -i 2000 -sc -rm-win-swap-hib -p reboot saveparts ask_user %WDRV%”
- #echo kernel /clonezilla/live/vmlinuz %BOPT% %RUN% %PRERUN% %RUN1%
- #pause
- kernel /clonezilla/live/vmlinuz %BOPT% %RUN% %PRERUN% %RUN1%
- initrd /clonezilla/live/initrd.img
- # Alternative Menu for a single automated backup/restore – remove -c if you want a fully automated operation
- title ^F4 F4 Auto-Restore Windows\nRestore Windows from IMG
- find –set-root /clonezilla/live/vmlinuz
- set BOPT=boot=live quiet live-config noswap nolocales edd=on nomodeset ip=frommedia ocs_live_keymap=”NONE”
- set RUN=ocs_live_run=”ocs-live-general” keyboard-layouts=”NONE” ocs_lang=”en_US.UTF-8″ live-media-path=/clonezilla/live bootfrom=/dev/%BAKDRV% toram=filesystem.squashfs ocs_live_batch=”yes”
- set PRERUN=ocs_prerun=”mount /dev/%BAKDRV% /mnt” ocs_prerun1=”mount –bind /mnt/clonezilla/images /home/partimag/”
- set RUN1=ocs_live_run=”ocs-sr -c –batch -e1 auto -e2 -j2 -k -p reboot restoreparts IMG %WDRV%”
- #echo kernel /clonezilla/live/vmlinuz %BOPT% %RUN% %PRERUN% %RUN1%
- #pause
- kernel /clonezilla/live/vmlinuz %BOPT% %RUN% %PRERUN% %RUN1%
- initrd /clonezilla/live/initrd.img
- title Auto-Backup Windows\nBackup Windows to IMG
- find –set-root /clonezilla/live/vmlinuz
- set BOPT=boot=live quiet live-config noswap nolocales edd=on nomodeset ip=frommedia ocs_live_keymap=”NONE”
- set RUN=ocs_live_run=”ocs-live-general” keyboard-layouts=”NONE” ocs_lang=”en_US.UTF-8″ live-media-path=/clonezilla/live bootfrom=/dev/%BAKDRV% toram=filesystem.squashfs ocs_live_batch=”yes”
- set PRERUN=ocs_prerun=”mount /dev/%BAKDRV% /mnt” ocs_prerun1=”mount –bind /mnt/clonezilla/images /home/partimag/”
- set RUN1=ocs_live_run=”ocs-sr -q2 -sc -rm-win-swap-hib -c –batch -j2 -z1 -i 2000 -p reboot saveparts IMG %WDRV%”
- #echo kernel /clonezilla/live/vmlinuz %BOPT% %RUN% %PRERUN% %RUN1%
- #pause
- kernel /clonezilla/live/vmlinuz %BOPT% %RUN% %PRERUN% %RUN1%
- initrd /clonezilla/live/initrd.img
- title Clonezilla (manual)\nRun backup/restore program manually (experts only)
- find –set-root /clonezilla/live/vmlinuz
- kernel /clonezilla/live/vmlinuz boot=live live-config noswap nolocales edd=on nomodeset ocs_live_run=”ocs-live-general” ocs_live_extra_param=”” keyboard-layouts=”” locales=”” ip=frommedia nosplash live-media-path=/clonezilla/live bootfrom=/dev/%BAKDRV% toram=filesystem.squashfs ocs_live_batch=”no”
- initrd /clonezilla/live/initrd.img
- # Preseed codes (ocs = Opensource Clone System)
- # video=uvesafb:mode_option=1024×768-32
- # vga=788 – use video mode 788 (800-600) or 791=1024×768, 785=640×480, vga=normal (no frame buffer)
- # nosplash – does not show splash screen
- # quiet – reduce amount of boot messages
- # keyboard-layouts=”uk” – set linux keyboard layout to uk
- # noprompt – does not ask to eject CD
- #
- # ocs_live_keymap=”NONE” – suppresses the keyboard user selection menu in clonezilla
- # ocs_live_keymap=”/usr/share/keymaps/i386/azerty/fr-latin9.kmap.gz” (French keyboard)
- # ocs_lang=”en_US.UTF-8″ – sets language for clonezilla
- # choices are de_DE.UTF-8, en_US.UTF-8, es_ES.UTF-8, fr_FR.UTF-8, it_IT.UTF-8, ja_JP.UTF-8, pt_BR.UTF-8, ru_RU.UTF-8, zh_CN.UTF-8, zh_TW.UTF-8
- #
- # ocs_live_run ocs-sr parameters:
- # –batch – automate run
- # -c check – asks user before completing action – Are you sure you want to continue ? (y/n)
- # -e1 auto – Automatically adjust filesystem geometry for a NTFS boot partition if exists
- # -t – Client does not restore the MBR (Master Boot Record)
- # -g auto – Reinstall grub in client disk MBR (only if grub config exists)
- # -e1 auto – Automatically adjust filesystem geometry for a NTFS boot partition if exists
- # -e2 – sfdisk uses CHS of hard drive from EDD (for non-grub boot loader)
- # -u – Asks the user for the image name (could be set in config too).
- # restoredisk or savedisk – Which mode to run, store, restore, partition or hard-drive
- # ask_user – requests name from user.
- # sdax – Which hard-drive should be written or read.
- # -q2 – Use “partclone”.
- # -z1p – Use gzip-compression (with multicore)
- # -i 2048 – Split filesize in megabyte (Split every 2GB a new file for the backup – use if FAT32 backup ptn.)
- # -p poweroff – power off after successfully running the script.
- # -rm-win-swap-hib Removes the page and hibernation files in Win if exists
- # -sc – suppress verify check after backup
SETTING A PRE-BOOT SILENT SPLASH SCREEN
If you want the user to see a splash screen but no menu at all, the user will then have no idea that the backup/restore menu exists. After 10 seconds the splash screen will disappear and the system will boot to Windows as normal. However, if the user hits a function key, the appropriate menu will be activated. This can be accomplished by adding the 8 lines of text below to the top of the menu.lst file:
- find –set-root /clonezilla/menusetting.gz
- # display the heading and cover up grub4dos version text
- write (md)0x220+1 !BAT\necho -n -P:0000 $[0133] \0
- initscript (md)0x220+1
- #set black text on black background so user will not see countdown timer or menu text
- color black/black
- # The command parameters 0 0 0 0 0 0 0 0 sets a 0 size border (i.e. no border around menu)
- /clonezilla/menusetting.gz 0 0 0 0 0 0 0 0
To remove the various grub4dos start-up boot messages that appear before grub4dos loads the menu, download the grub4dos patch file PatchMe. Copy it to the D:\clonezilla folder. Boot to the grub4dos menu and press c to get to the command console. Then type:
- find –set-root /grldr
- /clonezilla/patchme
This will patch the boot code and grldr file. Once patched, the PatchMe file is no longer required and can be deleted if you wish.
The user will just see the wallpaper image with no text or highlight line at all – if he presses F4 or F6 then the menu entry chosen will be executed immediately.
To shorten the timeout – just change the text ‘timeout 10’ to ‘timeout 1’ for a 1 seconds timeout.
ADDING AUDIO/VIDEO AIDS FOR THE PARTIALLY SIGHTED
If you need a beep to know when to press the function key, you can add the following line of code to the top of the menu.lst file:
color standard 0xF1 && clear && call Fn.2 7 && call Fn.2 7 && call Fn.2 7 && color standard 0xf && clear
This sets blue text on a white background – clears the screen so it is all white – beeps 3 times using Fn.2 7 (if your hardware supports it) – sets white text on a black background – then clears the screen so it is all black. Once the beeps have finished you can press a function key within the specified timeout period.
If in graphics mode, you will need to use the bios grub4dos utility to beep the speaker once – e.g.
call /bios int=0x10 eax=0xe07 > nulREMOVING THE GRUB4DOS BOOTLOADER
If you want to return to a normal booting system and remove the grub4dos bootloader and menu system, run RMPrepUSB hit Ctrl+F5, select the HDD and then hit Ctrl+B.
This changes the Settings to ALL DRIVES mode, so that the hard disk will appear in the drive list and then installs a standard bootloader using the Bootloaders – Install STD Mbr option.
You can then delete the menu.lst files and the backups and files on drive D: if you wish.
ADD A MEMORY TEST OPTION
Download PassMark memtest86 Free Edition ISO file and copy the \ISOLINUX\MEMTEST file to the clonezilla folder.
Add the following menu entry to your menu.lst file
title ^M Passmark Memtest86 [M] \n Test Memory\n http://www.memtest86.com/
find --set-root /clonezilla/MEMTEST
kernel /clonezilla/MEMTEST
boot
Pressing the hotkey M will run the memory test.
AUTOMATIC REMOTE BACKUP\RESTORE
If you install TeamViewer onto the target system, you can set it up to allow remote control by logging in using the Windows Username and Password (even at the Windows login screen).
This allows you to connect to the Windows system as long as it is switched on and has booted to the Windows login screen (a Windows password must be set for TeamViewer to work).
In this scheme, the backup image called ‘IMG’ is either made\overwritten or restored.
We can modify the menu.lst so that it will allow us to make an unattended backup or unattended restore:
Backup
1. Use TeamViewer to remotely log in and get to the Windows Desktop
2. Run D:\clonezilla\_StartRemoteBackup.cmd as Administrator
3. Reboot the system – C: will be backed up to IMG and then the system will reboot back to Windows
Restore
1. Use TeamViewer to remotely log in and get to the Windows Desktop
2. Run D:\clonezilla\_StartRemoteRestore.cmd as Administrator
3. Reboot the system – the IMG backup will be used to restore C: and then the system will reboot back to Windows
Notes:
The menu.lst assumes that Windows C: is at (hd0,1) (the second primary partition)
The menu.lst has been modified so that the manual backup and restore menu entries have been commented out with # (i.e. #title xxxx)
You must use a recent 2017 version of grub4dos (grldr) which can write to small NTFS files (included in the download)
There is no user interaction. Once a reboot has started, a backup or restore is unattended and the system will then reboot back to Windows
Only the Windows (C:) partition is backed up or restored. Do not attempt to backup\restore the clonezilla partition.
You can create an extra partition (e.g. for data/files, etc.) and add this to the backup\restore parameters if you wish.
The backup\restore menu entry items still require user interaction, remove the -c parameter if you don’t want them to prompt the operator.
CloneZillaBackupAutoUSER.zip allows for two backups, IMG for a ‘factory’ backup and IMGUSER for a ‘User’ backup. Both can be triggered remotely. Also, the Windows partition can be on any of several different partitions.
Download and use CloneZillaBackupAuto.zip to obtain these files and functions.
Downloads: Click here (OneDrive 89 folder) if you cannot find any file mentioned in the articles on this site or Contact Me.