
Table of Contents
As I had some problems doing this and could not find a simple ‘How To’ guide on it, here are some notes on how to do it.Unsupported embed
COMPILING GRUB4DOS UNDER LINUX (RECOMMENDED)
It is much quicker and easier to compile grub4dos under linux.
If you only have a Windows system, I suggest that you install Virtual Box and create a Virtual Machine from a linux MINT ISO (I used linuxmint-17).
I recommend using linux (rather than trying to use MinGW which will drive you mad and give you a headache)!
Pete Batard instructions to install any extra packages under linux are to run:
aptitude install gcc glibc-devel.i686 gcc-multilib make autotools autoconf git nasm upx
I used Mint v17 and found that some of these packages did not exist, however only a few were actually needed (the last few from memory).
I created a new folder on my Windows system and then shared it with linux – this meant I could access the same folder from both Windows and the linux VM – instructions are here – OR I found it easier to attach a USB drive to the Virtual Machine and use a folder on the USB drive for file transfer (you can also copy the grldr file to the USB drive and then test it).
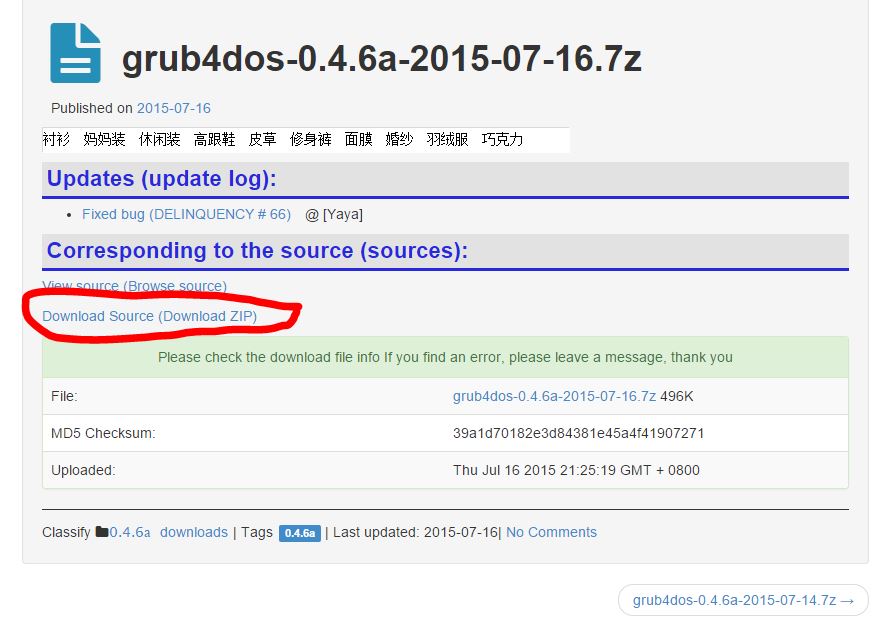
I then downloaded a grub4dos 0.4.6a source zip file from here and extracted the files to a new folder within the Windows shared folder.
From within the Mint VM, I then changed to the folder where the extracted source files were and ran autogen.sh (I ignored any error messages!) and then make…
cd grub4dos46a
./autogen.sh
make
This worked fine and compiled much quicker than if using MinGW under Windows (see below).
It was then just a matter of copying the .\stage2\grldr file to my USB drive to update the grub4dos version on that drive.
COMPILING GRUB4DOS UNDER WINDOWS
Pete Batard (author of Rufus) has produced a new guide for compiling grub4dos 2014-11-15 and later versions under both Windows and linux, which you can find here.
Note: where he says ‘accept defaults’ when running /postintall/pi.sh – this was not correct, you need to enter in the correct responses (e.g. patch C:\MinGW, etc., not just press [ENTER].
The instructions below may be outdated and no longer work.
This version may be out of date…
- First download MinGW from here. Click on the ‘Download and run the latest mingw-get-inst version’ text.
- Run the latest download (e.g. mingw-get-inst-20120426) –> mingw-get-inst-20120426.exe
- Choose ‘Use prepacked repository catalogues’ default option, Accept the EULA, use C:\MinGW as the install folder (do not use a path with spaces in it!)
- Click Next – Next until you get to the ‘Select Components’ menu – now you need to also tick the bottom two options – MSYS Basic System and MinGW Developer Toolkit as well as C Compiler
- Wait for the files to be downloaded and installed.
- In the Start Menu – run All Programs – MinGW – MinGW Shell
- You should now be at a MINGW32 command shell. Type ls to see the files and folders that are present. The actual root folder is located at C:\MinGW\msys\1.0\home\USERNAME (where USERNAME is your Windows user name).
- In Windows, go to www.sliksvn.com and download the latest build and install it. Then copy the contents of the C:\Program Files\Slik\bin folder to C:\MinGW\msys\1.0\bin
- (thanks to Dave N for the next tip)
- Download nasm (current build is: http://www.nasm.us/pub/nasm/releasebuilds/2.10.07/win32/nasm-2.10.07-win32.zip) extract and copy nasm.exe to C:\MinGW\msys\1.0\bin (the other files in the zip archive can be discarded).
- Download upx (current build is: http://upx.sourceforge.net/download/upx309w.zip) extract and copy upx.exe to C:\MinGW\msys\1.0\bin (the other files in the zip archive can be discarded).
- Download 7-zip (current non-beta command line build is: http://downloads.sourceforge.net/sevenzip/7za920.zip) extract 7za.exe. Rename it to 7z.exe and copy to C:\MinGW\msys\1.0\bin (the other files in the zip archive can be discarded).
- Now we need to downgrade the gcc version to 4.5.2 (thanks to ‘Dave N’ for help with this!). type:
- mingw-get upgrade gcc=4.5.2-1
- Now we need to download the latest chenall build. At the MinGW command prompt type:
- svn checkout http://grub4dos-chenall.googlecode.com/svn/trunk/ grubnew
- where grubnew will be the name of your new folder containing the latest source files. Note that if you connect via an internet proxy this won’t work!
- (optional – only do this if you have difficulties or the new grldr file does not load a menu.lst when it boots)
- To configure the files for the new build (create make files, etc.), type
- cd ./grubnew
- ./configure –enable-preset-menu=preset_menu.lst
- If all goes well there will not be any error messages.
- Now to compile grub4dos, simply type
- cd ./grubnew (if not already in the correct directory)
- make
- Again no error messages should be displayed and there should now be a file called grldr in the C:\MinGW\msys\1.0\home\USERNAME\grubnew\grub4dos-temp\grub4dos-0.4.5c folder
- Note: If Windows MinGW tops with a ‘cannot link at address 2000’ error you need to use gcc version 4.5.2-1 as in step 9.
- If the grldr builds but does not load a menu.lst, you need to add the files detailed in Step 8.
- Copy the grldr file to test on your new drive (e.g. you can test the USB drive using RMPrepUSB and the F11 QEMU emulation feature)
Now you can edit the source files as you wish (Notepad may be available) and just type ‘make’ to remake a new build.
With these three additional utilities installed in step 8, running “make” will build and pack a grub4dos-<version>-<yyyy>-<mm>-<dd>.7z (e.g. grub4dos-0.4.5c-2013-06-10.7z) exactly as found on the grub4dos-chenall download page http://code.google.com/p/grub4dos-chenall/downloads/list.
The 7z archive contains a diff file giving the differences between the locally built file and the svn sources.
If you want to see what you have changed compared to the original source files, open the 7z archive or type svn diff.
To create a new diff file type svn diff > mychanges.diff and then load the file mychanges.diff using NotePad2 or a similar programmers text editor.
COMPILING GRUB4DOS UTILITIES – E.G. WENV, ECHO
1. Download BackTrack 5 ISO and install it to a virtual machine’s virtual hard disk (e.g. Windows Virtual PC – set network adapter to Intel 82562V-2 10/100 not NAT).
2. Check the browser is working and then in a console window type svn checkout http://grubutils.googlecode.com/svn grubu
3. Use cd to change to the grubutils trunk/src folder and type ./build to build all utilities (all .c files will be compiled add placed in the bin subfolder ).
4. In the Windows Virtual PC Settings menu, enable the Integration features and then in BT5, run Setup from the CD that should now be detected by linux. This will install integration features via WINE.
5. In Dolphin, click on Network and Add Network Folder, enter the name of your host computer – e.g. MyDell\c$, enter the username and password and tick Remember password – if the password does not seem to work – just keep hitting OK until it is accepted – it seems to take several attempts!
6. You should now be able to browse to the host computer C: drive (Applications – Wine – Browse C: drive) and drop any compiled utilities (under the root folder) from the virtual machine onto the host machine.
Now just edit a source file – e.g. wenv.c and type ./build to recompile it. Then copy it to your host C: drive and then copy it to a USB drive to test it (e.g. under QEMU).
COMPILING GRUBINST UNDER WINDOWS
If compiling grubutils under MinGW for Windows
- svn checkout http://grubutils.googlecode.com/svn grubu
- cd grubu/grubutils/grubinst folder
- (tip: make a copy of Makefile in case it gets destroyed – do not type make -B or Makefile will get overwritten and it won’t compile!) cp Makefile Makefile.org
- type make – you may get a perl grub_mbr.h error 127.
- Try running make -f Makefile.vc6. You may then get a bin2h.c needed Error –
- Type cp ../common/bin2h.c .
- Try make -f Makefile.vc6 again – you may now get a bin2h.exe Error 127 error.
- Now type make -f Makefile.dos – you will get a grubinst.obj error 127
- Finally type make – it should work and compile to grubinst.exe!
To start again, type make clean
COMPILING QEMU-IMG.EXE
1. Download latest source
2. cd to new folder and run
configure –disable-guest-agent (otherwise asks for python)
(if error about glib-2.0 required to compile QEMU then edit configure file around line 1840 to comment out exit 1 line)
(if error about error: zlib check failed then install zlib and maybe xy too – see here for instructions)
make
strip qemu-img.exe (to get rid of debug code)
Note: qemu may not be usable as usually needs tweaks .