
Table of Contents
SECURELY ERASE (WIPE) YOUR HARD DISK OF ALL DATA (BEFORE DISPOSING OF IT)
INTRODUCTION
If you want to sell or give away or dispose of your system you should first wipe the data from the disk. Just re-installing the Operating System using the original manufacturers CD/DVD will not remove your personal data! So first you should wipe all the data from your hard disk so that no data at all (i.e. remove Windows, Linux, boot code, Master Boot Record, partition tables, pictures, games, music, browser password files, financial spreadsheets – everything) remains. You can use a special ‘Erase’ utility to wipe your entire hard disk. However, you must reboot your system to a different operating system first as Windows normally will not allow you to overwrite it’s system files whilst it is running.
Many ‘Erase’ programs work by writing all 00’s to all normal sectors on the drive. This can be very slow. However, if you use CMRR Secure Erase (HDDErase), it sends a special command to the hard disk which tells it to erase itself. This is MUCH faster as the erase utility does not have to write GBs of data to the drive. You can save hours of time when erasing a hard drive. HDDErase also wipes hidden sectors and also those sectors marked as ‘bad’ and which cannot be overwritten by normal wipe programs – these sectors contain old user data which could be accessed by an advanced engineer or hacker. So HDDErase is actually both faster and better as a ‘security wipe’ program than other types which merely erase the normally accessible sectors of a disk.
The first section below describes how to prepare a bootable USB Flash drive (or any USB drive), so that you can boot from it and run HDDErase.exe on any system that will boot from a USB drive.
Note: if you have an Easy2Boot USB drive, just copy the .iso file into the \_ISO\UTILITIES folder, rename it as HDDErase.isoDOS01 and run B:\HDDErase.exe from DOS after it has booted.
The second section (‘NUKE’) describes how you can run HDDErase directly from the same system disk that you want to erase and this method does not need any other form of boot media (i.e. does not need a bootable USB drive or bootable CD).
If you have problems on a particular (newish) system when using HDDErase or MHDD, I suggest your try the latest version of DBAN.
Erase an SSD drive
SSD Flash memory drives are special in that the drive firmware will reserve a portion of the memory for housekeeping. For instance, if a page of memory has been written to a lot, that page of memory will ‘wear out’ from too many erase/write cycles. So the drive firmware can dynamically swap out memory and replace it with some of the reserved unused memory – this is called wear levelling and prolongs the life of the drive. This is why a 512GiB SSD may only have 500GiB or so of accessible capacity. Modern SSD (and some HDD) drives will respond to the ATA Secure Erase command and this will erase all data from all memory. If the drive is using encryption internally (SED = self-encrypting drive), the erase can be very quick because it simply regenerates a new encryption key – thus making all the data on all sectors of memory invalid.
Tip: First look at the BIOS Setup settings options. Many BIOSes have an option to securely erase an SSD drive. First enter the BIOS configuration menu and select the drive you want to erase. Then look for an erase option.
Although HDDErase supports the ATA Secure Erase command, it is DOS-base and so only works on legacy BIOS systems. Instead you can UEFI-boot to Parted Magic (no longer free), Blancco (not free) or boot to a Linux distro such as Ubuntu and run hdparm from the command line. Under Windows you can try Samson’s Magician utilty (if a Samsung SSD), Intel Solid State Drive ToolBox (if Intel SSD), Seagate or WD disk utilities or EaseUS Partition Master. See here for more details.
Note that the drive should be connected directly to the PC/notebook (e.g. via SATA cable) – connecting a drive via USB will not usually work.
USE A WINDOWS INSTALLATION ISO OR WINPE
This method requires some care – ensure you select the correct drive. CLEAN ALL will overwrite all partitions and accessible sectors (but not all reserved sectors in an SSD).
- Boot to any Windows 8 or 10 ISO – e.g. Windows 10 Installation ISO or WinPE 8/10
- Press SHIFT+F10 to open a command console window
- Type DISKPART to run diskpart
- Display all disks
- LIST DISK
- Select the disk you want to erase
- SELECT DISK 0
- Erase the disk (all partitions, all data) – it may take a while!
- CLEAN ALL
- Quit
- exit
HDDERASE FROM A BOOTABLE USB DRIVE
WARNING: HDDERASE erases all partitions on a hard drive. If your hard disk has two partitions, say C: and D:, then this program will erase BOTH partitions. It will basically return your hard drive to a factory fresh state with no files or data on it at all.
NOTE: You can erase your hard disk without needing to make a CD or bootable USB. See NUKE at the end of this page).
Requirements
- A USB flash drive (or SD card if the target computer has a bootable SD card slot)
- RMPrepUSB full download
- The DOS-based (legacy BIOS) program HDDERASE.exe
Your target system (the one you want to erase) must be capable of booting from a USB drive. HDDERASE needs to run under FreeDOS or MS-DOS.
If you want to wipe a SATA drive, you will probably need to set the BIOS to IDE\Legacy mode first. If your system does not have such a disk controller BIOS setting, you can plug the HDD into a system that does, wipe it, and then return the HDD to the original system.
Instructions
- Prepare your USB drive using RMPrepUSB as follows
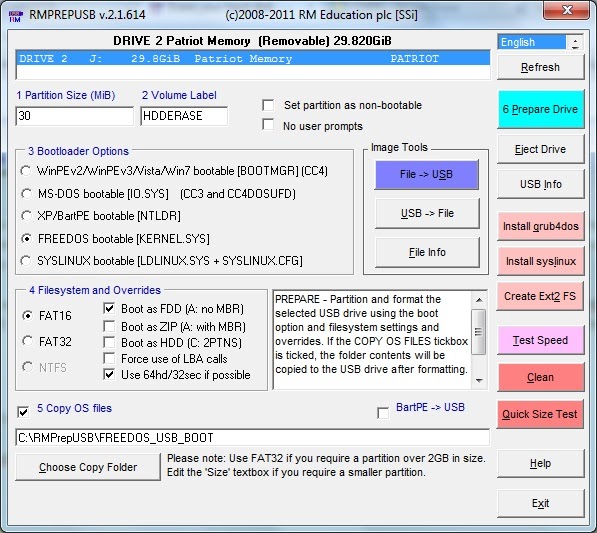
Note that you need to set the ‘Copy OS files’ option to the FREEDOS_USB_BOOT folder (which is included in the RMPrepUSB download).
The latest version of RMPrepUSB will prompt you to set the FreeDos folder.
If the target system does not boot, try the Boot as HDD option instead of Boot as FDD.
- Copy the program HDDERASE.exe to the USB drive
- Switch on your target system – it MUST be off to start with (if it is a notebook, make sure it is running from the mains as erasing a hard disk can take hours), enter the BIOS Setup menu (e.g. by pressing F2 or DEL usually) and change your SATA HDD controller settings from ‘AHCI’ or ‘Enhanced’ to Compatible/Legacy IDE. If your BIOS does not have these settings then don’t worry. Also, change the boot priority to make sure you boot from the USB drive. Save the settings and exit.
- Boot from the USB drive on the target system (the one you want to erase).
- Type HDDERASE from the FreeDOS command prompt to start the utility…
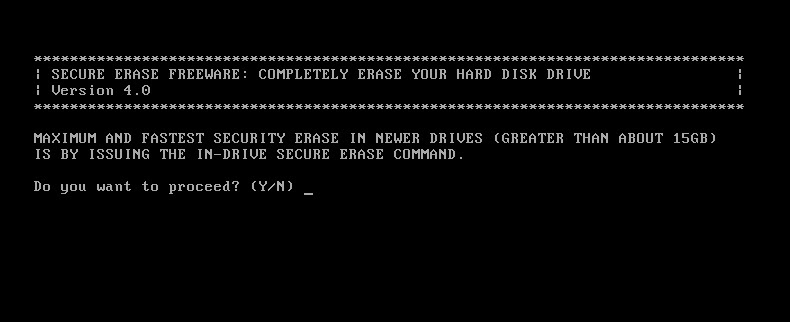
Answer Y to proceed
After a few more prompts, you will be given a list of detected drives:
- P0 is none
- P1 is none
- S1 is ATA DEVICE XXXXXXXX
- S2 is none
- PLEASE SELECT A DRIVE
Enter XX for aaaaa drive
- Enter EX to EXIT the program
- PLEASE ENTER YOUR SELECTION:
(if no drives are listed then change your BIOS HDD settings to disable AHCI/Enhanced mode and try again!)
Now type in the drive you wish to erase – e.g. S1 (note: Some SSD drives also support this feature – make sure you select the correct drive!)
If the drive supports the necessary ATA Security feature set command, you can proceed
If HDDErase says that the drive is password locked and offers to try to unlock it, say Yes. If the unlocking is successful you will be prompted to do a ‘hard reboot’ – this means turn off your system and turn it on again. When you re-run HDDErase, the drive should now be unlocked.
Type Y to proceed to the options menu.
Follow the prompts to start the erase process.
An example sequence is shown below. Also please read the Readme and FAQs below for more information.
Active HDD: Hitachi HTS722016K9SA00
****************************************************
| This drive supports the ATA security feature set |
| This drive supports enhanced secure erase        |
****************************************************
Do you want to procede to the options menu? (Y/N) y
**********************************************************
| Active HDD: Hitachi HTS722016K9SA00                    |
+--------------------------------------------------------+
| Enter 1 for executing secure erase                     |
| Enter 2 for executing enhanced secure erase            |
| Enter C to change the active HDD                       |
| Enter E to exit the program                            |
**********************************************************
Please enter your selection: 1
+----------------------------------------------------------+
| It is required to set a password to the HDD to perfom a  |
| SECURE ERASE.                                            |
| Setting HDD security with the following password: idrive |
| Set password command: Successful!                        |
+----------------------------------------------------------+
Do you want to proceed? (Y/N) y
The estimated duration of this process is: 120 minutes
The secure erase started now at: Sat Apr 12 12:52:12 Sept 2008
The current time is: 14:50:21
Secure erase complete
Audit log successfully written to LBA sector 0
Do you wish to view LBA sector 0? (Y/N): Y
This drive: Serial number = 070526DP0D00DVG0L9KA, Model = Hitachi HTS722016K9SA00
was successfully erased on...Sat Apr 12 14:50:21 2008
To go back to the options menu press ENTER . . .
This procedure can also be used on SSD Flash drives to reset them back to their ‘as new’ performance by erasing all data blocks.
If you wish to add HDDErase as a single bootable image file to your multiboot grub4dos USB boot pen, copy the file hdderase.img.gz from the Beta downloads page to your USB drive and add the following lines to your menu.lst file:
- title HDDErase floppy boot disk
- find –set-root /hdderase.img.gz
- map –mem –heads=0 –sectors-per-track=0 /hdderase.img.gz (fd0)
- map –hook
- root (fd0)
- chainloader (fd0)+1
You can also add Darik’s Boot and Nuke to the menu, in case HDDErase does not work with your hard disk:
- title Dariks Boot and Nuke dban-2.2.6_i586.iso
- find –set-root –ignore-floppies /dban-2.2.6_i586.iso
- map –mem –heads=0 –sectors-per-track=0 /dban-2.2.6_i586.iso (0xff)
- map –hook
- root (0xff)
- chainloader (0xff)
To make a fresh bootable grub4dos USB drive, use RMPrepUSB, set items 1-4 and click on 6 Prepare Drive, then click on Install grub4dos. Then press F4 to add the two menus to the menu.lst file. Then copy over the two files hdderase.img.gz and dban-2.2.6_i586.iso to the root folder (top level) of the USB drive. To test that the USB drive boots, press F11 in RMPrepUSB.
HDDErase ReadMe.txt file
HDDerase.exe
MD5 hash = D708E610BF123C840CC1482E52B22DDF
SHA1 = 27100fbfd1f25fec3d03f94071430c540a935fd0
Erases all data on a hard disk drive – a freeware utility, version 4.0 9/20/2008
========================================================================
I. Introduction
II. Revision history
III. Creating a boot disk
IV. Instructions for using HDDerase.exe
V. FAQ I.
Introduction
HDDerase.exe is a DOS-based utility that securely erases “sanitizes” all data on ATA hard disk drives in Intel architecture computers (PCs). It offers the option to run the drive internal secure erase command, security erase unit, based on the ATA specification by the T13 technical committee. To run the utility make a floppy, recordable CD-R, or USB DOS bootable disk; then copy HDDerase.exe to the bootable media. Reboot the computer with the floppy, CD-R, or USB inserted, and type “hdderase” at the system DOS prompt. Make sure to set the correct priority boot order in the system BIOS, such as first boot floppy, CD-R, or USB depending on which media is used to run HDDerase.exe. HDDerase.exe must be run from an actual DOS environment and not a Window based DOS command prompt environment. SUPPORT: Our sponsor, the National Security Agency, has ended their support of our program, and consequently we have no support staff to respond to problems. If you are having difficulty running the program, and have tried the readme.txt files on our website, then the easiest way to get drives securely erased is to connect the drive to a different PC and run hdderase.exe on it. This is particularly convenient if you have several drives to erase. *NOTE: For laptop users, please make sure that there is sufficient battery life to run and complete the secure erase procedure. Secure erase may take as long as two hours for larger capacity drives. If power is lost during the secure erase, the drive will be in a locked state, preventing all I/O access. See the FAQ for further discussion on this topic. II. Revision history ———————- 4.0 – Released 9/20/2008 – Added a system clock to print out the current time during the secure erase command. – Added new item in the options menu to switch between different attached hard drives without exiting the program. – Added new item in the options menu to unlock unlock drives with HDDErase passwords as well as user defined user or master passwords. – HDDErase now displays the password being set on the drive before the secure erase command is issued. A message is printed to the screen when the passwords are unlocked as well. – Added warning message to inform users to run HDDErase from AC power and not the laptop battery. – Added an audit log failed message that is printed only to the removable media when a secure erase command does not complete successfully. – Changed menu header displays. – Updated MD5 hash and added SHA1 hash. 3.3 – Released 11/17/2007 – Fixed displaced bit in the enhanced secure erase option. Enhanced secure erase command is now issued correctly. 3.2 – Released 6/7/2007 – HDDerase sets user password as “idrive” before performing (enhanced) secure erase. HDDerase also attempts to unlock drive with passwords from previous versions. – Program now attempts to turn on security feature set via “device configuration set” and then “device configuration restore” if the feature set is not enabled. – If selected drive is locked with a non-HDDerase password the user is given the option to: 1) unlock with user password, 2) unlock with master password (if high security), 3) secure erase with user password, 4) secure erase with master password, 5) enhanced secure erase with user password (if supported), 6) enhanced secure erase with master password (if supported). If option 3, 4, 5 or 6 is selected any possible HPA and/or DCO areas will not be reset. – If the system BIOS executes a “security freeze lock” command upon drive detection HDDerase attempts to bypass this. A hard reboot is required if the attempt is successful. Afterwards HDDerase should be run once more and the drive should not be in a frozen state. HDDerase will not attempt to bypass if a HPA is set. NOTE: This internal method may not work on all drives (MAXTOR drives for sure) and the FAQ should be checked for other methods to bypass the BIOS freeze lock. – Upper limit of non-user accessible areas (HPa/DCO) is word 3-6 of “device configuration identify” if device configuration overlay feature set is supported, “read native max address ext” if 48-bit addressing is supported, or “read native max address” if neither are supported. – fixed bugs related to drives that do not support 48-bit addressing. – fixed bugs related to drives that do not support device configuration overlays. – md5 hash updated in HDDeraseReadMe.txt for HDDerase.exe version 3.2 3.1 – Released 1/27/2007 – Program now checks for the existence of a host protected area and/or device configuration overlay, and gives the option to remove such areas. Upon requesting the removal of these areas, subsequent “set max address (ext)” and “device configuration restore” commands are issued–resetting the maximum user space to the native factory size so that a secure erase will erase all drive sectors. NOTE: These areas are not normally used for user data and need only to be sanitized for the most sensitive users of hdderase.exe. – md5 hash updated in HDDeraseReadMe.txt for HDDerase.exe version 3.1 3.0 – Released 12/12/2006 – Only two options are now available, secure erase unit and enhanced secure erase. All other methods have been removed. – Added audit trail after secure erase unit completes. When a secure erase or enhanced secure erase completes successfully, an erase completion message and time stamp are written to LBA sector 0 of erased drive. It will also print the same message to a log file “se_log.log” if possible. The log file is amended and updated each time the program completes a successful security erase or enhanced secure erase, creating a log of all completed erasures. – Program now checks for the existence of a host protected area and device configuration overlay. If any of the two exists, then a message is printed to the screen alerting the user of the number of sector(s) in the host protected area or device configuration overlay. These areas may or may not be erased, depending on the manufacturer. No changes are made to the drive’s configuration. – Added error message if security remains enabled after a secure erase. This indicates that the process did not finish successfully. – Set passwords changed from high to maximum security. – Added md5 hash in HDDeraseReadMe.txt for HDDerase.exe 2.0b – Released 10/11/2004 – Four drive erase options: secure erase unit, fast erase, single pass overwrite, and multi-pass overwrite. III. Creating a boot disk ————————– * To make a floppy DOS boot disk Download and run DOS 6.22 boot disk maker from www.bootdisk.com/bootdisk.htm. Erase the two Qbasic files from the created floppy to make enough room to copy HDDerase.exe onto the disk. * Windows ME Insert a floppy disk into drive A: double-click my computer on the desktop, right-click on floppy drive A: and select format from the resulting menu and click start. After the floppy is formatted, double-click drive C:, double-click the WINDOWS folder, double-click the COMMAND folder, double-click the EBD folder, click once on the COMMAND.COM file to highlight it, hold the Ctrl key and click the IO.SYS file to highlight this file as well, right-click on the IO.SYS file, select copy from the resulting menu, right-click the floppy drive A: and select paste from the resulting menu. * Windows 2000 Insert the Windows 2000 Professional CD. Open a command prompt and switch to the CD by typing in the drive letter and pressing enter. Type \Valueadd\3rdparty\Ca_Antiv and press enter. Now insert a floppy disk into floppy drive A: and then type makedisk and press enter. After the disk has been created, delete unnecessary files from the floppy to make enough room for HDDerase.exe * Windows XP Insert a floppy disk into drive A: double-click my computer on desktop, right- click on floppy drive A: select format from the resulting menu, check create an MS-DOS startup disk and click start. *Creating a bootable CD-R HDDerase v3.1 can be found on the “Ultimate Boot CD v4.1.1” which can be downloaded for free at: http://www.ultimatebootcd.com/download.html Burn the ISO image to a blank CD-R using your preferred recording software. Remember to change your boot priority settings in BIOS to boot from the CD-ROM drive first. If you wish to create your own bootable CD-R, follow the instructions at the following link: http://www.nu2.nu/bootcd/#cdromsi *Creating a bootable USB drive HDDerase v3.1 can be found on the “Ultimate Boot CD v4.1.1” which can be downloaded for free at: http://www.ultimatebootcd.com/download.html Extract the files from the ISO file using a free/shareware utility such as Undisker (http://www.undisker.com/) to a directory on your hard drive. Use a command/shell window and enter the command \tools\ubcd2usb\ubcd2usb.cmd This command will completely erase and reformat your usb stick. Remember to change your boot priority settings in BIOS to boot from the USB stick first. If your BIOS does not support USB devices as a boot option then you can not boot from a USB drive. IV. Instructions for using HDDerase.exe —————————————- *NOTE: For laptop users, please make sure that there is sufficient battery life to run and complete the secure erase procedure. Secure erase may take as long as two hours for larger capacity drives. If power is lost during the secure erase, the drive will be in a locked state, preventing all I/O access. See the FAQ for further discussion on this topic. Copy the downloaded file, HDDerase.exe onto the created floppy/CD-R/USB bootable DOS disk. Boot the computer in DOS using the bootable disk. Make sure to set the correct boot priority setting in the system BIOS. Type “hdderase” at system/DOS prompt to run HDDerase.exe. All ATA hard disk drives connected to the main system board will be identified and their information displayed. For PATA drives, make sure that the jumpers on the hard disk drives are correctly configured. Avoid setting the jumpers to CS (cable select) on the hard disk drives. Master or slave jumper setting is preferred. Example screen output for a typical, non-locked drive: 1. ******************************************************************************* | SECURE ERASE FREEWARE: COMPLETELY ERASE YOUR HARD DISK DRIVE | | Version 4.0 | ******************************************************************************* P0 is Hitachi HTS722016K9SA00 P1 is NONE S0 is NONE S1 is WD75AA-00BAA0 Please select a drive Enter P0 for primary master Enter S1 for secondary slave Enter EX to exit the program PLEASE ENTER YOUR SELECTION: p0 2. Active HDD: Hitachi HTS722016K9SA00 **************************************************** | This drive supports the ATA security feature set | | This drive supports enhanced secure erase | **************************************************** Do you want to procede to the options menu? (Y/N) y 3. ********************************************************** | Active HDD: Hitachi HTS722016K9SA00 | +——————————————————–+ | Enter 1 for executing secure erase | | Enter 2 for executing enhanced secure erase | | Enter C to change the active HDD | | Enter E to exit the program | ********************************************************** Please enter your selection: 1 4. +———————————————————-+ | It is required to set a password to the HDD to perfom a | | SECURE ERASE. | | Setting HDD security with the following password: idrive | | Set password command: Successful! | +———————————————————-+ Do you want to proceed? (Y/N) y The estimated duration of this process is: 120 minutes The secure erase started now at: Sat Apr 12 12:52:12 Sept 2008 The current time is: 14:50:21 Secure erase complete Audit log successfully written to LBA sector 0 Do you wish to view LBA sector 0? (Y/N): Y This drive: Serial number = 070526DP0D00DVG0L9KA, Model = Hitachi HTS722016K9SA00 was successfully erased on…Sat Apr 12 14:50:21 2008 To go back to the options menu press ENTER . . . HDDerase.exe menu 1: Secure Erase This uses the ATA internal drive secure erase command. It offers a higher level of secure erase than block overwriting software utilities. It can take 30 to 180 minutes depending on the drive’s capacity and speed. Drive will be left unlocked and ready for use once the process has successfully completed. 2: Enhanced Secure Erase (if supported by the drive) An optional ATA internal drive secure erase command. Drive will be left unlocked and ready for use once the process has successfully completed. Not all ATA drives support this erase method and if it does not, then you will not be given this option. C: Change Active HDD An option to allow the user to switch between multiples drives. L: Unlock a locked drive (if drive is locked) This option automatically tries to unlock the drive with all known HDDErase passwords. If this fails, the user is prompted for the correct user or master password on the drive. HDDErase will try to unlock the drive with the given password as both a user password and a master password. If your drive is not locked then you will not be given this option. Notes HDDerase.exe tests whether a drive is new enough to support the ATA Security Feature Set. If so (drives larger than about 15 to 20 GB), the secure erase option will be available. ATA drives more than several years old (generally smaller than 15GB) will not support the ATA Security Feature Set. If secure erase command execution is interrupted by restart or a power cycle before completion, the drive will be left in locked state. Run the program again after reboot and successfully execute any of the secure erase options or the unlock option to unlock the drive. Computer BIOS should be set to boot from the floppy drive A:, USB drive, or CD-ROM drive, depending on which media type is used to boot the system into DOS. The Windows Disk Management system program can be used to partition and format a secure erased disk, for reuse. V. FAQ ——- Q: My laptop shut down before the secure erase ended, etc… Now my hard drive is locked with a password. How do I unlock it? A: Normally if the secure erase procedure does not complete HDDerase can be run again and unlock your drive and then complete the erase procedure. An audit trail will be written to LBA 0 to confirm this. The unlock option (“U” from the options menu) can also be used to automatically remove HDDErase set passwords. If you are unable to run HDDerase again the user password that is set for HDDerase v3.2 is: “idrive”. The user password that is set for all versions of HDDerase v3.1 and below is: “xty3fgds2h32j4kd02k9rfgep36435”. A number of free utilities are available to unlock drives with a known password, such as atapwd (http://www.rockbox.org/lock.html) and MHDD (http://hddguru.com/content/en) to name a few. Please verify the correct version you are using and unlock with the appropiate password, then disable withthe same password. Q: What is the difference between secure erase and enhanced secure erase? A: Secure erase overwrites all user data areas with binary zeroes. Enhanced secure erase writes predetermined data patterns (set by the manufacturer) to all user data areas, including sectors that are no longer in use due to reallocation. ***NOTE: the enhanced secure erase option is not supported by all ATA drives. Q: How certain can I be that this program will erase all my data beyond recovery? A: Dozens of hard disk drives have been tested at the Center for Magnetic Recording Research (CMRR) for the functionality of the secure erase command. All hard drives that have been found to support the secure erase feature overwrite all user LBAs to binary zeroes. Q: Is there government approval for secure erase, that meets current federal and state lows, like Sarbanes-Oxley, the Health Information Portability and Accountability Act (HIPAA), the Personal Information Protection and Electronic Documents Act (PIPEDA), the Gramm-Leach-Bliley Act (GLBA), and California Senate Bill 1386? A: According to federal data sanitization document NIST 800-88, acceptable methods include executing the in-drive Secure Erase command, degaussing a drive, and physical destruction. Q: I receive “This drive is in frozen status” and “!! ATA Security Feature Set is prohibited by the system BIOS chip !!” messages. What does this mean? A: Some BIOS chips prohibit the secure erase option (they issue a Security Freeze Lock command when the drive boots up). This is supposed to prevent ATA passwords from being set maliciously by malware once the OS has loaded. HDDerase attempts to bypass this, but if HDDerase is unsuccessful there are three other possible ways to bypass the security freeze lock (see following question). Q: How can I bypass security freeze lock? A: Three different ways can bypass a BIOS security freeze lock: 1. Most preferred method: If another computer is available, boot the drive from another computer. Since the freeze lock is entirely BIOS dependent, another computer’s BIOS may not freeze lock the drive. 2. Second method: Switch the drive to another drive channel or another position on the channel, e.g. Switch drive from secondary master S0 to secondary slave S1 or vice versa. Some BIOSs do not send the Freeze Lock command to all channel master/slave positions. 3. Least preferred method: **There exists some danger to your drive in using this method, use at your own risk** Shut down the computer system. Unplug the four-wire power cable of the hard drive while leaving the signal cable plugged in. To eliminate the danger of ESD, always ground yourself when removing the power cord. Power on the system and boot into DOS with a DOS boot disk. Once DOS has booted up and you are at a command line interface plug the power cord of the hard drive back in. Run HDDerase.exe. The logic in this method is to prevent the drives detection in BIOS, which is when the freeze lock command is issued. Q: Can HDDerase.exe be used to erase my onboard or externally connected (USB, etc.) SATA drives? A: Yes, but some BIOS configuration may be required. Since HDDerase.exe only detects drives on the primary and secondary IDE channels (ports 01F0-01F7 and 0170-0177) the BIOS must be configured so that the SATA drive is detected one of these channels. For onboard SATA drives this can be done by switching the SATA drive from “enhanced mode” to “compatibility mode” in BIOS (compatibility mode is sometimes called “native mode” or “IDE mode”). E.g. BIOS >> IDE configuration >> onboard IDE operate mode >> compatibility mode. Note – not all BIOSs support this feature. Q: Can hdderase.exe be used to erase my SCSI or USB drives? A: No. Hdderase.exe is intended to be used only on SATA/ATA drives and will not work with SCSI or USB drives. There is at least one commercial company (http://www.deadondemand.com/ or http://ensconcedata.com) making “data shredder” machines offering data erasure of any drive, including SCSI. Q: What are HPA and DCO areas? A: HPA is an acronym for Host Protected Area. A HPA is a portion of sectors at the end of the hard drive that can not be addressed by the user. Normally this area is used to store hard drive diagnostic or recovery type software, but any type of data may reside in this area. DCO is an acronym for Device Configuration Overlay. Similar to a HPA, a DCO represents a portion at the end of the hard drive that is not user addressable. Both these areas are NOT overwritten when a windows format, secure/enhanced erase, or any other overwrite method is performed. In order for these areas to be erased they have to be first removed, and only then can the entire drive be erased (see the following question). ***Note: In our testing some drives overwrite the HPA when a secure erase is performed, but most drives do not erase this area when a secure erase is performed. CMRR contends that HPA erasure is not mandatory because user data is not stored there; however HDDerase offers erasure of both areas for maximum erase security. Q: Can hdderase.exe erase the host protected area (HPA) or the device configuration overlay area (DCO)? A: Yes. A message will appear if a HPA and/or DCO exist(s) on the selected drive and prompt the user if he/she wants the areas to be erased. Accepting removes the HPA and/or DCO via set max address (ext) and device configuration restore commands, respectively. A subsequent secure erase will then erase the entire drive. Declining leaves the HPA and/or DCO intact, and a subsequent secure erase may or may not erase over the HPA/DCO, depending on the manufacturer. CMRR Secure Erase protocol requires erasure only of all user-accesible records. If your drive is locked by a non-HDDerase password and if either option 3, 4, 5, or 6 is chosen, then the HPA and/or DCO will NOT be detected or reset. ***Note: the device configuration restore command disables ANY settings previously made by a device configuration set command–thereby placing the drive in its factory default state. Q: Can HDDerase.exe be run under Windows XP? A: Usually no, but it can be done with a kernel mode driver. A kernel mode driver can give the user direct access to the IDE I/O ports that can not normally be accessed in a Windows NT/XP environment (see following question on how to do this). It is not recommended to run HDDerase.exe in a Windows NT/XP environment because of conflicts that may occur when opening the ports. The preferred method is booting up the system in a true DOS environment and then running HDDerase.exe. Q: Where can I find a kernel mode driver that will give me access to the IDE I/O ports? A: http://www.embeddedtronics.com/design&ideas.html >> UserPort.zip. Follow the installation instructions and add the I/O ports for the IDE channel you want to use. Normally the I/O ports for the primary channel are: 1F0-1F7 and 3F6-3F6, and the ports for the secondary channel are: 170-177 and 376-376. You may check you systems IDE ports by going to >> My computer >> properties >> hardware tab >> device manager >> IDE ATA/ATAPI controllers >> primary/secondary IDE channel >> properties >> resources.
NUKE YOUR HARD DISK (NO USB DRIVE REQUIRED!)
(best for systems with one hard disk only)
If you are about to dispose of your PC or notebook (and maybe re-install the original OS from a recovery CD or DVD), you should erase all data from the hard disk first. I would always recommend you use a USB boot disk or boot from a CD to run HDDErase, but if you just want to wipe your Windows files and all data from your hard disk, without needing to make any other boot device or media (maybe your computer does not boot from USB and your CD drive is broken?), you can do it as follows:
- Download NUKE.ZIP – Tutorials section of this website
- Extract the contents to any folder on your hard disk (Windows XP or later) – this is the disk that you want to wipe!
- Right-click on the NUKE.CMD file and click Run As Administrator (or just double-click it if you have XP). This will install the grub4dos boot loader onto the first hard disk in your system so that instead of your computer directly booting to Windows, it will show a special boot menu first.
- Follow the instructions (type YES and NUKE when prompted), then ENTER key
- When your system reboots, you will see a grub4dos menu system, choose option 2 HDDErase

- Follow the instructions and select your hard drive (if it is not detected, set HDD Compatible non-AHCI mode in your BIOS menu options and reboot). If you have more than one hard disk in the system, erase the others first before you erase the system boot disk (hd0).
- If HDDErase needs to try to reset the HDD password before it can use the special Erase command, you MUST SWITCH OFF THE SYSTEM (not reboot, but switch off using the power button) after it has reset the password and then switch it back on again and re-run HDDErase.
- HDDErase should take a while to erase your hard disk – do NOT turn the system off during this time!
- If HDDErase cannot run on your hard drive even after resetting the password and switching it on and off again, use the Darik’s Boot and Nuke (DBAN) option instead (but it will take much longer to run).
HDDErase on a 2.5″ 5400rpm Hitachi 250GB notebook drive took 82 minutes, DBAN took 3.5 hours.
If HDDErase reports the drive is ‘frozen’ and you have switched off your system and re-run HDDErase already, you will need to power down your hard disk while HDDErase is running:
- Run HDDErase – first screen
- Unplug your hard disk’s power cable (while the computer is still on)
- Wait 30 seconds
- Re-attach your hard disk power cable
- Wait for 30 seconds
- Continue with HDDErase