
Table of Contents
If you need to boot a computer to DOS to flash the BIOS or perform some other task under DOS such as formatting a hard disk or running a DOS-based recovery program, here is how to do it.
CREATE A STANDARD FREEDOS BOOTABLE USB DRIVE
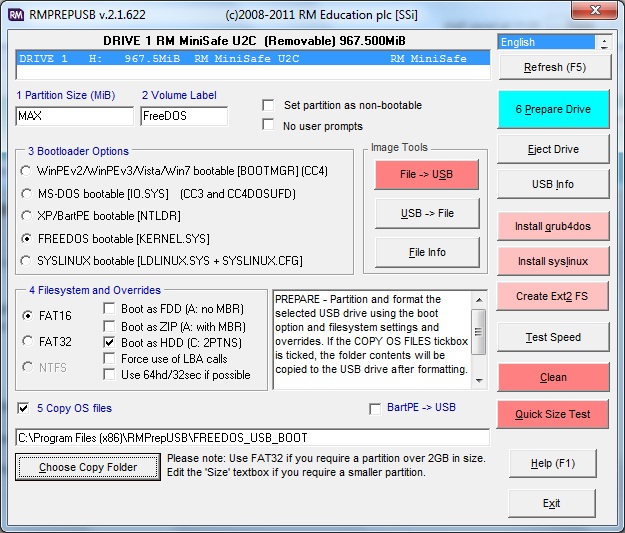
1. Download and install RMPrepUSB v2.1.622 or later
2. Insert a USB drive (hard disk or Flash drive) into the same computer and run RMPrepUSB
3. Select the USB drive in the top selection box and then set the options numbered 1 to 5 as follows:
1. MAX
2. FreeDOS (or any volume name you like) – you may be prompted to set the copy folder to FREEDOS_USB_BOOT – if so then accept it.
3. FreeDOS
4. FAT16 (or FAT32) + Boot as HDD
5. Tick the Copy OS Files box and Browse to the .\FREEDOS_USB_BOOT folder if it has not already been set.
4. Now click on the 6 Prepare Drive blue button
5. When the drive has been formatted, click on the Install grub4dos button and follow the prompts (choose MBR option or PBR option).
6. Now copy your BIOS Flash tools (typically a .exe file and a .ROM file) to the USB drive.
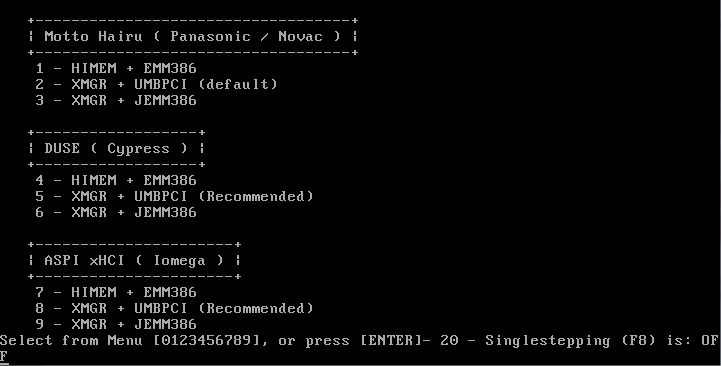
The USB drive is now ready to test. You can do this by pressing F11 when in RMPrepUSB. You should see a menu like the one below:
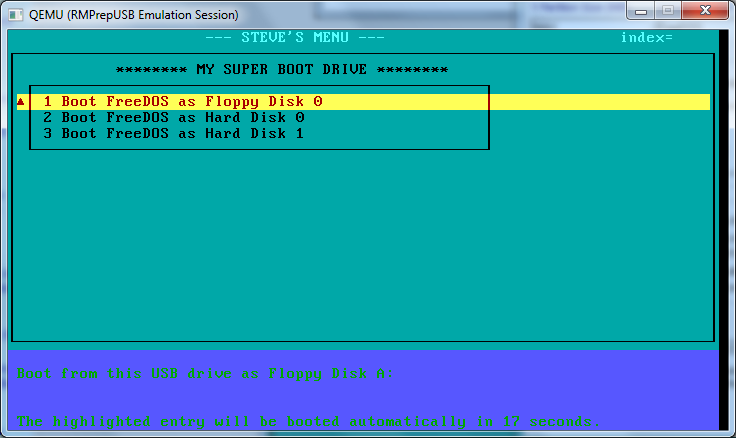
Note that you can choose to boot the USB drive either as a floppy (so you get the drive A: prompt), as hard disk 0 (so your computer hard disk will be the second hard disk when FreeDOS booots), or as hard disk 1 (so the computers hard disk will be the first hard disk and if you run FDISK or a DOS partition program, the first hard disk will be the computer’s hard disk and not your USB drive).
Example if ‘boot as floppy’ option 1 is chosen.
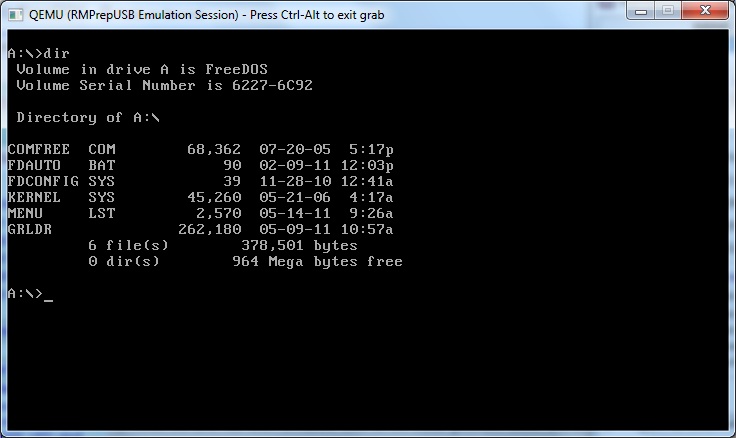
Once you have booted to DOS, you can type DIR to list the files on the USB drive.
Note: If you receive a message ‘Bad or missing Command Interpreter’ then you may need to type in the path and name of COMFREE.COM – e.g. Type D:\COMFREE.COM.
Feel free to edit the menu.lst file to change the title to anything you like! See the grub4dos tutorial for how to do this and more details on how grub4dos works.
How it works:
The ‘boot chain’ is – (MBR boot code) -> (grub4dos code and menu) -> KERNEL.SYS -> FDCONFIG.SYS -> COMFREE.COM -> FDAUTO.BAT
FreeDOS is booted by executing the file KERNEL.SYS (this is equivalent to the IO.SYS file when booting to MS-DOS).
KERNEL.SYS then looks for a CONFIG.SYS text file or an FDCONFIG.SYS text file. The commands inside this text file tell it what to do next.
In our case, it will load the shell COMFREE.COM (this is equivalent to the file COMMAND.COM when booting to MS-DOS).
When COMFREE.COM loads, it will look for a file called AUTOEXEC.BAT or FDAUTO.BAT. In our case we have FDAUTO.BAT and so commands in this file are executed.
The file GRLDR contains the grub4dos code and the text file menu.lst contains our grub4dos menu.
If you wish, to simplify the files, you can rename COMFREE.COM to COMMAND.COM and delete FDAUTO.COM and FDCONFIG.SYS. The ‘boot chain’ is then: KERNEL.SYS -> COMMAND.COM.
Booting to MS-DOS instead of FreeDOS
If you want to boot MS-DOS instead of FreeDOS, simply copy all MS-DOS (v7) files to the USB drive after following the steps above and then copy the IO.SYS file and rename it as KERNEL.SYS file so that the file KERNEL.SYS will actually contain the contents of IO.SYS.
You will, of course, need to obtain the MS-DOS boot files (IO.SYS, COMMAND.COM, MSDOS.SYS, CONFIG.SYS) first.
CREATE AND BOOT FROM AN MS-DOS 7 IMAGE FILE
RMPrepUSB can make a 1.44MB MS-DOS 7 floppy disk image containing the standard DOS boot files by extracting the floppy disk image from a standard Windows file within your Windows system.
1. Click File – Create 1.44Mb Floppy DIsk Image – the disk image file DOSBOOT.IMA will be created and automatically highlighted in Windows Explorer.
Note: This function was removed by Microsoft in Windows 10! Instead you can download a DOS .IMA or .IMG boot image (use Google to find one).
2. Copy the DOSBOOT.IMA file to your USB boot drive and add the following menu.lst entries (use F4 in RMPrepUSB):
- title MS-DOS Floppy boot image
- map /DOSBOOT.IMA (fd0)
- map –hook
- chainloader (fd0)/io.sys || chainloader (fd0)/kernel.sys
Note: IO.SYS may be a hidden file. kernel.sys will be present on FreeDOS images instead of IO.SYS.
You will need to make your USB drive bootable by formatting it with RMPrepUSB (use the 2PTNs option) and installing grub4dos (use the Install grub4dos button).
3. Press F11 in RMPrepUSB to test it…
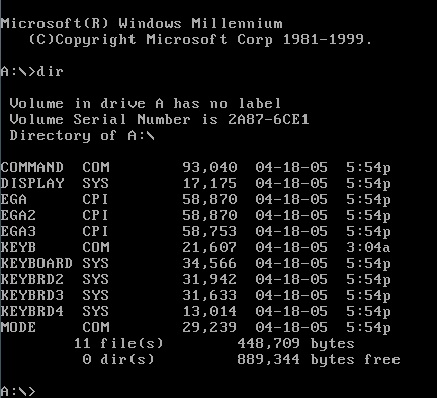
MS-DOS boot disk obtained as above.
Alternativrly, you can extract the boot files from the .ima file using 7Zip or WinImage, etc.
Booting to MS-DOS and FreeDOS
If you want to put both MS-DOS and FreeDOS onto the one USB drive and boot to either OS, simply copy the MS-DOS files to the USB stick after preparing it as above, and then edit the menu.lst menu text file and copy the FreeDos menu items 1 – 3 to make three more menu items (4, 5 and 6). Then edit the 3 new entries to change the titile and also change the KERNEL.SYS text in the menu item to IO.SYS. An example complete menu.lst is shown below which you can cut and then paste into the menu.lst file if you prefer.
- #This file is only of use if you also install grub4dos to your USB drive
- #Lines starting with # are comments
- #valid colours are: black, blue, green, cyan, red, magenta, brown, light-gray, dark-gray, light-blue, light-green, light-cyan, light-red, light-magenta, yellow and white
- #color pairs are : NORMAL HIGHLIGHT HELPTEXT HEADING consisting of foreground/background
- color black/cyan red/yellow green/light-blue white/light-cyan
- timeout 20
- default 2
- #These next two lines overwrites the grub4dos info with a nice title
- write (md)0x220+1 !BAT\necho -n -P:0000 $[0133] — STEVE’S MENU — index= \0
- initscript (md)0x220+1
- #Put a section heading here
- title ******** MY SUPER BOOT DRIVE ********\nPlease user the cursor keys or type a number to select a menu item
- root ()
- title ÚÄÄÄÄÄÄÄÄÄÄÄÄÄÄÄÄÄÄÄÄÄÄÄÄÄÄÄÄÄÄÄÄÄÄÄÄÄÄÄÄÄÄÄÄÄÄÄÄÄÄ¿
- root
- title ³ 1 Boot FreeDOS as Floppy Disk 0 ³\n\n Boot from this USB drive as Floppy Disk A:
- map –unhook
- map –unmap=0:0x82
- #Next line checks to see if we booted as a hard disk (80) and if so maps the boot device as a floppy disk
- checkrange 0x80 read 0x8280 && map (hd0,0)+1 (fd0) && map (hd1) (hd0) && map –hook && find && rootnoverify (fd0) && map –harddrives=1
- map –floppies=1
- chainloader /kernel.sys
- clear
- title ³ 2 Boot FreeDOS as Hard Disk 0 ³\n\n Boot from this USB drive as Hard Disk C: with the real hard disk as 2nd disk
- map –unhook
- map –unmap=0:0x82
- #Next line checks if we booted as a floppy drive (0) – if so we cannot convert to a hard disk
- checkrange 0x00 read 0x8280 && clear && find && echo Sorry – cannot map this floppy device as a hard disk! && pause && configfile (bd)/menu.lst
- rootnoverify (hd0,0)
- chainloader /kernel.sys
- clear
- title ³ 3 Boot FreeDOS as Hard Disk 1 ³\n\n Boot from this USB drive as Hard Disk C: with the real hard disk as first disk
- map –unhook
- map –unmap=0:0x82
- #Next line checks if we booted as a floppy drive (0) – if so we cannot convert to a hard disk
- checkrange 0x00 read 0x8280 && clear && find && echo Sorry – cannot map this floppy device as a hard disk! && pause && configfile (bd)/menu.lst
- #Next line checks to see if we booted as a hard disk (80) and if so swaps the boot device with the 2nd hard disk
- checkrange 0x80 read 0x8280 && map (hd0) (hd1) && map (hd1) (hd0) && map –hook
- rootnoverify (hd1,0)
- chainloader /kernel.sys
- clear
- title ³ 4 Boot MS-DOS as Floppy Disk 0 ³\n\n Boot from this USB drive as Floppy Disk A:
- map –unhook
- map –unmap=0:0x82
- #Next line checks to see if we booted as a hard disk (80) and if so maps the boot device as a floppy disk
- checkrange 0x80 read 0x8280 && map (hd0,0)+1 (fd0) && map (hd1) (hd0) && map –hook && find && rootnoverify (fd0) && map –harddrives=1
- map –floppies=1
- chainloader /io.sys
- clear
- title ³ 5 Boot MS-DOS as Hard Disk 0 ³\n\n Boot from this USB drive as Hard Disk C: with the real hard disk as 2nd disk
- map –unhook
- map –unmap=0:0x82
- #Next line checks if we booted as a floppy drive (0) – if so we cannot convert to a hard disk
- checkrange 0x00 read 0x8280 && clear && find && echo Sorry – cannot map this floppy device as a hard disk! && pause && configfile (bd)/menu.lst
- rootnoverify (hd0,0)
- chainloader /io.sys
- clear
- title ³ 6 Boot MS-DOS as Hard Disk 1 ³\n\n Boot from this USB drive as Hard Disk C: with the real hard disk as first disk
- map –unhook
- map –unmap=0:0x82
- #Next line checks if we booted as a floppy drive (0) – if so we cannot convert to a hard disk
- checkrange 0x00 read 0x8280 && clear && find && echo Sorry – cannot map this floppy device as a hard disk! && pause && configfile (bd)/menu.lst
- #Next line checks to see if we booted as a hard disk (80) and if so swaps the boot device with the 2nd hard disk
- checkrange 0x80 read 0x8280 && map (hd0) (hd1) && map (hd1) (hd0) && map –hook
- rootnoverify (hd1,0)
- chainloader /io.sys
- clear
- title ÀÄÄÄÄÄÄÄÄÄÄÄÄÄÄÄÄÄÄÄÄÄÄÄÄÄÄÄÄÄÄÄÄÄÄÄÄÄÄÄÄÄÄÄÄÄÄÄÄÄÄÙ
- root
MAKING DOS 6.22 AND DOS 5.XX BOOTABLE DRIVES
DOS 6.22 and previous versions only support smaller FAT16 drives and are not recommended as they do not support larger disks.
For a book on using DOS 6.22 (Using MS-DOS 6.22 by Jim Cooper) see here.
DOS 6.22 bootable FAT16 drives can be made using RMPrepUSB as follows:
Please use RMPrepUSB version 2.1.639 or later – set FAT16 + MS-DOS + Use 64hd/32sec if possible (CHS) tick box to force use of type 6 if FAT16 is used.
The partition size must be set to less than 2GB for FAT16.
if you install grub4dos then use this menu:
- title MS-DOS 6.22
- root ()
- chainloader +1
Note that chainloader /io.sys does not work if 64/32 geometry is used when under QEMU! But you can fix it using (note there are two minus signs before each word):
- title MS-DOS 6.22
- root ()
- geometry –bios –sync
- chainloader /io.sys
If using an earlier version of RMPrepUSB
1. Format a drive as FAT16 – MS-DOS using RMPrepUSB – Note: this will create a type 0E FAT16 partition which DOS 6.22 does not understand!
2. Edit the Partition Type number in the drive partition table to 06 (RMPrepUSB uses 0Eh by default) – this can be done as follows:
a. Select the disk in the selection box that you want to edit
b. Run DiskDoctor from RMPrepUSB (type ALT+CTRL+F5 or CTRL-D)
c. Set Start=0 and No. Sectors=1
d. Click on the Sequential READ button and then the Display and Edit Buffer button
e. Edit the partition table byte 1C2 text in the form window
01C0 01 00 0E FE 3F BE 3F 00 – 00 00 C0 D1 2E 00 00 00 …þ?¾?. ..ÀÑ….
and change it from 0E to 06
01C0 01 00 06 FE 3F BE 3F 00 – 00 00 C0 D1 2E 00 00 00 …þ?¾?. ..ÀÑ….
f. Click on WRITE using Buffer to save the change
g. Check the change was made by clicking on the Sequential READ button again and then the Display and Edit Buffer button
h. Exit from DiskDoctor
3. Now copy over the DOS 6.22 files (at least IO.SYS, MSDOS.SYS and COMMAND.COM are required)
Note that if you have prepared the partition using DOS 6.22 boot volume code, the file IO.SYS must be the first directory entry and this must be followed by MSDOS.SYS (which contains code and NOT text as with later versions). However, if you use RMPrepUSB to prepare the drive, the files do not need to be in any particular order as long as they are in the root of the drive.
DOS 7 bootable drives can be FAT32 or FAT16. To prepare a DOS 7 bootable drive, use RMPrepUSB and the MS-DOS setting. RMPrepUSB installs DOS 7 compatible volume boot code. Then simply copy over the DOS boot files. At least, IO.SYS, MSDOS.SYS and COMMAND.COM are required. See the section below to obtain a DOS 7 boot image and boot from it.
Troubleshooting
Error messages
If IO.SYS missing, -> ‘Error!‘ (for 6.22 boot code, IO.SYS must be the first entry in the directory)
If MSDOS.SYS is missing -> ‘Starting MS-DOS…‘ and non-flashing cursor if RMPRepUSB Dos 7 boot sector – OR ‘Non-system disk or disk error, Replace and press any key when ready‘ if a DOS 6.22 boot sector is present.
Checking the disk using DiskDoctor or the RMPrepUSB DriveInfo button.
1. Examine the first sector of the disk (0) – check it is a FAT16 type 06 (see above) if DOS 6.22 (use DiskDoctor or the Drive Info button)
2. Examine the start of the partition (P1), normally sector 63 or sometimes 32, to check the strings at the end of the sector are looking for IO.SYS.
3. Search the disk for the string .SYS using the DiskDoctor Search button (use ‘Tio‘ as a search string and a start sector of 100) until you find the 32-byte directory entries which may look like this:
- [Sector 1291] 0MB
- 0000 44 4F 53 36 32 32 20 20 – 20 20 20 28 00 00 00 00 DOS622 (….
- 0010 00 00 00 00 00 00 00 00 – 21 28 00 00 00 00 00 00 …….. !(……
- 0020 44 52 56 53 50 41 43 45 – 42 49 4E 20 00 22 2B 98 DRVSPACE BIN .”+˜
- 0030 54 40 54 40 00 00 C0 32 – BF 1C 03 00 F6 02 01 00 T@T@..À2 ¿…ö…
- 0040 41 55 54 4F 45 58 45 43 – 42 41 54 26 00 29 2B 98 AUTOEXEC BAT&.)+˜
- 0050 54 40 54 40 00 00 22 5D – 54 40 14 00 10 00 00 00 T@T@..”] T@……
- 0060 4D 53 44 4F 53 20 20 20 – 53 59 53 20 00 2C 2B 98 MSDOS SYS .,+˜
- 0070 54 40 54 40 00 00 C0 32 – BF 1C 15 00 FA 94 00 00 T@T@..À2 ¿…ú”..
- 0080 49 4F 20 20 20 20 20 20 – 53 59 53 20 00 30 2B 98 IO SYS .0+˜
- 0090 54 40 54 40 00 00 C0 32 – BF 1C 1F 00 46 9F 00 00 T@T@..À2 ¿…FŸ..
- 00A0 43 4F 4D 4D 41 4E 44 20 – 43 4F 4D 26 00 44 2B 98 COMMAND COM&.D+˜
- 00B0 54 40 54 40 00 00 C0 32 – BF 1C 29 00 75 D5 00 00 T@T@..À2 ¿.).uÕ..
This shows that the first directory entry is the volume label ‘DOS622’, the next file in the directory is DRVSPACE.BIN, the next is AUTOEXEC.BAT, and so on.
This is fine for a FAT16 drive prepared using RMPrepUSB as the order is not important and it will boot correctly (as long as the MBR partition table type is 06 and not 0E).
However, for a DOS 6.22 drive that has been prepared using some other utility, the directory entries must have IO.SYS first followed by MSDOS.SYS for the very first two entries. This includes the volume label which cannot be at the start of the directory for a pure DOS 6.22 boot disk as the partition boot code will fail to boot unless IO.SYS is the first entry and MSDOS.SYS the 2nd entry!
BOOT FROM A FREEDOS IMAGE FILE WITH USB DRIVERS
You can have lots of DOS image files. e.g. a 1.44MB or 2.88MB floppy disk image file, all on the same USB flash or hard disk. When you boot to the image from a USB drive, only the files inside the image and the boot drive will be accessible unless the DOS image also contains USB drivers so that you can also access other USB drives.
A DOS disk image which contains various USB drivers can be found here. Using this image, you could also boot from a CD and access USB drives.
Download the USB19.zip file, extract the USB19.BIN file and copy it to your USB drive, then add the following entry to you menu.lst grub4dos menu:
- title FreeDOS with USB drivers
- map /usb19.bin (fd0)
- map –hook
- chainloader (fd0)/kernel.sys || chainloader (fd0)/io.sys
The above menu can be modified to work with MS-DOS or FreeDOS images by changing the name of the .bin file to match your image file.
Once an option is picked and the drivers are loaded, look for USB drives by typing dir C: and then dir D: etc.
On a USB flash drive contain four 125Mb FAT16 partitions, I found C: and D: returned errors but E: and F: (the 3rd and fourth partitions on the USB drive) were accessible!
Running the PELS.exe DOS benchmark under DOS
ADDING DOS PAYLOADS TO EASY2BOOT
Floppy disk images
If you have a bootable floppy disk image, you can simply use the .img or .ima file extension. The file will be loaded into memory as a floppy disk drive. Any changes you make under DOS will be made to the memory RAM drive and will not be permanent.
If you use the .imarw file extension, the file will be directly mapped and any changes you make to it under DOS will be permanent.
Various other file extensions are also available for different behaviour – see here.
Bootable USB drives
If you have a bootable USB drive that boots as drive C:, you can add an image of it (.imghd) to your E2B drive. Use:
RMPrepUSB – Drive->File – (filename – e.g. DOS.imghd) – start=0 – length=P1 – file start=0
If the USB drive boots as A:, you can create an image in a similar way
RMPrepUSB – Drive->File – (filename – e.g. DOS.ima) – start=0 – length=(size of image = 3MB) – file start=0
The size of image will usually be 1.44MB or 2.88MB, therefore enter a size of 3MB.
ISO payloads
If you have a bootable ISO which boots to DOS, you can use various file extensions
.isoDOS – use for DOS-emulation bootable ISOs which normally load CD drivers to access the CD, all CD contents will be found on the FAT32 B: volume once booted to DOS.
.isoDOS01 – as .isoDOS but swaps over the USB boot drive with the internal hard disk so that the internal HDD is drive 0 – use for Win98 Install ISOs, etc.
.isonousb – loads ISO as CD (0xff), maps USB drive as fd0, removes USB drive from BIOS hard disk list. Useful for DOS if you don’t want your USB drive to appear as a hard disk. v1.61+ more details here
Read more: http://www.easy2boot.com/add-payload-files/list-of-file-extensions-recognised-by-e2b/
Note that most DOS ISOs contain a floppy-emulation boot image which contains the DOS boot files – this boot floppy image is hidden in the ISO.
The file contents of the ISO is usually accessed when this DOS floppy image boots and loads the CD driver which can then access the CD file contents.
Thus there may be two different ‘devices’, the CD device and the bootable floppy device (as a RAM drive).
DOS 6 was limited to drives max 8GB.
DOS 7 FDISK has a problem with drives > 32GB
Later versions also have problems with drives > 800GB, etc.
See here for more information.