
Table of Contents
GRUB4DOS GUIDE – HOW TO MAKE A MULTI-BOOT DRIVE (WITH VIDEOS+EXAMPLES)
PLEASE NOTE: WordPress has a nasty habit of translating two minus signs into an EM-dash, grub4dos uses two minus signs, so if you see a command like map —hook it actually should be
map --hook
Make sure you delete the long EM dash and replace it with two minus signs or you will get a grub4dos ‘Error 27 Unrecognized Command’ error message!
This guide contains many new and previously undocumented features but it may not be as up to date as the eBook.
HIGHLY RECOMMENDED: New grub4dos eBook (PDF) – ‘Getting started with grub4dos‘ – a complete guide with exercises, examples and full command reference for the modern version of the LEGACY version of grub4dos.
The article printed below is now old and rather outdated. I recommend getting the grub4dos eBook which contains an easy way to make nice menus using the latest version of grub4dos.
Note: There is now a new version of grub4dos called ‘grub4dos for UEFI’ by the same developers. This is NOT grub4dos but a completely new product which is for UEFI systems only – do not confuse the two products!
grub4dos is only for use with Legacy BIOSes (BIOS or CSM mode).
I highly recommend that you download and use only this version of grub4dos 0.4.6a version 2020-02-29 (2019-09-09 or 2019-12-30 are also good) – Other versions of grub4dos, both older and newer, may be buggy!
- Latest grub4dos downloads Note that 0.4.5c is an old stable release with no new features and some bugs (a=alpha, b=beta, c=release). I strongly recommend 0.4.6a (latest version may be buggy – use my recommended version). GitHub 0.4.6a source files here
-
Grub4dos command primer – Grub4dos 0.4.6a complete and regularly updated command reference (originally in Chinese by Stephenldj, translated and regularly kept up to date by me).
-
Grub4dos advanced – internal variables, memory usage, function calls, etc
-
RMPrepUSB – use this to install grub4dos + many other useful functions.
-
Easy2Boot – a universal multiboot solution based on grub4dos – just copy your ISO files to the USB drive and boot (also supports multi-UEFI booting and Secure UEFI-boot).
New – Easy2Boot Multiboot USB eBooks:
-
-
eBook #1: How to make a multiboot USB drive using Easy2Boot – a complete course on how to make a multiboot USB drive.
-
eBook #2: How to install Microsoft Windows using Easy2Boot – install Microsoft Windows unattended, with drivers + applications.
-
eBook #3: How to make a UEFI multiboot Easy2Boot USB drive – for systems which cannot MBR\Legacy boot.
-
eBook #4: UEFI-multiboot using the a1ive grub2 File Manager (agFM) – Now your E2B drive can Secure UEFI boot and then directly UEFI-boot from your ISOs, VHDs, etc.!
-
Get them at http://www.easy2boot.xyz/ebooks/
Grub4dos version 0.4.6a has Joliet ISO support, can map non-contiguous files, better debugging and it’s own rd/wr USB 2.0 driver and better NTFS file-write support, exFAT and ext3/4 support, new features such as setmenu, large font support, .jpg support, etc. etc.
To install grub4dos, I recommend using RMPrepUSB.
RMPrepUSB Blog – please leave a comment or feedback on RMPrepUSB or this Tutorial (please mention Tutorial number).
INTRODUCTION TO GRUB4DOS
This tutorial is an introduction on how to make a bootable grub4dos USB drive.
If you are a beginner to multibooting USB drives and just want to quickly make and test a multiboot USB drive, check out the Easy2Boot Project here.
Grub4dos allows you to make a multiboot (multipass) drive. When you boot from a bootable drive that contains the grub4dos bootloader, you are normally presented with a menu which allows you to boot from any OS or other program such as a memory test program that you have copied to the drive.
Grub4dos does not support UEFI-booting (but you can UEFI-boot using Easy2Boot).
Grub4dos boot code can be installed either onto the MBR (Master Boot Record, on the first sector of the disk) and boot track (first track) of a drive, or the partition boot record. It consists of two parts or stages. The first part is the boot code which is in the first sector and some of the following sectors of the boot drive or partition. Once this code is run by the CPU, the code then looks for a file called grldr. The grldr file needs be in the root and on the same boot partition if the boot code is installed onto the partition boot record (PBR – start of the partition).
If the boot code was installed onto the MBR, then the root of all devices will be searched to find the grldr file.
Grub4dos can boot an OS or executable from a ‘flat file’ structure or from disk image files or even ISO files. It can even load images into memory (ram drive) and run the OS from there! Grub4dos is used in most of my tutorials and is well worth getting to know it, if you are interested in making your own multi-boot drives. The RMPrepUSB download includes grub4dos. RMPrepUSB will install grub4dos onto a drive at the click of a button either to the MBR (Master Boot Record) or PBR (Partition Boot Record). Tip: If in doubt, always install twice, to both MBR and PBR!
Most of the tutorials on this website use grub4dos. Grub4dos can be installed onto a USB Flash drive, USB Hard Disk or even your PC’s hard disk. It can also be added to a bootable CD or DVD. Using grub4dos, you can make a bootable disk/CD/DVD that can run or install Windows XP, Windows 7/8, various versions of linux, memory tests and do much, much more…
Grub4dos can run grub4dos batch files (which must start with !BAT) and grub4dos executables and supports environment variables. It can access FAT12, FAT16, FAT32, NTFS, exFAT, ISO 9660 CDFS and ext2/3/4 filesystems. It is a very powerful environment and is under constant development and improvement by chenall, tinybit, yaya and many others. There is an active forum on reboot.pro here. By convention (not mandatory), grub4dos programs may have the file extension .g4e, grub4dos batch files may have the extension .g4b.
Tip: You can make Nov 2013 and later versions of grub4dos run these without needing to specify the file extension, by adding command –set-ext=.g4b;.g4e to a grub4dos menu.lst file.
# set default extensions for executables to .g4b (batch files) and .g4e (grub4dos executable files)
command --set-ext=.g4b;.g4e > nul
# set default path for executables as /bin
command --set-path=/bin > nul
If you have never used grub4dos before, I will give you a quick ‘How to’ introduction so you can make a working USB pen drive with which you can experiment.
IMPORTANT: Always use the latest RMPrepUSB version which will include a recent version of grub4dos or obtain the recommended grub4dos \grldr file.
I recommend that you always use the latest version of RMPrepUSB to install grub4dos rather than using grubinst or bootice for two reasons:
(1) Only (small) USB drives are listed by default, so you cannot accidentally damage your system or external USB hard disks,
(2) RMPrepUSB adds special modifications to the grub4dos boot code (using the latest version of grubinst.exe) which increase the chances of booting grub4dos on a wider variety of systems.
Note: The RMPrepUSB version of the grub4dos MBR code is not compatible with BootIce – so don’t attempt to tweak the defaults timeout,etc. using BootIce!
If you are having problems booting to grub4dos on some very old systems try FlashBoot to prepare your USB drive.
Click here for a complete set of RMPrepUSB and grub4dos YouTube video tutorials. Here are two…
REFERENCES
Documentation:
-
- grub4dos ReadMe.txt (old but useful user manual – data references ) – recommended!
-
New! grub4dos commands and primer (translated from Chinese) updated by me – recommended!
-
Chenall’s blog site (in Chinese)
-
-
grub manual (note: this is a grub manual and not grub4dos, but it is well written manual that might help you if you get stuck with the documentation for grub4dos)
Download sites:
-
-
Latest grub4dos downloads (GitHub source here)
-
(older) http://code.google.com/p/grub4dos-chenall/downloads/list – Chenall versions (‘Featured‘ = released, if it is not tagged as Featured then it has new features/fixes which may or may not go into the next ‘featured’ release)
-
http://code.google.com/p/grubutils/downloads/list – Chenall grubutils downloads – e.g. executable programs that run under grub4dos, such as hotkey or wenv
-
Reboot.pro:
This site:
- Tutorial 71 – Grub4dos utilities (Wenv, hotkey. bios, etc.)
-
Tutorial 60 – Grub4dos and Plop!
-
Lots of menu.lst example entries!
-
Sample background menus here.
-
Tutorial 57 – Automatic grub4dos menus, using hotkeys, hiding the menu and silent startup
Look here for advanced example menus and downloads including unifont to support UTF.8 characters, wallpapers, moving the menu, coloured text, etc.
Easy2Boot – USB Multiboot drive:
- Make a E2B drive – copy on all your ISOs and boot!
PART 1 – MAKE A BOOTABLE USB PEN DRIVE
- Download and install RMPrepUSB onto your Windows XP/Vista/Win7 system (always use latest Beta) . There is a portable version if you prefer this (though the full version adds no system drivers and is easy to completely uninstall should you want to).
Linux users can install grub4dos using BootIce. - Insert a USB Flash memory pen drive (or USB hard disk) into the USB port of your Windows computer and run RMPrepUSB – set the following options:
-
MAX size in MiB (1 MiB = 1024KB)
-
MEMTEST as a volume label
-
MS-DOS
-
FAT16 (or use FAT32 if you have >2GB USB drive) + Boot as HDD (2PTNS)
-
Leave the COPY FILES box unticked
-
Click Prepare Drive to format the USB pen (Note: you will lose all contents as it reformats the whole drive!)
-
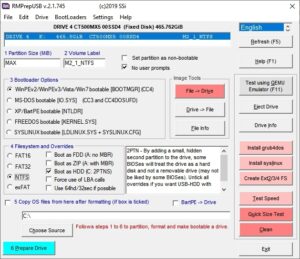
Note: If you are using a USB HDD, you may need to select Settings – List Large Drives >128GB.
3. Click on the Install grub4dos button – answer ‘Yes‘ to use the MBR option and hit Enter when prompted to copy the grldr file over – or use PBR option if you prefer. (‘No User Prompts’ must be unticked to get this option’).
You can use MBR or PBR or both with RMPrepUSB as it uses a special version of grubinst which works even when booting MS-DOS from grub4dos .
Make sure that the \grldr file has been copied across to the USB drive afterwards (you must hit the Enter key when requested – do not just quit the console window!).
Tip: Some systems give a ‘flashing cursor’ when they boot from grub4dos installed to the MBR. If you want your USB drive to boot from a wide variety of different systems, install grub4dos twice – once to the MBR and again to the PBR (‘No User Prompts’ must be unticked to get this option’)! For very old systems, you may need to format the USB drive using FlashBoot.
4. Now follow Tutorial #20 on how to add MemTest86+ to the USB drive you have just prepared (Memtest86+ is a good one to start with because it is quick to boot and ideal for testing the grub4dos menu with – or if you prefer, try Tutorial #37 to make a FreeDOS USB bootable pen drive).
Assuming you have added MemTest86+, you should now have a USB drive with the following 3 files on it (press F2 to check USB drive the contents):
- \grldr
- \menu.lst
- \memtest.img
Note that grub4dos consists of two parts as explained previously.
-
Part 1 is the boot code which does not actually exist as a file and so cannot be easily seen. It’s code can be located either in the Master Boot Record (first 31 sectors on a disk) or in the Partition Boot Record (first sectors at the start of a partition). This is written to the disk when you click on the ‘Install grub4dos’ button and grubinst.exe is run.
-
Part 2 is the main grub4dos code which is loaded by the Part 1 boot code. Part 2 is just the file grldr which should be located in the root of your bootable drive partition. This grldr file is copied from the RMPrepUSB application folder to the target drive when you click on the ‘Install grub4dos’ button and after grubinst.exe has run successfully. If you wish to use a different version of grub4dos, simply replace the grldr file on the USB boot drive with your different grldr file.
Once the the glrdr file loads into memory and runs, grub4dos will look for a menu file to parse and run (grldr includes a pre-boot configfile which then looks for a menu.lst file). The menu is in the form of a text file named menu.lst which is normally placed in the root of the drive. The search path that grub4dos uses to find a menu.lst file is:
- root / of the boot device, then /boot/grub folder, then /grub folder of boot device
- search all volumes except cd and floppies – same paths and in same order as above
The grldr file contains it’s own small pre-boot menu (512 bytes) which includes the commands to search for the menu.lst file. This embedded menu can be changed if you wish using BootIce.
If a menu.lst file is not found, grub4dos will display a grub> command prompt. You can type in most of the grub4dos commands at the grub4dos command prompt (such as help).
If a menu.lst file is found then the commands inside that file will be run.
Whatever device the /menu.lst file was found on, it will be set as the ‘root’ device and partition. So ls / or ls (bd)/ (bd=boot device) will always list the files on the root of the partition that contained the menu.lst that was found and loaded by grub4dos.
A menu file consists of two sections – all commands before the first title command are executed, in sequential order, as soon as the menu file is loaded.
When the first title command is found, any further lines are interpreted as menu entries (each menu entry starts with a title command word followed by one or more command lines).
Note: If your menu uses iftitle commands, all iftitle [xxxxx] lines are evaluated and any commands inside the […] brackets are executed, before the initial menu commands are run and the menu is displayed
When a user selects a menu entry and presses [Enter], the commands below the title command are executed by grub4dos until the next title command is found (or the end of file is found). When the next title command is found (or the end of file is reached) grub4dos will automatically issue a boot command and CPU control will be passed to whatever code was loaded by the previous menu instructions.
Note: The menu.lst file can be saved in ANSI format or UTF-8 format using Windows NotePad.
If saved in UTF-8 format, then non-ANSI characters can be used (e.g. chinese glyphs) but you must also load a font file such as unifont.hex.gz and the display must be in a graphics mode to display non-ANSI characters – e.g.:
graphicsmode -1 800

font /unifont.hex.gz

title reboot (重启)

reboot

title halt (关机)

halt
Here is a video on how to make a simple ANSI menu.lst menu file and it explains some of the command words that can be used in the menu.
Starts at 0:28
Tip: run RMPrepUSB and press F4 to create/edit a menu.lst file
Part 2 – Testing your USB pen drive
We now need to test your USB pen drive to see if it boots.
You can either reboot your computer (or use a different computer), change the BIOS boot menu order so that the BIOS will boot from the USB pen first and see what happens – OR – you can use an emulator like Qemu (this saves having to reboot your computer or unplug the USB drive and move it to another system) – simply press the F11 keyboard function key when running RMPrepUSB or click on the ‘Test using QEMU emulator‘ button in RMPrepUSB to run QEMU and see if your USB drive will boot!
Normally, Qemu does not allow BIOS sector writes (except to the MBR!) to the USB drive when it is mapped as a \\PhysicalDriveX on your computer (though no error will be reported as the drive is ‘snapshotted’ so that any writes are temporary only and cached) – i.e. any physical drive mapped by Qemu will be treated as a read-only device because Windows locks the volume and no physical writes to the volume will occur. For this reason, if you are emulating DOS USB drives using Qemu, you may find it does not work as expected when writing files to the USB drive under DOS and then rebooting again (once booted under Qemu) or even within grub4dos (e.g. the savedefault command does not actually save anything!). If, however, you use the latest version of RMPrepUSB, writes will work as expected! See also Tutorial 4 for how to boot from a USB drive in a VirtualBox VM (much faster than QEMU!).
Qemu may not always work as expected (it will be mentioned in the Tutorial if there is a known issue with any particular setup and QEMU), but booting from real computers should work as long as the USB drive is booted as a ‘hard-disk’/USB-HDD and not as a ‘USB-ZIP’ or ‘USB-FDD’ device!
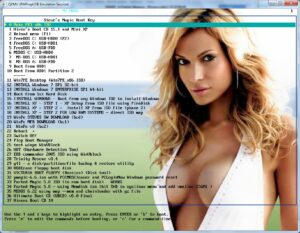
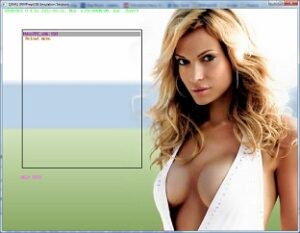
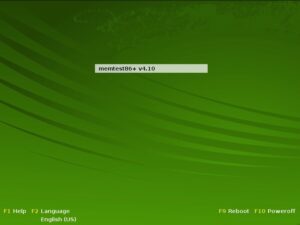
When you press F11 in RMPrepUSB to run QEMU, you will be asked if you want to create a virtual hard disk drive – answer 0, next you will be asked how much memory to allocate to QEMU – just click on OK. You should now see a BIOS boot screen window appear briefly and then a window like this:
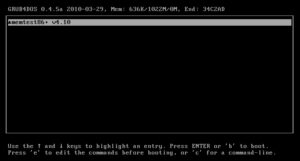
When you see this grub4dos menu – press the key and memtest86+ should start to run.
It is possible to spice up this menu and make it look better. Let us change the text and background colour, set a 200 second timeout, set a default menu choice if no key is pressed and add a background wallpaper using a .gz file by using these lines at the top of your menu.lst file (add it now and try it!):
#Normal text black with cyan background, Highlighted menu=yellow text with cyan background
#Help text=red with light=blue background, Heading is yellow text with white background
color black/cyan yellow/cyan red/light-blue yellow/white
timeout 200
default 0

# IMPORTANT: There must be no spaces at the end of the colour values (e.g. 0033FF) below or it will not take affect!
# The foreground and background commands must be AFTER the splashimage is loaded
# format: RRGGBB - e.g. FF0000 is bright red, 100000 is very light red, FFFFFF is pure white, 008000 is mid-green, C0C000 is red+green
foreground=0033FF
background=FF3300
Note: A line starting with # is a comment line – text which follows a # symbol (or pretty much any character!) will be ignored by grub4dos
Note: foreground and background commands will only work in old 16 colour graphicsmodes (e.g. graphicsmode -1 800 -1 4 or graphicsmode x – where x= 0, 1, 2, 4, 5, 7, 13, 14, 15, 16, 17, 18, 19 + some others). It is best to avoid these commands and use the color command instead – see below.
Note: The XPM format for splashimage is no longer supported by grub4dos.
Grub4dos ‘color’ values
The color statement has the format color NORMAL HIGHLIGHT HELPTEXT HEADING in pairs consisting of foreground text colour/background colour – valid colours are:
black, blue, green, cyan, red, magenta, brown, light-gray, dark-gray, light-blue, light-green, light-cyan, light-red, light-magenta, yellow and white.
- black 0
- blue 1
- brown 6
- cyan 3
- dark-gray 8
- green 2
- light-cyan 11
- light-blue 9
- light-green 10
- light-gray 7
- light-magenta 13
- light-red 12
- magenta 5
- red 4
- white 15
- yellow 14
Tip: A nice colour scheme can be made by using a light colour for the foreground and the same colour but darker for the background – e.g. light-cyan/cyan or light-green/green.
Note that using
color black/black
will result in no menu text or timeout or timer countdown text being displayed (black text on a black background)!
The ‘NORMAL’ colour setting also sets the console text colours too, unless you specify a ‘standard’ colour too.
With later versions of grub4dos (2012+) you can set individual colours if you are using a high resolution image (256 colours or more) as below:
splashimage /nice1024x768x24bit.bmp.gz

#0=black,1=blue, 2=green,3=cyan,4=red,5=magenta,6=brown,7=grey (add 8 for bright color - e.g. 15=white, 14=yellow, 13=pink,12=red,11=cyan,10=l.green, 9=bright blue, 8=grey)

#multiply by 16 to make the background blue (16x1), 32 to make the background green (16x2), 48 for bkgnd cyan (16x3), etc.

#set normal menu text color to bright red text (12 = 8+4), background to cyan (48) = 12 + 48 = 60

color normal=60

# or same as ...

color normal=0x3c

#set selected menu heading text to green

color highlight=02

#set helptext at bottom of menu to red

color helptext=04

#set menu heading colour to black

color heading=00

#set console text colour to white on black background (0x0F)

color standard=15

# or can use on one line as below

# color normal=60 highlight=02 helptext=04 heading=00 standard=0x0F border=0x00

#Another way to set colours is using hex values - a single hex digit for each colour - 0xbf where b=background=0-F and f=text foreground = 0-F

# colour background=blue (1), text=white (f) for normal menu text

color 0x1f

# normal = white text on blue, highlight = white text on green, helptext = grey text on red, heading = black text on light-magenta background

color 0x1f 0x2f 0x47 0xd0

# set console to light-red text on cyan background

color standard 0x3c

# note that if in graphics hi-res mode, the background colour for normal text and help text will be ignored and will be set to transparent.
the = sign can be omitted in the color command.
Flashing text
You can prefix most colours with ‘blink-‘ to make them flash. Note that blink only works in textmode (e.g. graphicsmode 3) and not in a non-text (hi-res) graphics mode. Also you cannot have light blinking background colours, e.g. color blue/blink-light-blue will report back a parsing error; color blink-light-blue/blue is OK and so is color blue/light-blue. Equally color 0x91 will set blinking blue text on a blue background (i.e. invisible!), whereas color 0x99 will set blinking light-blue text on a blue background.
color standard=blink-light-blue/green will work, but color standard=blink-light-blue/light-green will not work.
If you issue the command echo -h at the grub4dos command console, all the possible values from 0x00 to 0xff are listed in a table:
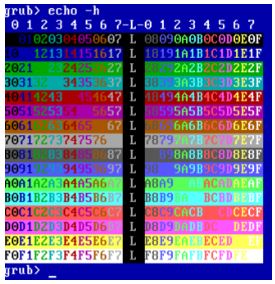
color 0x03 has a black background (0) and a bright green foreground (3).
color 0x5F has a pink background (5) and a white foreground (F)
You can also specify a colour pair as one or two RGB 3-byte hex value if in a hi-res VGA graphics mode (not text mode 3) instead of a foreground/background single byte value – e.g.
# 0x00-0xFF (a value of 0-255) is treated as a background/foreground color value pair

# numbers larger than 1 byte (0x100-0xFFFFFF) are treated as an RGB value and sets a black background

color standard=0x0000F4

echo This is red on a white background

color standard=0x0100F4

echo this is blue on a black background (same as 0x0000000100F4)

color standard 0xFF00000000FF

echo this is blue text on a green background

color border=0x9955cc

#sets a mauve menu border colour
Later versions of grub4dos (June 2013 and later) can also understand individual colour settings, e.g. color standard=blink-light-blue/black will set blinking (if in text mode) light blue text on a black background.
Valid colours are: black, blue, green, cyan, red, magenta, brown, light-gray, dark-gray, light-blue, light-green, light-cyan, light-red, light-magenta, yellow and white.
You can use a 64-bit value to set both the highlight background colour and the text colour:
# yellow 00FFFF00 + background will be 00222222 (v. dark grey/black)
color highlight=0x0022222200FFFF00

color standard=cyan/black – sets cyan text on a black background
color standard=0x00AAAA – sets cyan text on a black background (background always black/transparent)
color standard=0x03 – sets cyan text on a black background (0x13 would set cyan on blue background)
echo $[0003] Hello – prints cyan text on current background (0013 would set cyan on blue background)
echo $[0x03] Hello – prints cyan text on a black background (0x13 would set cyan on blue background)
Use $[] to set the colour back to it’s previous value – e.g. echo -e Hello $[0106]This is yellow$[] This is the same colour as ‘Hello’
When in graphics mode, background = black = transparent. Only the standard and highlight colours accept a background colour setting.
color highlight=0x22222200FFFF00 – sets background (0x222222) and text colour (0xFFFF00) using 0x00rrggbb00RRGGBB format.
color standard=0x0000FF00FFFFFF – sets console text to white text on blue background.
Grub4dos commands
Comment lines start with a # in my tutorials (actually for most grub4dos versions, any starting character except A-Z,a-z,0-9,/(%,white space and + are treated as a comment line character – but the ‘official’ character for a comment is #).
For commands that are above any menu title command (i.e. before a ‘title’ line), the commands must start on a new line with no space or other character in front of them.
For lines which follow after a ‘title’ line, white space and graphics characters are ignored unless they follow a command word – e.g. echo ## ##.
Nearly all grub4dos commands are (and must be) lower case (e.g. root (hd0,0) is OK, but Root (hd0,0) or root (HD0,0) will give an error). Grub4dos filenames are not usually CaSe SeNsItIvE, but to be on the safe side always use the same upper and lower case letters to match the files on the USB drive (ext2/3/4 grub4dos volumes will be case sensitive). It is also recommended to use 8.3 filenames if possible (i.e. not long filenames) as you may get problems when booting OS’s that do not cope well with long filenames such as MS-DOS or some ISO filesystems. Also be aware that files within a CD or ISO image may be uppercase when accessed by grub4dos, even if they appear as lowercase when viewed in Explorer.
Note that, like linux, grub4dos uses forward slashes for directory path separators(/) and does not use the backslash (\) character as used by Windows!
The \ character in grub4dos is used for literal characters, e.g. \n can be used as a carriage return character for adding help text on a title line but \\n would be treated and displayed as ‘\n’.
Long filenames that have spaces in them (e.g. A File Name with Spaces.txt) must be ‘escaped’ using a backslash character (\) before each space character like this:
ls /A\ File\ Name\ with\ Spaces.txt
If the file ‘A File with Spaces.txt’ exists, then the ls command (equivalent to a dir command) when run, produces the result…
/A\ File\ Name\ with\ Spaces.txt
PART 2 – SETTING A BACKGROUND IMAGE
Older versions of grub4dos required a 14-colour, 640×480 bitmap to be made, however, new versions (2011+) allow you to specify high-colour graphics modes and use high-resolution bitmaps.
If you just want to add a nice background, skip the next bit and jump to the ‘High Colour and High Resolution Backgrounds‘ section below.
NOTE: XPM format is not supported in later versions of grub4dos (2015+)
Low Resolution 14 colour 640×480 bitmaps
Note that the menu example above has a ‘splashimage‘ statement. For older versions of grub4dos this command can only use a 14 colour 640x480pixel image to use as a background image (if you do not change the graphicsmode and leave it set to the default mode).
For your 14-colour splashscreen image (if you have used a splashimage command), by default, the foreground colour (all of the menu text and the highlight for the currently selected option) will be white, and the background colour (the highlighted text within the currently selected option) will be black. This menu text will be laid over the background image.
You can change the splashimage menu text colours however with separate foreground= and background= commands, which is what the two ‘foreground’ ‘background’ lines do in the menu above.
The foreground=RRGGBB and background=RRGGBB commands only work on 14-colour 640×480 images. If you are using splashimage with higher resolution images (which is supported on 2012 versions of grub4dos), use the new color command (see above).
Make your own splashimage 14-colour background file
You can use 7Zip or Gzip to create a compressed 14 colour .bmp.gz file for your splashimage bitmap or you can use an uncompressed .xmp file instead.
There are 3 important things to know about grub4dos’s default splash image support.
-
The image needs to be in xpm format (it can be compressed to .gz format) – NOTE: XPM is not supported in later versions of grub4dos (2015+)
-
The image needs to be 640×480 in size.
-
The image must have only 14 colors or less.
You can find some pre-made 14 colour compressed 640×480 backgrounds in the Beta Downloads page. These files are nice and small and so won’t eat up space on your USB boot drive.
14-Colour SplashImage CONVERSION METHOD 1 (highly recommended for all Windows XP/Vista/7 users – just drag and drop to convert!)
First download and install ImageMagick-6.7.1-7-Q16-windows-dll.exe from http://www.imagemagick.org (main download page is here).
Next download the grub_consplash_xpmgz zip file from the Downloads – Beta – Tutorials page of this site.
Extract the grub_consplash_xpmgz.cmd file from the ZIP file and copy it to the same folder that you keep your bitmaps in.
Now simply drag and drop any 640×480 .bmp or .png file (can be any colour depth but must be 640×480) onto the grub_consplash_xpmgz.cmd icon and a new xpm.gz file of the same name will be quickly created which has just 14 colours in the same folder that the cmd file is located. The conversion is quite good and probably better than you could do manually using a bitmap editor tool!
Note: if the drag and drop does not work, then you probably have a different version of ImageMagick installed – in this case you will need to change the pathnames by editing the text in the grub_consplash_xpmgz.cmd file using Notepad.
Note: Splashimage also can load highly compressed .lzma files – for example:
1. Make a BlueLight.bmp file
2. download lzma.exe from https://code.google.com/p/grub4dos-chenall/downloads/detail?name=lzma.exe
3. Open command prompt
4. type
lzma.exe e BlueLight.bmp BlueLight.bmp.lzma
An lzma file is typically much smaller than a .gz file
SplashImage CONVERSION METHOD 2 (for XP – manual)
Note: The XPM format no longer supported by grub4dos!
First find your picture and change it to be 640×480 and 14 colours (use Windows XP MSPaint or your favourite app).
Next save it as a 16 colour .BMP file.
Now get bmp2xpm.exe from the Downloads page or click here and extract and run it. Find your .BMP file (File – Scan for bitmaps) and select it and click on Convert to create your XPM file. Then use 7Zip or Gzip to compress it as a .gz file – or just leave it as an XPM file.
SplashImage CONVERSION METHOD 3 (I could not get this to save in the correct format – maybe you will have more luck!)
Note: The XPM format is no longer supported by grub4dos.
You can also use Gimp to produce the .gz file. You can reduce the colours in Gimp by selecting Image, Mode, Indexed and entering 14 as the maximum colors (if it does not prompt you for the number of colours, select RGB and then select Indexed). Click Convert. Save this file as a XPM, then gzip it. Right-click the file and use 7zip – add to archive – choose .gz from the drop down list beside the name of the file. Under Windows 7, I had some trouble with this method and could not get it to work (maybe you can!).
High colour and high resolution backgrounds (recommended)
With the newer 2012 versions of grub4dos (included and used by RMPrepUSB), you can use 16-bit (256 colour) or 24-bit or 32-bit colour images with splashimage.
.bmp or compressed .bmp.gz images can be used, however, to set the text colours in this higher graphics mode, you can use the new color command syntax.
splashimage /nice1024x768x24bit.bmp.gz

#0=black,1=blue, 2=green,3=cyan,4=red,5=magenta,6=brown,7=grey (add 8 for bright color - e.g. 15=white, 9=bright blue)

#multiply by 16 to make the background blue (16x1=0x10), 32 to make the background green (16x2), 48 for bkgnd cyan (16x3), etc.

#set normal menu text color to bright red text (12 = 8+4 = 0x0c)

color normal=0x0c highlight=0x1e helptext=0x0D heading=0x0A standard=0x0b border=0x01
Note that the background colours for normal, heading, border and help text will be ignored as the background will always be set to transparent,
However, the highlighted menu and standard (console text) options both have valid background values as these will have an opaque background (or 0 = transparent).
You can also use 32-bit and 64-bit colour values if the display is in graphics mode – e.g. color normal=0xFF00FF.
The latest 0.4.6a version of grub4dos can also load standard .jpg images using the splashimage command (if it does not seem to work, load and re-save the .jpg file using Microsoft Paint to convert it to standard JPEG non-progressive 100% format).
Make a high resolution splashimage file
0.4.5c and later versions of grub4dos support bmp files and compressed .bmp.gz files in 640×480, 800×600 and 1024×768, 8, 16, 24 or 32 bit colour, later versions of 0.4.6a also support .jpg files.
Before using the splashimage command, you should always set the graphicsmode first.
1. Make your picture and save it as a .bmp file
2. (optional) compress the .bmp file using 7Zip to a GZip file (xxx.bmp.gz)
3. Add the file to your menu.lst entry together with the correct graphicsmode command (the graphicsmode command is optional, the splashimage command will automatically try to set the correct resolution if the image is a standard size such as 800×600, 1024×768, etc.) – e.g.
#for an 800 x 600 24 bit colour background, the range value 100:1000 is used in case of non-standard display heights (usually 600)
graphicsmode -1 800 100:1000 24
splashimage /nice800.bmp.gz
#for a 1024 x 768 32 bit colour background
graphicsmode -1 1024 100:1000 32
splashimage /nice1024.bmp.gz
#general command to pick highest mode available up to 1000 xres – recommended if you have a wide variety of systems
#pick highest resolution up to 1000×10000 and either 24-bit or 32-bit colour only
graphicsmode -1 100:1000 100:10000 24:32
splashimage /nice800.bmp.gz
You can use a bmp file or a .bmp.gz file format for the splashimage command (or .jpg for later 0.4.6c versions of grub4dos).
An example using an lzma compressed file and the individual color statements (see above for details about the color command syntax):
# set 640 xres in any mode
graphicsmode -1 640
# set font spacing when in terminal console mode
terminal --font-spacing=0:3
# set menu colors - white normal menu text, purple highlighted, green heading, white console text, black menu border
color normal=0x0f highlight=0x75 helptext=0x1D heading=0x0A standard=0x0F border=0x00
# display background image 640x480 14 colour
splashimage /bluenight.bmp.lzma
Changing the screen resolution with ‘graphicsmode’
You can have 800×600 splashimage backgrounds but you may need to switch the graphics mode to 800×600 using the graphicsmode -1 800 600 statement at the start of the menu before you use the splashimage statement. Note that using a higher display resolution will mean you can fit more menu items on the screen (1024×768 allows 48 lines in the menu’s first page, 800×600 allows 37 lines, 640×480 allows 30 lines in the menu first page) .
It is important to realise that not all systems can support high resolutions or all colour bit densities. For instance, most older netbooks are 800×600 and so would not support 1024×768. For this reason, if you want your bootable USB drive to work on a variety of systems, you will need to either use the lowest common denominator (e.g. 800×600) or check what graphics mode is supported and have a variety of different bitmaps of different resolutions available (see below for more about how to do this).
The graphicsmode command can be used in a menu.lst file to change BIOS screen resolution and colour resolution – e.g.
graphicsmode -1 100:1000 100:10000 24:32 – general command to pick highest mode available – recommended if you have a wide variety of systems
graphicsmode -1 640 480:800 – pick best mode (-1) with x-res of 640 and y-res of between 480 and 800 (pick highest available up to 800)
graphicsmode -1 640 480:800 24:32 – pick best mode (-1) with x-res of 640 and y-res of between 480 and 800 and colour depth between 24 and 32 bits per pixel
graphicsmode -1 1024 480:800 24:32 || graphicsmode -1 640 480:800 || graphicsmode -1 800 || graphicsmode -1 – try high xres, high colour depth in any mode, then any colour depth at 640×480 to 800, then mode for 800 xres – then any mode!
graphicsmode -1 -1 -1 24 – use the highest 24 bits per pixel colour mode available
graphicsmode 3 – use normal text mode
If you have some systems which do not support high resolution modes, you can use the best resolution with the correct image like this:
graphicsmode -1 640 100:1000 24:32 && set GM=640 && echo 640 xres supported
graphicsmode -1 800 100:1000 24:32 && set GM=800 && echo 800 xres supported
graphicsmode -1 1024 100:1000 24:32 && set GM=1024 && echo 1024 xres supported
pause --wait=1
if "%GM%"=="1024" splashimage /nice1024.bmp.gz
if "%GM%"=="800" splashimage /nice800.bmp.gz
if "%GM%"=="640" splashimage /back640.bmp.gz
The command vbeprobe will list all the modes available on your particular system…

So you can determine the highest mode available by checking for the text in the output of vbeprobe – e.g. add this to the top of your menu.lst
# allow vbeprobe command to output text
debug 1
# list all available BIOS modes
vbeprobe > (md)0x220+5
# turn off text output from future commands
debug off
# clear the display to keep it clean!
clear
# look for 640, 800 and 1024 modes and list them to the screen if found
cat --locate=", 640" (md)0x220+5 > nul && set GM=640 && echo 640 xres supported
cat --locate=", 800x600" (md)0x220+5 > nul && set GM=800 && echo 800x600 supported
cat --locate=", 1024x768x24" (md)0x220+5 > nul && set GM=1024 && echo 1024x768x24 supported
# wait 3 seconds so the user can see the modes supported by the BIOS
pause --wait=3

# now change to the highest resolution supported and load the matching bitmap
if "%GM%"=="1024" graphicsmode -1 1024 100:1000 24:32 && splashimage /nice1024.bmp.gz
if "%GM%"=="800" graphicsmode -1 800 100:1000 24:32 && splashimage /nice800.bmp.gz
if "%GM%"=="640" graphicsmode -1 640 100:1000 16:32 && splashimage /back.bmp.gz
# allow text output from any future commands so we can debug the menu items
debug 1
Note that you can check for just the x-resolution, or x and y-resolution or both x and y and color depth as well. You should modify the three green lines above as you wish.
For instance you can match on 800x600x24 or just 800×600 or just 800. You can add more lines and match on 800x600x16 and 800x600x32 as well if you like.
An example of a 1024×768 splashimage and large menu.
Changing the menu position and border
Note: Latest version of grub4dos 0.4.6a includes the setmenu command (see bottom of page), so menuset or menusetting.gz is not required. The following section is for interest only and I suggest you use the inbuilt setmenu grub4dos command.
You can change the menu position, border character (only if in 640×480 text mode) and menu height using the grubutils utility menuset which must be copied to your USB drive. Please see Tutorial #71 and the menuset command for details.
graphicsmode -1 1024 100:1000 24:32 && splashimage /nice1024.bmp.gz
color normal=0x06 highlight=0x75 helptext=0x1D heading=0x0A standard=0x0F border=0x00
# ul ur ll lr hor ver menul menuw menu1st menuhgt helprow
/menuset 0 0 0 0 0 0 10 50 5 29 35
This sets the menu left position to 10, menu width to 50, the first menu item at row 5, 29 items per menu and help text starting at row 35.
Setting color border=0x0c would give a bright red border around the outside of the text menu instead of a black border.
Note: If you have a border around the menu, it will be drawn outside of the menu text area. e.g. if menul=10 then the border will be in column 8 and an arrow pointer in column 9 followed by the menu text starting in column 10. The horizontal lines of the border are drawn 1 line above and below the top and bottom of the menu text area. Therefore you must allow for 2 columns extra on the left, and 1 column extra on the top, bottom and right hand side of the menu text area for the border line.
1024×768 menu with re-positioned black menu border and help text.
If you require no border around the menu, or require the menu to be past column 78 (over to the right of the screen) then menuset will not work correctly. In this case use the menusetting utility (click to download) as follows:
HI-RES 1024×768 MENU EXAMPLE
This requires the file menusetting.gz to be present on the root of the boot device…
Note: Latest version of grub4dos 0.4.6a includes the setmenu command (see bottom of page), so menusetting is not required.
clear
debug off
# autonumber menu entries 0x20 is space character after number, 01 = enable numbering
write --bytes=2 0x8274 0x2001
# set 1024x768 and load background (don't display 'Loading splashimage...' text by redirecting to nul)
graphicsmode -1 1024 768 24:32 && splashimage /nice1024.bmp.gz > nul
# set colours
color normal=0x06 highlight=0xe6 helptext=0x0D heading=0x0A standard=0x0b border=0x01
# Note: apart from highlighted, standard and heading text, any background colour is ignored as it will always be 'transparent'
# clear grub4dos header and put a heading above the menu box at position Y=08 X=84 of text colour 3 (cyan) and bright (1), background color is 0 and blink is 0
write (md)0x220+1 !BAT\necho -n -P:0000 $[0122] \necho -n -P:0884 $[0103] --- MY LITTLE MENU ---\0
initscript (md)0x220+1
# wordspacing and linespacing normally set to 0, borderwidth=0 for no border, 1 for thin border, etc.
# /menusetting.gz u will restore max menu grub4dos default
set wdspace=0
set lnspace=0
set topstart=10
set rstart=95
set noitems=10
set menuw=30
set bdwidth=1
set tophelp=23
/menusetting.gz u
# place a 10 entry menu at extreme right of 1024x768 splashimage bitmap, starting 10 lines down
/menusetting.gz %wdspace% %lnspace% %bdwidth% %tophelp% %noitems% %topstart% %menuw% %rstart%
Note that if the system does not support 1024×768 hi-colour modes, you will get very strange results! Test it out with QEMU first!
If bdwidth is not 0 then you must allow for the border (rstart=2 is minimum) (see above). If bdwidth=0 then rstart=0 is the minimum menu right column position.
Changing the text font
grub4dos has a built in command font. This can be used to load a GNU Unifont hex file, but a graphicsmode or splashimage command must be used to change the display because special fonts require a graphics display mode rather than a text mode.
graphicsmode -1 640:800
font /unifont.hex.gz
The unifont.hex.gz file can be downloaded from the Beta Downloads area here. It supports most of the entire unicode characters set which covers most languages and so i is quite large!
The font command
The font command without a parameter, loads the BIOS VGA ROM ASCII fonts for codes 0x20-0x7F.
You cannot load two fonts using consecutive commands, one after the other, e.g. this does not load the roman.hex.gz font:
font /sans.hex.gz
# next line does NOT work!
font /roman.hex.gz
Instead, you have to use the font command in between, to enable the loading of the second font…
font /sans.hex.gz
font
font /roman.hex.gz
Setting a default entry and numbering the menu entries
You can also set a default menu item that will be pre-selected and also set a timeout value in seconds.
Try these options as an experiment (the special 2048 byte default file needs to be on your drive and can be downloaded from the Beta downloads section).
Note: QEMU in RMPrepUSB v2.1.707 and later versions allows writes to the USB stick and so the default /default command will work OK under QEMU as long as you use RMPrepUSB to run QEMU.
grub4dos default commands:
default /xxxx.def – this command defines the name of the file that is to be used to store the default setting in or fetch the default setting from, on startup – the file can be any name but must be 2048 bytes in size – it is normally called just ‘default’.
savedefault – this command saves the current menu item to the default file – so if menu #2 has been selected and a savedefault command is used in that menu, then ‘2’ will be saved to the default file (xxxx.def).
;the special file ‘default’ (2048 bytes) must be in the same folder as menu.lst
;when grub4dos loads, the default menu item that was previously set and saved to this file is obtained from this file on first boot/reload
;this may not work under QEMU and most virtual machines – it should work when booted on a real system or a VM that allows write to the USB volume
default /default
;set a timeout of 10 seconds before the default menu item is actioned
timeout 10
;default 2
;this will always set the default to the third menu item, so uncomment it if you always want the 3rd item
#reset key map

setkey
#change key map for UK keyboard
setkey at doublequote
setkey doublequote at
setkey tilde bar
setkey numbersign backslash

title 0 reboot with savedefault
savedefault
reboot

title 1 reboot with savedefault
savedefault
reboot

title 2 reboot with 5 second wait for confirmation
savedefault --wait=5
reboot

title 3 reboot with 10 sec wait for confirmation
savedefault --wait=10
reboot

title 4 set default as 2 reboot
savedefault=2
reboot


Note that the user can press '3' to select the 'reboot with a 10 sec wait' menu item. If you have more than 10 entries, grub4dos will still work - e.g. if the user presses '1' and then '2', then menu item 12 will be selected. So you can have up to 100 numbered entries (0-99).
Latest Feb 2012 chenall builds (in latest RMPrepUSB) now support saving of the current menu item number or you can use a + or – offset – e.g.
savedefault +1 saves the default menu item as the next menu item, so that on reboot or reload of menu.lst the next menu item will be highlighted
savedefault -1 sets default to previous menu item
set /a CURDEF=*0x8276 & 0ff gets current menu item number as a variable CURDEF (not supported on some versions of grub4dos – latest is OK)
savedefault –wait=3 +1 sets default as next menu entry but needs Y confirmation from user within 3 seconds
savedefault fallback sets the default menu entry as whatever the fallback value is currently set to
fallback 1 sets the fallback entry to menu item 1 – if the current menu command fails/has errors, grub4dos will immediately run menu entry 1 – think of it as ‘fallback’ = ‘failover’.
The latest chenall builds of grub4dos (2012 – included in RMPrepUSB) allows you to autonumber menu entries by adding a write –bytes=2 0x8274 command, e.g.:
#autonumber boot entries with a hyphen after the number
#write --bytes=2 0x8274 0x2d01
#autonumber all entries including non-boot entries with a space after the number
#write --bytes=2 0x8274 0x20ff
#autonumber boot entries with a space after the number
write --bytes=2 0x8274 0x2001

title
configfile (bd)/menu.lst

title this will be numbered 1
some command here
some command here

title --- menu heading is not numbered ---
root

title this will be numbered 2
some command here
some command here
The user can also use hotkeys (e.g. F1, F2, etc.) to select a menu item and run it (if using a 2012 chenall build of grub4dos as used by RMPrepUSB) – see Tutorial #57 for details on how to add this function to your menu.
Adding your own menu heading
Maybe you do not want the grub4dos version number text and the grub4dos title at the top of the menu?
Would you rather have your own title there? If so, try this at the top of your menu.lst file:
color black/cyan yellow/gray
echo -P:0017 $[0026]PLEASE WAIT
pause --wait=1
write (md)0x220+1 !BAT\necho -n -P:0000 $[0133] --- STEVE'S MENU --- \0
initscript (md)0x220+1
Note: lines 1, 2 and 3 are only for demonstration and can be omitted in your final menu.
As mentioned previously, grub4dos commands are case sensitive. The keyword Title or TITLE will not work, it must be title. The same rule applies for other keywords like map and root, etc. Also the first command word must be at the very start of each line with no space or tab before it.
The lines in the example are explained below:
Line 1 – the color command sets the text and background colours for the menu text and highlighted menu text (note American spelling of ‘color’ and ‘gray’)
Line 2 – the echo command is supported by later versions of grldr v0.4.5b (as used in RMPrepUSB v2.1.617 and later)
Line 3 – the pause command will wait for a key press, if –wait is used it will only pause for the number of seconds specified or until a key is pressed (Use the debug -1 command to suppress the seconds countdown if you prefer).
Line 4 – this line writes a grub4dos batch script to ram (md). Grub4dos batch scripts must start with the text !BAT. The text ends with a 0 byte to show the end of the script code.
The syntax used for a device (md)0x220+1 means device=memory, address = sector 220 hex = byte position 272Kb in memory, first sector (first 512 bytes)
Line 5 – this line runs the script from the ramdrive that we have just written in line 4
Note: The echo command is only supported in later versions of grub4dos – to test if the echo command works, just type ‘c’ to get to the grub4dos command console and then type ‘echo fred’ in the grub4dos command shell. If it displays ‘fred’ then the command is supported.
Using the echo command
The syntax of echo is:
echo -n -e -P:YYXX $[ABCD] \n\nhere lies your message
where -n is optional and means ‘do not throw a carriage return at the end of the message’. -e means translate escape characters such as \n.
-P:YYXX Position – moves the cursor to the specified row YY and column XX – e.g. -P:0003 is the top row of the screen (00) in the 4th column (03). Must be at start of the string and must be followed by a SPACE character.
$[ABCD] Color – specifies the text colour where A=0/1 (where 1 is blinking text if in text mode or bright background if in graphics mode), B=0/1(where 1 is bright text), C=0-7 background colour, D=0-7 text colour. (Blinking text does not work under QEMU or VMs as blinking is done by the graphics hardware and not by software).
Colours for the C and D parameters are: 0=black/grey 1=dark blue, 2=green, 3=aqua, 4=dark red, 5=pink, 6=yellow/brown, 7=grey/white. Setting B (the second number) to 1 will brighten the text colour.
$[0133] is non-blinking bright aqua text on a dark aqua background in text mode, but in graphics mode the background will be unchanged.
You cannot set a black background using $[AB0D] in graphics mode (e.g. if using splashimage) – it will print with whatever the current background colour is if C=0 – e.g. echo $[0104] will print bright-red text without changing the background colour. More examples if in graphics mode…
red text on White $[0xf4] or $[1074]
red text on yellow $[0xe4] or $[1064]
red text on black $[0x0c] red text on current background $[0104]
dark red on white $[0xf4] dark red text on current background $[0004]
green text on black $[0x0a] green on current background $[0102]
yellow text on black $[0x0e] yellow on current background $[0106]
red text on white background if in graphics mode $[1074]
Use $[] to set the colour back to it’s previous value – e.g. echo -e Hello $[0106]This is yellow$[] This is the same colour as ‘Hello’
You can also set a 24-bit foreground (FG) and 24-bit background colour (BG) using echo [0xBG00FG] (if in hi-res graphics mode) where BG00FG is a 64-bit number in format 0x00RRGGBB00rrggbb – the value must be greater than 0xFF.
echo $[0x00FF00FF00775500]Test
alternatively you can set a background/foreground combination using a single hex byte value – $[0x2F] – for a blue background (2) and white text. (F).
You can also specify escape characters using -e to print any character – for example:
echo -e =

echo -e \x3d (note: there is no 0 preceding the x)

echo -e \075

echo $[]=
all print one equals sign…
=
\075 is octal for the value 61 which is the ASCII code for the = sign. 0x3d is the hexadecimal value 61.
echo -e special sequences are:
\\ backslash
\a bell
\n new line
\r carriage return
\t horizontal tab
and you can print leading spaces, slashes and the % character like this
set a=8086
echo -e \x20 PCI\\VEN%a% \%age
which prints:
PCI\VEN8086 %age
To print a unicode character use \Xnnnn instead of \xnn, e.g. echo -e \X00dc here is a capital U with an umlaut (0.4.6a after March 2016).
UTF-8 characters can be printed using echo -e \xe0\xae\xae for ம
echo -e \r\nThis is on a new line
prints This is on a new line where is a carriage return and is a line feed or cursor down.
echo -e -n this is a line\r\n\32\00
will echo this is a line followed by four bytes of value (in hex) 0A 0D 1A 00. The value 1A is CTRL-Z and is used as an end-of-file marker when reading a text file by most filesystems. The \00 at the end is not needed unless you need to write a 0 value as grub4dos will write a 0 to mark the end of the string anyway. Any characters following a \00 value will not be printed, as 0 is used as an ‘end-of-string’ byte by grub4dos.
This next example defines a variable that contains the text %F_%H%M which would otherwise be hard to output:
# set a to %F_%H%M
set a=\x25\x46\x5f\x25\x48\x25\x4d
echo -e %a%
set a=\x25F_\x25H\x25M
echo -e %a%
# or use single quotes
set a='%'F_'%'H'%'M
echo -e %a%
If you want to pass this to a kernel command line, then use single quotes as using backslash sequences don’t work!:
# set a to %F_%H%M
set a="$(date +'%'F_'%'H'%'M).log"
kernel %a%
You can write coloured text to more than one position by writing a script which contains more than one echo line as below:
# $[ABCD] Color - specifies the text colour where A=0/1 (where 1 is blinking text), B=0/1(where 1 is bright text), C=0-7 background colour, D=0-7 text colour
# Colours for the $[] parameters are: 0=black/grey 1=dark blue, 2=green, 3=aqua, 4=dark red, 5=pink, 6=yellow/brown, 7=grey/white.
write (md)0x220+1 !BAT\necho -n -P:0000 $[0113] --- MY MENU --- \necho -n -P:2301 READ THIS\0
initscript (md)0x220+1
$[0113] writes — MY MENU — in bright cyan text on a dark blue background, whilst ‘READ THIS’ appears at the bottom left of the grub4dos menu (white text on a black background).
MENU.LST example
(note the help text, which is displayed at the bottom of the menu, is specified in the title line by using \n after the menu text entry)
Adding debug 0 to your menu will suppress the menu item number that is displayed at the top-right hand corner of the screen if you use the latest June 2011+ versions of grldr.
debug 0
color black/cyan yellow/cyan
write (md)0x220+1 !BAT\necho -n -P:0000 $[0133] --- MY MENU --- \necho -n -P:2300 READ THIS\0
initscript (md)0x220+1

title 0 Shutdown\nThis will switch off the system
echo $[0173] Shutting down in 2 seconds
pause --wait=2
halt

title 1 Reboot\nThis will reboot the system
echo $[0173] Rebooting in 2 seconds
pause --wait=2
reboot
More about menu entries and numbering
If you want your menu to have a gap in the menu entries to group the items, you can use:
title
root
to create a blank line in the menu.
Using the cursor UP and DOWN keys will cause these menu items to be skipped over. If however you use the cursor LEFT and RIGHT keys, the menu items will not be skipped and you can select any of them.
If in a text mode, you can also create a box within the menu using special graphics characters in your menu.lst file, like this (cut and paste this into Notepad):
title PLoP Boot Manager\n
find --set-root /HBCD/plpbt.bin
kernel /HBCD/plpbt.bin

title ÚÄÄÄÄÄÄÄÄÄÄÄÄÄÄÄÄÄÄÄÄÄÄÄÄÄÄÄÄÄÄÄÄÄÄÄÄÄÄÄÄÄÄÄÄÄÄÄÄÄÄ¿
root

title ³ Boot from Hard Drive - Windows XP (NTLDR) ³\n
find --set-root --ignore-floppies --ignore-cd /ntldr
map () (hd0)
map (hd0) ()
map --rehook
find --set-root --ignore-floppies --ignore-cd /ntldr
chainloader /ntldr

title ³ Boot from Hard Drive - Windows Vista/7 (BOOTMGR) ³\n
find --set-root --ignore-floppies --ignore-cd /bootmgr
map () (hd0)
map (hd0) ()
map --rehook
find --set-root --ignore-floppies --ignore-cd /bootmgr
chainloader /bootmgr

title ÀÄÄÄÄÄÄÄÄÄÄÄÄÄÄÄÄÄÄÄÄÄÄÄÄÄÄÄÄÄÄÄÄÄÄÄÄÄÄÄÄÄÄÄÄÄÄÄÄÄÄÙ
root

title More...
root
Note that ending the title with just \n is used at the end of some lines just to get rid of the edit help text which grub4dos normally displays at the bottom of the menu.
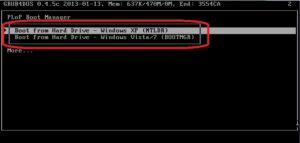
The circled text shows the result when using the special graphics characters.
Note how More… can be used to move the menu list down by a whole page
if you have more menu entries after it and it is the last menu entry at the bottom of the menu.
Another tip is to write the last menu entry like this:
title ...Back
root
This prompts the user to move to the end of the menu to get back to the first menu item.
Yet another tip: If you find that you are constantly editing the menu.lst file and then rebooting to check the colours and text positions on the menu, there is an easier way to test your menus! Make the first menu entry (entry 0) reload the menu.lst file and set the default to 0 and timeout to 3, so that it is automatically reloaded every 3 seconds. Then all you need do is edit and save the menu.lst file and it will automatically be reloaded and displayed every 3 seconds (this is very easy if using an emulator like QEMU and you have the menu.lst on the USB drive open in Notepad!). You can also test out different splashimages – just overwrite the bmp file with a newer version whilst emulating under QEMU.
default 0
timeout 3
splashimage /mynewimg.bmp.gz

title Reload menu.lst
configfile (bd)/menu.lst

#title your other entries here .....
If you want to try this using QEMU in RMPrepUSB, you must use SHIFT+CTRL+F11 to run QEMU in write-protect mode, otherwise Windows will not be able to write to the USB drive as using just F11 dismounts the USB drive from Windows.
Numbering menu entries
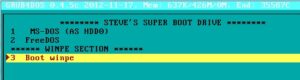
Here is a menu which is numbered…
#add debug 0 to suppress the menu number at top right of screen
debug 0
#default will be WinPE Boot = 4 (as menu entries are counted from 0 for the default number)
default 4

title ******** STEVE'S SUPER BOOT DRIVE ********\nPlease user the cursor keys or type a number to select a menu item
root ()

title 1 MS-DOS (AS HDD0)\nBoot to MS-DOS
rootnoverify (hd0,0)
chainloader (hd0,0)/io.sys

title 2 FreeDOS \nBoot to FreeDOS
find --set-root /kernel.sys
chainloader /kernel.sys

title ****** WINPE SECTION ******\n
root()

title 3 Boot winpe
chainloader /bootmgr
then if the user presses the ‘3’ key, they will will get the 5th menu entry (the Boot winpe entry).
If you were to change the No. 1 an entry to
title 9 MS-DOS (AS HDD0)\nBoot to MS-DOS
then if the user presses 9 then that first entry will be selected because grub4dos sees that it has been numbered by you as 9.
Recent versions of RMPrepUSB/grub4dos include these new improved menu numbering features. You can number your entries consecutively starting from 0 or if you have a blank entry for the first menu title start from 1 (1,2,3,4,etc.), and you can have lots of menu separators or blank titles and the user can still press ‘9’ (for instance) and get the menu item numbered ‘9’ even if it is the 13th menu item (as long as the title line starts with the number 9). Note that if you do not want the user to see a menu item 0, you must still have a first menu entry (entry 0) even if it is just a heading or a blank space (title + root) before you have a menu 1 entry.
If you are having trouble getting the numbered menu items to work and have more than 10 entries, just remember to number the first five or so menus and make sure that you have a menu item (which will be menu item 0) before menu item 1 . Menu item 0 can be a heading or a numbered (0) or un-numbered menu item, but menu item 0 must exist for the menu system to work properly when the user types the numeric keys.
Also, make sure the first numbered menu items are present (for example if you have 23 menu items, then menu items 0,1 and 2 must be present and numbered). If you want to have menu items numbered non-consecutively (for some strange reason!) – say numbered as 1,2,3,10,11,12,20,21,23 – then you must have 24 menu entries in total, so use blank entries at the end of the file to make up the total number of entries to 24 – e.g. use lots of these lines at the end of the menu.lst if you have missing menu numbers in your menu.lst file.
title \n
root ()

title \n
root ()

title \n
root ()

etc.
Menu entries can also be auto-numbered. This is useful is using iftitle entries (see below) or if you want to add extra menu entries in the middle of your menu.
Suppress grub4dos startup/bootup messages (silent)
grub4dos echoes some debug messages to the screen on startup, which you may not want the user to see. They can be patched out by using a grub4dos batch file.
At the start of your menu.lst, run the patchg4d.g4b batch file – it will automatically make the patches to blank out the messages – see here for more details.
It only needs to be run once (on a real system, not QEMU unless USB writes are working) for the patch to take affect.
e.g.
# patch out messages for silent startup
/patchg4d.g4b
To just have a background bitmap displayed,. but no menu text, see here.
Password protection
You can also add passwords to the menu. Adding a password before the first title entry will stop users from being able to edit the menu (when booting from the USB drive) or entering the grub4dos command shell unless they type ‘p’ and then enter the correct password. Adding a password under each title entry will prompt the user for that password when that particular menu item is run. You can also encrypt your password. For example:
# the password is steve - type p and then the password to enable grub4dos menu editing - note there are two hyphens in front of md5 - i.e. --md5

password --md5 $1$5$dd0FhBSySgRc8priEU3Dg1

title Test password is admin1 (not encrypted)
password admin1
geometry (hd0,0)

title Test Password is admin, MD5 encrypted
password --md5 $1$6$ftCQWsyP7jK5sUt/JMHMi/
geometry (hd0,0)
Note that adding a password line above the first title line also has the affect of suppressing the default grub4dos menu help text at the bottom of the screen for all menu entries. Instead a slightly different one is used which adds the text ‘Press P to gain privilege control’.
You can download the md5crypt program from here to generate your MD5 hash code for your password – run it from the Windows command shell and then cut and paste the ‘password –md5 xxxxxxxxxxxx’ line into your menu.lst file. You can also generate an MD5 hash code from the grub4dos command shell using the command md5crypt, but you will have to manually type the hash code into your menu file as you cannot cut and paste it from the grub4dos shell window!
md5crypt chooses a different salt each time it is run. The salt used follows the $1$ prefix and is separated by another $ sign. You can generate md5 hashes online here (just use any salt you like).
Secret menus
grub4dos has a hiddenmenu command.
It can take several parameters
–silent – do not show the timeout countdown or the menu
–off – show the countdown and menu
–chkpass – check for the ESC key and if hit prompt for a password,
or
–chkpass=0xssss – check for scancode ssss where ssss is the hex scan code for a key and prompt for a password
The menu below gives the user 3 seconds to press the ESC key (no timeout is displayed, the screen is just blank for 3 seconds). If ESC is not pressed, then the submenu.lst will be loaded and displayed. If a key is pressed then the timeout will stop and the main menu (menu.lst) will be shown to the user.
MENU.LST
timeout 3
hiddenmenu --silent

title Goto the public menu
configfile /submenu.lst

title Hidden menu 1
root ()

title Hidden menu 2
root ()
You can also require the user to enter a password (after hitting F10) in order to get to the secret hidden main menu.lst as shown in the example below:
MENU.LST
write (md)0x220+1 !BAT\necho -n -P:0000 $[0133] --- HIDDEN MAIN MENU --- \0
initscript (md)0x220+1
timeout 3
password rm

# hit F10 and enter password to remain on this menu
hiddenmenu --chkpass=0x4400

title Goto the public menu
configfile /submenu.lst

title Hidden menu 1
root ()

title Hidden menu 2
root ()
SUBMENU.LST
write (md)0x220+1 !BAT\necho -n -P:0000 $[0133] --- PUBLIC MENU --- \0
initscript (md)0x220+1
##hiddenmenu --off
default 1

title Goto Hidden menu.lst\nPress F10 and enter the password!
configfile /menu.lst

title Public menu 2
root ()

title more public stuff
root ()
To determine what scan code you need for the any particular key combination, press c whilst in the grub4dos menu to get to the grub4dos command prompt, and then type
debug 1

# soak a key if in BIOS keyboard buffer

call Fn.20 ;; if not %@retval%==-1 call Fn.19

pause --test-key
and then type the key combination (or single key) that you want, e.g. F11=8500, F10=0x4400, CTRL+G=2207 (you can use a single key press, or a key plus one of SHIFT, ALT or CTRL).
It is best to avoid F11, F12 and some of the other keys like Pause/Break, Prt Scr, Insert, Delete and keys from the Numeric Keypad as these may not work if you boot from a notebook.
Many notebooks do not even generate BIOS scan codes for these keys!
To have a single menu which contains some hidden entries that you can only see by pressing F10, use a menu.lst like the one shown below:
# suppress messages
debug off

# autonumber bootable entries with a space after the number
write --bytes=2 0x8274 0x2001

if "%HIDE%"=="" write (md)0x220+1 !BAT\necho -n -P:0000 $[0133] --- HIDDEN MENU --- \0
if "%HIDE%"=="" initscript (md)0x220+1
if "%HIDE%"=="" timeout 3
if "%HIDE%"=="" password rm

# hit F10 and enter password to remain on this menu
if "%HIDE%"=="" hiddenmenu --chkpass=0x4400
if "%HIDE%"=="1" write (md)0x220+1 !BAT\necho -n -P:0000 $[0133] --- PUBLIC MENU --- \0
if "%HIDE%"=="1" initscript (md)0x220+1
if "%HIDE%"=="1" timeout 10

# install the hotkey utility so we can use hotkeys to select a menu entry
if "%HIDE%"=="1" /hotkey

iftitle [if "%HIDE%"==""] Goto the public menu - do not press any key
set HIDE=1
configfile /menu.lst

iftitle [if "%HIDE%"==""] Hidden menu 1
root ()

iftitle [if "%HIDE%"==""] Hidden menu 2
root ()

title ordinary menu
root ()

iftitle [if exist (bd)/xxx.iso] Load xxx.iso if it exists
etc.
# this entry will appear on the public menu and can be used to reload the menu and give you a chance to enter the password
# you can omit the menu title text if you don’t want any menu entry to be visible to the end user – e.g.
# title ^F10
title ^F10 Reload menu\nReload this menu
set HIDE=
configfile /menu.lst
To get from the PUBLIC menu to the HIDDEN menu, press F10 to auto-run the ‘Reload menu’ entry and then press F10 again within 3 seconds and enter the password (rm).
You will need to add the hotkey utility to the root of your USB drive which can be downloaded from here.
Note: To obscure the text in the menu.lst file, compress it using 7Zip to the Gzip format (but keep the filename as menu.lst)
PART 3 – ADDING A GRAPHICAL MENU USING GFXBOOT/GFXMENU
Note: Splashimage will now support high resolution full colour images and the new graphicsmode and color commands in grub4dos means you can have 1024×768 32 bit colour backgrounds if you want – without needing to use GFXBoot at all.
So before you go to the bother of reading this section, unless you really, really want to use GFXBoot, you should skip this section. Although GFXBoot is good for providing attractive high resolution and high colour backgrounds, the menu features are limited and are not as flexible as the grub4dos menu system.
Using GfxMenu
Note: It is better to get your grub4dos menu fully working before you attempt a pretty GFXMenu as the GFXMenu system is somewhat ‘fragile‘!
We can add an 800×600 wallpaper using the add-on GFXMenu component.
- Download the file GFXboot.zip from the Beta section and unpack it to a folder on your hard disk (say C:\GFXMenu)
- Double-click on the file repack.cmd – you should now see a file called message has been created
- Copy the file message to your USB pen drive
- Now add the single line
- gfxmenu /message
- to the top of your menu.lst file.
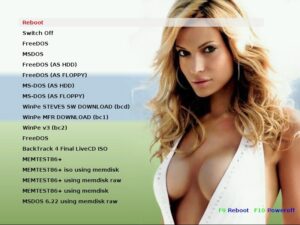
- Now try it by booting from it or using Qemu Manager or selecting it in RMPrepUSB and pressing F11 to run QEMU – you should see this:
Pressing F1 will produce some help (mainly for linux users), F2 will allow you to change language but only English is available in the files I have provided.
Pressing F9 will reboot the system and F10 should switch off the system.
If the user presses ‘1’ then the first menu item will be selected (note: this is different from the grub4dos numbering!), if there were more menu entries then they could press ‘2’ for the second entry, etc. If they press [ESC] then they will be asked if they want the old grub4dos style text menu and it will display the black and white menu as in the first screenshot above (or coloured if you used the color or foreground/background commands).
More info on GFXmenu can be found here.
This green background is a bit boring though and we don’t really want the F1 and F2 prompts. This is how to change it and have your own picture:
Go to the folder where you downloaded the GFXmenu files (e.g. C:\GFXmenu) and find the \files folder. There are two files in here we can change, back.jpg and gfxboot.cfg.
Find a jpg file that you want for the background. It should be 800 x 600 and 16-bit (65K) colours (though you can use a different resolution by editing gfxboot.cfg but I suggest you stick with 800 x 600 16-bit for your first attempt). Simply replace the file back.jpg with your one. It MUST be called back.jpg.
IMPORTANT: Note that you must replace the current back.jpg file – do not add any more files or jpgs to this folder or rename the old back.jpg file and leave it there – if you do then gfxmenu may not work!
Tip: if you have Windows 7 you can search for suitable jpg files in the Explorer search box using type:jpg width:800.
I recommend you do not edit the jpg using PhotoShop as PhotoShop seems to produce incompatible jpg files and you may just get a black background. If you have used PhotShop to edit the picture – load it using MSPaint or IrfanView and then use Save as.. to save it again.
Now to change the menu colours, menu text position and remove the F1 and F2 panel:
Using Notepad or any other text editor, and edit the file files\gfxboot.cfg and uncomment (remove the starting # character) the following entries and change them as below:
menu_start_x=50
menu_start_y=50
hide_help=1
hide_lang=1
Save the file and double-click on the repack.cmd file.
Copy the new message file that it has just created (check the date/time is correct) to your USB drive and overwrite the old one
Now go test it!
You should see that you now have your own wallpaper…
An example of a GFXMenu high quality background (click for a larger picture)
You may find however that the text of your menu items don’t show up very well against your new wallpaper if they are a similar colour to the background. In this case you can change the colour of the menu text using these 3 lines in the files/gfxboot.cfg file (the lines starting with a # below are just comments and can be omitted as they will be ignored anyway):
#Normal text color, use RGB value such as 0xffffff.
menu_text_normal=0xff0000
#Color of selected text
menu_text_select=0x00ff00
#background bar color of selected menu text
menu_bar_color=0xeeeeee
The colours are specified in hexadecimal and are in three groups of two hexadecimal numbers – 0xrrggbb – 0x means that we are specifying a hex number, then we have rrggbb (the first two numbers specify the red brightness, the second the green brightness and the third the blue brightness). Hexadecimal numbers can thus range from 00 (which means 0 in decimal and thus off) to ff (which means 256 in decimal and thus maximum brightness) – here are some colours and their hexadecimal equivalents:
white = 0xffffff (red+green+blue at max intensity)
black = 0x000000 (all off - no colour at all = black)
red = 0xff0000 (red at maximum + green off + blue off = red)
green = 0x00ff00
blue = 0x0000ff
grey = 0xcccccc
chocolate = 0x993300
for a colour chart and more values, see here.
For a ‘transparent’ highlight menu selection bar use menu_bar_color=0x000000 and menu_text_select=0xffffff.
To set a 24-bit colour for the background use a 64-bit number – e.g.
# yellow 00FFFF00 + background will be 00222222 (v. dark grey/black)
color highlight=0x0022222200FFFF00
Tip: You may have noticed that any error will make grub4dos go back to its default menu list when using a GFXMenu. If you want it to always display the GFXMenu (even after an error), you can use the default and timeout commands which don’t work in the GFXMenu anyway. Use the following lines at the top of the menu.lst file.
gfxmenu /message
timeout 1
default 0

title Graphical Menu (press ESC - Enter - then ESC quickly for grub4dos text menu)\nDisplay graphical menu automatically
configfile (bd)/menu.lst
This will always display the GFXMenu unless you press ESC – then Enter when prompted and then quickly press ESC (or cursor key) to stop the 1 second timeout and stay in the grub4dos menu. Alternatively, omit the title line (but not the other 4 lines of text) and the grub4dos text-based menu will never be displayed – it will always load the GFXMenu, even after an error.
PART 4 – UNDERSTANDING GRUB4DOS COMMANDS
Now you can try some of the other tutorials on this website and add an extra menu entry into your menu.lst. I would suggest you look at the Ylmf tutorial #17 2nd part – you can add the Ylmf ISO file, and then create the casper-rw file using RMPrepUSB v2.1.605 or later (i.e. follow steps 1, 2 and 5 only). Just pick any tutorial that takes your fancy and add the menu entries into your existing menu.lst file.
For the standard grub4dos menu, you can change the colours, add a timeout, a default choice after the timeout expires (must have the special file ‘default’ on your drive from the grug4dos package), save the default choice, load a different menu list, set passwords for different menu entries, have a background splash screen, add help text to each menu option (by using \n in the title), include or suppress menu editing and command shell entry. See the reference section at the top of this page.
Note that some of these options are not available when using the GFXMenu menu system – i.e. timeout, passwords, help text, menu editing and command shell entry. I suggest that once you have your GFXMenu background working, you comment out the line for it in your menu.lst so you can more easily debug using the standard grub4dos menu features, and then uncomment it when you have finished.
The instructions above should allow you to make a nice user menu, but what do the commands in the menu.lst file actually do? Lets look at what we have, now that you have added Ylmf to the USB drive:
title memtest86+ v4.10
find --set-root /memtest.img
map /memtest.img (fd0)
map --hook
chainloader (fd0)+1
rootnoverify (fd0)
map --floppies=1

title Boot YlmF (Windows Like OS) Non-Persistent\nBoot YlmF from an ISO
find --set-root /Ylmf_OS_3.0.iso
map /Ylmf_OS_3.0.iso (0xff)
map --hook
root (0xff)
kernel /casper/vmlinuz file=/cdrom/preseed/ubuntu.seed boot=casper iso-scan/filename=/ylmf_OS_3.0.iso floppy.allowed_drive_mask=0 splash
initrd /casper/initrd.img

title Boot YlmF (Windows Like OS) Persistent\nBoot YlmF from an ISO and keep any changes in a persistent filesystem
find --set-root /YlmF_OS_3.0.iso
map /YlmF_OS_3.0.iso (0xff)
map --hook
root (0xff)
kernel /casper/vmlinuz file=/cdrom/preseed/ubuntu.seed boot=casper persistent iso-scan/filename=/YlmF_OS_3.0.iso floppy.allowed_drive_mask=0 splash
initrd /casper/initrd.img
What do these commands mean? A detailed explanation of most commands can be found here but here is a quick ‘essentials’ guide.
The first line in each section begins with title xxxxx, and is fairly obvious! It is the text that is presented to the user as a menu item. If you have \n in the title then any text after the \n will appear as the help text at the bottom of the menu list (but not if you have GFXMenu running). You can have more than one \n to make multiple help text lines.
The second line in all these examples is a find –set-root command. This command tells grub4dos to search each drive volume and look for the file specified in the path specified on all devices in the order: all hard disks – all CDs/DVDs and then all floppies – see here for an explanation. Note that this command can cause problems if you happen to have the file it is looking for on both your hard disk and your USB pen. It is often better to create a file with a unique name (e.g. ABC98732JKL.TAG) on your USB drive and use find –set-root /ABC98732JKL.TAG – that way grub4dos won’t find the wrong file! When grub4dos finds the file, it sets the current search path to that path – for instance if you had
find –set-root=/public /public/benji/ABC.TAG
it would set the current drive to the drive where it first found that file – all future references could use / to reference the folder /public. Using the –set-root command is useful because some PCs will boot from a USB pen drive as a hard disk and some will boot to the same pen drive as a floppy – so if you tried to load the file from (fd0)/memtest.img on a system that mapped the USB pen to a hard disk drive (i.e. hd0,0) then it would not find it.
find –set-root –devices=h /bootmgr would find a hard disk partition containing /bootmgr and set that partition as the root drive. Possible devices are u,p,n,h,f,c.
find > /myfile.log – list all drives and put result into the file myfile.log (myfile.log must already exist and be large enough to hold the output – this may not work under QEMU but should work using the latest version of RMPrepUSB v2.1.707 or later).
Note that you can specify the devices to search or the devices to ignore as follows:
#ignore floppy and cds when searching for the file
find --set-root --ignore-floppies --ignore-cd /Ylmf_os_3.0.iso

#search only on floppy drives and hard drives
find --set-root --devices=fh /Ylmf_os_3.0.iso

#search floppy, cd, pxe and harddrives
find --set-root --devices=fpch /Ylmf_os_3.0.iso
If no floppy drive or cd drive is present, then using the –devices switch to force grub4dos to search those devices may cause long timeouts of several minutes! See the bottom of this page for how to avoid this.
The map command
The next line is a map command. grub4dos has some special devices which it can map a file to. BIOS devices are numbered 0-255 where 0-3 are floppy disks fd0-fd3,0x80-0x9F are hd0-hd31, cd0 is 0xA0, etc. Here are the grub4dos device references and numbers:
(hd0) = (0x80) – first hard disk, hd1=2nd hard disk, etc.
(hd0,0) – first partition on first hard disk, (hd0,4) first logical partition (even if there is only one primary ptn)
(hd) – then last hard disk in the system + 1 (i.e. next free drive number). map /fred.img (hd) maps to next free drive number and increases the BIOS harddrive count by 1.
(hd-1) – last hard disk
(hd-1,0) – the first partition on the last BIOS hard disk in the system
(fd0) = (0) – first floppy disk, fd1=2nd hard disk, etc.
(hd32) =(0xA0) – virtual CDROM – if you map an ISO to this device it will behave as a CD device – this is the same as device A0 in DOS. 32-ff are virtual CD/DVD drives.
(rd) – ramdrive (in Ram above 32MB) – mapping a file (inc. iso or .gz file) to this device causes it to be treated as a ramdrive with files
(rd)+1 – access to ramdrive – the drive type (floppy,hd,cd), position on memory and size can be preset
(cd) – the real CDROM device
(0xff) – virtual CDROM drive (alternative to hd32 – try this for .iso files if hd32 does not work)
(hd0)+1 – the first sector (MBR) of the first hard drive
(hd0,0)+1 – the whole of the first partition of the first hard disk, (hd0,0)+4 would load the first 4 sectors. +1 is a special case meaning (the whole partition)
(bd) – the boot device can be referred to using this device name even if the root device is set to something else (newer versions only) – note (bd) can also be used for the partition that contained the menu.lst file that was first loaded – e.g. ls (bd)/ will list the partition that contains menu.lst even if grldr was on a different partition.
(ud) – special ptn area section if formatted with fbinst on usb device
(cd0) – first physical CD device
(pd) – root folder of PXE boot server
(md) – this the system RAM which is directly accessed in units of 512 byte sectors – always use high address like (md)0x200+1 which is well away from the BIOS area. grub4dos can use any memory up to 32MB – for large areas, use memory above 32MB. IMPORTANT NOTE: Using ‘write‘ to (md) may not always work unless you first initialise the area first – e.g. echo fffffffffffffffffffffffffffffffffffffff > (md)0x30000+1.
Syntax for block devices: ()+,
e.g. (hd0)2+1,20 first 20 bytes in third sector of disk 0, (md)0x300+2,600 first 600 bytes starting at sector 0x300 in memory.
Device contents can be accessed like this (Dev)SectorOffset+NoSectors – where Dev is a valid device, SectorOffset is 0-based 512-byte sector offset and NoSectors is the number of 512-byte sectors to act on. e.g. cat –hex (hd0)0+3 will list the bytes in the first three sectors of hd0 (usually contains the MBR), cat –hex (hd0,1)0+1 will list the 512 bytes in the first sector of the 2nd partition of hd0 (usually contains volume boot code). You can use the command ‘pager off‘ to disable the ‘hit Q to Quit or any key to continue’ end of page prompt.
A detailed explanation of these mapped virtual device names and lots more can be found here. When mapping a device using the map command, +1 refers to the whole partition not just the first sector for some commands.
Numbers
grub4dos numbers can be specified as:
decimal – e.g. set /a num=255
decimal plus quantifier – e.g. set /a num=2k, set /a num=0x2k (k m g t are recognised where k=1024, m=1048576, g=1073741824, t=1099511627776)
hex – e.g. set /a num=0xff
octal – e.g. echo -e \61 (max \377 = 255 decimal) only for certain commands such as echo -e and cat.
e.g. cat –locate=\40 (hd0)0+1 to find spaces (20 hex) in the MBR
if 0x31z==49z echo SAME
if 0x1ky==1024z echo SAME
if 0x10ky==16384z echo SAME
If number ends with an unrecognised character it is treated as a terminator.
map command
The map command takes effect when grub4dos comes to the end of a menu entry or executes the boot command. It will also take effect immediately within grub4dos if a map –hook command is executed.
It is important to understand how grub4dos maps your image. If you map an image to a floppy device (fd0/fd1) then grub4dos will expect it to contain boot code and/or a valid filesystem parameter block at the beginning of the file. If this code tries to access a floppy disk drive, it will be accessing your image file instead. So you can map a 1.44MB floppy disk image (such as memtest.img) to fd0. However, if you try to map memtest.img to (hd32) then grub4dos will treat it as an iso file and map the image as a CD device – hence when the memtest floppy image tries to read sectors from the ‘floppy disk’ it fails to boot. Similarly, if you try to map a binary program instead of a floppy disk image as (fd0) it will fail to load.
The map command will cause the file specified (or device) to be treated as a virtual device – any access to the device will cause a block seek to the correct place in the file – for this reason the file must be contiguous (i.e. whole file in sequential clusters). For ISO files you may get a ‘File not contiguous‘ error reported by grub4dos. This often happens when you copy, edit and delete files on the USB drive a lot and then copy over an ISO file. The best way to fix this is run WinContig.exe on the drive (type CTRL+F2 in RMPrepUSB) – if this does not work due to lack of space then copy all the files off of the USB drive, reformat the drive and then copy them all back again. Another way to get around this, is to use the map –mem command – If you use this command the ISO file does not need to be contiguous (but the whole ISO will be loaded into memory by grub4dos which will be much slower and also requires the system to have more memory). For instance, the line
map /YlmF_OS_3.0.iso (0xff) || map –mem /YlmF_OS_3.0.iso (0xff)
will attempt to map the iso directly as a contiguous file, but if it fails because the iso file is not contiguous, grub4dos will then try to load it into memory as one contiguous block and then map the device 0xff to it. The || symbol means OR, so the command is ‘map the iso directly as device (0xff) OR if this fails then load it into memory and map it as device (0xff)’. Note that if the ISO is 3+GB then you will need more than 3GB of memory! The symbols && means AND e.g. ls /menu.lst && echo menu.lst exists in the root! && pause – which means list the file /menu.lst AND if this worked echo ‘menu.lst exists in the root AND if this worked pause until the user presses a key.
Note that if you map an ISO file (or any file) and the media is writable, it is possible to modify the contents of the ISO file, for instance
cat –locate=BOOTFIX.BIN –number=1 –replace=XXX (0xff)+0x1000
Will modify the early bootcode (first 8MB) of a bootable Windows ISO and change the BOOTFIX.BIN string to XXXTFIX.BIN – this will result in suppressing the ‘Press any key to boot from CD or DVD’ prompt when you boot from the ISO.
To avoid changing an ISO file accidentally, use map –read-only /win8.iso (0xff) .
Note also that the 0x1000 (=8MB) number refers to the number of CD sectors to search because 0xff is a CD device – a CD sector is 4096 bytes not 512 bytes.
IMPORTANT NOTE WHEN USING && or || : Changes may not take affect until the complete line has been executed (they do not execute sequentially!) – for instance:
set a=Hello && set b=%a%
set
will produce the result
a=Hello
the first time it is run. If you then run the same line again then it will produce
a=Hello
b=Hello
because the second time it is run a will already have been set by the first run.
You can use a single line if you use call and precede the variable with ^ – for example
set a=Hello && call set b=%^a% Steve!
set
will display
a=Hello
b=Hello Steve!
grub4dos versions later than 2013-03-19 support the ;; operator – this will unconditionally execute statements in order:
e.g.
set a=1 ;; echo %a% ;; # this is a comment
will print 1 on the screen
Using ;; in a line is the equivalent of splitting the line into separate command lines, i.e.
set a=1
echo %a%
# this is a comment
To check if your version supports the ;; operator, use
set g4new=1 ;; echo -e \;\; is supported! && if not “%g4new%”==”1” echo Error: this grub4dos version does not support the “;;” operator! && pause
We also have the &; and |; operators in April 2013 and later versions. These act like && and || except that environment is changed after each statement, so that menu lines such as:
set a=1 ;; set b=1 &; if %b%==%a% echo %a% matches %b%
work as expected.
The map command continued…
The grub4dos map command also supports .gz (gzip) compressed files (which you can make using 7Zip or Gzip). This is useful if you are short of space on your USB drive and you have ISO files which will compress well.
It is important to understand that grub4dos works by patching BIOS interrupts, so real-mode Operating systems like MS-DOS and FreeDOS will work well when the map command is used. However, once a protected mode Operating System like Windows XP or linux runs, and once it loads it’s own device drivers, these do not use the BIOS at all. This means that as soon as the Operating System protected-mode kernel is loaded, all of the grub4dos mapping is lost – Windows or linux will see only physical devices and not the virtual devices created by the grub4dos map commands (though there are some special features in grub4dos to make it work better for OS’s such as linux that can boot from a ram drive).
You can disable a BIOS device like a CD-ROM by mapping some memory as that device – for instance:
# make CD device invalid so DOS does not see a CD when it boots! Only works if (cd) device is present
map --mem (md)0+16 (cd)
map --hook
Booting DOS from a USB Floppy
Most modern PCs and Notebooks will boot a USB disk drive as a hard disk (C:), but many will not boot a USB drive as a floppy drive. If they do not boot correctly (e.g. all you see is a flashing cursor at the top of a blank screen) then format your USB drive using the Boot as HDD (2PTNS) option in RMPrepUSB. Once you have a USB bootable drive that boots to DOS (or at least starts to boot to DOS), you may find that the DOS payload that you have copied to your USB drive expects to be booting from drive A: (a floppy disk) and not drive C: (a hard disk) and so reports errors whilst running the Config.sys or Autoexec.bat files . Using grub4dos however, we can map the USB drive’s first partition (the main DOS partition) to a floppy drive (fd0) and then boot DOS from that floppy drive. Here is the menu.lst entry:
title Boot DOS as Floppy Disk 0\n Boot from this USB drive as Floppy Disk A:
# undo any previous mappings
map --unhook
map --unmap=0:0x82

# Next line checks to see if we booted as a hard disk (80) and if so maps the boot device as a floppy disk
checkrange 0x80 read 0x8280 && map (hd0,0)+1 (fd0) && map (hd1) (hd0) && map --hook && find && rootnoverify (fd0) && map --harddrives=1

# Set total number of floppy drives to 1
map --floppies=1
chainloader /kernel.sys || chainloader /io.sys || chainloader /ibmio.sys || chainloader /ibmdos.sys
clear
Note that this also maps your internal hard disk (hd1) to (hd0) and so when it boots from the new floppy device (fd0), DOS will see only one hard disk (your internal hard disk) and one floppy disk (your USB drive).
The hook command
The next line is map –hook. This is where any previous map commands actually become activated and hooked into the BIOS. The map device commands check that a file is contiguous and loads it into memory if the –mem parameter is specified, but any attempt to access the device will fail until the BIOS interrupts are actually ‘hooked’ to their new virtual drives or files. The map –hook command changes the BIOS interrupt pointers so that an access to the virtual device will actually access the file or device specified by the map (device) commands. If no map –hook command is specified in the menu, it will be automatically executed when grub4dos boots, so there is no need to use map –hook unless you need to access the mapped device first.
The root, kernel, chainloader and other commands
The next line (in the Ylmf menu) is the root (0xff) command, this mounts the ‘volume’ and sets the root device to the file that was chainloaded, so that any file path to / , will access the 0xff device. You could instead just use (0xff)/ to specify the same folder, however some command lines (kernel parameters, etc.) might not be able to understand the (0xff) device name, so it is best to set the root device to the device you are about to boot from.
root bootdev – special command which will set the root to the initial boot device.
root endpart – sets the root to the last partition of the current disk.
When setting a directory path, you must always include a device in the full path when using the root command (e.g. () or (hd0,1) or (0xff)).
You can also set the current path using root, e.g.
root ()/grub – will set the current path to \grub, therefore ls / will list files in /grub
root ()/ – will set the current path back to the top root folder of the current device
It is good practice to always use root before you use chainloader, because root can establish some parameters when the device is mounted which is then used by the chainloader command. If root fails then use rootnoverify instead, e.g.
root (0xff) || rootnoverify (0xff) ;; # if root command fails then rootnoverify will be used instead
chainloader (0xff)
The || operator means ‘if previous command fails, do next command’.
The kernel command is an instruction to load a linux kernel which expects to be loaded into memory in a certain way; also we can pass parameters and values to the kernel by using a command line type syntax on the same menu line which will get passed to the linux kernel.
Note: Avoid using any other command after the kernel command has been executed as they could corrupt the memory area used to load the kernel into (which starts at the 32MB area), for example using > nul on any line following the kernel command, as this can cause problems. The kernel and initrd commands should always be the last two commands. If you wish to suppress the loading messages produced by kernel and initrd then precede the kernel and initrd lines with
debug -1 && errorcheck off
The final line in the Ylmf menu is initrd, this is an initial ramdrive which is a temporary filesystem used in the boot process of the linux kernel – initrd and initramfs are both commonly used to make preparations before the real root filesystem can be mounted.
For the memtest menu.lst entries we have:
chainloader (fd0)+1
rootnoverify (fd0)
map –floppies=1
chainloader is a command to load a file or a disk sector into memory and set the code execution start point to the start of that memory location where it loaded the code to. In this case it is set to the first partition of the virtual floppy disk drive (which is the memtest86.img file). As the memtest86.img file is a 1.44MB floppy disk image, it will load the first floppy disk boot sector. As we have mapped the whole file as a virtual floppy disk, when that boot sector code executes, it will try to access floppy disk sectors, but grub4dos has just mapped the floppy disk to the memtest86.img file instead, so the boot code will actually read sectors from the memtest86.img file when it asks to read sectors from the ‘floppy disk’. Add –force if grub4dos gives an error due to a bad signature or incorrect format.
rootnoverify (fd0) sets the current device root to the virtual floppy and does not verify or check if the device is a valid ‘disk’ with valid geometry or mount the device. In this example, this line is actually not needed and the USB drive will boot to memtest without this line. Using root (fd0) would fail though (Error 17: cannot mount selected partition).
map –floppies=1 – this tells grub4dos that the BIOS must report just one floppy is present (the mapped one) to the OS – this can usually be omitted unless you are booting to DOS or some OS which may enumerate floppy drives.
When grub4dos finishes a sequence of commands in a menu.lst and finds the end of file or a new title command, it automatically runs the ‘boot‘ command which then transfers CPU execution to the code loaded into memory (either by a chainloader command or an initrd or kernel command).
Contiguous files
To check if a file is contiguous from within grub4dos, use the blocklist command. In the grub4dos menu, type C to get to the grub4dos command prompt and then use the blocklist command as shown below:
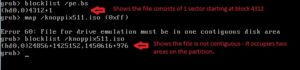
# this way assumes you are going to map the iso anyway
map /test.iso (0xff) || echo FILE IS NOT CONTIGUOUS && pause
or
# check iso file is contiguous...
set ISO=/test.iso

#ensure normal echo mode
debug 1

blocklist %ISO% | set check=
set c=%check:~7,18%
echo %c% > (md)2800+1
echo Checking for comma in && cat (md)2800+1
cat --locatei="," (md)2800+1 > nul && echo WARNING: %ISO% is not contiguous - please run WinContig.exe on the drive! && pause
Notes about blocklist:
-
The blocklist command lists a volume sector offset relative to the start of the partition – e.g. if the first partition on the disk begins at LBA 63 then a blocklist result of ‘(hd0,0)2+1’ would indicate that 1 sector at LBA 65 (63+2) contains the data.
-
On NTFS volumes, blocklist may not return any position+length information at all – this indicates that all the file’s data is within the $MFT $DATA directory entry and so is contiguous and may be up to 680 bytes in length – if the file is any longer, then blocklist will work as expected. Note that older grub4dos versions do not support writes using dd to these small NTFS files!
- Later grub4dos 0.4.6a 2018 versions display small NTFS files when using the blocklist command as, e.g. (hd0,0)22234[288-360] which indicates that the data of the small file is inside the $MFT record and begins at byte 288.
Multiple sub-menus
With grub4dos, you can have multiple menus. The menu shown below will allow the user to load one of three sub-menus.
title DOS Boot menu\nChoose to boot MS-DOS or FreeDOS in a variety of ways
configfile /dosmenu.lst

title linux Boot menu\nChoose from a variety of different linux distros
configfile /linuxmenu.lst

title Install Windows\nChoose to install and version of Windows onto your hard disk
configfile /winmenu.lst

#In these three sub-menus, you can then also include a 'main menu' menu entry such as:

title Return to Main Menu\nGo back to the main menu
find --set-root /AABBCC.TAG || find --set-root /menu.lst
configfile ()/menu.lst
Note that as the sub-menus may have changed the drive mapping, the above ‘return to main menu’ entry tries to find the original USB boot drive by looking for the special tag file AABBCC.TAG which you should place on the grub4dos boot drive. As a ‘default’ backup, if it cannot find AABBCC.TAG anywhere, then it looks for menu.lst instead (and we hope you don’t have a file called menu.lst on the internal hard disk!).
Tip: You can jump from one menu item to another using goto n, errorcheck must be on first or it won’t work e.g.
title Goto demo
pause Hello - now I am going to run menu 3 (if it exists)
errorcheck on
goto 3
pause You should not see this!
grub4dos memory and ramdrives
System memory locations can be read and obtained as a grub4dos variable like this:
set /a m=*0x60000
The value obtained and placed in the variable m will be a 64-bit (8 byte) value. Often you may wish to read the value of a single byte, word or dword (4 bytes), you can do this as follows
set /a m=*0x60000 & 0xff – get byte value
set /a m=*0x60000 & 0xffff – get word value
set /a m=*0x60000 & 0xffffffff – get dword value
The (md) memory drive is directly mapped to system memory also. (md)+1 has a special meaning – ‘all of the drive’. (md)2+3 means three sectors in memory starting at the second sector in memory – this equates to memory address 0x400 (512*2) for a length of 3 sectors or 0x600 (512*3) bytes.
Use read to get a 32-bit value.
Use calc *some_address to get 64-bit value – e.g. calc *0x82d0 | set base_rd=
Note: The physical memory address range from 1M to 32M is reserved for grub4dos internal code and data. Users should not use this range (32MB = 0x200,0000 or (md)0x10000).
Try these commands – they will all list the same contents from the same area of memory
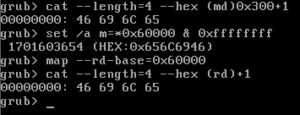
The default drive number for (rd) is 0x7F which is a floppy device. If (rd) is a hard drive image, you should change the drive number to a value of 0x80-0x9f, CD-ROMs/DVDs should use 0a0-0xff (but avoid using 0xff, because 0xffff is used for the (md) device).
map --ram-drive=0x9f
map (rd)+1 (hd2)
map --hook

# hd2 now is 40000 hex bytes in length and will be accessed as if it were a hard disk (with a MBR and partition table).
Note that the ram drive base address will be set to the top of available memory by the map command (regardless of what rd-base has been set).
You can locate a file at 0x600000 in memory using:
map --mem=0x3000 ()/ntldr (rd)
or you can use rd-base, rd-size and ram-drive to create a ram drive.
map --ram-drive=0x9f
map --rd-base=0x600000
map --rd-size=0x180000
dd if=()/ntldr of=(rd)
IMPORTANT NOTE: Using ‘dd‘ to (rd) or (md) may not always work unless you initialise the area first – e.g. echo fffffffffffffffffffffffffffffffffffffff > (rd)+1. This is because dd will refuse to write to an area of memory that it ‘thinks’ contains a compressed file.
In 2014-09 and later versions of grub4dos, you can precede dd with the raw command which will prevent auto-decompression. – e.g.
raw dd if=()/fred of=(rd)
–rd-size sets the maximum size of memory that will be used in bytes so ntldr should not be larger than 0x180000 bytes in this example. Normally rd-size is set to 0x100000000 (4GB) by grub4dos. You do not need to change rd-size it in normal use. If you do change it, set it back to 0x100000000 afterwards.
Using variables in grub4dos menus
Recent versions of grub4dos (see near end of the grub4dos readme file for more details) also have the ability to set and use variables.
Variable names can be a maximum of 8 characters. If a 9-character name is used it will be shortened to 8 characters, e.g.
set ABCDEFGHI=1
set
ABCDEFGH=1
Variable names of greater than 9 characters will be ignored.
Be careful not to put any extra spaces after a set command line – e.g.
set A=fred
will set A to ‘fred ‘ if the line ends with a space (note the space at the end of the line as shown on this page by me highlighting the text for you!).
set ask=
set /u /p:3 ask=Please type your name within 3 seconds and press ENTER :
if "%ask%"=="" pause --wait=3 TOO SLOW! && configfile /menu.lst
echo Your name is %ask%
Switches you can use with set are:
/u – convert to uppercase
/l – convert to lowercase
/a – convert to decimal number
/A – convert to hexadecimal number
/p – prompt for input and wait
/p:n – prompt for input and wait n seconds (timeout)
* – delete all variables
(no switch) – display all variables
xx – display all variables beginning with xx – e.g. set A displays all variables that start with A
e.g
# note we must use 3 separate lines as && does not affect the environment until the full command line has been run!
set f=hello && set g=32
set /u f=%f% && set /A g=%g% > nul
echo %f% %g%
HELLO 0x20
Consider the following menu.lst
title Boot from any hard disk partition
errorcheck off

## ignore errors in case no hd1
geometry (hd0)

## show hd0 partitions
echo
geometry (hd1)

## show hd1 partitions
errorcheck on

## don't ignore errors now
set /p HD=Which hard disk do you want to boot from (0 or 1):
set v=0
if "%HD%"=="0" set v=1
if "%HD%"=="1" set v=1
if "%v%"=="0" exit
set /p PTN=Which partition do you want to boot from on hd%HD% (0 or 1):
set v=0
if "%PTN%"=="0" set v=1
if "%PTN%"=="1" set v=1
if "%v%"=="0" exit
echo Booting from (hd%HD%,%PTN%)
root (hd%HD%,%PTN%)
chainloader (hd%HD%,%PTN%)+1
boot

title Boot any ISO
ls /ISO/
set /p MYISO=Which ISO do you want to boot?
ls /ISO/%MYISO% || echo ISO %MYISO% NOT FOUND! && exit
map /ISO/%MYISO% (0xff)
map --hook
chainloader (0xff)

# Note:This example only works if you are using a version of grub4dos that treats ;; ## as a comment delimiter
# If your grub4dos does not like it, remove the ;; ## characters and all text after it
# Should work with 2014 versions of grub4dos

title test variables and inline comments feature of grub4dos
debug off ;; ## don't show debug info
set A=1 ;; ## set the variable A to 1
set B=3 ;; ## set the variable B to 3
set /A C=%B% + %A% ;; ## Add the two together /A means arithmetic
echo %A% + %B% = %C% ;; ## show the sum and result
pause ;; ## pause for the user to see
set GG=
set /l GG=Aa
## converts to lower case and put in GG variable
echo %GG% - should echo aa ;; ## should be lower case aa
set GG=
## clears GG variable if nothing after the = sign
set /u GG=Aa
## sets to uppercase
echo %GG% = should echo AA
set GG=
## clears GG variable
set /p /u GG=Type in Aa here:
## prompt user to type and convert to uppercase
if %GG%@==@ echo YOU DID NOT TYPE ANYTHING IN! && pause
echo %GG% should echo AA
## it should be all uppercase
if "%GG%"=="AA" echo What you typed was converted to uppercase correctly!
pause

echo We can display words inside percent signs, e.g. %^GG% by using the ^ symbol anywhere inside it
pause

configfile (bd)/menu.lst ;; ## reload this menu
boot ;; ## include an action command so we can select this in the menu
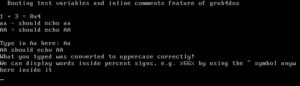
Note: The version of grldr treats ;; the same as if there was a carriage return in the menu.lst file
The command syntax for setting and testing grub4dos variables is:
set [/p] [/a|/A] [/l|/u] [VARIABLE=[STRING]] you can set or clear a variable or prompt for one using /p, /a does arithmetic operations and /u converts to uppercase or /l to lower
if [/I] [NOT] STRING1==STRING2 [COMMAND] where I means case Insensitive – New command supports three test functions >=, == and <=
if [NOT] exist VARIABLE|FILENAME [COMMAND] you can check for the existence of a variable or filename
The latest version (13/12/2011+) can use <= and >= operators as well as == and NOT x==y.
e.g.
set /p /u ask=Enter iso filename WITH NO EXTENSION (e.g. win7pro32 ) :
echo %ask% && pause
the /u will always convert the answer typed by the user into uppercase.
Another example:
debug off
set a=2
set /A b = %a% + 4
echo %b%
set /a b = %a% * 4
echo %b%
pause
will print 0x6 and 8 as /A is used to convert the answer to hex notation and /a is used for decimal arithmetic.
The debug off stops the result of the set calculation from being displayed on the screen. You could instead redirect to nul – e.g. set /A b=%a% + 4 > nul
Notes:
Variables are case sensitive,
set a=5
set A=6
echo %A% is more than %a%
Note that A and a are different variables with different values.
set * will delete all variables
set * && set var1=%var1% && set var1=%var1% will delete all variables except var1 and var2
setlocal && set * && set var1=%var1% && set var1=%var1% will delete all variables except var1 and var2 only in the local environment (all variables are restored on endlocal) – see here for more details on setlocal.
The cat command
Later versions of grub4dos (2012) have enhanced cat parameters which allow you to replace strings.
The cat command has these parameters:
–hex display file contents in hex – e.g. display MBR using cat –hex –length=512 (hd0)+1
–hex=h if h=1 then display in hex else display as text
–skip=S number of bytes to skip – e.g. cat –hex –length=512 –skip=500 /menu.lst would list 512 bytes starting at byte 1F4
–length=L number of bytes/characters to display (can be used with –locate)
–locate=STRING find a string in the file (max.16 characters allowed)
–locate-align=A look for a STRING on an alignment boundary – e.g. –locate-align=4 will look for the string at positions 0,4,8,12,etc…
–locatei=Test case insensitive locate command (looks for Test, test, tEST, etc.)
–replace=RRR replaces STRING with another string RRR (use 2013 0.4.5c versions and you can use very long strings for –replace).
Use doublequotes if you need a space or tab character, e.g. –replace=” ” or a hex number e.g. \x20 (you can use \\ for the \ character). Note: cat –locate=color red/green –replace=color white will result in color whitereen.
The command cat –locate=c –replace=coloR –number=1 /menu.lst will change color to coloR
–number=N number of replacements to be made or locations to be listed.
Instead of –length=N you can also use a comma in some case, e.g. this prints a=a abc=abc
echo abcde > (md)0x3000+1
cat –length=1 (md)0x3000+1 | set x=
cat (md)0x3000+1,3 | set y=
echo a=%x% abc=%y%
Strings can be enclosed in double-quotes if they contain spaces, e.g. –locate=”\x0apxe detect” looks for a line feed character (hex 0a) followed by ‘pxe detect’
Note: using > to redirect data in grub4dos uses an internal 8K buffer – any more characters than 8192 bytes will be lost. e.g. cat –hex (md)0x4e+4 > /file.txt will lose characters after 8192 bytes. Also do not use cat /file1.txt > file2.txt – only 8192 bytes will be transferred – used dd if=files.txt of=files2.txt instead.
Note: If (md)0x3000 contains a compressed file (e.g. fred.gz) then cat will display the decompressed bytes unless you use raw cat
Note: If using cat –hex, it may not always work if the first few bytes appear to resemble a compressed file header to grub4dos. In this case cat –hex will not output anything at all in pre-September 2014 versions of grub4dos!!! To always view the exact byte content a memory area or file, turn off the grub4dos decompression translation using:
# turn off decompression
write 0x82a4 1
# always show actual bytes
cat --hex --length=32 (md)0x300+1
# restore decompression
write 0x82a4 0
In 2014-09 and later versions of grub4dos, you can prepend commands like dd or cat with the raw command – e.g.
raw cat --hex myfile.txt.gz
# this will never try to decompress the contents of a file or memory and so will always show the actual bytes.
To get the length of a file use –length=0:
Special case: cat –length=0 /myfile.iso
returns: Filesize is 0xAC3
In 2015+ versions, a 3.999gb or larger file will return a value of @retval=1. The maximum size returned by @retval is -1
Use *0x8290 to obtain the file size of large files (see below)
e.g.
cat --length=0 /myfile.iso && set /a LEN=*0x8290
echo Length of file is %LEN% bytes
# calculate sizes in MB of iso and available memory - 0x8298 is internal grub4dos location of mem size in Kbytes
set /a MEMSIZE=*0x8298&0xFFFFFFFF>>10
cat --length=0 /myfile.iso && set FSize=*0x8290>>20
if %FSize%>=%MEMSIZE% && echo Need More memory!
# to get the expanded length of a compresses .gz file - use:
cat --length=1 /myfile.gz && set /a filesize=*0x8320

# Or directly call grub_open file function it will put filesize at memory 0x8320 - this works well for non-compressed files too.
call Fn.26 /myfile.gz && set /a filesize=*0x8320
The main use of cat is to change the contents of a file (via byte replacement).
ls (0xff)/ && root (0xff)
ls (0xff)/I386/ && cat --locate=rdisk(1) --replace=rdisk(2) (0xff)/I386/TXTSETUP.SIF
ls (0xff)/AMD64/ && cat --locate=rdisk(1) --replace=rdisk(2) (0xff)/AMD64/TXTSETUP.SIF
ls (0xff)/ && chainloader (0xff)/I386/SETUPLDR.BIN
ls (0xff)/ || rootnoverify (hd0)
ls (0xff)/ || chainloader (hd0)+1

cat --hex ()+1 - display the first sector of the current drive in hex
cat --hex /boot.ini - display contents of a file in hex
cat --locate="abc \"def" (md)0x300+1 -find abc "def in memory

#an example of using double-quote " marks (hex=22h) and carriage returns in a replacement string
#note that the maximum length for any locate string is only 16 characters!!!!
set CN=S
set ON=Org
set CN=\x22%CN%\x22\r\n;
set ON=\x22%ON\x22\r\n;
cat --locatei="rName=" --replace="rName=%CN%" (fd0)/winnt.sif
cat --locatei="OrgName=" --replace="OrgName=%ON%" (fd0)/winnt.sif

#this will set ComputerName="S" and OrgName="Org" - the line will end with a carriage return and the next line will be commented out.
#all lines in winnt.sif should be followed by a long row of ;;;;;;;;;;; characters to allows for longer strings set by --replace.
This would replace the line
ComputerName=xxxxxxxx
with this
ComputerName=”S”
;xx
Note: cat –replace will only work if writes to the target device is permitted. Thus changing a menu.lst file under QEMU will not work (unless RMPrepUSB v2.1.707 or later is used) as QEMU does not normally allow writes to a mounted physical device.
Tip: To prevent grub4dos listing hex positions on the display, use > nul at the end of the line. Try also errorcheck off and debug off to suppress unwanted values being printed on the screen.
You can use double-quotes with the set command to avoid grub4dos errors and have leading spaces – e.g. set “a= fred && doris ;; echo george” will set a to ‘ fred && doris ;; echo george’ (without the quotes)
Here is an example of how to capture a hexadecimal text number, get it into a variable and perform maths on it:
/bios int=0x15 eax=0x0000e801 > (md)0x300+1
cat --skip=24 --length=4 (md)0x300+1 | set n=
set /a MEMSIZE=0x%n%/16+16
echo Memory size is %MEMSIZE%MB

# get the size of a file into the variable KSIZE
# must set debug to normal otherwise cat --length won't echo!
debug normal
cat --length=0 /kernel.sys > (md)0x300+1 && cat --skip=12 (md)0x300+1 | set FSIZE=
debug -1
set /a KSIZE=%FSIZE%
pause --wait=8 KERNEL.SYS is %KSIZE% bytes long
debug normal

# or to get file length - use internal grub4dos variable which holds result of cat --length
cat --length=0 /myfile.iso && set /a LEN=*0x8290

# display the MBR of disk 0 (the boot drive)
cat --hex --length=512 (hd0)+1

# display the first PBR of disk 0
cat --hex --length=512 (hd0,0)+1
Automatically show only valid menu entries using iftitle
If you use a 2012 or later versions of grub4dos grldr file from chenall (as in RMPrepUSB), then it will support the new command iftitle. This can be used to conditionally list menu entries and should work with gfxmenu systems too. The syntax is:
iftitle [xxxxx] menu title\nhelp text
xxxx must either equate to ‘True’ or ‘False’. You can use multiple statements (e.g. iftitle [if exist /fred.lst && if exist /doris.lst] here is my text).
Note that there must be no space after the [ and no space before the ] or it will not work correctly and you may get strange results. xxxx should evaluate to true or false but it does not work with all commands. A working example would be:
iftitle [if exist (hd0,0)/test.img] boot to (hd0,0)/test.img
map --mem (hd0,0)/test.img (fd0)
map --hook
chainloader (fd0)+1
so if test.img did not exist on (hd0,0) then the menu entry would not be visible to the user. New versions can also auto-number menu entries.
Be aware that when a menu.lst file is loaded, all commands in all the iftitle square brackets in each menu will be executed first before the final menu is displayed. Therefore any drive mapping or variables set in the iftitle commands will all run one after the other before the menu is displayed.
If you are having trouble with iftitle entries, you can debug them by pressing the INSERT key as grub4dos is booting. Grub4dos will then enter single-step mode. Now just keep pressing the Enter key and each line will be executed after each key press. When an iftitle statement is reached, you will see lines like this:
IFTITLE: [if exist /myfile.txt] my title-> rp=32
IFTITLE: [if exist /myfile1.txt] my title-> rp=0
‘rp=0′ or ‘NO ‘indicates that g4d will not use the menu entry, and rp=(any number except 0) or YES means the menu entry will be shown.
PART 5 – TROUBLESHOOTING GRUB4DOS MENUS
grub4dos has very powerful and useful menu editing and command line features. To try this, let us boot from our USB pen and select the Memtest86 menu item – but don’t press [Enter] – instead press ‘e’ for edit (note you must be in the grub4dos menu system, if in the GFXmenu system, press the [ESC] key to get to the grub4dos menu). The menu lines for the Memtest86 menu will be displayed when e is pressed. You can now edit these lines and add or delete lines and try to fix any problems. Any changes you make however will NOT permanently change the menu.lst file, the changes are only temporary. There is help text below the edit window to help you to edit the menu entries.
USB Keyboard does not work when grub4dos loads – if the keyboard stops working once the grub4dos menu is displayed, this may be due to a BIOS not detecting USB devices correctly. To check this, connect ONLY the USB keyboard and your USB boot device. Make sure you disconnect all other devices (mouse, webcam, etc.) from all other USB ports. Now see if the keyboard works in grub4dos. If it does then you may find that one particular USB device is causing the problem. Try plugging that ‘troublesome’ USB device into a different USB port (try them all) to see if you can eliminate the problem.
Fatal! Inconsistent data read from (0x80) 488135025 – if you see an error similar to this from grub4dos AND you are using a large hard drive (over 128GB) then this error may be due to your BIOS not supporting large USB drives. If the same USB drive boots OK using QEMU, then the problem is in your BIOS on the target system that failed (other systems may work depending on their BIOS). If you reduce the size of the partitions so that they do not extend beyond 128GB then you should not see this error. You can try loading Plop! to fix this problem on ‘bad BIOS’ systems – see the section on Plop above. Also try grub4dos v0.4.6a and use the usb –init command to use the inbuilt USB 2.0 driver.
Often you need to see what is going on when each of the menu commands run and perhaps ‘single-step’ through them. Press ‘c’ for command line interpreter and you will be given a command prompt. You can now type in the commands one by one and observe what happens. Entering a partial command and hitting the [TAB] key will often complete the command or give a list of possible valid values to complete the command. Remember to reboot each time you try a new set of commands and try to boot (type ‘boot‘ from the command line to try to boot). Some useful commands to help debug your menu items are:
Note: grub4dos commands are always lowercase!
help – to see a list of commands
help map – to see the syntax of map command
ls – list files and folders at the current root location
map –status – displays what devices are present and if they are ‘hooked’ by grub4dos
map ( [TAB] – (where [TAB] means press the TAB key on the keyboard – will print all possible disks that it can see – e.g. Possible disks are : hd0 hd1 rd cd
root – displays the root device – e.g. (hd0,0): Filesystem type is fat, partition type 0x0c
geometry – show current drive geometry
geometry –tune – alter current drive geometry reported by BIOS to match that of MBR
find +1 – list all devices with a known filesystem
find – list all devices
find (hd0, [TAB] – shows all possible partitions on first hard disk
boot – boot using the device/file previously selected, for example can be used when preceded by a chainloader command.
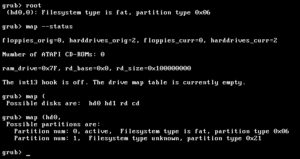
Example debug commands and their results (click to enlarge)
For a full list of commands in the latest version of grub4dos (as used by RMPrepUSB).
Debugging
Tip: to aid debugging, it is good practice to use the following two lines at the beginning of each menu item to undo any previous drive mappings (though it can be quite slow)
map --unhook
map --unmap=0:0xff
If booting to DOS or linux, you may get better results (helps prevent flashing cursor syndrome!) using the geometry tune and sync commands to ensure the correct disk geometry – e.g.
title More reliable MS-DOS boot on any system
find --set-root /io.sys
geometry --tune
geometry --sync
chainloader /io.sys
You could also try geometry –bios –sync instead of just geometry –sync (e.g. MS-DOS 6.22 under QEMU needs this!)
Another tip is to turn on debugging using a number (-1,0,1,2,3) or keyword (on, normal, off)
#case sensitive!
debug on
You have a choice of debug on (2), off (0) or normal (1) or a number. Normal is the default. A value of -1 tends to turn off any normal extra messages such as timeout countdowns or information messages. The command debug status displays the current debug level number.
Debug 3 allows you to single-step a grub4dos batch file line by line – e.g.
debug 3
/mybatch.g4b
Debug levels
-1 = turns off normal messages such as countdown timers, etc (e.g. pause –wait=5 does not print 5,4,3,2,1 on display)
0 = debug off – suppresses normal, non-fatal error messages (silent)
1 = debug normal – standard settings (only some messages shown)
2 = debug on – shows informational messages on some commands (verbose)
3 = single-steps through a grub4dos batch file (older versions)
Another trick for better results is to use && and || (which means AND and OR) – here is an example –>
title here is a test
#turn off debug and prevent countdown timer from displaying
debug -1
ls /my.iso && clear && pause --wait=3 I found /my.iso!
#now turn debug on again
debug normal

(put more commands here)
This says ‘list /my.iso to the console – if it was there then clear the screen – if that worked output the message ‘I found /my.iso’ and wait for 3 seconds or until a key is pressed’.
The command pause –test-key will output the scancode of the next key that you press.
It is good practice to first soak up any previous key presses using Fn.20 and Fn.19 before waiting for a key press in case multiple key presses were entered previously…
# soak a key if in BIOS keyboard buffercall Fn.20 ;; if not %@retval%==-1 call Fn.19
To have a menu entry which takes you to the command line shell, use ‘commandline’ in a menu entry – this may be useful for debugging:
title Goto grub4dos command line

(some command)

(some command)

(some command)

#now drop to command line and try a few things before typing boot to test booting...

find
ls /
pause
commandline
Another useful menu entry which will reload your menu.lst file after you have just changed it (e.g. whilst running under an emulator and to save rebooting under the emulator) is:
title Reload menu.lst
#errorcheck off will prevent grub4dos aborting if it finds an error with any command.
#This means you can try several commands in a row until one works:

errorcheck off
configfile (bd)/menu.lst
find --set-root --ignore-floppies --ignore-cd /boot/grub/menu.lst && configfile /boot/grub/menu.lst
find --set-root --ignore-floppies --ignore-cd /grub/menu.lst && configfile /grub/menu.lst
boot
Booting from CD or accessing a CD
Sometimes it is necessary to initialize a CD-ROM or DVD drive before grub4dos can access it, use these commands in you menu before trying to access files on an optical drive or before using the find command to look for files on an optical drive.
cdrom --init
pause --wait=5
Booting older OS’s
MS-DOS 6.22 will not boot under QEMU using chainloader /io.sys if you have a disk goemetry that is not 255×63. It must be FAT16 type 06 (use RMPrepUSB 64hd/32sec setting).
To boot from MS-DOS 6.22 using grub4dos try using this geometry command to correct the disk geometry before booting to io.sys:
title MS-DOS 6.22
root (bd)
geometry --bios --sync
chainloader /io.sys

title MS-DOS boot from boot sector (no fix required)
root (bd)
chainloader +1
Note: If you are using a DOS 6.22 image (and you have not used RMPrepUSB to format the disk), the file IO.SYS needs to be the first file in the directory, and the file MSDOS.SYS must be the 2nd file in the directory. To check this, boot to grub4dos, type C to enter the console and type:
chainloader /io.sys

cat --hex (md)2+1
check that at 00000100: you have listed IO SYS followed by MSDOS SYS at 00000120: –
00000100: 49 4F 20 20 20 20 20 20 - 53 59 53 20 00 58 4B 6E IO SYS .XKn

00000110: 56 40 56 40 00 00 C0 32 - BF 1C 08 00 46 9F 00 00 V@V@..À2 ¿...FŸ..

00000120: 4D 53 44 4F 53 20 20 20 - 53 59 53 20 00 5C 4B 6E MSDOS SYS .\Kn

00000130: 56 40 56 40 00 00 C0 32 - BF 1C 0A 00 FA 94 00 00 V@V@..À2 ¿...ú”..
To boot to ntldr 3.5.1 try –force –load-segment=0x2000 – e.g.
title example nt 3.5x ntldr
#chainloader (hd0,0)+1
chainloader --force --load-segment=0x2000 (hd0,0)/ntldr351
root (hd0,0)
boot
Typing ‘help chainloader’ in the grub4dos console will list the full syntax and range of options for the chainloader command.
Single-Stepping
If grub4dos has trouble booting or finding your menu.lst, then as soon as it starts to boot, keep hitting the INSERT key. Grub4dos will then be in single-step mode and you can see error messages which are normally hidden (same as if debug 2 was used). This is especially useful if you are using iftitle menu commands as these are displayed in single-step mode and -> Yes or -> No indicates if the expression inside the [] was true or false.
You can also single step batch files by setting ‘debug 3’ first.
When in single step mode, press a key to execute each next step until you see your menu:
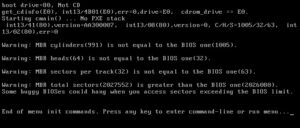
In grub4dos 2015-01-10 and later versions, you can single-step using the debug command (new feature – not all commands may be supported yet – use help debug to check!):
Usage:
Debug PROG ARG1 ARG2 ARG3 etc.
e.g.
debug /test.bat 1
in debug mode the following keys can be used.
Q Exit the program
C into the command shell – ESC to resume and run next line
S Skip to next line
B Set a breakpoint line or break when memory changes
E Disable debugging, run to program end or break
N Run to the first line of the next function/call
– B Set a breakpoint line format that can be used as follows:
[* | + | -] INTEGER – By default, this value is an absolute line number.
Use * in front of a memory address where the program will first read the value of memory, when performed to determine whether the value of the memory changes, changes to interrupt.
Leading + / – value is a relative back row number.
Screen Capture
You can type grub4dos commands in the grub4dos shell and then capture the entire screen to a text file. This allows you to post the screen capture text to a forum or email it to someone. This is especially useful if you only see the problem on a real computer and cannot capture the screen when running under an emulator or virtual machine. To do this follow this procedure:
- Download the grab.zip file and copy the contents to your USB boot drive
- Boot your system and press C to get to the grub4dos console
- Type graphicsmode 3 so that you have a text mode CGA screen mode
- Now type your command sequence that is giving you problems (tip: type debug 2 before you start)
- Type /grab.g4b to grab the screen and copy the text into grab.txt (or /grab.g4b 1 to put text in grab1.txt, etc).
You can now read the grab.txt file on another system and cut and paste the contents.
Checking what devices are present
Want to know if your USB drive is booting as a hard disk or floppy?
title who am I?
checkrange 0x80 read 0x8280 && pause --wait=3 I am Hard Disk 0
checkrange 0x81 read 0x8280 && pause --wait=3 I am Hard Disk 1
checkrange 0x82 read 0x8280 && pause --wait=3 I am Hard Disk 2
checkrange 0x00 read 0x8280 && pause --wait=3 I am Floppy Disk 0
checkrange 0x01 read 0x8280 && pause --wait=3 I am Floppy Disk 1
reboot
This works because the BIOS keeps the boot device number at 0x8280 (the value held there can be: 80 hex is hard disk 0, 81h is hard disk 1, 0 is floppy disk 0, etc.).
You can also use it like this to always boot from your hard disk, even if the USB drive booted as a floppy on one system and a hard disk on another:
checkrange 0x80 read 0x8280 && map (hd1) (hd0)
checkrange 0x80 read 0x8280 && map --hook
chainloader (hd0)+1
These menu items mean: if the USB booted as hd0 then map my real hard disk as hd0 – now boot from hd0.
So if the UFD booted as a floppy the system will boot from hard disk (hd0), if the USB drive booted as hd0, grub4dos will map hd1 (the hard drive) as hd0 and then boot from hd0 (the hard disk).
Or if you always want your USB drive to boot as a floppy disk on any system…
title Always boot from USB AS A FLOPPY
checkrange 0x80 read 0x8280 && map (hd0,0)+1 (fd0)
checkrange 0x80 read 0x8280 && map (hd1) (hd0)
checkrange 0x80 read 0x8280 && map --hook
chainloader (fd0)+1
rootnoverify (fd0)
map --floppies=1
map --harddrives=1
boot
Slow or no USB booting on some systems?
If some systems seem to boot very slowly from a USB drive, this is often because their BIOS only support USB 1.0 speeds when booting. You may be able to use USB 2.0 speeds by using Plop.
For details on how to load Plop, see below or see Tutorial #60. If you have a BIOS which does not support USB booting at all, Plop can be run from a bootable CD – once running you can use Plop to boot from USB (mainly the older USB controllers are supported but not modern or USB 3.0 controllers)
PLOP
Plop is a bootmanager that has it’s own USB 2.0 driver stack which only supports read access to USB 2.0 devices. This means that you can boot to Plop from a bootable CD and then use Plop’s USB driver to boot to a USB drive even if the BIOS does not support booting directly from a USB drive. However, it is also useful to have Plop on a USB boot pen because Plop has a USB 2.0 driver and some BIOSes only support USB 1.0 booting which is very slow. To force your grub4dos menu to always load Plop and thus always use Plop’s USB 2.0 driver, you can use the following entry at the beginning of your grub4dos menu.lst file:
cat –hex –locate=”PoLPu@” (md)0x3d0+0x130 > nul || kernel /plpbt/plpbt.bin
# rest of menu entries go here …
The first line checks to see if PLOP is loaded in memory – if it is not then it will load the Plop bootloader using the kernel command. You can configure the plpbt.bin file using the plpcfgbtGui.exe utility and set the default boot device to USB and a timeout of 5 seconds. This will configure plpbt.bin so that it reboots back to the USB drive after 5 seconds, but this time it will have full USB 2.0 support (if your BIOS did not have it before). You can also avoid needing to configure the bin file by using command line parameters – for more details about Plop – see Tutorial #60.
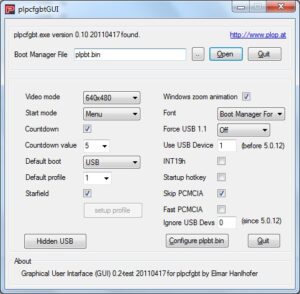
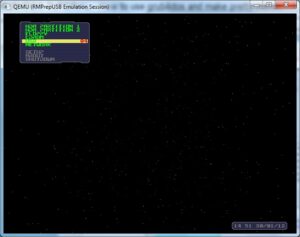
Note that PloP USB detection does not work on some systems, so you will not be able to use this automated Plop method on these systems. It is better to have Plop as a menu option for this reason.
Also note that if Plop is loaded and you load grub4dos again, as Plop does not support writes to USB devices, any commands such as dd or savedefault which write to the USB device will not work.
grub4dos 0.4.6 has a built-in USB 2.0 driver which is read/write. To use the USB driver, just execute the command usb –init. This is also useful in cases where the USB support in a system’s BIOS may be buggy (e.g. cannot access more than 137GB of a USB hard disk). The grub4dos driver will replace the BIOS USB driver and may thus fix the problem.
PART 6 – GRUB4DOS UTILITIES
Grub4dos can run special grub4dos batch files and special grub4dos utilities. Wenv is a grubutils utility which has enhanced environment variable features. The grubutils utility collection contains various other programs which can be run from a grub4dos environment such as chkpci, mbrcheck, menuset, etc. Hotkey is a grub4dos utility that allows your menu to respond to hotkeys to select a menu entry. See Tutorial #71 for more details.
WENV
Wenv (available on Beta downloads page) is a grub4dos utility (a program) that you can run under the grub4dos environment. It is just like an executable that you would run under DOS (e.g. find.exe) but it runs under grub4dos. It allows you to use environment variables in your menu.lst files or to run a script file which can execute grub4dos commands. For instance….
title Install Windows 7 64-bit Enterprise Edition\nRun the Windows install DVD to install a copy of Windows to your hard disk
/Imdisk/wenv set iso=/iso/en_windows_7_enterprise_with_sp1_x64_dvd_620201.iso
find --set-root/ImDisk/myiso.cmd
dd if=()/ImDisk/au.xml of=()/AutoUnattend.xml
dd if=()/ImDisk/cr.txt of=()/ImDisk/myiso.cmd
/ImDisk/wenv call write ()/ImDIsk/myiso.cmd SET MYISO=${iso}\r\n
/ImDisk/wenv call map ${iso} (0xff)
map (hd0) (hd1)
map (hd1) (hd0)
map --hook
chainloader (0xff)
Note that line 2 sets the grub4dos environment variable ‘iso’ to the path of the ISO file by running the wenv executable with parameters.
In line 6 and line 7 we can use this variable value by substituting it with ${iso}.
Note that wenv needs to have a full path as grub4dos needs to find the wenv file which is in the /ImDisk folder in this example.
Also note that to use environment variables and wenv with grub4dos commands, we need to ‘call’ the grub4dos command, this why lines 6 and 7 start with ‘/ImDisk/wenv call’
If you copy the grub4dos executable file wenv (available on Beta downloads page) to the USB drive /ImDisk folder, you can make the menu.lst easier to edit and add more ISO files.
The Wenv download zip file also includes an English translated text file which I have added for you to study.
WENV list of commands currently supported:
SET to set/change/add/delete/display variables
GET display variable/variables and get length of the variable in %?_GET% internal variable
FOR similar to the windows shell FOR cmd instruction
CALC simple calculator (priority from left to right, does not support brackets)
ECHO Display a message or variable to the screen
READ a file and run the commands inside – similar to a .cmd batch file (must use WENV supported commands) also supports parameters.
CHECK check if an equation is true or false, if it returns true a command can be executed
RESET clear/reset a variable
CALL call the grub4dos shell to execute a grub4dos command
Note: SET, GET, FOR, RESET, CALC and ECHO are largely redundant now as similar functions are built into the latest grub4dos versions from chenall (included in RMPrepUSB).
If using calc in grub4dos, some operators may not work with spaces – e.g. calc 44|2 works, but calc 44 | 2 does not.
operators | % >> and << cannot have spaces, but * / – + ^ & work with spaces or without.
Note that ^ is XOR and | is OR and & is AND, << is shift left and >> is shift right, % is modulo (remainder).
For instance, if you type /wenv set in the grub4dos command console window, then wenv will display all current grub4dos environment variables.
Here is another example of how you can use wenv (note: this time wenv is located in the root of the drive and not in the ImDisk folder):
title Specify an iso file to run
# list all files in the /boot/imgs folder so the user can see them
ls /boot/imgs/
echo
# Ask user which iso they want (name is converted to uppercase as $U is specified)
/WENV set ask=$U,$input,Enter iso name with no extension (e.g. dban) :
/WENV get ask || echo No iso file specified! && exit
clear
/WENV echo Loading /boot/imgs/${ask}.iso - please wait ...
# run the grub4dos map command and specify the iso file we want to load
/WENV call map --mem (bd)/boot/imgs/${ask}.iso (0xff)
map --hook
chainloader (0xff)
# Examples using the RUN.bat file (included with the download)
title Auto-make menu for /BOOT/IMGS/ folder
# call the RUN batch file and create a configfile in the ramdrive for all image files
/RUN.bat .Automenu
# Load the new configfile
configfile (md)0x3000+0x10

title Boot dos
# call the RUN batch file with the file we want to load in the /BOOT/IMGS folder specified
/RUN.bat DOS622.IMA
# Add the boot command so the user can use the cursor keys to select this menu entry
boot
For an example of how to make a script file which can run under grub4dos (which must begin with the text !BAT), see the file RUN.BAT example included with the wenv.zip download.
See also the grab.g4b file in grab.zip for another example of using wenv.
hotkey
Another grub4dos utility you can run is the ‘hotkey‘ utility which allows the user to use hotkeys (e.g. F1, F2, etc.) to select a menu item and run it (use the latest chenall build of grub4dos as in RMPrepUSB) – see Tutorial #57 for details.
PART 7 – GRUB4DOS MISC COMMAND, INTERNAL VARIABLES AND FUNCTIONS
Using dd to edit sectors
We can map a drive in memory, copy sectors to it, edit the sector contents and then write the sector back as follows:
This example will change sector 63 (0x3e) of your disk 0 (i.e. USB boot drive) by changing the last byte (0x1ff) at the end of the 512 byte sector!
(md) is the whole of RAM, so cat –hex (md)+1 will list 512 bytes from memory address 0 (the interrupt table). (md)2+1 will list the BIOS data area which starts at 400h.
set A=*0x475 && 0xff will put a value from memory into the variable A.
BIOS location 475h is the BIOS hard disk count.
cat –hex (md)0x800+1 will list memory starting at 1M (extended memory) start ‘sector’ 800hex * 200h bytes per sector = 1Mb
# turn off grub4dos auto-decompression
write 0x82a4 1
# map a ramdrive in memory as device 8 as we use --mem it won't affect real memory address
map --mem (md)0x20+10 (8)
# now hook it so we can access it using (8) as a device name
map --hook
# now read the 63rd sector (0 is first sector so 3e is sector 63) into the memory drive
dd if=(hd0)0x3e+1 of=(8) bs=512 count=1
# display 1 sector of the memory drive (so we see the whole sector we just copied into memory)
cat --hex (8)+1
# change the byte at position 1ff hex (the last byte) to BB
write --offset=0x1ff (8) \xBB
# display the sector again
cat --hex (8)+1
# WRITE THE NEW SECTOR BACK TO HD0
dd if=(8) of=(hd0)0x3e+1 bs=512 count=1
# display 1 sector on the drive 0 - it should now has BB at the end
cat --hex (hd0)0x3e+1
# display just the one byte in hex
cat --hex --length=1 --skip=0x1ff (hd0)0x3e+1
# send the same command to a memory scratch area
cat --hex --length=1 --skip=0x1ff (hd0)0x3e+1 > (md)0x300+1
# just display on the screen the two characters for the value of the changed byte - i.e. 'BB'
cat --length=2 --skip=10 (md)0x300+1
# copy byte to scratch area in memory
cat --length=1 --skip=0x1ff (hd0)0x3e+1 > (md)0x200+1
# set variable MYBYTE to the value just written
set /a MYBYTE=*0x40000 & 0xff
echo Byte is %MYBYTE%
# turn back on grub4dos auto-decompression
write 0x82a4 0
The last few lines will print
000001FF: BB
BB
Byte is 187
Note that dd will decompress a compressed file for you: e.g.
dd if=()fred.gz of=()/empty.txt
raw command
You should be aware that as grub4dos treats any sequence of bytes that ‘look’ like a compressed file differently, some commands like dd, cat and write don’t always work as expected – so precede them with the raw prefix command!!! See here for an explanation.
If using dd to write to a file on an NTFS drive, the drive will need to be about 1K bytes or larger (this a limitation of grub4dos with NTFS). This issue has been fixed in the 0.4.6a 2015-06-05 version and later versions which have no NTFS file size limitation.
checktime command
This grub4dos command will print the current time, date and day of the week or check the time within a range, e.g.
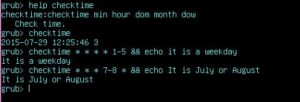
terminal command
This command can be useful when using a graphics display.
terminal | set MODE=
MODE will be ‘console’ if in a non-graphics mode (e.g. graphicsmode 3) or ‘graphics’ if in a graphics mode (e.g. as set using graphicsmode -1 800).
The terminal command also displays the number of characters per line and the number of lines per screen.
example to set spacing…
terminal --font-spacing=0:7
0 = spacing between characters, 7 = spacing between lines. –font-spacing is useful to alter the line spacing in menus and console text.
setmenu command
This new command is in grub4dos 0.4.6a 2015-08 and later versions. It can be used instead of the menusetting.gz batch file to set the size, shape and position of the menu.
Type ‘help setmenu‘ for details. Note — is two minus signs with no space.
A useful new feature is ‘setmenu –right-align’ which will align the menu and help text to the right of the menu – useful for Arabic languages.
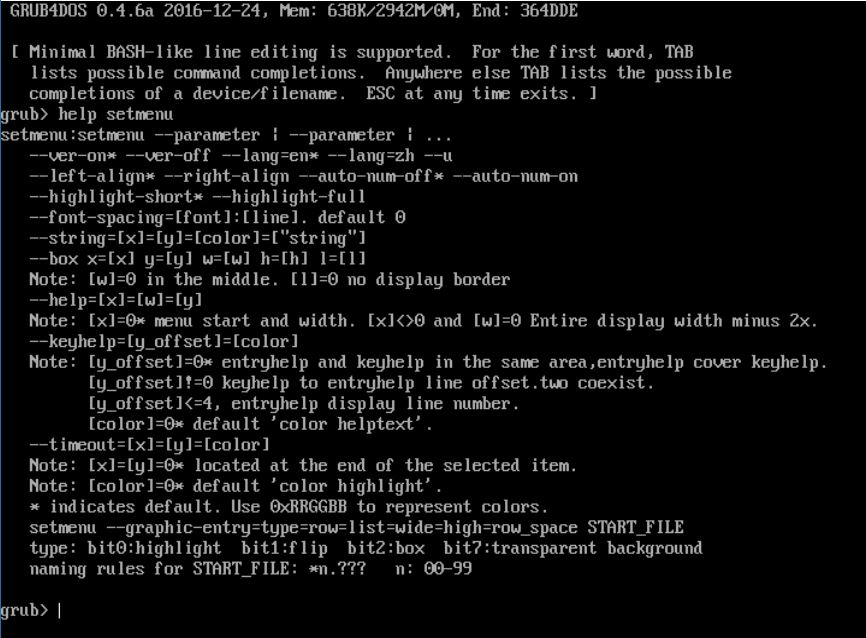
–ver-off will remove the grub4dos version header at the top of the screen
–u for resetting back to default values
The menu language can be changed to chinese using setmenu –lang=zh
The menu highlight bar can be set to the length of the menu entry or the entire width of the menu using –highlight-short or –highlight-long
The spacing between each character and each line can be changed using –font-spacing
The size and position of the menu entries and menu border can be changed using –box
The position of the menu entry help text under the menu can be changed using –help
Use –keyhelp to change the grub4dos help text position where no \n(help text) is used in menu entries title lines – e.g. the text ‘press c for command line, e for edit’. e.g. –keyhelp=61=0xe
–graphic-entry can be used to display graphical bitmaps instead of menu text – see here for details (status=experimental)
setmenu –auto-num-on will turn on menu numbering
setmenu –timeout will set the position and color of the seconds countdown if a default timeout has been set – e.g. –timeout=0=0=0xff0000 for red countdown number at the end of the menu entry
e.g.
graphicsmode -1 800
#load 800x600 wallpaper
splashimage /_ISO/Sample_MyBackground.jpg
#set colors to red with blue text as highlight
color 4f 1f

# remove grub4dos version header line and move default keyhelp menu text off the screen (line 61)
setmenu --keyhelp=61=0xe && setmenu --ver-off
# set menu area left-hand top corner at x=3 y=2 (border width=4)
setmenu --box x=3 y=2 w=64 h=30 l=4
# change position of menu help text to side of menu, x/y = 69/20 width=30 characters
setmenu --help=69=30=20
# change menu border to thin line (use 0 to turn off border)
setmenu --box l=1

title menu a\nHelp for menu a\nmore help
chainloader +1

title menu b\nHelp for menu b\nmore help
halt

title menu c\nHelp for menu c\nmore help
reboot

Please click here to look at hidden secrets within grub4dos which may be useful for anyone needing extra tweaks in menus or grub4dos batch files!
PART 8 – TESTED MENU.LST ENTRY EXAMPLES
For example menu entries and lots of tricky code please see here.
I also recommend that you look at the \_ISO\e2b\grub\QRUN.g4b grub4dos batch file in Easy2Boot to see how to boot lots of different payload files…
and don’t forget to buy my eBooks – there is an eBook on grub4dos too 😉
Downloads
Click here (OneDrive folder) if you cannot find any file mentioned in the articles on this site or Contact Me.
OVER TO YOU!
I hope this is enough to get you started. For more info on how to boot specific iso’s visit reboot.pro’s grub4dos forum here – for menu.lst entries for ISO booting see here.
If you have any hints or tips or have any successful grub4dos menu entries that you have 100% tested, please use the Contact Me tab and let me know and I will add them here.
keywords: grub, grub4dos, grubfordos, menu, introduction, howto, how to, gfx menu, gfxmenu, manual, getting started, teach, learn, menu, new version, latest, documentation, specs, how to, faq