
Table of Contents
If you want to make a USB Flash drive that can install Windows 7 32/64bit, XP Home and Pro, Vista 32/64bit and W2K8R2 see Tutorial #63 which combines this tutorial and Tutorial #43 into one!
Note: This method may not work work on some non-Intel chipset systems. The main advantage of this method however is that it is very quick to try out – just drop your ISO files on the USB drive and test it! If this method does not work then I would recommend trying WinSetupFromUSB instead (see Troubleshooting section below).
This tutorial explains how you can add an XP Install ISO file to your grub4dos bootable USB flash drive. It is the perfect companion for Tutorial #43 and can easily be added to the menu.lst used in that tutorial or see Tutorial #63 which combines this tutorial and Tutorial #43 into one.
Tutorial #82 explains how you can use one XP ISO to start an automated, semi-automated or manual install onto any system, and automatically add the specific drivers and applications for that particular system all from one USB bootable drive. For instance, you could have a bootable USB hard disk which could be used to automatically install (with all drivers and applications) a netbook, a Dell PC, an Asus notebook and an HP PC all using the same XP ISO but all having different drivers and applications without using an image.https://www.youtube.com/embed/-nZAhE0SetM
NEW!!!!! Click here for Easy2Boot – just add XP ISOs and install XP!
supports all Windows Install ISOs and all linux ISOs – just drag and drop!https://www.youtube.com/embed/ZZ3ULjFxIDs
This video moves quite fast, so use the pause button to see each step and all settings used!
Some points to note about this method of installing XP from an XP ISO file are:
- You only need the unmodified ISO file of the XP install CD (which you can make if you have the CD and do not have an ISO file) – modified ISOs may or may not work because they might contain a modified i386\winnt.sif file – so try it and see…
- You do not need to modify the XP ISO file to add mass storage drivers (F6 can be used to add Intel mass storage drivers manually)
- You can only install XP onto a system that has 1GB or more of RAM as the ISO file is loaded into RAM
- Supports modern Intel AHCI/SATA BIOSes. You can install a vanilla XP CD ISO onto any system – even if it has an AHCI-mode hard disk drive by using F6 to add extra mass storage drivers.
- This method does not produce a fully automated install – you will need to press a few keys (similar to running setup from the XP CD)
- It takes a total of approx 20 minutes from first boot from your USB flash drive to get to the fully installed Windows XP Desktop.
- If you have a non-Intel or new AHCI or RAID controller, you may need to modify the WinVBlock/FiraDisk floppy disk image (instructions provided at the end of this article).
INTRODUCTION
This method uses WinVBlock and/or FiraDisk which are virtual disk drivers (RAM disks) which can be recognised by grub4dos and XP.
Both virtual disk drivers are similar and both do a similar job. I found WinVBlock to be faster during the STEP 1 file copy stage for some reason, but on some hardware platforms the XP Setup failed during the GUI mode ( STEP 2). So for a reliable method, I would recommend always using both FiraDisk and WinVBlock unless you can be bothered to experiment to see if only one is needed! However, if you get problems (e.g. BSOD) just try one of the FiraDisk or WInVBlock drivers.
On your USB Drive you will only need these 4 or 5 files after you follow this tutorial:
- menu.lst – two menu items are needed in this file – add them to your existing file if you already have one
- grldr – this is copied on when you install grub4dos using RMPrepUSB
- winvblock.ima.gz – this file is a floppy disk image which contains txtsetup.oem and WinVBlock and FiraDisk driver + added Intel AHCI and RAID drivers for XP
- XP.ISO – this is a copy of a standard XP SP2 or SP3 install CD-ROM
- PCIID.ima.gz – optional floppy disk image which runs FreeDOS and lists the Mass Storage PCI IDs in your system
ALTERNATIVE DOWNLOAD: winvblockJmicron_C600.ima.gz.gz (see bottom of page – unzip it to get new winvblock.ima.gz file) – experimental F6 floppy disk which includes:
JMicron JMB363 PCI Express to SATA II x2 and PATA Host Controller – PCI\VEN_197B&DEV_2363
Intel C600/X79 series chipset 6-Port SATA AHCI Controller – 1D02 – PCI\VEN_8086&DEV_1D02
Only use if you have one of these two devices – otherwise use the standard download.
During testing, I found that WinVBlock failed when used with a DQ57 Intel mainboard in STEP 2 and prompted me for a cmprops.dll file which it could not find as the virtual CD loaded by grub4dos had disappeared! I also got the same error when running under the QEMU emulator. If however, I used FiraDisk, then it installed XP fine. Here are my test results for an HP mini 100e netbook (Atom N455 CPU) and an Intel DQ67OW Intel Series 6 chipset mainboard (both running under BIOS=AHCI HDD):
- Atom + WinVBlock + AHCI = works
- Atom + FiraDisk + WinVBlock + AHCI = works
- Atom + Firadisk + AHCI= works
- DQ67 + WinVBlock + AHCI= missing files cmprops.dll, iexplore_ex_
- DQ67 + Firadisk + AHCI= works
- DQ67 + WinVBlock + Firadisk + AHCI = works
- DQ67 + FiraDisk + WinVBlock + AHCI = works
AIM
To boot a PC or notebook from a USB Drive (USB flash drive or USB hard disk) and install XP onto the hard disk of that computer, even if the computer BIOS only supports AHCI mode for the hard disk (no BIOS IDE/Compatible mode in the BIOS menu). No special nLited or modified XP CD/ISO is required.
This tutorial was tested by installing an Atom based netbook (HP mini 100e netbook – SATA AHCI mode) which did not have an IDE/Compatibility mode setting in it’s BIOS and also on an Intel DQ67 board in both AHCI and IDE hard disk modes.
METHOD
1. Create an empty folder on your Windows hard drive – let’s call it C:\XPINST.
(Note: you do not need to use the exact same filenames or paths mentioned in this tutorial, you can change these to anything you like as long as the menu entries match the file paths.)
2. Add your unmodified XP SP3 ISO file to this new C:\XPINST folder (modified ISOs may not work). If you do not have an XP Setup ISO file (XP install CD ISO), then make one from an XP install CD using an iso imaging tool such as Nero. MagicISO can also do this – follow the tutorial here. Alternatively, use WinImage – Disk – Use CD-ROM F:, then Disk – Create CD-ROM ISO image…
Name the file XP.ISO and place it in the C:\XPINST folder.
3. Download the file winvblock.ima.gz from the Beta Downloads – Tutorials section of this website. Place it in the C:\XPINST folder (do not unzip it).
4. Prepare a menu.lst file. If you already have one on your USB bootable drive that you use with grub4dos, then cut and paste the following entries into it. If you do not already have a menu.lst file, simply open Notepad (press F4 in RMPrepUSB) and cut and paste this text into menu.lst.
Save the file as C:\XPINST\Menu.lst (WARNING: If using Notepad, make sure you use File – Save As (*.*) or else it may save the file as menu.lst.txt – we need it to be called menu.lst!) .
Check that the file extension is .lst by setting Windows Explorer – Organize – Folder and Search Options – View – and untick ‘Hide extensions for known file types’ so that the file extension will be displayed.
menu.lst
# hd0 is USB
# hd1 is real HDD #note: --mem is not needed to load XP.ISO in this step
 title INSTALL XP - STEP 1 - XP Setup from ISO file using FiraDisk\nRemember to select both AHCI driver AND FiraDisk driver!!!
 find --set-root --ignore-floppies --ignore-cd /winvblock.ima.gz
 map --mem /winvblock.ima.gz (fd0)
 map --mem /winvblock.ima.gz (fd1)
 #if this loads the ISO into memory slowly - then you need to run WinContig on the ISO file on your USB drive to speed it up!
 map /XP.iso (0xff) || map --mem /XP.iso (0xff)
 map (hd0) (hd1)
 map (hd1) (hd0)
 map --hook
 root (0xff)
 if not exist (0xff)/i386/setupldr.bin echo WARNING: The ISO is not an XP Install ISO!!! && pause
 chainloader (0xff)/i386/setupldr.bin || chainloader (0xff)/I386/SETUPLDR.BIN || chainloader (0xff)
 pause If you have an AHCI HDD you MUST press F6 when prompted, then hit S to select WinVBlock or FiraDisk (recommended) driver, then hit S again to select your AHCI driver (e.g. Atom Netbook=WinVBlock+ICH7R/DH, DQ67 series 6=FiraDisk+Desktop,Workstation,Server Express)
 pause Now quickly hit [Enter] twice (and then F6 if you need to install an AHCI driver) …


 #hd0 is USB
 #hd1 is real HDD
 #boot.ini
 #note: --mem is used first - if not enough memory then retry try without loading iso into ramdrive (but may get BSOD)
title INSTALL XP - STEP 2 - Install XP from ISO file (phase 2)\n2nd phase of setup will complete the install and reboot from the hard disk
 find --set-root --ignore-floppies --ignore-cd /winvblock.ima.gz
# we must load the ISO into memory, so it will be slow to load here …
 map --mem /XP.iso (0xff) || map /XP.iso (0xff)
 map (hd0) (hd1)
 map (hd1) (hd0)
 map --hook
 rootnoverify (hd0,0)
 chainloader (hd0)+1
 pause Press ENTER and then unplug this USB drive…

title INSTALL XP - STEP 1A (USE IF PREVIOUS STEP 1 GAVE BSOD 7B ERROR) - XP Setup from ISO file using FiraDisk\nRemember to select both AHCI driver AND FiraDisk driver!!!
 find --set-root --ignore-floppies --ignore-cd /winvblock.ima.gz
 map --mem /winvblock.ima.gz (fd0)
 map --mem /winvblock.ima.gz (fd1)
 map --mem /XP.iso (0xff)
 map (hd0) (hd1)
 map (hd1) (hd0)
 map --hook
 root (0xff)
 chainloader (0xff)/i386/setupldr.bin || chainloader (0xff)/I386/SETUPLDR.BIN || chainloader (0xff)
 pause If you have an AHCI HDD you MUST press F6 when prompted, then hit S to select WinVBlock or FiraDisk (recommended) driver, then hit S again to select your AHCI driver (e.g. Atom Netbook=WinVBlock+ICH7R/DH, DQ67 series 6=FiraDisk+Desktop,Workstation,Server Express)
 pause Now quickly hit [Enter] twice (and then F6 if you need to install an AHCI driver) …

 title INSTALL XP - STEP 2A FOR LOW RAM SYSTEMS (FASTER) - direct ISO map\nDoes not work on some systems - e.g. some Atom CPU based netbooks
 map --mem /winvblock.ima.gz (fd0)
 map --mem /winvblock.ima.gz (fd1)
 map /XP.iso (0xA0)
 checkrange 0x80 read 0x8280 && map (hd0) (hd1)
 checkrange 0x80 read 0x8280 && map (hd1) (hd0)
 map --hook
 map --rd-size=2048
 map --mem (rd)+4 (0x55)
 map --rehook
 write (0x55) #!GRUB4DOS\x00v=1\x00XP.iso\x00\xA0\x00
 rootnoverify (hd0,0)
 chainloader (hd0)+1
 pause Keep the USB drive connected until Setup completes!

 title Boot from 1st Hard Disk \nBoot from MBR of first hard disk
 map (hd0) (hd1)
 map (hd1) (hd0)
 map --hook
 chainloader (hd0)+1
 rootnoverify (hd0)

 iftitle [if exist /PCIID.ima.gz] List Mass Storage PCI IDs (run checkpci from FreeDos)\nMake a note of the PCI IDs listed and then check them against the TXTSETUP.OEM entries
 map --mem /PCIID.ima.gz (fd0)
 map --hook
 root (fd0)
 chainloader (fd0)+1
5. (recommended) Download and add the file PCIID.ima.gz for the List Mass Storage menu item, if you require this. Do NOT decompress (unzip) the .gz compressed file, just copy it to your C:\XPINST folder – e.g. \XPINST\PCIID.ima.gz.
6. Now it is time to make your bootable USB drive. If you already have a bootable USB drive with a grubdos bootloader installed, just copy the contents of the C:\XPINST folder to the USB drive. If you want to wipe a USB drive, reformat it and make it bootable, then proceed as follows:
6.1. Download and install RMPrepUSB (v2.1.618 Beta or later is recommended)
6.2. Run RMPrepUSB and set the options as follows:
1 – MAX
2 – XP INST (or any volume name you like)
3 – WinPE v2
4 – FAT16 if under 2GB, or else FAT32 or NTFS – always tick the 2PTNS box
5 – Tick the Copy OS Files box and set the path to C:\XPINST (do not tick the BartPE -> USB box)
6 – Click on Prepare Drive
8. When the format has completed, in RMPrepUSB, click on Install grub4dos and choose MBR (yes) and then hit <Enter> to copy over the grldr file when prompted.
You should now have a bootable USB drive which has the four or five files listed at the beginning of this section.
9. If you want to test that it works, press F11 (run QEMU) in RMPrepUSB and choose to create a new virtual hard disk of say 1000MB. Then you can emulate an install of XP from within Windows (it will not affect your current Windows system at all except to create a 1GiB file at the RMPrepUSB installation folder at ..\RMPrepUSB\QEMU\harddisk.img ).
HOW TO USE THE USB DRIVE TO INSTALL XP ONTO YOUR SYSTEM’S HARD DISK
You will need to boot from the USB drive twice. In STEP 2, the XP ISO file must be loaded into ram which can take a minute or two. Please watch the YouTube video,
STEP 1 (first boot)
- Plug in the USB drive to your target computer. Set the BIOS boot order so that it boots from the USB drive first.
- When the USB drive boots, you should see a menu similar to this one:
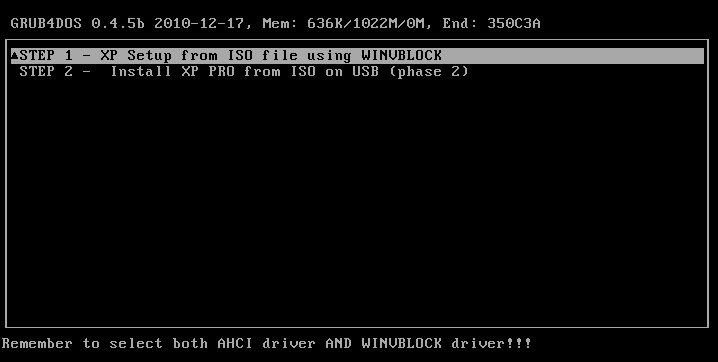
- Note: This menu does not show the List Mass Storage PCI IDs menu entry (added in preparation step 5 above).
- At this stage, if your system is in AHCI mode and you are unsure which driver you need, choose the List Mass Storage PCI IDs entry (see step 5 above) and make a note of the SATA device ID listed. Then press CTRL-ALT-DEL to reboot back to the main menu again.
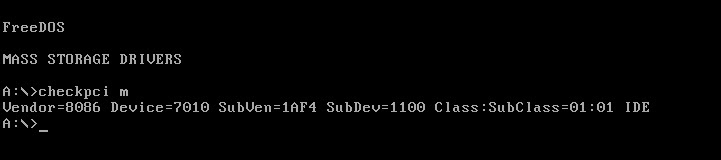
Note: Use the ‘List Mass Storage PCI IDs’ entry in the grub4dos menu to list PCI IDs of mass storage drivers and then refer to the current txtsetup.oem file at the end of this page which has all PCI IDs currently supported to find which SATA AHCI driver you need to select. (This screenshot is a bad example as it does not actually list any SATA devices so no extra SATA AHCI driver would be required in this case! If a SATA device is listed you will need to select the correct AHCI driver).
- Select STEP 1 and hit ENTER.
- Hit ENTER to go past the few prompts. You should see a message similar to ‘Press any key to boot from CD‘ – press ENTER again quickly. If the ISO starts to load slowly into RAM (as in STEP 2-2 below) then you need to run WinContig (RMPrepUSB CTRL+F2) to defrag it to make it contiguous. Normally, if the ISO file is already contiguous this step is very quick.
Note: if you get a grub4dos Error 13: Invalid or unsupported executable format – make sure your ISO has an I386 folder and the \I386\SETUPLDR.BIN file within it.
(do not use the Microsoft SP3 Update ISO – you need a bootable Install XP OS ISO!)
3. If you have a system that has a BIOS which uses AHCI mode for the SATA hard disk (many BIOS Setup menus allow you to set IDE or Compatible mode for the Hard Disk and this may avoid any problems with the dreaded 0x0000007B Blue Screen of Death if you can do this first!), you will need to load an AHCI driver by pressing F6. If you do not do this you may get a Blue Screen of Death shortly afterwards with an 0x0000007B error or possibly the SATA hard disk will simply not be listed later on.
If you get a BSOD 0x0000007B error on booting to XP Setup, try menu STEP 1A instead of STEP 1 (if you have >512MB of RAM available) – this loads the whole ISO into memory and so is slower but should not crash.
4. If your BIOS has IDE disks, or has SATA disks but the BIOS is set to IDE mode, you do not need to press F6. However, if you have an Atom based system (Netbook/EeePC, etc.) with AHCI mode set in the BIOS (for instance), here is what you need to do:
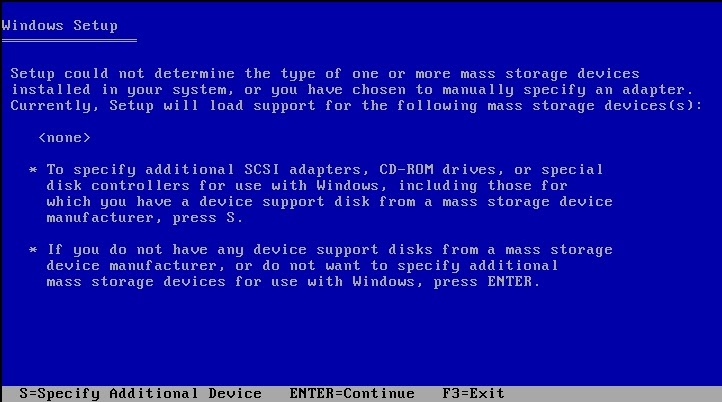
5.1. Quickly press F6 when you see the prompt at the bottom of the blue screen. You will only have a few seconds to do this. Note that on some systems, if you press F6 many times, this can cause XP Setup to hang or freeze – so only press F6 once or twice slowly.

5.2 After pressing F6, it may prompt you to press F2 – ignore this, you only need to press F6 when prompted.
5.3 A short while later you will be prompted to press ‘S=Specify Additional Device’ to select a driver. Press ‘S’ and select the WinVBlock Bus (32-bit) (should be the preselected in the list) OR the FiraDisk driver and hit ENTER to install it. WinVBlock does not work on some chipsets (e.g. DQ67 – fails in Setup GUI stage 2 during ‘copy files’) but works OK on Atom N455 netbooks, FiraDisk works on most if not all systems, so if in doubt choose the FiraDisk driver. BUT if you get a BSOD 0x0000007B error after this – try again and choose WinVBlock32 instead!
5.4. Now press ‘S’ again and select the AHCI driver from the list that is the correct one for your hardware (you need to use the UP/DOWN cursor keys to find a driver in the list more are listed below the last entry!). In the case of the Atom N455 netbook, you need the ‘Intel(R) ICH7R/DH SATA AHCI Controller‘.
NOTE: If you are unsure of which driver you need to choose, you should run ‘List Mass Storage PCI IDs’ from the menu before you start STEP 1 and then refer to the table here.

- ALWAYS select the FiraDisk Driver (or use the WinVBlock Bus 32-bit driver if you want to experiment).
- Use the UP/DOWN cursor keys to select another driver (the list will scroll down to show more drivers).
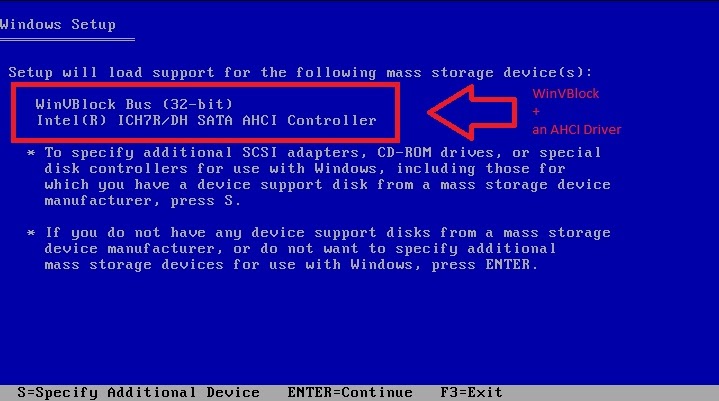
5.5 You should now see that the two drivers are now listed under ‘Setup will load support for the following mass storage device(s):’ list, one should be the WinVBlock driver or FiraDisk driver and the other should be the AHCI driver you just selected. Press Enter to Continue. You should see a ‘Setup is Starting Windows‘ message. A BSOD at this point indicates you forgot to include the WinVBlock/FiraDisk driver!
5.6 At the ‘Welcome to Setup’ screen press ENTER to set up Windows XP and then press F8 to agree to the EULA. Press ESC as you don’t want to repair the current installation. Select the partition you want to install XP to in the usual way.
IMPORTANT NOTE: If an AHCI driver is needed and you did not select exactly the correct AHCI driver entry, then you will only see your USB drive listed by Windows Setup and no hard disk! If this happens you will have to reboot and choose STEP 1 again and press F6 and select a different AHCI driver (or use the Find PCIID menu to find out which SATA controller you have and then refer to the listing at the bottom of the page to find out it’s name as it appears in the XP menu).
6. You can delete and reformat the hard disk partitions here if you wish (make sure you don’t format your USB drive by mistake though!). Then the copy files textmode phase should now begin:
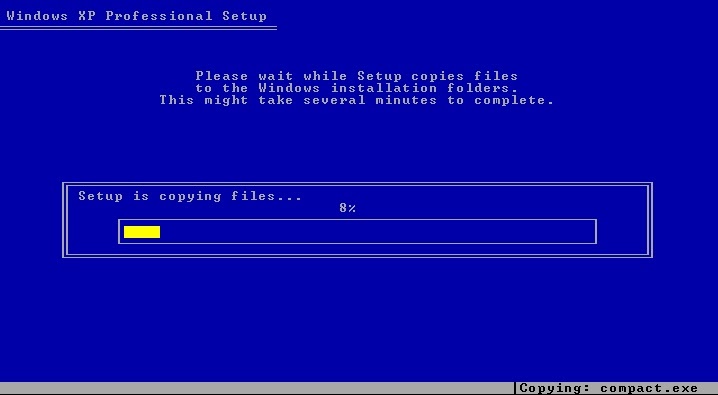
At the end of this phase, the computer will reboot and you should again see the menu.lst menu choices (assuming you have set the BIOS boot order to boot to USB devices first). You need to ensure the system reboots back to the USB drive again.
STEP 2 (2nd reboot)
- If you don’t see the menu shown in Step 1.2 above, then boot from the USB drive again.
- Now choose the 2nd menu item ‘STEP 2 – Install XP from ISO on USB (phase 2)‘. you should see the ISO file load into memory and the memory counter incrementing as the ISO file loads into memory –
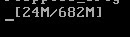
– until the whole iso file is loaded (682Mb in this case). If you do not have enough memory in your system, the iso will be mapped directly and the XP GUI may or may not crash! If it does crash because you have less than 1GB of RAM in your system, reboot to the USB drive again and try the LOW RAM option (which may work if you are lucky!).
When the whole ISO file has loaded into memory, press ENTER as instructed to boot from the Internal hard disk and then remove the USB drive (unplug it) – it is no longer needed if the ISO file was loaded into memory. If in doubt (if you saw no memory counter as shown above), leave the USB drive connected – if the Windows GUI mode has a problem later, reboot and try the STEP 2 LOW RAM menu item instead.
The XP GUI install should now proceed just like a normal XP setup. If you are prompted to accept the unsigned Virtual floppy driver (‘not passed Logo testing’), just click on OK.
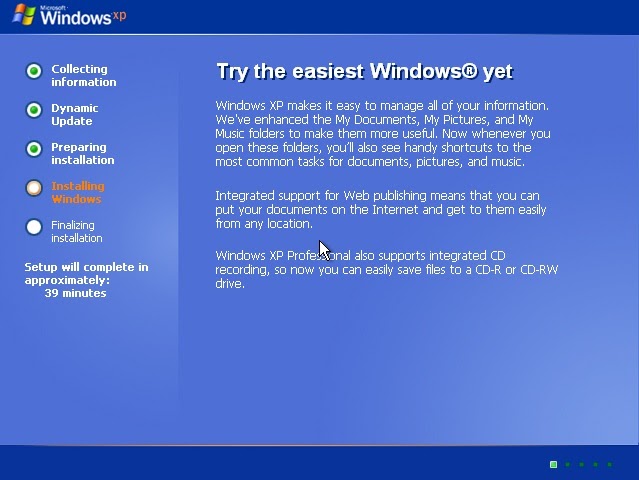
After the installation of Windows XP has finished, you will need to add any extra drivers, etc. to your new Windows XP OS in the usual way.
Troubleshooting
Stop error 0x0000007B just after using STEP 1 usually means XP cannot access the USB disk for some reason. This is unusual but can usually be fixed by using STEP1A instead so it loads the ISO into memory first. If you did not press F6 and select the Firadisk or WinVBlock driver, then you will get a 7B error (unless you use STEP 1A).
Stop error 0x0000007B usually means XP cannot access the hard disk. This usually indicates that you have not loaded the correct Mass Storage Driver (hard disk driver or AHCI/RAID driver) for your system when you used F6 in STEP 1.
Stop error 0x00000077 KERNEL_STACK_INPAGE_ERROR – see http://support.microsoft.com/kb/228753 for more info. This usually occurs (annoyingly!) right at the very end of STEP 2 and especially on Atom based netbooks and PCs. You should only see this error if you tried using the LOW RAM STEP 2 option. If the ISO file is loaded into RAM (using –mem) then this error can be avoided.
STEP 2 is very slow to start and shows a [xxM/xxxM] progress counter – this is the expected behaviour. The most reliable (trouble free) method is to always load the ISO into memory for Step 2. If you do NOT see this counter after choosing STEP 2 from the menu, then you should use the Drive – Make all files contiguous option in RMPrepUSB to ensure you ISO file is contiguous.
STEP 1 is very slow to start and shows a [xxM/xxxM] progress counter – this should not cause a problem but does indicate that the ISO file on the USB drive is not contiguous – it would load XP Setup almost instantly if you made the ISO file contiguous using the Drive – Make all files contiguous option in RMPrepUSB to ensure you ISO file is contiguous. If this fails due to lack of space on the USB drive, copy all files to your hard disk and remake the USB drive and then copy all the files back again so that the files on the USB drive will not be fragmented.
System reboots at very beginning of Step 2 (GUI mode setup) just after ‘Setup is being restarted…’ appears – this may indicate a problem with the Firadisk or WinVBlock driver files. Re-download and re-copy the files to your USB drive. If the system gives a 0x0000007B BSOD error on reboot after step 2, try using both Firadisk+WinVBlock+AHCI driver next time you re-install!
‘Files Needed’ pop-up – then the file ‘cmprops.dll’ is needed when you click on the Browse button – this occurs typically when Windows resets the USB devices and the connection with the ISO file on the USB device is lost. If the ISO file is loaded into RAM (using –mem) then this error can be avoided. You could also try plugging the USB drive into a different USB port at this point to see if it is re-detected and then try to continue.
Files Needed pop-up – then the file ‘asms’ is needed – this usually occurs when STEP 1 has been completed and then XP Setup boots from the hard disk instead of re-booting from your USB drive for the second time. Insert the USB drive and boot from it, then choose STEP 2 from the USB boot menu.
Tip: Check the MD5 checksum of the XP ISO file by running RMPrepUSB and typing ALT+F2 and select the ISO file on the USB drive. Make sure the MD5 number is correct (or at least the same as the MD5 checksum of the iso file on your hard drive). It is not uncommon for large files on a flash drive to be corrupt and this would cause BSOD errors!
Error copying WinVBlock or Firadisk files during file copy stage – if you have to skip the copy of each of these files during the file copy stage, the problem is usually that you are using an ISO which contains an /i386 folder with a winnt.sif file that has OemPreinstall=Yes in the [Unattended] section. Set this to No to fix it.
STEP 1 – blank screen – ‘Setup is starting Windows‘ after copy files in first stage followed by a blank screen – This may be caused by a buggy bios, edit the menu to insert one of the following e820cycles commands just before the map –hook line – only one may work and it will only work on that specific BIOS! Tip: try 3 first and then 0 and then all the others.
map –e820cycles=0 means int15 will never be hooked.
map –e820cycles=1 means int15 will be hooked at first, but after 1 cycle of call to int15 E820, it will un-hook and not hook again.
map –e820cycles=2 means int15 will be hooked at first, but after 2 cycles of call to int15 E820, it will un-hook and not hook again.
map –e820cycles=3 means int15 will be hooked at first, but after 3 cycles of call to int15 E820, it will un-hook and not hook again.
map –e820cycles=4 means int15 will be hooked at first, but after 4 cycles of call to int15 E820, it will un-hook and not hook again.
map –e820cycles=-1 means int15 always hook – this is the default for grub4dos versions after July 2011
Here “unhook” means the grub4dos int15 E820 handler will unhook and will not modify the returned values for memory size, so that the original BIOS int15 entry will be restored to the interrupt vector table.
The disk or CD you inserted may be damaged. – white text on blue background – occurs just after F8 and disk format in XP Step 1 – a file reference in an INF file loaded via txtsetup.oem on the F6 floppy disk does not exist. Look through the INF files and check that all files specified are present.
WinSetupFromUSB
If this method does not work for you (or rather your particular target system), then I recommend using WinSetupFromUSB. It takes rather longer to make the USB drive using WinSetupFromUSB but it should be simpler and give more reliable results than the method described above. WinSetupFromUSB prepares a new, modified ISO file rather than using your original ISO file. It also works better if your ISO has been modified or contains a modified winnt.sif file.
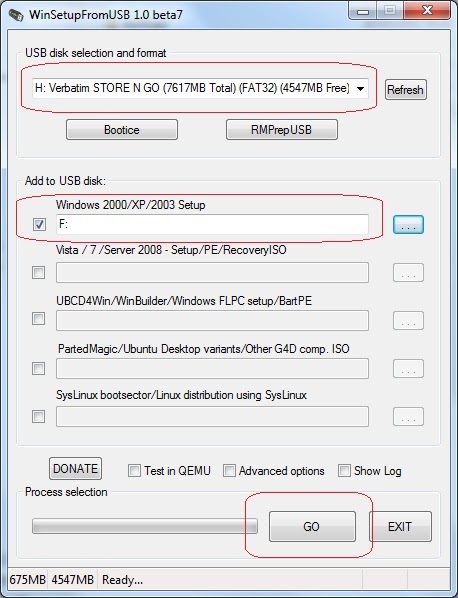
- To use WinSetupFromUSB, use the RMPrepUSB button to format your USB drive (if required).
- Then select your USB destination drive.
- Then select your XP CD (note: it is MUCH FASTER than using a real CD if you mount the XP ISO file as a virtual drive using ImDisk first!). Then press GO.
Rufus
Another alternative is Rufus. Rufus converts an ISO file to a USB drive – it will re-format a USB drive and copy over the contents of an ISO and make it all work! It works with many different ISOs including XP, Win7/8, linux ISOs, etc. Click on the CD icon to set the name of the ISO file and then click Start.
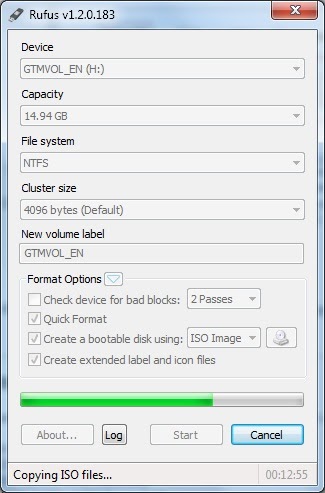
TABLE OF PCI IDs and DRIVER DESCRIPTIONS
If you have an AHCI PCI ID (SATA) for an Intel chipset listed by the PCIID menu entry, you can look up the correct driver to select using the table below:
VENDOR=8086 DEVICE=27C1 “Intel(R) ICH7R/DH SATA AHCI Controller”
VENDOR=8086 DEVICE=2681 “Intel(R) ESB2 SATA AHCI Controller”
VENDOR=8086 DEVICE=27C5 “Intel(R) ICH7M/MDH SATA AHCI Controller”
VENDOR=8086 DEVICE=2821 “Intel(R) ICH8R/DH/DO SATA AHCI Controller”
VENDOR=8086 DEVICE=2829 “Intel(R) ICH8M-E/M SATA AHCI Controller”
VENDOR=8086 DEVICE=2922 “Intel(R) ICH9R/DO/DH SATA AHCI Controller”
VENDOR=8086 DEVICE=2929 “Intel(R) ICH9M-E/M SATA AHCI Controller”
VENDOR=8086 DEVICE=3A02 “Intel(R) ICH10D/DO SATA AHCI Controller”
VENDOR=8086 DEVICE=3A22 “Intel(R) ICH10R SATA AHCI Controller”
VENDOR=8086 DEVICE=3B29 “Intel(R) 5 Series 4 Port SATA AHCI Controller”
VENDOR=8086 DEVICE=3B2F “Intel(R) 5 Series 6 Port SATA AHCI Controller”
VENDOR=8086 DEVICE=3B22 “Intel(R) 5 Series/3400 Series SATA AHCI Controller”
VENDOR=8086 DEVICE=1C02 “Intel(R) Desktop/Workstation/Server Express Chipset SATA AHCI Controller”
VENDOR=8086 DEVICE=1C03 “Intel(R) Mobile Express Chipset SATA AHCI Controller”
VENDOR=8086 DEVICE=2682 “Intel(R) ESB2 SATA RAID Controller”
VENDOR=8086 DEVICE=27C3 “Intel(R) ICH7R/DH SATA RAID Controller”
VENDOR=8086 DEVICE=27C6 “Intel(R) ICH7MDH SATA RAID Controller”
VENDOR=8086 DEVICE=2822 “Intel(R) Desktop/Workstation/Server Express Chipset SATA RAID Controller”
VENDOR=8086 DEVICE=282A “Intel(R) Mobile Express Chipset SATA RAID Controller”
For PCI Ids not on this list, see here.
Here are some mainboard or notebook models and the AHCI driver description:
PCI IDs MODEL NAME Description for AHCI driver
8086 3B29 Acer Aspire 7741G Intel(R) 5 Series 4 Port SATA AHCI Controller
8086 27C1 Atom based netbooks Intel(R) ICH7R/DH SATA AHCI Controller
8086 1C02 Intel DQ67 (series 6 chipset) Intel(R) Desktop/Workstation/Server Express Chipset SATA AHCI Controller
8086 24D1 ASUS P4P800 SE Intel 82801EB Ultra ATA Storage Controllers (submitted by LEO33 – thanks!)
8086 24DB ASUS P4P800 SE Intel 82801EB Ultra ATA Storage Controllers (submitted by LEO33 – thanks!)
8086 2829 VM VirtualBox Chipset=ICH9 Intel(R) ICH8M-E/M SATA AHCI Controller
Please send me more PCI IDs and driver names and PC/notebook models that you have successfully used and I will add to this list.
Also, if your system did not require a SATA driver, let me know too.
APPENDIX – HOW TO ADD A DIFFERENT MASS STORAGE DRIVER
This section describes how to modify the WinVBlock driver floppy disk image and add the correct AHCI or mass storage driver for your hardware, so that it will contain the correct driver for your system. I will assume you have both 7Zip and WinImage already installed on your ‘office’ PC.
We need to combine the WinVBlock files in the floppy image file and the AHCI Driver files for your system and then edit the TXTSETUP.OEM file so that it has both the AHCI driver entries and the WinVBlock entries in a single TXTSETUP.OEM file. These instructions apply equally to the FiraDisk TXTSETUP,OEM file.
1. Download the correct F6 AHCI/RAID disk image/files for your system. This is normally a 1.44MB floppy disk image, or a group of files comprising txtsetup.oem and at least one .sys, .inf and .cat file. The system manufacturer normally provides these files.
For instance, if you have an Asus EeePC, go to http://support.asus.com/download/download.aspx?SLanguage=en-us and select you model of EeePC, then choose XP as the OS and download the AHCI driver from the SATA drivers section. This is just an example – the Atom AHCI drivers are already included in the WinVBlock.ima.gz disk image.
Place them in a new empty AHCI folder on your hard drive.
2. Extract the image file from the WinVBlock.ima.gz file as follows: double-click on the .gz file to open it in 7Zip and extract the 1.44MB IMA image file to a folder – then double-click the winvblock.ima file to open it in WinImage. Extract the WinVBlock_txtsetup_orig.txt file from this image to a folder on your hard drive.
3. Load the two files txtsetup.oem (from your downloaded file in STEP 1) and the WinVBlock_txtsetup_orig.txt file from the WinVBlock.ima image into a text editor so you can cut and paste from one to the other (or use the FiraDisk_txtsetup_orig,txt file instead if you want FiraDisk).
New Method: Just simply add the new text from your txtsetup.oem file to the bottom of the existing one! It should work fine. No need to do the complicated editing mentioned below!
We now need to merge the text inside these two txtsetup.oem files. It is easiest to copy the few lines of the WinVBlock (or FiraDisk) text file into your new, larger AHCI txtsetup.oem file. Each section needs to be copied separately – see below for an cut-down example. Save the new file as TXTSETUP.OEM in your AHCI drivers folder (overwriting the original one).
4. The last step is to make a 1.44MB floppy disk image of the new contents. Double-click on the WinVBlock.ima file to open it in WInImage, now use the Image – Inject a Folder toolbar to add all the files from your prepared AHCI driver folder. Then use File – Save As and save it as an .IMA file. You can then use 7Zip to compress it to a .gz file and place it on your USB drive to replace the current one.
Tutorial #33 has some tips on using WinImage with floppy disk images.
—- WinVBlock TXTSETUP.OEM file —-
[Disks]
disk = “WinVBlock Driver Disk”,\WinVBlk.inf,\
[Defaults]
scsi = WinVBlock32
[scsi]
WinVBlock32 = “WinVBlock Bus (32-bit)”
WinVBlock64 = “WinVBlock Bus (64-bit)”
[Files.scsi.WinVBlock32]
driver = disk,WVBlk32.Sys,WinVBlock
inf = disk,WinVBlk.Inf
catalog = disk,WinVBlk.Cat
[Files.scsi.WinVBlock64]
driver = disk,WVBlk64.Sys,WinVBlock
inf = disk,WinVBlk.Inf
catalog = disk,WinVBlk.Cat
[Config.WinVBlock]
value=””,TxtSetupInstalled,REG_DWORD,1
[HardwareIds.scsi.WinVBlock32]
id=”ROOT\WINVBLOCK”,”WinVBlock”
id=”Detected\WinVBlock”,”WinVBlock”
[HardwareIds.scsi.WinVBlock64]
id=”ROOT\WINVBLOCK”,”WinVBlock”
id=”Detected\WinVBlock”,”WinVBlock”
—- EXAMPLE AHCI DRIVER TXTSETUP.OEM FILE (yours may be much bigger!) —–
; Copyright (c) 2003-08 Intel Corporation
;#############################################################################
;#
;# Filename: TXTSETUP.OEM
;#
;#############################################################################
[Disks]
disk1 = “Intel(R) Rapid Storage Technology Driver”, iaStor.sys, \
[Defaults]
scsi = iaStor_7RDH
;#############################################################################
[scsi]
; iaAHCI.inf
iaAHCI_7RDH = “Intel(R) ICH7R/DH SATA AHCI Controller”
;#############################################################################
; iaAHCI.inf
[Files.scsi.iaAHCI_7RDH]
driver = disk2, iaStor.sys, iaStor
inf = disk2, iaAHCI.inf
catalog = disk2, iaAHCI.cat
;#############################################################################
[Config.iaStor]
value = “”, tag, REG_DWORD, 1b
value = “”, ErrorControl, REG_DWORD, 1
value = “”, Group, REG_SZ, “SCSI Miniport”
value = “”, Start, REG_DWORD, 0
value = “”, Type, REG_DWORD, 1
;#############################################################################
; iaAHCI.inf
[HardwareIds.scsi.iaAHCI_7RDH]
id = “PCI\VEN_8086&DEV_27C1&CC_0106″,”iaStor”
—– COMBINED RESULT —–
Note: You can simply append one file to the other – you don’t need to combine the lines as shown below (wish I’d known that before!).
Here is the end result when we combine the two files by adding the WinVBlock entries to the larger AHCI txtsetup.oem file – note how the Default has been changed to be WINVBLOCK, so if F6 is not pressed, this is always loaded by default. The same procedure applies if using the FiraDisk txtsetup.oem file.
The changes made by adding WinVBlock are in red.
; Copyright (c) 2003-08 Intel Corporation
;#############################################################################
;#
;# Filename: TXTSETUP.OEM
;#
;#############################################################################
[Disks]
disk1 = “Intel(R) Rapid Storage Technology Driver”, iaStor.sys, \
disk = “WINVBLOCK DISK”,\winvblk.inf,\
[Defaults]
scsi = WINVBLOCK
#scsi = iaStor_7RDH
;#############################################################################
[scsi]
WinVBlock32 = “WinVBlock Bus (32-bit)”
WinVBlock64 = “WinVBlock Bus (64-bit)”
; iaAHCI.inf
iaAHCI_7RDH = “Intel(R) ICH7R/DH SATA AHCI Controller”
;#############################################################################
; iaAHCI.inf
[Files.scsi.iaAHCI_7RDH]
driver = disk1, iaStor.sys, iaStor
inf = disk1, iaAHCI.inf
catalog = disk1, iaAHCI.cat
[Files.scsi.iaStor_7RDH]
driver = disk1, iaStor.sys, iaStor
inf = disk1, iaStor.inf
catalog = disk1, iaStor.cat
;#############################################################################
[Config.iaStor]
value = “”, tag, REG_DWORD, 1b
value = “”, ErrorControl, REG_DWORD, 1
value = “”, Group, REG_SZ, “SCSI Miniport”
value = “”, Start, REG_DWORD, 0
value = “”, Type, REG_DWORD, 1
;#############################################################################
; iaAHCI.inf
[HardwareIds.scsi.iaAHCI_7RDH]
id = “PCI\VEN_8086&DEV_27C1&CC_0106″,”iaStor”
[Files.scsi.WinVBlock32]
driver = disk,WVBlk32.Sys,WinVBlock
inf = disk,WinVBlk.Inf
catalog = disk,WinVBlk.Cat
[Files.scsi.WinVBlock64]
driver = disk,WVBlk64.Sys,WinVBlock
inf = disk,WinVBlk.Inf
catalog = disk,WinVBlk.Cat
[Config.WinVBlock]
value=””,TxtSetupInstalled,REG_DWORD,1
[HardwareIds.scsi.WinVBlock32]
id=”ROOT\WINVBLOCK”,”WinVBlock”
id=”Detected\WinVBlock”,”WinVBlock”
[HardwareIds.scsi.WinVBlock64]
id=”ROOT\WINVBLOCK”,”WinVBlock”
id=”Detected\WinVBlock”,”WinVBlock”
HOW TO FIND THE CORRECT DRIVER FOR YOUR SYSTEM
Examine the PCI IDs in the txtsetup.oem file (see end of this page) and compare this with the PCI IDs from your system. For instance, if the SATA PCI ID is listed as Vendor=8086 Device=1C02 by the List Mass storage PCI ID utility, look for this in the listing of txtsetup.oem at the end of this page. You will find it listed as:
[HardwareIds.scsi.iaAHCI_DesktopWorkstationServer]
id = “PCI\VEN_8086&DEV_1C02&CC_0106″,”iaStor”
Now look for the section that lists iaAHCI_DesktopWorkstationServer in the [SCSI] section – it lists:
iaAHCI_DesktopWorkstationServer = “Intel(R) Desktop/Workstation/Server Express Chipset SATA AHCI Controller”
So Intel(R) Desktop/Workstation/Server Express Chipset SATA AHCI Controller is the correct driver to select for PCI ID 8086 1C02.
Note: 8086 is the vendor ID for Intel. If you have an 8086 Vendor ID then the driver will probably be in the txtsetup.oem list – if it is not an Intel SATA PCI ID you may need to modify the txtsetup.oem file and add more drivers.
CURRENT TXTSETUP.OEM FILE IN WINVBLOCK.IMA.GZ DISK IMAGE
The file listed below is what is currently in the txtsetup.oem file in the WinVBlock.ima.gz compressed floppy disk image in the Beta Downloads section of this website, as used in this tutorial. Note that firadisk is also included so you can select either WinVBlock or FiraDisk (or both!).
; Copyright (c) 2003-10 Intel Corporation
;#############################################################################
;#
;# Filename: TXTSETUP.OEM
;#
;#############################################################################
[Disks]
disk1 = “Intel(R) Rapid Storage Technology Driver”, iaStor.sys, \
diskf=”FiraDisk Installation Disk”,\firadisk.inf,\
disk = “WinVBlock Driver Disk”,\WinVBlk.inf,\
[Defaults]
#scsi = iaStor_Mobile
#SCSI=firadisk
scsi = firadisk
#scsi = WINVBLOCK32
;#############################################################################
[scsi]
Default = “Choose Firadisk (or WinvBlock), then press S then choose your SATA driver”
firadisk=”FiraDisk Driver (32-bit)”
firadisk64=”FiraDisk Driver (64-bit)”
WinVBlock32 = “WinVBlock Bus (32-bit)”
WinVBlock64 = “WinVBlock Bus (64-bit)”
; iaAHCI.inf
iaAHCI_7RDH = “Intel(R) ICH7R/DH SATA AHCI Controller”
iaAHCI_ESB2 = “Intel(R) ESB2 SATA AHCI Controller”
iaAHCI_7MMDH = “Intel(R) ICH7M/MDH SATA AHCI Controller”
iaAHCI_8RDHDO = “Intel(R) ICH8R/DH/DO SATA AHCI Controller”
iaAHCI_8MEM = “Intel(R) ICH8M-E/M SATA AHCI Controller”
iaAHCI_9RDODH = “Intel(R) ICH9R/DO/DH SATA AHCI Controller”
iaAHCI_9MEM = “Intel(R) ICH9M-E/M SATA AHCI Controller”
iaAHCI_10DDO = “Intel(R) ICH10D/DO SATA AHCI Controller”
iaAHCI_10R = “Intel(R) ICH10R SATA AHCI Controller”
iaAHCI_5 = “Intel(R) 5 Series 4 Port SATA AHCI Controller”
iaAHCI_5_1 = “Intel(R) 5 Series 6 Port SATA AHCI Controller”
iaAHCI_5_1_1 = “Intel(R) 5 Series/3400 Series SATA AHCI Controller”
iaAHCI_DesktopWorkstationServer = “Intel(R) Desktop/Workstation/Server Express Chipset SATA AHCI Controller”
iaAHCI_Mobile = “Intel(R) Mobile Express Chipset SATA AHCI Controller”
; iaStor.inf
iaStor_ESB2 = “Intel(R) ESB2 SATA RAID Controller”
iaStor_7RDH = “Intel(R) ICH7R/DH SATA RAID Controller”
iaStor_7MDH = “Intel(R) ICH7MDH SATA RAID Controller”
iaStor_DesktopWorkstationServer = “Intel(R) Desktop/Workstation/Server Express Chipset SATA RAID Controller”
iaStor_Mobile = “Intel(R) Mobile Express Chipset SATA RAID Controller”
;#############################################################################
; iaAHCI.inf
[Files.scsi.iaAHCI_ESB2]
driver = disk1, iaStor.sys, iaStor
inf = disk1, iaAHCI.inf
catalog = disk1, iaAHCI.cat
[Files.scsi.iaAHCI_7RDH]
driver = disk1, iaStor.sys, iaStor
inf = disk1, iaAHCI.inf
catalog = disk1, iaAHCI.cat
[Files.scsi.iaAHCI_7MMDH]
driver = disk1, iaStor.sys, iaStor
inf = disk1, iaAHCI.inf
catalog = disk1, iaAHCI.cat
[Files.scsi.iaAHCI_8RDHDO]
driver = disk1, iaStor.sys, iaStor
inf = disk1, iaAHCI.inf
catalog = disk1, iaAHCI.cat
[Files.scsi.iaAHCI_8MEM]
driver = disk1, iaStor.sys, iaStor
inf = disk1, iaAHCI.inf
catalog = disk1, iaAHCI.cat
[Files.scsi.iaAHCI_9RDODH]
driver = disk1, iaStor.sys, iaStor
inf = disk1, iaAHCI.inf
catalog = disk1, iaAHCI.cat
[Files.scsi.iaAHCI_9MEM]
driver = disk1, iaStor.sys, iaStor
inf = disk1, iaAHCI.inf
catalog = disk1, iaAHCI.cat
[Files.scsi.iaAHCI_10DDO]
driver = disk1, iaStor.sys, iaStor
inf = disk1, iaAHCI.inf
catalog = disk1, iaAHCI.cat
[Files.scsi.iaAHCI_10R]
driver = disk1, iaStor.sys, iaStor
inf = disk1, iaAHCI.inf
catalog = disk1, iaAHCI.cat
[Files.scsi.iaAHCI_5]
driver = disk1, iaStor.sys, iaStor
inf = disk1, iaAHCI.inf
catalog = disk1, iaAHCI.cat
[Files.scsi.iaAHCI_5_1]
driver = disk1, iaStor.sys, iaStor
inf = disk1, iaAHCI.inf
catalog = disk1, iaAHCI.cat
[Files.scsi.iaAHCI_5_1_1]
driver = disk1, iaStor.sys, iaStor
inf = disk1, iaAHCI.inf
catalog = disk1, iaAHCI.cat
[Files.scsi.iaAHCI_DesktopWorkstationServer]
driver = disk1, iaStor.sys, iaStor
inf = disk1, iaAHCI.inf
catalog = disk1, iaAHCI.cat
[Files.scsi.iaAHCI_Mobile]
driver = disk1, iaStor.sys, iaStor
inf = disk1, iaAHCI.inf
catalog = disk1, iaAHCI.cat
; iaStor.inf
[Files.scsi.iaStor_ESB2]
driver = disk1, iaStor.sys, iaStor
inf = disk1, iaStor.inf
catalog = disk1, iaStor.cat
[Files.scsi.iaStor_7RDH]
driver = disk1, iaStor.sys, iaStor
inf = disk1, iaStor.inf
catalog = disk1, iaStor.cat
[Files.scsi.iaStor_7MDH]
driver = disk1, iaStor.sys, iaStor
inf = disk1, iaStor.inf
catalog = disk1, iaStor.cat
[Files.scsi.iaStor_DesktopWorkstationServer]
driver = disk1, iaStor.sys, iaStor
inf = disk1, iaStor.inf
catalog = disk1, iaStor.cat
[Files.scsi.iaStor_Mobile]
driver = disk1, iaStor.sys, iaStor
inf = disk1, iaStor.inf
catalog = disk1, iaStor.cat
;#############################################################################
[Config.iaStor]
value = “”, tag, REG_DWORD, 1b
value = “”, ErrorControl, REG_DWORD, 1
value = “”, Group, REG_SZ, “SCSI Miniport”
value = “”, Start, REG_DWORD, 0
value = “”, Type, REG_DWORD, 1
;#############################################################################
; iaAHCI.inf
[HardwareIds.scsi.iaAHCI_ESB2]
id = “PCI\VEN_8086&DEV_2681&CC_0106″,”iaStor”
[HardwareIds.scsi.iaAHCI_7RDH]
id = “PCI\VEN_8086&DEV_27C1&CC_0106″,”iaStor”
[HardwareIds.scsi.iaAHCI_7MMDH]
id = “PCI\VEN_8086&DEV_27C5&CC_0106″,”iaStor”
[HardwareIds.scsi.iaAHCI_8RDHDO]
id = “PCI\VEN_8086&DEV_2821&CC_0106″,”iaStor”
[HardwareIds.scsi.iaAHCI_8MEM]
id = “PCI\VEN_8086&DEV_2829&CC_0106″,”iaStor”
[HardwareIds.scsi.iaAHCI_9RDODH]
id = “PCI\VEN_8086&DEV_2922&CC_0106″,”iaStor”
[HardwareIds.scsi.iaAHCI_9MEM]
id = “PCI\VEN_8086&DEV_2929&CC_0106″,”iaStor”
[HardwareIds.scsi.iaAHCI_10DDO]
id = “PCI\VEN_8086&DEV_3A02&CC_0106″,”iaStor”
[HardwareIds.scsi.iaAHCI_10R]
id = “PCI\VEN_8086&DEV_3A22&CC_0106″,”iaStor”
[HardwareIds.scsi.iaAHCI_5]
id = “PCI\VEN_8086&DEV_3B29&CC_0106″,”iaStor”
[HardwareIds.scsi.iaAHCI_5_1]
id = “PCI\VEN_8086&DEV_3B2F&CC_0106″,”iaStor”
[HardwareIds.scsi.iaAHCI_5_1_1]
id = “PCI\VEN_8086&DEV_3B22&CC_0106″,”iaStor”
[HardwareIds.scsi.iaAHCI_DesktopWorkstationServer]
id = “PCI\VEN_8086&DEV_1C02&CC_0106″,”iaStor”
[HardwareIds.scsi.iaAHCI_Mobile]
id = “PCI\VEN_8086&DEV_1C03&CC_0106″,”iaStor”
; iaStor.inf
[HardwareIds.scsi.iaStor_ESB2]
id = “PCI\VEN_8086&DEV_2682&CC_0104″,”iaStor”
[HardwareIds.scsi.iaStor_7RDH]
id = “PCI\VEN_8086&DEV_27C3&CC_0104″,”iaStor”
[HardwareIds.scsi.iaStor_7MDH]
id = “PCI\VEN_8086&DEV_27C6&CC_0104″,”iaStor”
[HardwareIds.scsi.iaStor_DesktopWorkstationServer]
id = “PCI\VEN_8086&DEV_2822&CC_0104″,”iaStor”
[HardwareIds.scsi.iaStor_Mobile]
id = “PCI\VEN_8086&DEV_282A&CC_0104″,”iaStor”
[Files.scsi.firadisk]
driver=diskf,firadisk.sys,firadisk
inf=diskf,firadisk.inf
catalog=diskf,firadisk.cat
[Config.firadisk]
[HardwareIds.scsi.firadisk]
id=”detected\firadisk”,”firadisk”
[Files.scsi.WinVBlock32]
driver = disk,WVBlk32.Sys,WinVBlock
inf = disk,WinVBlk.Inf
catalog = disk,WinVBlk.Cat
[Files.scsi.firadisk64]
driver=disk1,firadi64.sys,firadisk
inf=disk1,firadisk.inf
catalog=disk1,firadisk.cat
[Config.firadisk64]
[HardwareIds.scsi.firadisk]
id=”detected\firadisk”,”firadisk”
[Files.scsi.WinVBlock64]
driver = disk,WVBlk64.Sys,WinVBlock
inf = disk,WinVBlk.Inf
catalog = disk,WinVBlk.Cat
[Config.WinVBlock]
value=””,TxtSetupInstalled,REG_DWORD,1
[HardwareIds.scsi.WinVBlock32]
id=”ROOT\WINVBLOCK”,”WinVBlock”
id=”Detected\WinVBlock”,”WinVBlock”
[HardwareIds.scsi.WinVBlock64]
id=”ROOT\WINVBLOCK”,”WinVBlock”
id=”Detected\WinVBlock”,”WinVBlock”
RMPrepUSB Blog – please leave a comment or feedback on RMPrepUSB or this Tutorial (please mention Tutorial number).https://drive.google.com/embeddedfolderview?id=1JJPBFZPR72iQdPpiQXzu5PIL-bwm6lnG#list
Downloads
Click here (OneDrive folder) if you cannot find any file mentioned in the articles on this site or Contact Me.