
Table of Contents
NOTE: THIS IS FOR WIN7/VISTA/XP INSTALL ISO FILES ONLY.
USE EASY2BOOT FOR XP/VISTA/7/8 ISO INSTALLS + LINUX LIVE CD + ALMOST ANY OTHER ISO YOU WANT TO BOOT!
ATTENTION: This Tutorial is now outdated
Please use Easy2Boot for Windows Install ISOs – it is much easier and better!
The download for this tutorial also includes menu entries for HBCD, UBCD, DSL, Knoppix, YLMF, Acronis, PMagic, etc. to make a multiboot USB drive. Just add the correct files!
INTRODUCTION
If you have purchased a Windows 7 Professional or Ultimate computer which has a valid and legal Certificate of Authenticity (COA), then you are licensed to run Win 7 Pro or XP Pro via downgrade rights. However, many manufacturers annoyingly do not provide Recovery Media (e.g. they do not provide a bootable DVD or a bootable Flash memory stick). Asus EeePCs now do not come with any form of external recovery media feature! Some other Original Equipment Manufacturers (OEMs) include an application to allow you to make backup DVDs if they have an internal DVD writer fitted, but even if you have enough writeable DVDs (which are never provided!), the final backup contains GB’s of ‘crapware’. If any one of the DVDs get scratched you have lost your backup image for good! This is really annoying if you want to install Windows back onto your computer at a later date.
If you do manage to install Windows from a different source (perhaps borrow a friends DVD?), you then still have the problem of activating it. This normally this cannot be done unless you have the original matching OEM Recovery DVD from the same manufacturer (which is often not obtainable from the manufacturer even if you ask them!). However, you can install and activate both XP and Windows 7 onto a blank hard disk from a bootable USB Flash drive within about an hour using the method below. Activation can be done by ‘hacking’ Windows (which is against the Microsoft licensing agreement and is done at your own risk!). You will need to search for the XP SP3 iso file using your favourite search engine; since it is illegal to host Microsoft XP ISOs, I cannot provide a link for those of you that do not already have an XP Pro installation CD or copy of the ISO file.
This tutorial should only be used to install Windows on systems which have a valid Microsoft Windows licence.
This tutorial has been tested many times using an Asus EeePC 904HA netbook. It shows you how to create a multiboot USB Flash drive which can install both XP and Windows 7 onto the same system’s hard disk drive. It can also be used to boot to FreeDos (perhaps to update a BIOS) or test memory or erase a hard disk and can be expanded for many other uses just by adding the appropriate ISO files (in most cases).Unsupported embedhttps://www.youtube.com/embed/0ELgYchzgJ0
YouTube video of this Tutorial – please watch…
PROCEDURE SUMMARY
- Prepare a bootable USB flash drive using RMPrepUSB v2.1.638 or later
- Add the XP ISO file and rename it
- Add the Windows 7 iso and rename it
- Check the ISO files are contiguous and check each ISO MD5 hash is correct
- Boot from the USB flash drive, choose XP Step 1 and press F6 etc., reboot to Step 2 and install XP Pro onto the target system
- Activate Windows XP Pro
- Boot from the USB flash drive and install Windows 7 onto the target system
- Activate Windows 7
- (optional) add Hirens Boot CD, Damn Small Linux, Ophcrack, Parted Magic, Ultimate Boot CD, Knoppix, Acronis, Darki’s Boot and Nuke, etc. (the menus are already in the menu.lst download file – just add the files to your USB drive!)
HISTORY
- Original version
- v7 2012-11-16 – updated for Hirens Boot CD v15.2 ISO – see Tutorial #29 for details.
REQUIRED DOWNLOADS
Before you begin, make sure you have these 4 files…
- Windows XP Professional SP3 OEM XP ISO file – MD5=9bb3cb003e2c6005fccc28c305be05ff (search for the MD5 checksum and you should find a copy to download). If you have an XP Pro install/recovery CD, you can create an ISO file from it using MagicISO or ISODisk or any similar utility. An unmodified ISO is required, otherwise WinVBlock or FiraDisk may not load using F6.
- Note: For those of you not familiar with MD5 hash values (or CRC32 or SHA1 values), this is a way off ‘adding’ together all the bytes in a file in such a way as to ensure that all the bytes and their order within a file is correct (taking an MD5 hash does not change the file in any way). For instance, if a website says the MD5 of an ISO file is 9bb3cb003e2c6005fccc28c305be05ff, then after you download it, use RMPrepUSB and ALT+F2 and point the checksim utility ‘HashMyFiles’ at the newly downloaded ISO file, after it has calculated the MD5 of the file, check that it matches 9bb3cb003e2c6005fccc28c305be05ff. Then copy the ISO to your USB drive (following the instructions below) and again use ALT+F2 to get the MD5 hach value of the ISO file that is now on the USB drive. If you get the same number, then this guarantees that the ISO file is not corrupt on your USB drive. It is not uncommon for file corruption (or shortening) to occur during download or file copy operations to a USB drive, so I highly recommend you always check the MD5 value of any large file. If you are not told what MD5 value to expect, compare the MD5 value of the ISO file on your hard disk after downloading, with the MD5 value once it is on your USB drive – this ensures your USB drive copy is OK.
- Windows 7 SP1 ISO file (make a note of the MD5 checksum from the website so you can check it on the USB drive later). You can also install Vista from an ISO file in the same way as Win 7.
- Latest Beta RMPrepUSB v2.1.638 or later (download it and install it).
- XP7PWD.zip download from this site and extract – protected by a secret password (hint: 9 lower case letters – a well known USB preparation utility that is part of the current URL in your browser now!)
- Note: This download may be reported as a threat by some antivirus utilities – but it is not a virus and will not harm your system or privacy!
You will also need…
- A 4GB or larger USB Flash drive (not a USB hard drive – because USB HDD’s won’t work for the Win 7 install in this tutorial!)
- Any Windows PC with which to prepare the USB flash drive
- The ‘target’ computer that you want to install Windows onto – e.g. notebook with a new hard disk – must have >512MB of memory.
METHOD
Install RMPrepUSB
1. Install the latest version of RMPrepUSB to a Windows computer. You’ll need v2.1.638 or later as this has the latest grub4dos version and it includes WinContig.
Prepare the installation folder C:\Win7XP
2. Download the file XP7PWD.ZIP and extract it to a new folder on your Windows hard disk – for example C:\Win7XP (you will need to enter a password for the zip fle as it is password protected – see the ‘Required Downloads’ section for the password!)
Download and rename the ISOs…
3. Download and copy the Windows XP SP3 OEM ISO file (you will have to search the internet for this if you do not have the CD or the ISO already – see Required Downloads section above for details).
Make sure the the XP ISO file is placed in the folder C:\Win7XP\_iso\Windows and rename it to XPPROSP3.ISO if it is Professional. If you have an XP Home ISO, it should be named XPHOMESP3.ISO. You can have both XPPROSP3.ISO and XPHOMESP3.ISO if you wish. So you can have one or both of:
_ISO\Windows\XPPROSP3.iso
_ISO\Windows\XPHOMESP3.iso
4. Download one or more Windows 7 SP1 or SP0 (RTM) or Vista ISOs and copy each ISO file to the folder C:\WIN7XP\_iso\Windows.
I would suggest you use the Professional versions (usually they all contain all versions except Enterprise anyway).
4.1 Rename each ISO file as in the list below. The following ISO’s can be added and will automatically be listed in the menu:
_ISO\Windows\Win7_32_SP1.iso
_ISO\Windows\Win7_64_SP1.iso
_ISO\Windows\Win7_32_SP0.iso
_ISO\Windows\Win7_64_SP0.iso
_ISO\Windows\Vista_32.iso (this can be any version but must be named like this)
_ISO\Windows\Vista_64.iso (this can be any version but must be named like this)
_ISO\Windows\SVR2K8R2_64.iso (this can be any version but must be named like this)
If you want to install a 64-bit version of Win 7, it will still work fine, but you must name the iso file as Win7_64_SP1.iso (or Win7_64_SP0 if it is the first non-SP1 RTM version).
Most Windows 7 ISO files will contain all versions of Windows 7 (Starter, Home Basic, Home Premium, Professional, Ultimate) even if it says it is only for one of these!
When you install using this method, you will be able to choose any of the Win7 versions. So just download any one or all of the Win 7 Professional ISO files and rename them accordingly.
If you want a USB Flash drive that also has Vista then add all these ISO files and name them correctly too.
If you want to add more versions of Vista or Windows 7 Enterprise or even Server 2K8 R2, just add another menu entry to the menu.lst file using Windows NotePad as a text editor. Each menu entry begins with ‘title’. You must change all references to the ISO file so that the name of the ISO file matches the name in the menu.
Prepare the USB Flash drive
Note: Win 7/Vista/SVR2K8 installation does not work if you use a USB hard disk – you must use a USB Flash memory (pen) drive that is seen by Windows as a Removable drive (shown by RMPrepUSB when the drive is selected). If you just want to install XP, you can use either a USB hard disk or a USB Flash drive.
The USB drive must be large enough to take all the ISO files that you want to put on it.
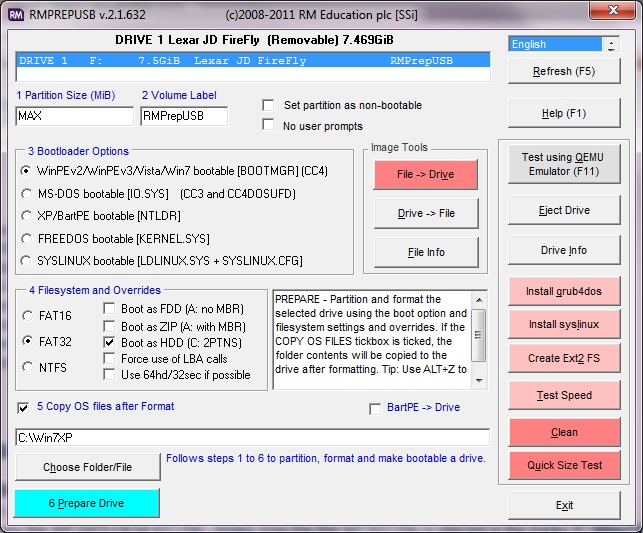
5. Run RMPrepUSB and set the options as follows (see screenshot below):
1 Size = MAX
2 Volume label = RMPrepUSB (or whatever you like!)
3 WinPE v2 [BOOTMGR]
4 FAT32 (if you do not need to boot to FreeDOS then use NTFS as it is faster and supports files larger than 4GB) – also tick the Boot as HDD checkbox.
5 Tiick ‘Copy OS files‘ and set the copy files path to that of your hard disk folder where you have copied the files (do NOT choose extract) e.g. C:\Win7XP
6 Click on 6 Prepare Drive
Install grub4dos
After the drive has been formatted and the files from the C:\Win7XP folder have been copied over by RMPrepUSB…
5.1 Click on the Install grub4dos button
answer Yes to MBR question
hit Enter next to copy over the grldr file when prompted (do not close down the command shell – you must hit the [Enter] key as prompted).
Note: RMPrepUSB Beta includes the latest version of grub4dos – you MUST use the latest version of the grub4dos grldr file (December 2011 or later).
Even if you don’t format the drive with RMPrepUSB, please use the latest version of RMPrepUSB to install grub4dos.
6. You should now have a USB Flash drive with the following contents (check the iso files are present and correctly named!):
7,998 AutoUnattend.xml
48,745 back.xpm.gz
68,362 COMFREE.COM
60 FDAUTO.bat
39 FDCONFIG.SYS
272,013 grldr
1,494 How to Activate XP.txt
45,260 KERNEL.SYS
16,897 Menu.lst
231,424 message
105,592 PCIID.ima.gz
43,319 plpbt.bin
721,160 winvblock.ima.gz
39 xpsp3_Key.txt
850 ActivateXP.cmd
142 XPACTIVE.REG
<DIR> AntiWPA
<DIR> FiraDisk
<DIR> FREEDOS
<DIR> Windows Loader
<DIR> WinVBlock
<DIR> _iso
_iso/Windows/Win7_32_SP1.iso
_iso/Windows/XPPROSP3.iso
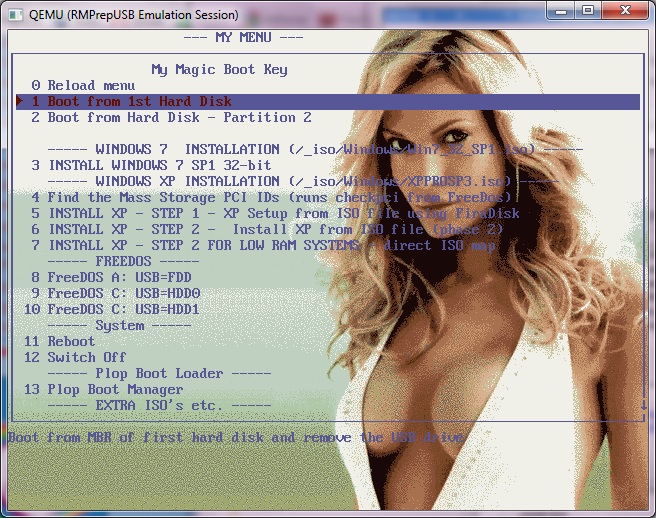
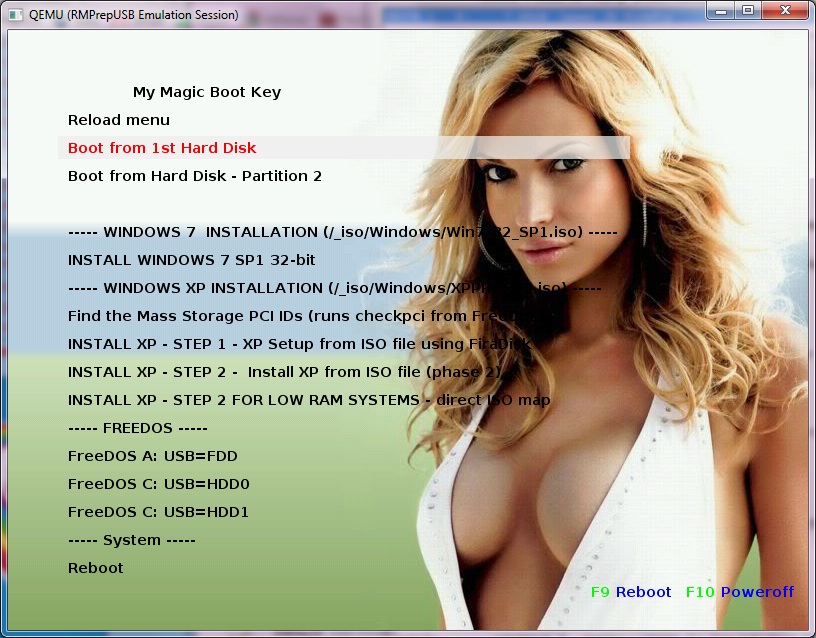
7. Now check that the USB Flash drive will boot and show a menu, test it in RMPrepUSB by pressing the F11 key to run QEMU – answer 0 to the virtual disk question (or 2000 if you want to actually try to install XP to a virtual hard drive). This does not change your current OS but does make a 2GB file on your hard drive which you can later boot from using menu option 1.
Hit Enter for the virtual RAM size – do not use a size over about 1.3GB.
You should see a menu with XP install and Windows 7 install items listed (3-7).
If some entries are missing then check that you have copied the iso files to the /_iso/Windows folder and named them correctly.
If you just see a grub> prompt then you did not follow the instructions in step 5.1 correctly – you must hit the [Enter] key after grub4dos has been installed so that the grldr file is copied over.
Once all menu items are listed, you should now have a bootable USB Flash drive!
If you see a ‘bootmgr is missing’ error message then you have forgotten to install grub4dos in step 5.1!
Try the menu items to see if they work (this won’t affect the system files on your hard disk at all – it is quite safe). To quit QEMU, hit ALT+CTRL and then click on the X in the top right corner of the form.
Items 3-7 should be the Win 7 and XP options if the iso files are present.
Tip: To change the menu title or menu text, edit menu.lst using NotePad (or press F4 in RMPrepUSB).
8. (Optional) Download any XP and Win7 network (LAN or WiFi) drivers for the target system and store them on the USB Flash drive. These will be required in order to get updates as an internet connection will be required. You can also add any other drivers (such as chipset, graphics, audio, etc.) for your target system at this stage as you will need them later on once Windows is installed.
9. To avoid ‘File is not contiguous’ errors – run RMPrepUSB and type CTRL+F2 to run WinContig and defrag all files on the selected drive.
10. IMPORTANT: Check the MD5 hash checksum of the ISO files in the /_iso/Windows folder on the USB drive to ensure they have been copied correctly.
You can do this by pressing ALT+F2 in RMPrepUSB. This is worth the few minutes it takes and may save you lots of frustration later. It is not uncommon to find errors when copying large files to a USB Flash drive! If you get the wrong MD5 checksum, check the MD5 of the copy on the hard disk and/or repeat USB drive preparation again.
Note: If you delete an iso file from the USB drive and copy over another iso file, then run step 9 again to ensure the files are still contiguous.
USING THE USB FLASH DRIVE TO INSTALL WINDOWS
INSTALLING XP ONTO A TARGET SYSTEM
1. Boot the target system from the USB drive you have just made and install XP onto the internal hard drive by following the How to use the USB drive to install XP onto your system’s hard disk section in Tutorial #30 (basically press F6 and select WinVblock 32 bit AND FiraDisk 32 bit AND the correct AHCI driver for your system – please read Tutorial #30 for more details which also has a Troubleshooting section).
If your BIOS setup menu has an AHCI setting for the hard disk controller, set disable AHCI – or else you will need to load an AHCI driver later (after pressing F6 and at the same time as you load Firadisk).
Note: If you get an [iftitle] error message then you have not used the latest grldr file on your USB drive – please use latest Beta version of RMPrepUSB and click on the Install grub4dos button to re-install the correct version of grub4dos (say Yes to the MBR question and make sure you press Enter to copy across the new grldr file). Alternatively, replace the grldr file with the one from the RMPrepUSB app. folder.

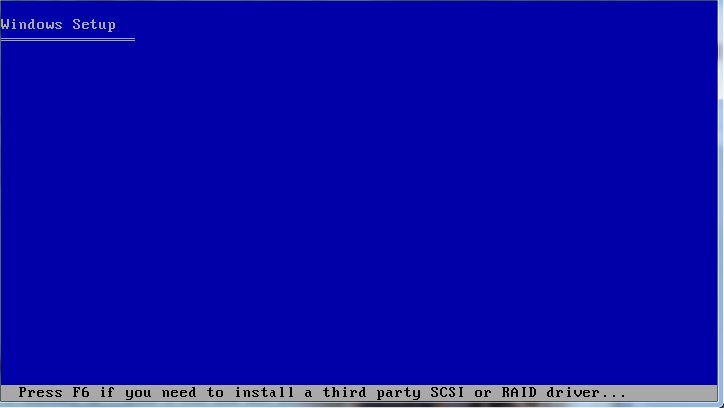
Choose INSTALL XP – STEP 1 hit F6 when prompted – later on press S and choose Firadisk 32 and WinVBlock 32
2. Create a smaller (e.g. 200GB) partition to install XP to if you are later going to install Windows 7 as well. For instance, if you have a 500GB hard disk, delete all partitions and create a 200GB partition and install XP onto that partition. This would leave 300GB to make a Window 7 partition later on.
3. Once the target system has completed step 1 and it reboots back to the USB drive again, choose STEP 2 from the USB boot menu and XP will go into the GUI mode install phase, when you are prompted for an XP Pro Product Key – just click Next without entering a Product Key and click No when prompted again to enter one. If you need to enter a key use the one beginning with Q9RV4 contained in the text file in the download xpsp3_Key.txt – you can change it later to your own key.
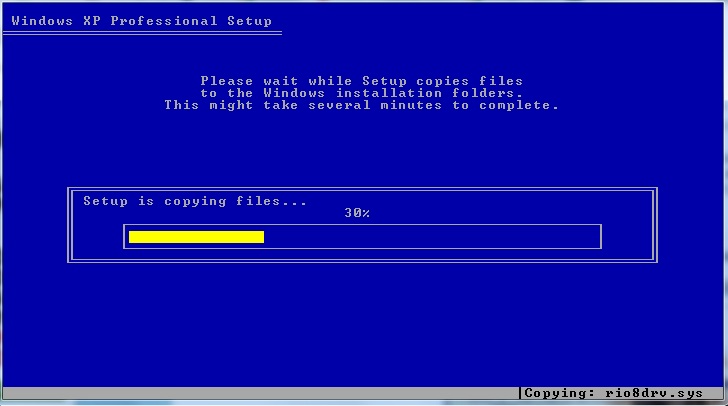
STEP 1 starts the textmode ‘copyfiles’ phase…
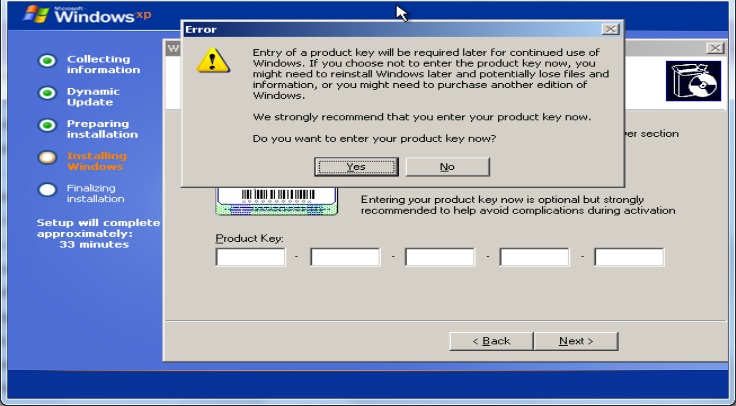
To avoid a ‘Not Genuine Windows’ issue later, use the Windows XP CD key from the COA label on the system.
If you fo not have an XP key, skip the product key entry by clicking Next and No.
4. Install the network drivers from the folder on your USB drive (optional).
Activating XP
If possible use your XP Pro Product Key. If the Product Key is not valid, you will get a ‘Not Genuine Windows’ message after activation.
If the key is valid but does not activate (maybe it is the OEM key from the COA label) and the target system has a valid licence for XP Pro or Vista Business or Win 7 Pro, you can use the following work-around:
1. Run AntiWPA3.cmd from the AntiWPA folder on the USB drive.
To test Activation will not expire after 30 days…
2. Set the date forwards by 2 months and reboot.
3. If your system asks for activation – try running AntiWPA3 again. Reboot XP and run it in Safe Mode by pressing F8 on boot.
If you want to be able to use Windows Update, then use a valid XP Pro Product key during installation.
You can change the product key by disabling the AntiWPA3 patch (by running it again), reboot and then run c:\Windows\System32\oobe\msoobe.exe /a – enter a valid product key – attempt to activate it, and then run AntiWPA3.
Please note: the target system should be legally licensed for XP Pro!
INSTALLING WINDOWS 7 ONTO A TARGET SYSTEM
1. Boot from the USB Flash drive on the target system and follow Tutorial #43 to install a version of Windows 7. Create a new partition and install Win 7 to that partition – click ‘skip’ when prompted for a Product Key. Note: Use a USB 2.0 port and not a USB 3.0 port as Win 7 has no inbuilt drivers for USB 3).
2. If required, install a Windows 7 network driver (optional).
Activating Windows 7
Change the Product Key to your own Windows 7 Product Key that came with the target system.
If this does not activate and you have a matching Windows 7 COA label on the system you can activate Win 7 as follows (please ensure you have a valid licence!).https://www.youtube.com/embed/StcweadllS4
1. Run Windows Loader.exe from the Windows Loader folder.
2. Click the Install button (search for Daz Windows Loader or click here for more info).
3. When it has completed, reboot the computer.
Note: The target system should be legally licensed for the correct version of Windows 7!
To check the system is correctly activated, run Windows Update.
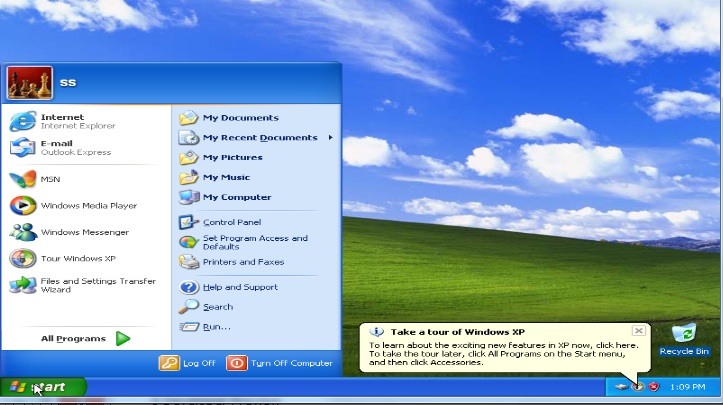
You should now have a dual boot system for XP Pro and Windows 7 and both should be fully and permanently activated. Install any more drivers that are required for your system and all the MS updates. Don’t forget to add an antivirus app. (such as the excellent free MS Security Essentials).Unsupported embed
WHAT IF YOU HAVE ALREADY INSTALLED WINDOWS 7 AND NOW WANT TO INSTALL XP?
1. Boot to Windows 7 and go into Disk Manager (diskmgmt.msc), select a partition on the hard drive (e.g. C:) and right-click on the horizontal partition and choose Shrink Volume… Reduce the volume size enough to leave room for a new XP partition. Create a new NTFS partition ready for XP.
2. Now install Windows XP to the new partition by booting from the USB Flash drive and following Tutorial #30.
3. Once XP is installed you will find it boots straight to XP and will no longer boot to Windows 7 – don’t panic!
3a. At this point you can fix this by installing EasyBCD and then use EasyBCD to add an entry for XP to the Windows 7 BCD – see 5:27 at this video for instructions. You do have to install .Net however which may take some time.
3b. Alternatively, you can install and run RMPrepUSB within XP on the target system and type ALT+F5 to show all drives. Then install grub4dos to the hard disk MBR. Also copy the grldr file to the root of the Windows 7 volume (use the Install grub4dos button).
Next press F4 in RMPrepUSB and create a menu.lst file on the hard disk using NotePad, as below (cut and paste this text):
timeout 5
# set default to 1 to boot to Win7 or set to 0 to boot to XP
default 1
title Windows XP
find –set-root /ntldr
chainloader /ntldr
title Windows 7
find –set-root /bootmgr
chainloader /bootmgr
4. Now reboot and you should be able to choose which OS to boot to.
TIPS
If you want a nicer background (see screenshot below) for your bootable USB drive, simply delete the # character from the beginning of the gfxmenu line in the menu.lst file to get the menu below:
#uncomment this for a hi-res background – but changes menu behaviour
#gfxmenu /message
Higher resolution and more colourful background using GFXMenu.
Note that this may not work on some systems which do not have compatible graphics adapters (which is why it is not set by default). If it does not display correctly on a system, press ESC to return to a non-graphical text-based grub4dos menu. GFXMenu does not show any help text and some error messages may be hidden.
MAKING A MULITBOOT (AKA ‘MULTIPASS’) USB BOOT DRIVE
The menu.lst provided can be used as a multi-boot USB drive simply by adding more files to the USB drive. If you examine the menu.lst file you will see it has many more entries – for most of these you will simply need to add the correct ‘payload’ file (e.g. iso file) to the USB Flash drive. Examine the menu.lst and see what options are available (e.g. YLMF, Backtrack, BartPE, Hirens, etc.). Many of these will also be detailed in articles on this RMPrepUSB website – here is a brief summary of some of them…
Hirens Boot CD v15.2 – copy to /ISO/Hiren’sBootCD.iso – see Tutorial #29
YLMF – add /_ISO/linux/YLMF.iso – ideal intro to a linux OS for a netbook similar to Windows XP in look and feel – see Tutorial #17
Ultimate Boot CD version 5.0 – add /_ISO/linux/ubcd50.iso – see Tutorial #24
Parted Magic 4.10 – add /_ISO/linux/pmagicapr.iso
Parted Magic 5.2 – add /_ISO/linux/pmagic52.iso
Partition Magic 5.7 – add /_ISO/linux/pmagic-5.7.iso – see Tutorial #14
Partition Magic 5.8 – add /_ISO/linux/pmagic-5.8.iso
Partition Magic 6.6 – add /_ISO/linux/pmagic-6.6.iso
Dariks Boot and Nuke v2.2.6 – add /_iso/linux/dban-2.2.6_i586.iso – see Tutorial #25
Damn Small Linux – add /_iso/linux/dsl4410.iso
Knoppix v5.1.1 – add /_iso/linux/KNOPPIX511.iso
Kasperksy AV 2010 – add /_iso/linux/rescue/rescue.iso
Acronis True Image 2009 – add /_iso/linux/acronis.iso
Windows Password reset – add /_iso/linux/cd100627.iso (NT password reset) – see Tutorial #12
Ophcrack Windows password cracker – see Tutorial #13
SliTaz 3.0 – add /_ISO/linux/slitaz-3.0.iso
BackTrack 4 or 5 – see Tutorial #9 for what files to add to /BT4 or /BT5 folders
OCZ SSD firmware update – add /_iso/linux/ocz_fwupd_2.68.12.iso – see Tutorial #61
Want to add more? Just search this site using the search box at the top of the page for the name of the program or OS that you want to add, then edit the menu.lst file (press F4 in RMprepUSB) to add the new menu entry and add the ‘payload’ files (e.g. ISO file) as described in each tutorial.
See the grub4dos tutorial if you want to learn more about grub4dos, or edit the menu or change the menu background. Contact me if you have any questions after searching this site for answers.
RMPrepUSB Blog – please leave a comment or feedback on RMPrepUSB or this Tutorial (please mention Tutorial number).
Q9RV4 – G448X – F4WJP – F69MX – YBQ46