
Table of Contents
Using an XML file, it is possible to fully or partially automate the installation of Windows.
You can read the Microsoft Technet page to read more about XML answer files.
The Microsoft recommended way to create an XML file is to use the Windows System Image Manager (WSIM), however this is not the easiest utility to download (you need to download and install the whole WAIK for each version of Windows) and it is not very easy to use either.
A much easier way to generate simple answer files is to use the Windows Answer File Generator (WAFG).
This is a web site which contains various pages which allow you to define what settings you want in an XML file and then save the settings to a file.
Click here for Win7, or here for Win8 or here for Win8.1. You can also find their Tutorial about the various XML settings here.
The WAFG and the XMLtoE2B.exe utiity provide an easy way to create a fully-automated XML answer file in just a few minutes!

Once you have made and downloaded the XML file using WAFG however, you may find some problems:
(Tip: the ‘tweaks’ below can be quickly added by using the XMLtoE2B.exe Windows utility mentioned at the bottom of this page).
1. INSTALLATION PRODUCT KEY
For Windows 8 and 8.1, at the first WindowsPE boot stage, we need to specify a Product Key , otherwise we will be prompted to enter a Product Key manually.
If you use an incorrect Product Key then the install will produce an error! Even if the source you are using does not normally require a Product Key to be entered, the correct one may be required in the XML file.
We can either use a generic ‘install-only’ Product Key which will not activate, or a legal Product Key which will activate.
For Win8/8.1, the two extra Product Key entries need to go just inside the <UserData> sections just above the <FullName> lines.
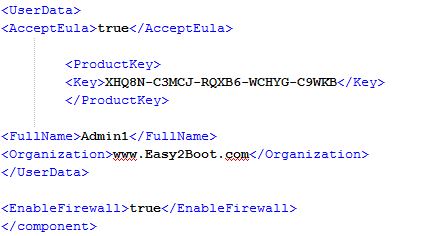
So, the same Product Key should appear FOUR TIMES in the one WAFG XML file.
Note: The XML format for the product key is different in the lower part of the XML file – there are no <Key></Key> tags (!!) so the last two entries will be in the format of <ProductKey>xxxxx-xxxxx-xxxxx-xxxxx-xxxxx</ProductKey>.
2. SPECIFY WHICH IMAGE TO USE
The XML file generated assumes that there is only one image in your install.wim file. This is OK for single-image .wim files that you have made yourself, perhaps using SysPrep.exe, for deployment of a bespoke image or maybe a single-image volume licence wim file; however normal Retail\OEM Install.wim files contain multiple images inside the Install.wim file, so you may see a ‘choose an Edition’ menu, as shown below:
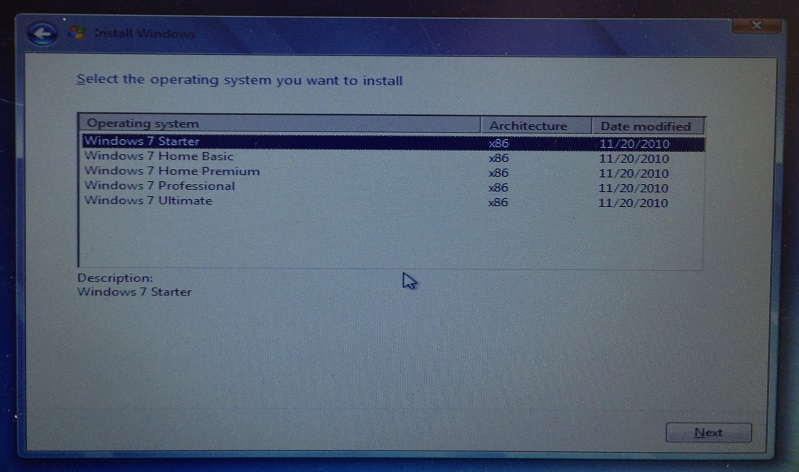
You may see this screen, even if you have included a Product Key.
To prevent this screen from appearing, you will need to specify an <InstallFrom> section which goes just under the <OSImage> tag line…
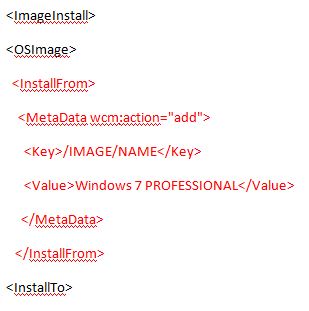
To ensure the Value is exactly correct, it should match what is listed in the Editions menu.
e.g. For Windows 8.1 Professional use ‘Windows 8.1 Pro’ (not ‘Windows 8.1 Professional’). Windows 8 Core or Media Center will require a different XML file for this reason a well as needing a different Product Key.
Instead of a NAME key, it is possible to use the Index number of one of the images that is inside the wim file instead of the name: e.g.
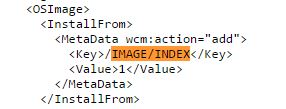
To find the correct Index number or DisplayName, you must check the [1].xml file inside the \Sources\Install.wim file. Typical Index numbers are:
Windows 7 Starter = 1
Windows 7 Home Basic = 2
Windows 7 Home Premium = 3
Windows 7 Professional = 4
Windows 7 Ultimate = 5
Windows 8 = index 2
Windows 8 Pro = index 1
Windows 8.1 = index 2
Windows 8.1 Pro = index 1
Notice that Windows Pro is usually the 1st image in Win8/8.1!
3. PROMPT FOR A COMPUTER NAME
Next we need to look at the Computer Name. This can be defined in the WAFG page and is specified in the XML file under the <component name=”Microsoft-Windows-Shell-Setup” section – e.g. <ComputerName>MyPC</ComputerName>.
If it is left blank as <ComputerName></ComputerName> then a ‘random’ name will be generated by Windows Setup.
If you want to be able to enter your own computer name near the end of the build then you must remove the <ComputerName></ComputerName> line completely AND ensure that SkipMachineOOBE is set to false.
4. CREATE PARTITIONS
Now we come to disk partitioning and formatting. We must tell Windows Setup what partitions to create and how to format them. We must also specify which partition to copy the Windows OS files to.
The WAFG web tool actually defines a System Reserved partition of 100MB (<size>100</size>) and the rest for an OS partition. For the OS partition, it creates a maximum sized partition (<Extend>true</Extend>) to fill the rest of the disk.
This can be changed to create a single, full-sized partition or even more complex GPT partitions for UEFI installs. The Disk Configuration portion of the XML file defines this, e.g.
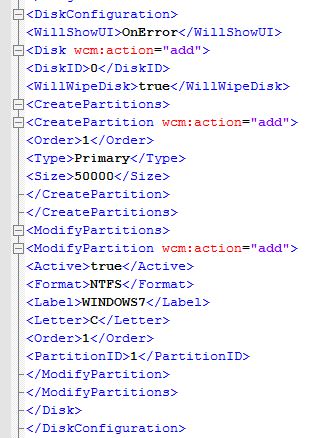
Check also the InstallTo portion of the XML and the PartitionID value if you change the partition arrangement: e.g. for a single-partition drive you will need:
<InstallTo>
<DiskID>0</DiskID>
<PartitionID>1</PartitionID>
</InstallTo>
Note: DiskIDs start from 0, PartitionIDs start from 1.
EASY2BOOT
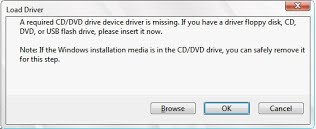
If you are going to use the XML file with a Windows 7/8/8.1 Install ISO file on a Removable USB flash drive then you will also need to add the special RunSynchronous XML lines which load the ISO file as a virtual DVD so that Windows Setup can find the \Sources\Install.wim (and does not prompt you to install any ‘CD\DVD drive drivers’ because it cannot find it!
If installing from an ISO you will need to add in the RunSychronous ‘LOADISO’ sections (twice, once for x86 and once for amd64) just below the <component name=”Microsoft-Windows-Setup” … line:
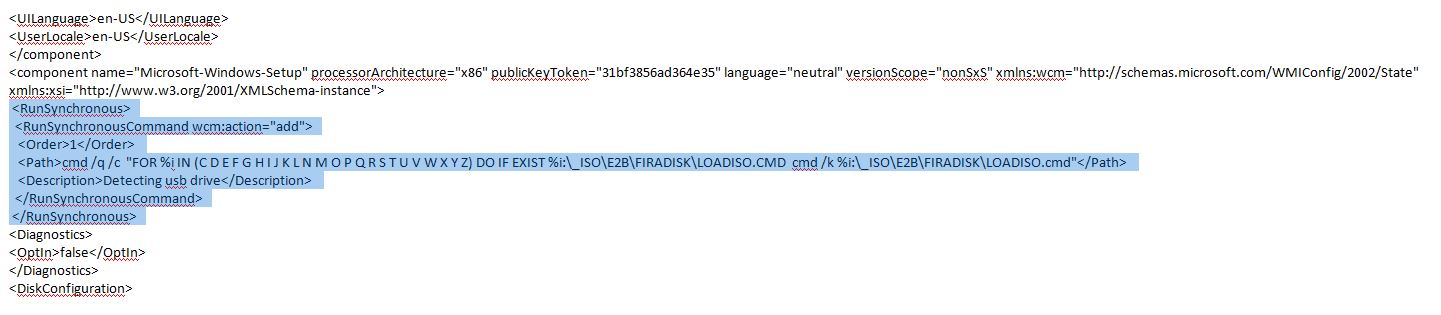
If the XML file already contains a <component name=”Microsoft-Windows-Setup” section, then just add the XML lines between <RunSynchronous… and </RunSynchronous> and change the ‘Order’ number(s) if required. Look at one of the E2B XML files for an example.
Use LOADISONP.CMD instead of LOADISO.CMD if you don’t want the ‘Repair Windows’ blue console window prompt (Note: ‘LOADISO’ should occur 4 times in the XML file).
Note: If you add this RunSynchronous code section to an XML file that is used with an Easy2Boot .imgPTN file, it will not cause a problem – you will just see a small blue console flash up and then quickly disappear when it cannot find the LOADISO.CMD file.
XMLTOE2B.EXE
The above changes to the WAFG XML file can however be made a lot easier by using the Easy2Boot utility XMLtoE2B.exe.
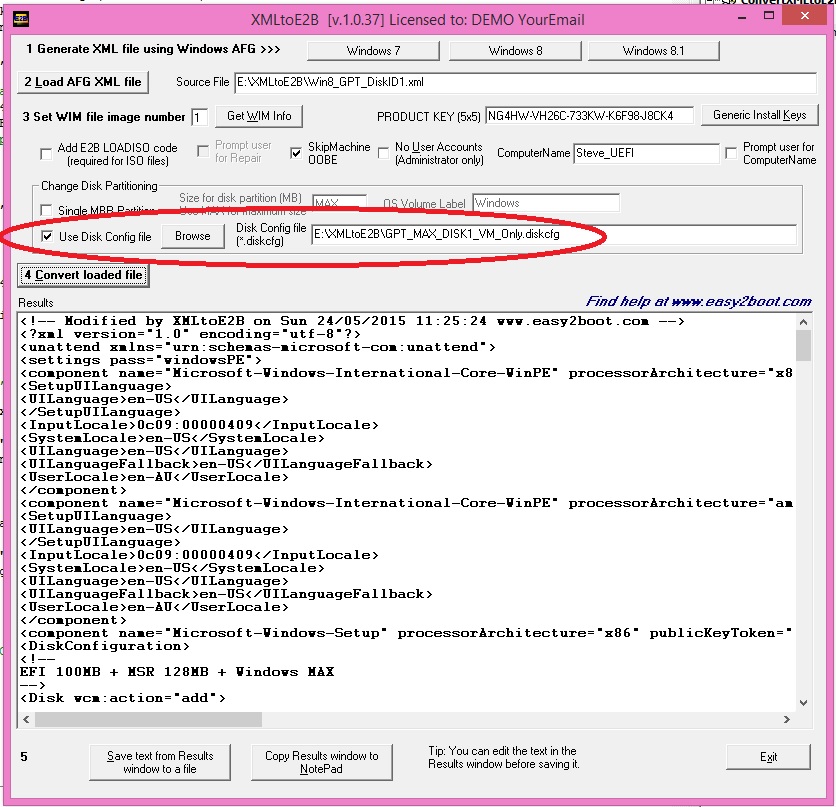
This utility can also be used for non-Easy2Boot scenarios too, just leave the LOADISO checkbox unticked.
The utility can load .diskcfg files (some of which are included in the download) and XMLtoE2B will merge them with the WAFG XML file. This is very useful for specifying different disk configurations.
Full details about XMLtoE2B can be found on the Easy2Boot website here.
HOW TO USE AN XML ANSWER FILE
If you have a Removable E2B USB Flash drive
1. For ISO booting in E2B, just copy the XML file to the correct Windows folder (e.g. \_ISO\WINDOWS\WIN8 for Windows 8 and 8.1 XML files).
Give the XML file a suitable name (e.g. Win8.1Pro_AutoWipe_User1_max.xml. (MBR systems only).
OR
2. For a FAT32 Windows Install .imgPTN file, switch to the .imgPTN file’s CSM menu and then quit (F10) or remove the USB drive – then re-insert the
E2B drive and copy the XML file to the root of the image partition (not the E2B partition which contains the \_ISO folder!) and name it \AutoUnattend.xml. (MBR and UEFI systems)
If you have a Removable USB Flash drive containing the extracted ISO files (e.g. Rufus or Windows USB\DVD Download Tool)
- Place the \AutoUnattend.xml file in the root of the USB Flash drive and it will be automatically detected by Windows Setup (or WinPE).
If you have a Fixed-Disk type of E2B USB drive (or USB-HDD)
- Use a ‘Helper’ Removable USB Flash drive with the E2B drive and follow step 1 above. (MBR systems only)
- OR
- For a FAT32 Windows Install .imgPTN file, switch to the .imgPTN file’s CSM menu and then quit (F10) or remove the USB drive – then re-insert the E2B drive, mount the \Sources\boot.wim image #2 file using GImageX and copy the XML file to the mounted folder and name it \AutoUnattend.xml. See here for more information. (MBR and UEFI systems).
If you have a Fixed-Disk USB drive containing the extracted ISO files (e.g. Rufus or Windows USB\DVD Download Tool)
- Mount the \Sources\boot.wim image #2 (Setup) file using GImageX and copy the XML file to the mounted folder and name it \AutoUnattend.xml. See here for more information. (MBR and UEFI systems).
Use a FAT32 formatted USB drive if you want to support UEFI-booting.
USING VIRTUAL MACHINES (E.G. VIRTUAL BOX + DAVIDB’S VMUB)
WARNING: If the XML file installs to Drive 0, then do not use it with a Virtual Machine (e.g. Virtual Box) unless the target virtual disk is Drive 0.
If the E2B USB drive is drive 0 then it will be wiped! You must use the Fixed-Disk #2 method but also modify the DiskID value inside the XML file before use. See here for more information.