
Table of Contents
INTRODUCTION
If you have a USB hard disk (classed as a ‘Fixed Disk’ by Windows), you will find that Windows can format that disk with multiple primary and logical partitions.
However, most USB Flash drives are set as ‘Removable Drives’ when shipped by the USB drive manufacturer which means that Windows will only access one partition on the drive.
The first sector of a partitioned disk is called the Master Boot Record (MBR). Near the end of this sector is the partition table which can contain up to four primary partition entries. One (and only one) of these table entries can be an Extended Partition entry. An Extended Partition entry points to another Extended Partition table which contains one or two entries (a logical partition entry and optionally another Extended Partition entry). In this way it is possible to have much more than four partitions on a drive.
So an MBR partition table can have:
Up to four Primary Partition entries
– OR –
Up to three Primary Partitions and one Extended partition entry
On a ‘removable’ drive (like most USB Flash drives), Windows will only recognise the first raw or Windows-formatted primary partition in the partition table.
Actually, it will mount the first primary partition it finds that has a non-zero partition type and that is formatted with a format recognised by Windows, starting from the first entry in the partition table.
Note: Recent versions (2017) of Windows 10 Creator can mount multiple partitions on Removable USB drives!
This means that even if you create a multi-partitioned USB Flash Drive (most of which are set as ‘Removable Drives’ when shipped by the manufacturer), Windows will not mount the other volumes or assign drive letters to them.
- One common solution to this problem is to set the USB Flash Drive (UFD) to be a ‘Fixed Disk’ by ‘flipping the RMB bit’ in the UFD controller using the Lexar BootIt.exe utility. However, this only works on certain UFD controllers (e.g. some models of Lexar, HP, Verbatim, Netac).
- Another common solution is to install either the Hitachi Microdrive Filter cfadisk.sys or the dummydisk.sys driver by Anton Bassov. To see how this works, see Agni’s YouTube video. Note that cfadisk.inf can be dynamically added using drvload.exe, but all drive file handles must be closed or you will get a ‘a reboot is required’ message. You can instead just unplug and re-connect the USB driver immediately after installing the driver. For WinPE Setup scenarios, see reboot.pro here. WARNING: I do not recommend that you use this driver on Windows 64-bit systems – it can seriously mess up your OS and make it unbootable and unrepairable!
These two methods have the advantage that you can create and access any number of primary and logical volumes on your UFD under Windows at any time.
In this Tutorial, I am going to discuss two other methods:
1. EaseUS Home Partition Master + RMPrepUSB
2. BootIce. This is a disk partitioning, formatting and editing tool, however the English button labels are sometimes confusing or misleading although it is a very useful and powerful utility.
A useful feature in both BootIce and RMPrepUSB is that they can re-arrange the Master Boot Record partition table entries so that you can place any one of the four partition tables at the beginning of the MBR partition table. This is very useful as it means you can have up to four Primary Partitions on a UFD and access them one at a time by getting BootIce to re-order the partition table so that the first partition table entry is accessible by Windows.
New: The latest versions of RMPrepUSB (2.1.650 and later) include an option to choose which partition to make visible to Windows using the ‘Drive – Set Windows accessible partition’ (Ctrl-O) function which will read the existing partition table and ask which partition you want to make the first one.
This means you don’t need to use BootIce to swap accessible partitions once you have created a multi-partition UFD. See the RMPrepUSB YouTube video for a quick demonstration.
REQUIREMENTS
You can accomplish most of the following using the partitioning, formatting and partition swapping menus in BootIce (see here).
- BootIce (slow site!)
- Download and install EaSeus Partition Master Home Edition
- plus…
- Download and install RMPrepUSB from this site (v2.1.650 or later).
METHOD
1. First, use EaseUs Partition Master to create up to 4 Primary (not Logical) partitions on your target UFD. If you intend to run DOS, I would suggest you first create a small (2GB maximum) FAT32 partition for it at the beginning of the UFD. If you intend to run a version of Linux that does not support NTFS, then also create a larger FAT32 partition. If you intend to run Windows XP, Vista, Win7/Win8, then I would suggest a large NTFS or FAT32 partition. Don’t forget to click on the Apply button at the top or changes will not take place!
You can also use BootIce to do this if you prefer.
2. Once you have the partitions created, use the latest version of RMPrepUSB to install grub4dos to the MBR and copy over the grldr file. I suggest you also install it to the PBR for best ‘bootability’ on a wider range of systems.
Note: If you wish, you can use BootIce to do this, but it does not copy over the grldr file and the grub4dos version it uses may be out of date and so may not work with some of the menus used in my tutorials. It also may not be as ‘bootable’ as the special RMPrepUSB version.
3. Now place your files on the first partition which should be visible in Windows Explorer and your menu.lst file (use RMPrepUSB F4 to create and edit the menu.lst). Test that it boots using QEMU (press F11).
4. You can use RMPrepUSB or BootIce to swap partitions:
4a. Use RMPrepUSB
To add files to the other partitions, you can just use the RMPrepUSB Ctrl-O (O=Order) feature (versions 2.1.650 and later only).
Note: RMPrepUSB can also reset the partitions so that they are in standard ascending order (which BootIce does not do).
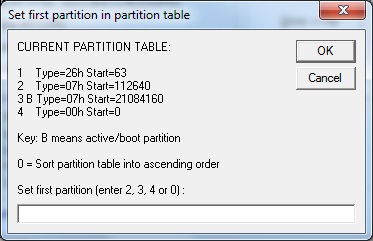
RMPrepUSB’s – Ctrl-O dialogue box
– OR –
4b. Use Bootice instead:
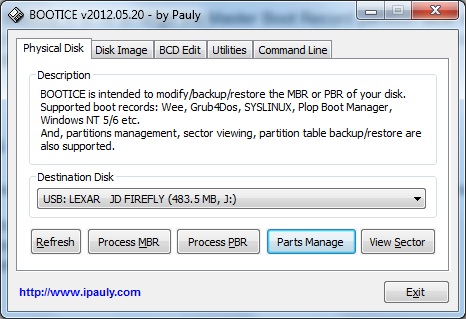
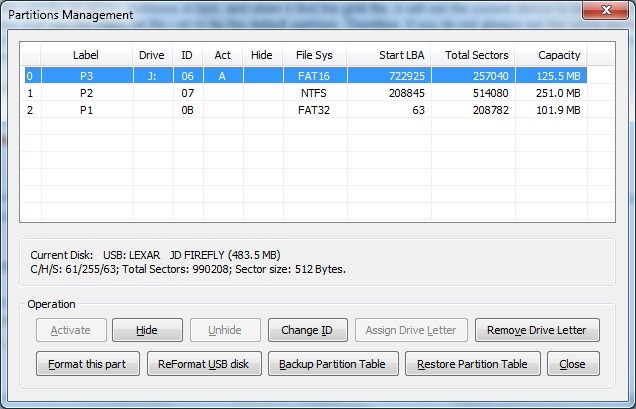
However, if you want to use BootIce instead, run BootIce and select the USB Flash drive (UFD) in the drop-down list, then click ‘Parts Manage‘ (i.e Manage Partitions):
You will see the partition table of your UFD, now suppose you want to make the 251MB NTFS partition accessible by windows, click on the ReFormat USB Disk button (don’t worry, we are not going to reformat the UFD!).
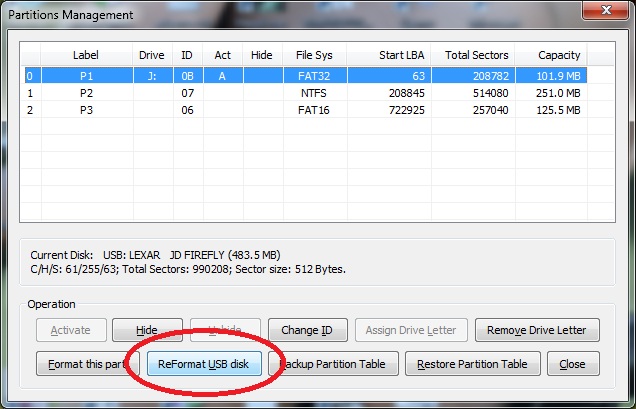
Here you can see the three partitions that I created. To change the order, click on ReFormat USB disk.
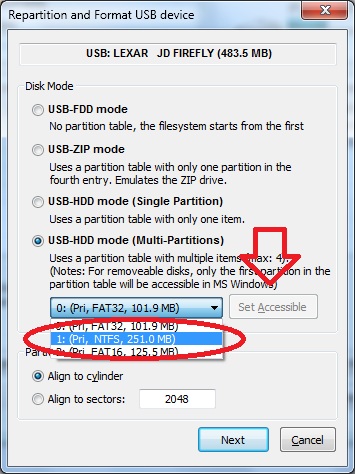
You should now see the form as shown below. Use the drop-down list to select the partition you want to access and then click on the Set Accessible button. After a few seconds, you should be able to use Windows Explorer to access the partition and copy or edit files on it.
Finally hit the Cancel button of the Repartition and Format USB Device form and then hit the Close button on the Partitions Management form.
Now click the Refresh button in BootIce (or Exit) and if you still have EaSeus Partition Master open, click on the Refresh button of that too – otherwise they will not show the new partition arrangement.
5. You can now copy files to the new volume. If you have more partitions, simply use RMPrepUSB – Ctrl-O or BootIce to make a different partition visible to Windows and then copy your files to that partition.
Here you can see that the third FAT16 partition is now first in the partition table and thus accessible to Windows.
Tip: remember to set the first partition back so that it is in first place in the table before you test it!
NOTES
grub4dos will always reference the first entry in the partition table as (hd0,0) – therefore it is important that when you test your grub4dos multiboot UFD (for instance in QEMU) and you have a menu.lst file that references the other partitions using (hd0,x), you must always use BootIce to set back the first partition to be the first entry in the partition table. Note that RMPrepUSB has a ‘re-order partitions‘ option which will re-arrange the four partition entries into ascending order (the same order used by Diskpart).
grub4dos will try to find the grld file on all the partitions in turn, and when it find the grldr file, it will set the current device to be the volume that it find the grldr file on. It will then try to find a menu.lst and set the current partition that has the menu.lst file in it, to be the default partition. Therefore, if you do not always set the same partition table entry back to be the first table entry, a path in the menu of /xxx.iso may not work correctly because the default root device will be different. It is therefore best practise to use find –set-root <a marker file> in all your menu.lst entries to ensure the correct partition has been selected as the default current volume by grub4dos.
e.g. do not use a menu like this because (hd0,1) may get moved around when you re-order the partitions…
- title Boot YlmF (Windows Like OS) Non-Persistent
- map (hd0,1)/Ylmf_OS_3.0.iso (0xff)
- map –hook
- root (0xff)
- kernel /casper/vmlinuz file=/cdrom/preseed/ubuntu.seed boot=casper iso-scan/filename=/ylmf_OS_3.0.iso floppy.allowed_drive_mask=0 splash
- initrd /casper/initrd.img
- Instead use a menu like this…
- title Boot YlmF (Windows Like OS) Non-Persistent
- find –set-root /Ylmf_OS_3.0.iso
- map /Ylmf_OS_3.0.iso (0xff)
- map –hook
- root (0xff)
- kernel /casper/vmlinuz file=/cdrom/preseed/ubuntu.seed boot=casper iso-scan/filename=/ylmf_OS_3.0.iso floppy.allowed_drive_mask=0 splash
- initrd /casper/initrd.img
NTFS+FAT32
You can make a multipartition USB Flash boot drive using the free EaseUS Partition Master Home Edition. You can make a drive with the following partitions:
1. Primary FAT32 (0ch) – Active boot partition (maybe contains MS-DOS or FreeDOS boot files or both) – Use RMPrepUSB to create this so it will be FAT32 Type 0C (do not use Easeus Home Partition manager to make this as it makes a Type 0Bh FAT32 partition)
2. Primary NTFS (07h) – to hold large ISO files – e.g. Windows All In One ISO files (see Tutorial 43) – Easeus Home Partition manager can create this
3. Primary EXT3 – can be used as a swap partition by a linux OS
4. (unused) – can be used to map a linux ISO – so keep it free – see Tutorial 96 for details
As DOS uses the BIOS for disk access and some BIOSes are not able to access sectors past 8GB (due to bugs in the USB int 13h code), it is always best to make the FAT32 partition start at the beginning of the USB disk.
As Windows Explorer will only see the first partition on a flash drive, you can use the RMPrepUSB Ctrl-O function to swap ptn 1 with ptn 2 and then copy or edit the files on each partition.
You can then install grub4dos to the FAT32 ptn using RMPrepUSB make sure that the FAT32 ptn is the first one and is visible in Explorer.
Now, if you try to boot Windows XP, PE, Vista, 7, 8, Server 2008, etc from the NTFS partition – when Windows boots, it will not be able to access any files on the NTFS partition if it is the 2nd partition on the flash drive. One way to fix this is to ensure that the NTFS partition appears first in the partition table – this means you must remember to always leave the USB stick partition arrangement with the NTFS ptn set to the first position.
Swapping partitions using grub4dos
To get around this, you can add some some grub4dos commands to swap over the partition entries. So the command at the start of the menu.lst on the FAT32 partition will set the FAT32 partition entry in the table as the first partition, and the commands at the start of the NTFS menu.lst will set the NTFS partition entry as the first entry in the partition table.
The two sets of menu commands are attached in the g4d_ptn_swap.zip file below.
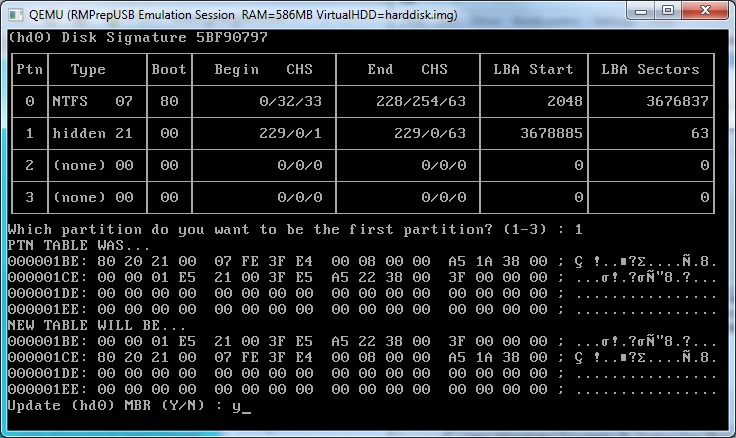
You might like to use the SetPtn1.g4b grub4dos batch file (which also requires wenv). This displays a table of the current MBR partitions to the user and asks him which partition he wants to make the first one. You can automate the batch file with no user prompts and add it to your menu.lst files if you wish. Type SetPtn1.g4b with no parameters in the grub4dos console, to see how to use the program.
The multiboot solution Easy2Boot contains a sample .mnu file that adds a menu entry which allows you to swap over partition 1 with partition 2. This means you can ‘hide’ all the files on the Easy2Boot partition.
Click here (OneDrive folder) if you cannot find any file mentioned in the articles on this site or Contact Me.