
Table of Contents
Other Tutorials you might like:
45 – How to PXE boot grub4dos/WinPE from a Windows 7 PC
80 – How to retrieve files from a computer without booting it to an OS
69 – Boot over the internet with iPXE
also checkout this free PXE software from Aomei Technology – easy to setup up but only supports one boot image at any one time. (thanks to ‘Jack‘ for the heads up on this one!).
INTRODUCTION
This makes installing Windows XP, 2003, Vista, Win 7, Win 8 or Win 2K8 via PXE very easy!
It is called Serva and can be found here. It does NOT require the Windows WAIK to be installed and is quite a small download – with it you can set up a RIS and WDS server on your Windows PC and you don’t need to even touch any existing DHCP server or router!
The instructions are easy to follow, but here is what I did to get PXE booting and a Windows 7 install going in just 5-15 minutes!
Note: proxyDHCP PXE booting is explained here: http://blogs.technet.com/b/dominikheinz/archive/2011/03/18/dhcp-amp-pxe-basics.aspx
MY SETUP
I have a typical home network – an ADSL router which has four Ethernet ports (and a wireless aerial) and a Windows 7 PC. The target PXE boot PC was an Asus netbook.
Windows PC <——> Dlink ADSL router + 4 port hub <——-> any other PXE-boot capable computer
(Win 7 + Serva PXE & TFTP Server) (PXE client) Unsupported embed


QUICK HOW TO
1. Download Serva from the Serva website (the Community version is free)
2. Run the download to unpack and copy the Serva files to any convenient folder on your Windows hard disk (you might like to make a link on your Desktop to the exe)
3. Create a C:\SERVA_ROOT empty folder.
4. Run Serva.exe and click on the Settings button at the bottom (if you get a Windows FireWall warning then ALLOW the program access through the firewall).
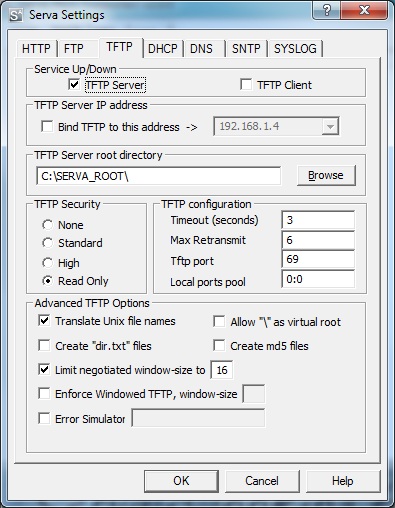
5. Click on the TFTP tab and set the Root directory to C:\SERVA_ROOT and tick the TFTP Server box as shown below:
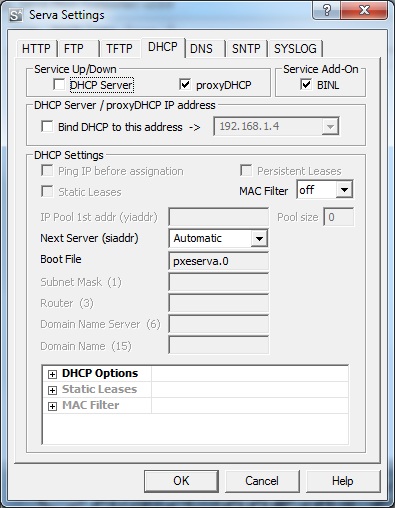
6. Click on the DHCP tab and set proxyDHCP (if you already have a DHCP server or DHCP router)and tick the BINL box.
7. Quit the app and re-run the Serva.exe app again. This is necessary because when Serva re-starts it will generate the PXE download files according to what folders you have created. Serva only does this when it starts. If you make any changes to the folders under C:\SERVA_ROOT then you should always quit and re-run Serva before you try a PXE boot.
8. Check that there are now some folders underneath the C:\SERVA_ROOT folder.
9. Set up a Windows share to the C:\SERVA_ROOT\WIA_WDS folder and after that, use the Windows Advanced Properties dialogue (click on the folder and then click Properties – Sharing) to set access for Everyone and set the Share name to WIA_WDS_SHARE.
10. Copy the contents of your Windows 7 (or Win8/10 or Vista or Server 2K8R2) DVD to a new folder – e.g. copy a Win 7 SP1 32-bit install DVD to C:\SERVA_ROOT\WIA_WDS\Win7_32_SP1
11. If you have more DVDs, just make a new folder for each of them under C:\SERVA_ROOT\WIA_WDS
12. If you have NT OS source files (e.g. 2003, XP or Server2K8 non-R2) then put these under C:\SERVA_ROOT\WIA_RIS and share the C:\SERVA_ROOT folder as WIA_RIS_SHARE (see doc on website). Make sure “Everyone” group has read permission on the just created share. You also need to set a Null Session share on the C:\SERVA_ROOT folder.
13. Quit the Serva app and re-run it
14. Now try to PXE boot your target system
15. For a WDS install (Vista, Win7,Win8, WIN10, SVR2K8R2), you will be prompted for a username and password – use your host PC computername\username and password – e.g. mynewHP\Administrator myhppwd.
That’s it – now try to PXE boot a system over Ethernet.
I would recommend using a Windows 10 32-bit or 64-bit install folder (copy of the install DVD) to start with as these will have the most network drivers in them already and will work on any CPU. The troubleshoooting documentation on the Serva website explains how to add OS network drivers if the standard Microsoft install files do not already contain the correct network driver for your target systems.
TROUBLESHOOTING
- After connecting the network cable, watch the Windows SystemTray network icon – wait until the icon animation has stopped (usually 1-2 minutes) before you attempt to start Serva.
- If you having problems, try disabling the Windows Firewall on your PC and temporarily stopping your Anti-Virus protection,.
- If you are using a router as a hub, disconnect any other Ethernet cable except for the target PXE system and your Serva Windows PC.
- Try a different PXE client notebook or PC – some PXE BIOSes are buggy (not all PXE BIOS ROMs support proxyDHCP PXE booting)!
- If it starts to load the OS installation files and then stops with an error message – see here.
- If you are installing XP and you just see the black screen with the XP logo, make sure you have set up the Share on the C:\SERVA_ROOT folder correctly and followed the Null Session share instructions.
- If the client is having communication problems with the Serva host PC (e.g. PXE client is not receiving the DHCP offer or lots of timeouts, etc.) try switching off and on your router – if still no joy, switch off your host PC, client PC and router. Then switch on the router, wait 1 minute and the switch on your host PC. Now try again!
Note: grldr and grub.exe will not work if the PXE server is using proxyDHCP mode. Grub4dos does not currently support this feature. To use grub4dos your PXE server must also be the DHCP server (i.e. do not use proxyDHCP mode and disable your DHCP server services whilst Serva is running).
USE ORACLE VM VIRTUALBOX TO PXE BOOT FROM SERVA
You can PXE boot using Oracle VM Virtual Box to test that PXE booting is working.
1. Add a new Virtual machine which has a virtual hard disk that you can install the OS onto.
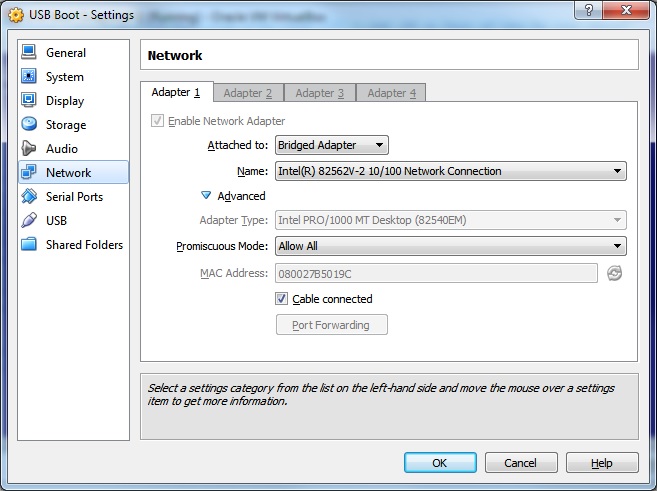
2. Set up the Network Adapter to Bridged and set the Name to the physical network adapter on your host system (see below).
3. Run the VM and press F12 to get the BIOS boot option menu:
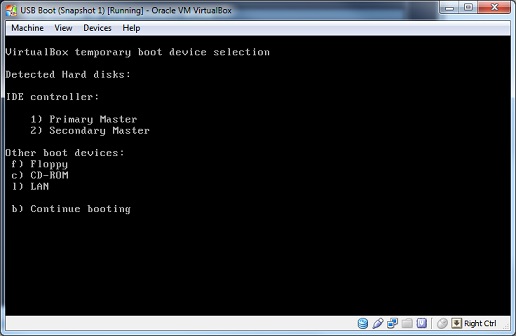
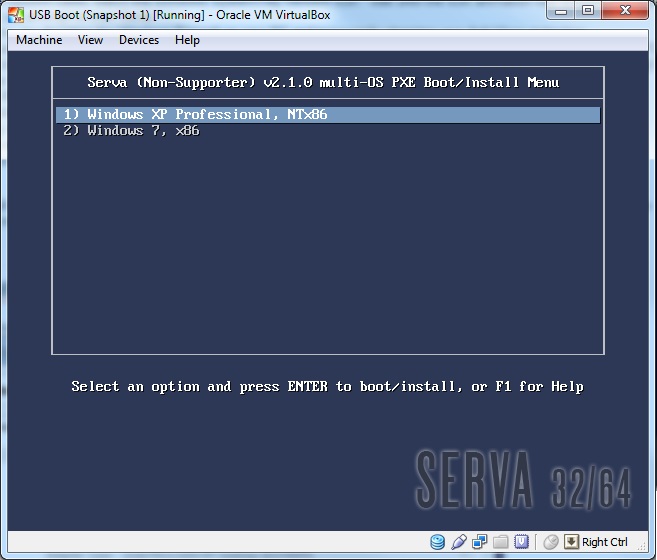
Press L to boot from the LAN. You should then see the Serva menu if PXE booting was successful:
Note that Windows XP will require the correct network driver to be added. See the Serva website for instructions.
You can now install XP or Win7 to your virtual hard disk (if you wish).
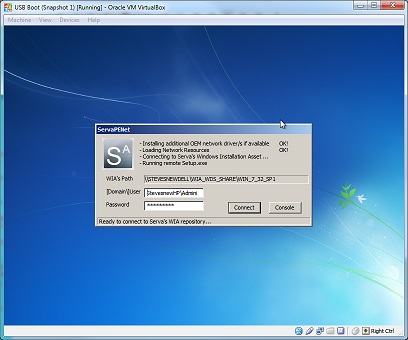
Win7 logon pop-up. You may need to add the correct Win 7 network drivers if they are not already in Win 7 WinPE.
BOOTING LINUX VIA PXE USING SERVA
Please read here to see how to boot various linux distros using SERVA.