
Table of Contents
Slax booted within the QEMU emulator using RMPrepUSB.
Note: Easy2Boot will boot nearly all linux LiveCD ISOs – just copy over the .iso file and boot!
Slax 9.11 (and probably other versions?) seems to not detect some types of USB drive (e.g. SilverStone MS09 enclosure+M2 flash card). If it fails to find the ISO or the /slax folder when booting, try the Slax linux ‘fdisk -l’ command at the console prompt – the USB drive should be listed if it was detected correctly by the Slax kernel.
BOOTING FROM THE ISO FILE DIRECTLY USING GRUB4DOS
1. Download the ISO and copy it to the /ISO folder on your USB drive (note: if you copy it to a different folder be sure to change the from= entry also – note that the path and filename are CASE SENSITIVE!)
2. Install grub4dos on the USB drive if you haven’t already done so (use the RMPrepUSB – Install grub4dos button)
3. Add one of the following menus to your menu.lst file (press F4 in RMPrepUSB to load menu.lst into Notepad)
- #The iso file must be in the /ISO folder on the USB drive (paths are case sensitive!)
- title slax 6.1.2
- map /ISO/slax-6.1.2.iso (0xff) || map –mem /ISO/slax-6.1.2.iso (0xff)
- map –hook
- root (0xff)
- kernel /boot/vmlinuz from=/ISO/slax-6.1.2.iso ramdisk_size=6666 root=/dev/ram0 rw
- initrd /boot/initrd.gz
- # Example for 7.0.8 – note the ISO has a \slax folder so last two lines are different
- title Slax 7.0.8 i486
- map /ISO/slax.iso (0xff) || map –mem /ISO/slax-6.1.2.iso (0xff)
- map –hook
- root (0xff)
- # boot to Desktop using slax.flags=xmode
- kernel /slax/boot/vmlinuz vga=773 rw slax.flags=xmode from=/ISO/slax.iso
- initrd /slax/boot/initrfs.img
4. Press F11 to try it out under the QEMU emulator.
USING SYSLINUX
These instructions will create a new USB flash drive (or USB Hard drive) and install the Syslinux bootloader onto it.
1. Download the Slax ISO v6.1.2 from the Slax website
2. Download and install RMPrepUSB v2.1.630 or later
3. Slax requires syslinux version 3 – Run RMPrepUSB and press F3 to open Explorer at the RMPrepUSB folder – open the Syslinux – Syslinux_3.86 folder and copy the syslinux.exe file to the RMPrepUSB folder – this will overwrite the current syslinux.exe (which is version 4) with version 3.86. Now the Install Syslinux button on RMPrepUSB will install v3.86 instead of version 4 when it is used.
4. Set up RMPrepUSB to format and prepare your USB drive as in the picture below. Be sure to use FAT32 and to select the downloaded ISO file in section 5 – click 6 Prepare Drive.
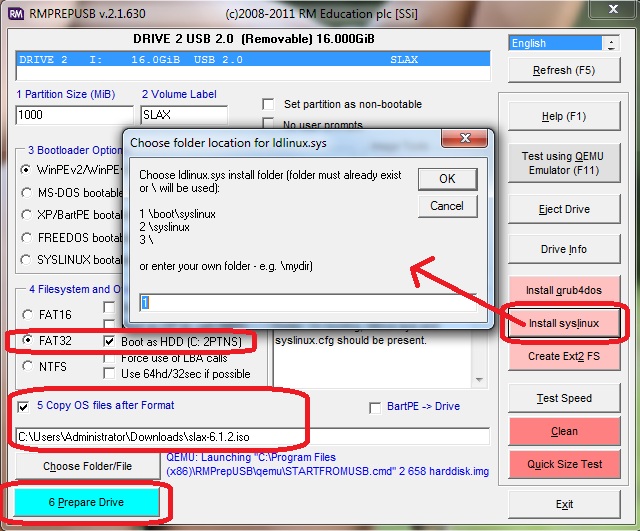
Click on the Choose Folder/File button and say ‘Yes’ to extract files from the ISO – then select the ISO file.
5. Now click on Install Syslinux and choose option 1 (you can say no to the -r Raid option if you like).
6. Now press F11 or click on the Run QEMU button to test the USB drive – it should boot to Slax (type startx to run the Desktop):
SLAX 7.0
If you boot from the ISO then persistence will not work. Slax looks for \xxx\*.sb (where xxx is the ‘from’ directory). That folder is then set as the ‘base’ folder and Slax will then look for a ‘changes’ folder under it which is writeable and NOT NTFS (ext or FAT32).
To get persistence to work you need a FAT32 USB bootable drive.
Extract the ISO /slax folder to your USB FAT32 drive and rename the \slax folder to something unique – e.g. slax708_32 for the 32-bit version of 7.0.8
- \slax708_32
- \slax708_32\boot
- \slax708_32\changes (changes.dat will be made for persistence changes)
- \slax708_32\modules
- \slax708_32\rootcopy
- \slax708_32\01-core.sb, 02-xorg.sb etc. etc.
Menu.lst example
- # /slax708_32/changes/ folder must exist for persistence to work (not NTFS!)
- title SLAX 7 persistent \n Run Slax with persistent changes (NO PERSISTENCE IF NTFS)
- kernel /slax708_32/boot/vmlinuz vga=773 rw slax.flags=perch,xmode from=/slax708_32
- initrd /slax708_32/boot/initrfs.img
set vga=normal for a different graphics mode.
Troubleshooting
If it fails to boot, delete the changes\changes.dat file – if it corrupted or belongs to a different ‘session’ it may be causing problems.
Make sure the drive (or .imgPTN image partition) has enough spare space on the volume to create a changes.dat file.