
Table of Contents
Note: You may prefer an easier method for creating installations by using WinToUSB. This makes it very easy to create MBR-bootable USB drives.
INTRODUCTION
If you try to install Windows 8.1 To Go on a Removable USB Flash drive, you will find that it will not boot and you just get an ‘everlasting spinning circle of dots’ on first boot (Win10 1703 and later will work OK however).
However, if you install to a VHD then it will boot OK, even from a Removable USB Flash drive. Thanks to devdevadev for pointing this out here.
Note that this method will only support MBR-booting (not UEFI-booting) because we need to create an NTFS partition so that it can hold the large VHD file and UEFI needs a FAT32 partition to initiate booting.
This method should work fine with any Win7 or Win8 ToGo too.
An easy way to make and add lots of (MBR-bootable, non-UEFI) Windows OS VHDs to an Easy2Boot USB drive is described in my blog here. E2B v1.69+ must be used because it can directly boot from Win7/8/10 VHDs.
SUMMARY
The basic procedure will be:
1. Create an NTFS volume on a USB drive – this will be the boot drive – e.g. E:
2. Create a VHD file and mount it as another volume\drive letter – e.g. Z:
3. Use WinNTSetup to install from our Install.wim file to both E: and Z: and dismount/detach the VHD
4. Fix the BCD file so that it will look for the VHD on any drive
5. Copy the large VHD file to the USB drive
6. Boot to allow Windows Setup to complete and be configured
REQUIREMENTS
- RMPrepUSB (of course!)
- BootIce for BCD editing
- WinNTSetup to extract the files and make the USB drive bootable
- A way of extracting or mounting an ISO as a virtual drive (7Zip or ImDisk or a Windows 8 system)
- Windows Install ISO or extracted files, e.g. – Win8.1 Evaluation
METHOD
1. Create a large NTFS volume
We need to create an NTFS volume that will hold the VHD file + some Windows boot files such as \bootmgr and the \boot folder.
1.1 Installing WinToGo onto a single-boot USB drive
If you just wish to install WinToGo to a non-Easy2Boot, normal USB drive, then format the USB drive using RMPrepUSB – bootmgr – NTFS – Boot as HDD (C: 2PTNS).
If you are not using RMPrepUSB, then I suggest you use a partitioning tool to create 2 partitions, the 2nd partition can be very small (e.g. 1MB) and is not used – however, it will improve the chances of booting correctly as a HDD on some systems.
1.2 Installing WinToGo onto an Easy2Boot USB drive
If you want to add WinToGo to an Easy2Boot USB drive then you will need to create a .imgPTN file as follows:
- Create an empty, new folder on the Windows Desktop called EMPTY.
- Drag-and-drop the EMPTY folder onto the MPI Toolkit MakePartImage Desktop shortcut (not the MPI_NTFS shorcut!)
- Answer the questions when prompted – Note: you will need to specify NTFS and the size in decimal MB units (e.g. if you specify 30000 then that will make a 27.9GB volume). You also need to allow for 20MB for the Windows Boot files and 10MB for the E2B CSM files. So if you want a 30GiB WinToGo VHD volume, you will need to specify approx. 32500MB.
- e.g.
- N = NTFS
- SIZE=32500
- OUTPUT FILENAME=C:\Win81ToGoVHD.imgPTN
- VOLUME NAME=Win8ToGo (or whatever you like – keep it short!)
- MENU NAME= (whatever you like)
- When the .imgPTN file is made, copy it to your Easy2Boot USB drive (e.g. \_ISO\WIN folder)
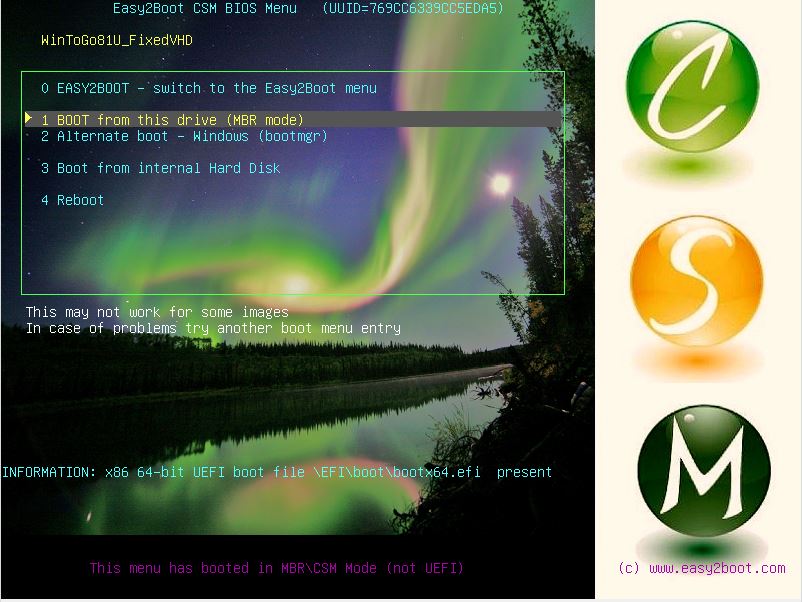
- Boot to the Easy2Boot USB drive (either on a real system or using QEMU or Virtual Box) and select the new .imgPTN file to load the CSM menu (as shown below)
- Quit the VM or unplug the USB drive so that it is now in the CSM mode
2. Install.wim file
We need to get access to the \Sources\Install.wim file that is inside the Windows 8.1 Install ISO. You can either extract the Install.wim file from the ISO file using 7Zip or some other utility OR use ImDisk to mount the ISO as a virtual DVD (or double-click in Win8 to mount it as a virtual DVD).
3. Create a VHD
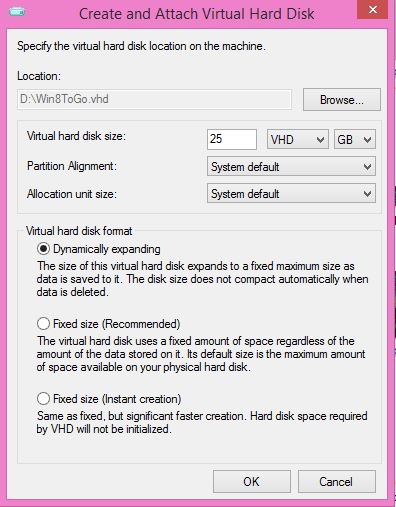
- Run WinNTSetup.exe and click on the VHD>>> button, near the bottom of the Windows Vista/7/8/10/2008/2012 form.
- Click Create
- Click on Browse and set the Location to where you want the VHD file to be saved to – I recommend you choose your fastest drive (an SSD if possible) – e.g. C:\wintogo81.vhd
- You can choose the USB drive at this point if you wish – it will just be much slower to install Windows to it in step 4 below
- Choose VHD (or VHDX) and set the size in GiB
- Use VHD if booting Win7ToGo (not recommended!) or either if booting Win8ToGo (use VHDX if over 2TB – VHD may be faster)
- Choose the Virtual hard disk format – it may be easier to choose Dynamically Expanding (recommended) because the VHD file created initially will be much smaller than a fixed size VHD file, however there may be a slight performance penalty when in use. For instance, you could create a 50GB expanding VHD file (which may be 10GB after installing Windows to it) and place it on a 60GB partition and Windows would gradually expand the 10GB VHD as more files/updates were added until it filled all the remaining space up to 50GB – you would then get an ‘out of space’ error because it could not expand the VHD file any further due to lack of free space. Using a Dynamically Expanding VHD makes working out the partition sizes much easier!
- Note: There must be enough free space on the partition or you will get a boot error – e.g. If you have created a 25GB expanding VHD and place it on a 20GB partition, it won’t boot. If you place the VHD on a 30GB partition but only 10GB of space is free it may also not boot if the VHD cannot be expanded to 25GB.
Tip: If you create the VHD on the USB drive and in the correct location, then it will not be necessary to tweak the BCD later.
4. Install Windows to the Boot drive and VHD

In WinNTSetup, set the first field to the location of your Install.wim file.
Note: If you want to use the WIMBOOT feature of Win8.1U1+ (for fast SSD/Flash only) to reduce wasted space, copy the install.wim to the E: drive (e.g. E:\image\install.wim) and then change the first field to point to the install.wim on the E: drive (e.g. E:\image\install.wim).
The Boot volume should be set to your USB drive letter – WARNING: Do not specify any of your Windows system internal drives!
The target volume should be the VHD drive letter (usually Z:)
If you wish, you can use the Tweaks>>> button to set any of your preferences. Disabling the Hibernate and Page File may be a good idea for instance.
If you tick the ‘Windows Image File Boot (WIMBoot)’ option (Win81.Update1+ only) this will save space on your drive, however it can cause more disk activity and may have an affect on performance if you have a slow USB drive or CPU. The Install.wim must be present on the boot partition (or at least the same physical disk) for the WIMBoot option to be present.

The WIMBoot option may not be displayed (depends on your Windows install.wim location and version).
I do not recommend using the wimboot option.
If you set ‘Mount Installation drive as’ to * then the system drive letter of a standard Windows Install will not change. A stock Windows (non-WinToGo) 7 will result in D:, and Windows 8 and newer usually in C:
The ‘drive letter pre-assignment’ option will save the drive letters of all fixed volumes. So for WinToGo this option is of no use.
Unlike a normal WinToGo installation, WinNTSetup does NOT hide the system’s internal hard disks – so they will be accessible to the user.
Now click Setup to begin installing to the two volumes. As we cannot UEFI-boot from a single NTFS partition, you can change the Boot option from ALL to BIOS to save a few MB of filespace.
If the boot volume is an Easy2Boot drive, set the ‘Boot Code’ option to ‘So not update the Boot code’.
Note: If WinNTSetup reports a problem as soon as you click Setup and OK the next step, then Quit it completely and re-run it again.
5. Tweak the BCD
- Now run BootIce – BCD tab – Other BCD file – choose \boot\BCD file on the USB boot drive – Easy Mode (do not change C:\boot\BCD !!!)
- Change the [Boot Device] – Disk: to BOOT(WIM)/LOCATE(VHD)
- Click on Save current system and Save Globals
- If you wish, you can change the OS title:
- Check the path and name of the File: field – it should be something like \xxxxx.vhd
- Close and quit the utility

This shows the BCD before it has been changed – you should change the Disk: field to BOOT(WIM)/LOCATE(VHD)
Note: A solid black checkbox indicates ‘not defined in BCD’.
Now detach the VHD using the VHD>>> button and choose detach.
6. Copy the VHD file
If you did not create the VHD file directly on the USB drive, then now you must copy it to the USB drive.
Keep the path the same as that shown by BootIce (e.g. if it was made with the VHD in the root (e.g. D:\), then copy it to the root of the USB drive).
If you made the VHD file in C:\temp, then make a \temp folder on the USB drive and copy the VHD file to the \temp folder – or run BootIce and change the path
On the USB drive we should now have… (ensure you have set Explorer to show Hidden and Protected Operating System files and file extensions):
- \Win8ToGo.vhd
- \Boot folder
- \bootmgr
7. (optional) If using E2B
If the USB boot partition was an Easy2Boot USB .imgPTN, it will now boot straight to WindowsToGo every time and not the CSM menu of Easy2Boot.
To fix this so that it boots to the CSM menu first, use RMPrepUSB – Install grub4dos – MBR=Y (do NOT install to the PBR!)
FINISHED!
8. Boot!
Now we can finally boot from the USB drive. First ensure you have a backup of the .VHD file safely on your Windows hard disk – just in case!
I strongly recommend you use a Real Machine, at least for the first 3 Setup boots.
If anything goes wrong you can simply overwrite the VHD file with the original one.
Paging may be enabled if you haven’t used the Tweaks settings – look for a large /pagefile.sys file on the USB drive – it will save space if you turn off paging (as long as you have plenty of RAM in the system). Use the Windows key + Pause/Break key combination – Advanced system Settings – Performance – Advanced – Virtual memory – change
Note: always shutdown the WinToGo OS nicely to avoid file corruption!
9. Make it portable
If you intend to move the VHD and the boot files to a new USB drive, repeat Step 5 above.
It may be worth making a backup of all these files too, so you can quickly restore them.
If you have used a 90-day Evaluation version, the original VHD can be quickly restored after 90 days and you can quickly go through Setup again for another 90-days.
It is also possible to extend the 90-day period by another 90-days using slmgr /rearm.
You can add more VHD’s if the partition image is large enough and then add more entries into the BCD using BootIce (just copy the existing one but change the VHD filename).
Reducing the Easy2Boot .imgPTN size
If you have made a fixed VHD installation, but find that you now have several GB of free space on the NTFS partition, this can be used for file transfer. Any files you place in the USB drive’s NTFS partition will be accessible from both the WinToGo session and when you plug your E2B USB drive into your Windows system.
Note: Allow for maximum expansion if using a dynamically expanding VHD. e.g. if using a 25GB VHD, you should make a 26GB or larger partition image or else you will get a ‘VHD BOOT HOST VOLUME not enough space’ boot error.
MODIFICATIONS TO SUPPORT UEFI BOOTING
UEFI-booting using a VHD requires two partitions, one for the FAT32\EFI boot partition and an NTFS partition to hold the large VHD file. For this reason we cannot use a Removable-type of USB Flash drive for WindowsToGo and use a single NTFS partition, because Windows will only mount one partition on a Removable-type of drive.
Note: Win10 1703 and later versions can boot from a Removable drive with more than one partition.
If you have a USB ‘fixed-disk’ type of drive, you can create a FAT32 partition for the first partition (say 300MB) and the rest as an NTFS partition which will hold the VHD.
In WinNTSetup, you should specify the FAT32 partition as the Boot drive. Create the VHD on the USB drive, if possible, otherwise once the installation has completed, move the VHD to the USB drive’s NTFS partition and run BootIce BCD edit as instructed above.
If you want to add Win81ToGo to an Easy2Boot USB drive, then make two .imgPTN files from the EMPTY folder – e.g.
WinToGo81.imgPTN (size=300MB – FAT32)
WinToGo81 (size=33GB – NTFS).
When you boot to E2B and select the WinToGo81.imgPTN file, then both files will be installed as partitions:
Partition 1 = WinToGo81.imgPTN FAT32 300MB – contains CSM menu and Windows \Boot folder etc.
Partition 3 = WinToGo81 NTFS 33GB – containing a 30GB VHD file
If possible, create the VHD on the USB drive and install to it whilst on the USB drive – otherwise you will need to use BootIce to edit both the \Boot\BCD and \EFI\Boot\Microsoft\BCD
(P.S. I have not tested this – but it should work!)
Transferring to a Removable USB Flash drive for UEFI-boot support
The arrangement below may work on some UEFI systems but not others (untested!):
Once you have the two partitions above working on a USB Hard Disk, you can try renaming the two files and swap them over so that the file with the .imgPTN file extension is the NTFS partition :
Partition 1 = WinToGo81.imgPTN NTFS 33GB – containing a 30GB VHD file
Partition 3 = WinToGo81 FAT32 300MB – contains CSM menu and Windows \Boot folder etc.
You should then be able to UEFI-boot from the FAT32 partition (but some UEFI systems may not list the 3rd partition as a boot option).