
Table of Contents
This Tutorial has been adapted from misty‘s method 3 from reboot.pro.Unsupported embed
INTRODUCTION
This tutorial shows how you can create a Virtual Hard Disk (VHD) file on an external USB Hard drive and make the system boot to Windows 8 from the VHD file rather than from a flat file structure on the USB drive.
Note: A much easier method is now available! Use the free version of WinToUSB to quickly create a bootable USB drive.
Caution: This Tutorial is not for beginners – please read the Warning below!
A VHD file is a file that can be loaded and treated by Windows as if it was a hard disk. So a 20GiB VHD file will appear to Windows as a 20GB drive containing the Windows OS and from which Windows 8 can boot.
You can thus boot your existing system from the OS that is on it’s hard drive or boot the system from the Windows 8 VHD file on the external USB drive.
This Tutorial has been tested using an XP netbook with a 60Gib USB HDD connected. I have not fully tested this on a USB Flash drive, but initial testing shows it should work (especially if it is a USB 3.0 Flash drive). The Flash drive will need to be at least 16GB though. MS recommend that the Flash drive is a ‘WindowToGo’ approved flash drive (meaning it appears as a Fixed Disk and not a Removable Disk to Windows).
Because a VHD file is used, you can easily copy the VHD file from the USB drive to any or all of your USB Hard disks and USB Flash drives (if they are big enough!). This means it is very easy to back up the whole Windows 8 installation, as it just means you copy one file.
You can also move the Windows 8 VHD to another USB hard disk, provided that you also run bcdboot on the new drive.
Note: to avoid altering your internal hard disk boot files, you can follow Tutorial 53 but create and mount a VHD as described below, instead of installing Win8 directly to the USB drive volume.
Warning!
As we are going to install a copy of Windows 8 onto a system (even though Windows 8 will actually be on an external USB drive and in a file),
the internal hard disk boot files will be changed by Windows 8 Setup!
This means that the Windows 8 Setup program will make you internal hard drive dual/multi bootable because it will add the entry for the Windows 8 VHD:
- If you use a Windows XP system, it will change the bootloader to use bootmgr instead of XP’s ntldr. You will still be able to boot to XP on the internal HDD, but the first ‘default’ boot option will fail unless you also have the external USB drive connected which has the external Win8 USB VHD file on it.
- If you use a Windows Vista/7/8/Server2008R2 system, an extra boot entry will be added to the boot menu for the external Win8 USB VHD file.
In addition, the boot partition of your external USB Hard drive will also be changed, as the hard drive needs to be able to load bootmgr. If the USB hard drive is a grub4dos multiboot HDD, then you will need to add an extra entry to chainload to the bootmgr bootloader. If the USB Hard drive already has a valid BCD (i.e. already has Windows Vista or later OS on it) then the boot menu loaded by bootmgr will be affected.
These changes can however be undone after the installation has been completed (see end of this Tutorial).
REQUIREMENTS
- A Windows Netbook/PC/Notebook with internal hard drive – preferable a system that is a ‘test’ system and not your work or office system!
- A USB external hard drive (the VHD file will be created on here) – at least 20GB of free space is required
- USB stick (bootable, with Windows 8 setup files) – or a Windows 8 Installation DVD
HDD = Hard Disk Drive
VHD = Virtual Hard Disk – a file that is mounted by Windows as if it was a real hard disk
1. MAKE A WINDOWS 8 INSTALL USB DRIVE
If your system has a DVD drive or you have a USB DVD drive then you do not need to make a bootable Windows 8 install USB Flash drive.
To make a bootable USB Flash drive that will install Windows 8 onto a netbook or other computer, simply run RMPrepUSB and setup the 1-5 settings as below and click on 6 Prepare Drive:
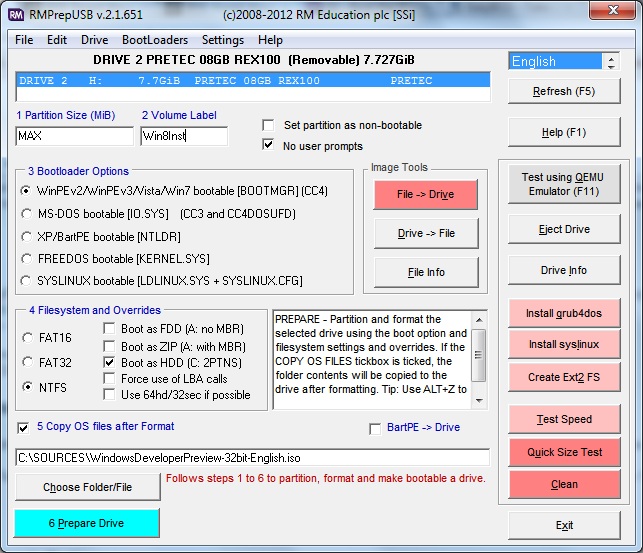
Click on Choose Folder/File and then ‘No’ and then select your Windows 8 ISO file.
2. CREATE A VHD INSTALLATION
1. Attach both USB devices and boot from the USB stick (or DVD) to start Windows 8 setup.
2. On the first Windows Setup screen, choose your language and click on Next.
3. Select Custom when asked Which type of installation do you want?
4. Proceed with the installation until you are presented with the ‘Where do you want to install Windows?’ screen and a list of drives and partitions is displayed.
5. Now press the SHIFT key down and press and release the F10 function key (i.e. press SHIFT+F10) – a windows shell text-mode console window should now appear.
6. Type Diskpart and check the mount points for the drives by typing LIS VOL – in my case internal HDD=C:, USB stick=D:, external USB HDD=E:.
7. Create a (sparse) 20GB VHD file using the command
create vdisk file=E:\Win2go.vhd maximum=20480 type=expandable
8. Select the newly created VHD file using the command
select vdisk file=E:\Win2go.vhd
9. Mount the VHD file using the command
attach vdisk
10. Exit diskpart using command
exit
obviously, you can have a larger VHD if you wish by increasing the 20480 number!
11. Click on the Refresh icon to update the drive list. You should now see a 20GB Unallocated Space appear in the list – select this and ignore any warning messages (if there are any) and proceed with the install of Windows 8.
Enter the correct Win 8 product key if requested
Windows 8 Release Preview (2012-05-31) – key = TK8TP-9JN6P-7X7WW-RFFTV-B7QPF
This key will most likely expire soon after Microsoft officially launch Windows 8.
3. REBOOT AFTER THE WINDOWS 8 INSTALLATION FILES HAVE BEEN COPIED
12. When the installation reboots, do not allow it to reboot from the internal hard disk, instead you must reboot to Windows 8 Setup again by booting from the USB Windows 8 installation source again (e.g. boot from the USB Flash drive with the Win8 Setup.)
13. After selecting a language and country as before, press SHIFT+F10 again to open up a command console again.
14. Type diskpart and then list the volumes available by typing
LIS VOL
15. Identify the USB hard disk volume letter, e.g. E:
16. Select the VHD file using the command
select vdisk file=E:\Win2go.vhd
where E: is the volume letter
17. Mount the VHD file using the command
attach vdisk
Check the drive letter for the newly mounted VHD file by typing
LIS VOL
e.g. you now see the VHD drive = F:
18. Exit diskpart by typing exit
19. Run the following command to create the boot files
bcdboot F:\Windows /s E: /f ALL /v
where F: is the mounted volume and E: is the USB hard drive.
20. If your USB hard drive does not have the normal bootmgr bootloader already installed then it will not boot, so you will need to run the following command:
bootsect /nt60 E:
(note that E: is the volume letter for the USB drive volume and NOT the volume letter of the VHD volume.)
alternatively, if you already have grub4dos installed on your USB hard disk, you can add a new entry in the menu.lst file on the USB hard disk as follows:
title Boot to Windows 8 (VHD)
chainloader /bootmgr
21. Type wpeutil reboot to reboot the system (or just switch it off and on again).
REMOVING THE WINDOWS 8 BOOT MANAGER FROM THE INTERNAL HARD DISK
If your internal hard disk on the system that you were using contained Windows XP, then when you next attempt to boot from the internal hard disk, it will attempt to boot from the external USB hard disk instead and display an error. This is because when you installed Windows 8, it changed the internal hard disk’s partition code so that it would load bootmgr instead of ntldr. The installer would also have added the \bootmgr file to your internal hard disk.
To fix your Windows XP system, boot from the Windows 8 Setup USB install Flash drive again and use SHIFT+F10 to open up the command console again. Then type
bootsect /nt52 C:
where C: is your XP system disk. This will change the partition bootloader so that it loads ntldr instead of bootmgr.
If your hard disk previously contained Vista or Windows 7 or Windows 8, you will find that a new boot option for Windows 8 will have been added to your Windows 8 boot menu which will not work unless you have the Windows 8 USB hard drive connected that contains the VHD file. To fix this, use EasyBCD to remove the extra BCD entry.
MOVING THE VHD
To move or copy the VHD to another USB drive:
1. Copy the vhd file to the new USB drive
2. Boot from the Windows 8 install DVD or ISO and press SHIFT+F10, mount the VHD and run bootbcd by following steps 13 – 19 above
Note that activation will be a problem if moving to different hardware unless you have the volume licence Enterprise SKU and multiple access keys!