
Table of Contents
ATTENTION: NEW TUTORIAL #32 IS EASIER AND QUICKER TO SET UP AND USE!
INTRODUCTION
This tutorial will show you how to have a bootable USB drive (flash drive or HDD) which can contain any number of Vista, Win 7, Server 2008 or later Installation DVDs (both 32-bit and 64-bit) and boot from any one of them. You can then install that OS onto your PCs hard drive just as if you had booted from the DVD. This method does not load the ISO file into RAM and is just as fast as running from a flat-file USB drive and faster than booting from an install DVD.
For a quick and dirty method of adding Windows Vista/7 ISOs to your existing grub4dos USB drive (and if you don’t mind having to type a few command line commands each time) see the ADDENDUM at the end of this tutorial.
Note: Tutorial #32 is an enhancement of this method but is fully automatic and very easy to set up.
The basic idea behind this is simple. You boot to WinPE, you use ImDisk to mount an ISO as a Volume letter, you run Setup.exe from the new volume letter. The only complication is that you cannot run a 64-bit Setup.exe from a 32-bit WinPE environment, so we need two WinPE versions on the same USB drive. To test this I used an 8GB USB Flash drive and Windows 7 SP1 64-bit Enterprise edition ISO and a 32-bit Vista Spanish edition.
If you also want to add OS installs from XP ISO files to your USB drive – see Tutorial #30.
This tutorial allows you to have a grub4dos boot menu that contains 2 entries
1. Install a 32-Bit Windows OS
2. Install a 64-Bit Windows OS
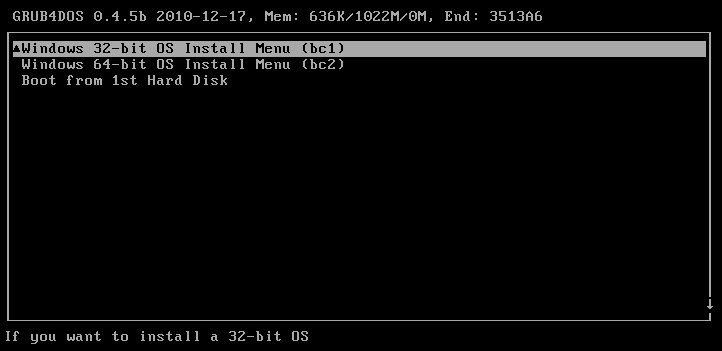
The basic grub4dos menu
When you select one of these two grub4dos menu choices, the USB drive will then boot to either WinPE v3 32-bit or WinPE v3 64-bit.
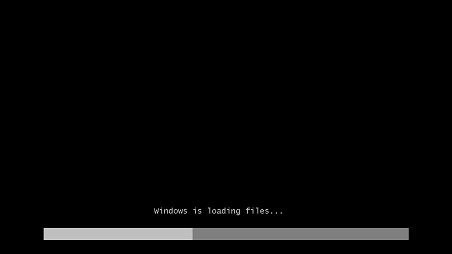
The USB drive loads WinPE (either 32-bit version or 64-bit version)
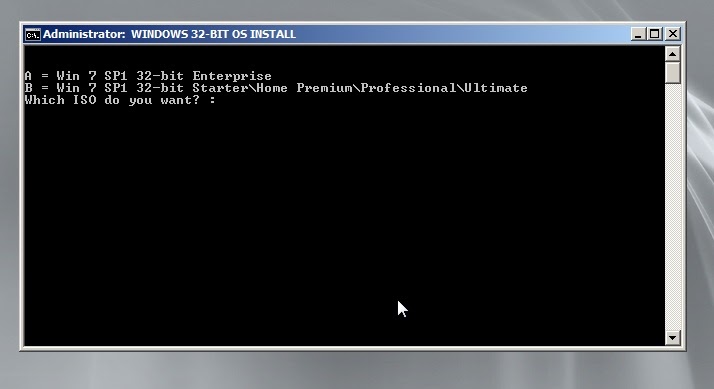
At this point you will be presented with a list of ISO files and you can choose which one to run.
This menu can be easily modified to contain all your 32-bit ISO files
From then on it is just as if you booted from the DVD.
The files on the USB drive will be:
- bootmgr
- menu.lst
- grldr
- \boot folder
- \sources folder containing two boot.wim files – boot1.wim and boot2.wim
- \ImDisk folder containing ImDisk driver and some script files which you can edit
- \ISO folder for all your Windows ISO files
A suggested Menu.lst is:
title Windows 32-bit OS Install Menu (bc1)\nIf you want to install a 32-bit OS
map –mem /bootmgr (rd)
write –offset=0x105E (rd)+1 \xEB\x08
write –offset=0x54696 (rd)+1 1
chainloader (rd)+1
root ()
title Windows 64-bit OS Install Menu (bc2)\nIf you want to install a 64-bit OS
map –mem /bootmgr (rd)
write –offset=0x105E (rd)+1 \xEB\x08
write –offset=0x54696 (rd)+1 2
chainloader (rd)+1
root ()
title Boot from 1st Hard Disk \nBoot from MBR of first hard disk
map (hd0) (hd1)
map (hd1) (hd0)
map –hook
chainloader (hd0)+1
rootnoverify (hd0)
N.B. If you already have a different version of the WAIK installed, you can use that instead, but you will need to change the patch bytes as follows (use 1 for the first menu and 2 for the 2nd menu):
For Windows 7 Bootmgr SP0 build 7600 (CRC32: EE471B58)
write –offset=0x105E (rd)+1 \xEB\x08
write –offset=0x54696 (rd)+1 1
For Windows 7 Bootmgr SP1 build 7601(CRC32: ???? from SP1 WAIK)
write –offset=0x105E (rd)+1 \xEB\x08
write –offset=0x54735 (rd)+1 1
For Windows Vista Bootmgr SP2 build 6002 (CRC32: E6CDE422)
write –offset=0x1058 (rd)+1 \xEB\x08
write –offset=0x48C20 (rd)+1 1
For Windows Vista Bootmgr SP1 build 6001 (CRC32: 6442A4AD)
write –offset=0x1058 (rd)+1 \xEB\x08
write –offset=0x4883C (rd)+1 1
For Windows Vista Bootmgr SP0 build 6000 (CRC32: 543E715A)
write –offset=0xE28 (rd)+1 \xEB\x08
write –offset=0x54B6C (rd)+1 1
For a CRC32 utility to obtain the checksum of your bootmgr file, download CRC32 from the Beta Downloads section.
Sidebar: The BC1 and BC2 files I provide have already had the commands:
bcdedit -store c:\WINISO\boot\bc1 -set {bootmgr} nointegritychecks 1
bcdedit -store c:\WINISO\boot\bc2 -set {bootmgr} nointegritychecks 1
run on them to prevent bootmgr complaining that it has been corrupted when it is patched by the grub4dos write command. If you still get a ‘corrupted’ message it indicates that the first ‘write’ patch in the menu.lst entry is not the correct patch for your bootmgr file – check the CRC32 signature!
You will require source Microsoft ISOs for Vista/Win7/Server 2008 (note OEM DVDs should work also – some MS Win7 ISOs can be downloaded from here – use the Digital River links, some other links on this page may be broken). You can make an ISO file from a DVD if you use WinImage or similar software.
INSTRUCTIONS
1. Prepare an empty folder on your main Windows computer hard disk (e.g. C:\WINISO)
2. Download and install the Windows 7 (RTM) WAIK – Note: it must be the RTM first release version and NOT Vista or Win7 SP1 version – check the CRC32 value of bootmgr if in doubt!
3. Run the WAIK command prompt (from Start Menu – Deployment Tools Command Prompt) and type the command: COPYPE x86 C:\x86 to make an 32-bit version of WinPE v3
4. Type the command: COPYPE amd64 c:\amd64 to make a 64-bit version of WinPE v3
5. Download the WINISO.ZIP file from the Beta Downloads – Tutorials section of this website and extract the contents to C:\WINISO
6. Copy the WinPE.wim file from C:\x86\winpe.wim to C:\WINISO\Sources\Boot1.wim and rename it
7. Copy the WinPE.wim file from C:\amd64\winpe.wim to C:\WINISO\Sources\Boot2.wim and rename it
8. Copy the bootmgr file from C:\x86\ISO\bootmgr to C:\WINISO\bootmgr (should be 14 July 2009 383,562 bytes in size if correct version of WAIK is installed – please check!) – see here for patches for different versions of bootmgr.
9. Copy the whole folder from C:\x86\ISO\boot to C:\WINISO\boot
10. Now we need to add some commands to the boot1.wim file and the boot2.wim file so that they will automatically find and run the RunISOxx.cmd file when WinPE boots.
Option: If you want to leave this bit until after you have tested your USB drive, you can skip the next two steps (skip step 10 and 11) – it just means you will have to find and run IMDISK\RUNISO32 or IMDISK\RUNISO64 manually when WinPE boots.
To modify each bootx.wim file:
Create an empty folder at C:\MOUNT
At the WAIK command prompt, type:
imagex /mountrw c:\WINISO\sources\boot1.wim 1 c:\MOUNT
then use Windows Explorer and Notepad to find and edit the C:\MOUNT\WINDOWS\SYSTEM32\STARTNET.CMD file which should contain just one line (wpeinit). Add the following text AFTER this line:
@echo off
SET USBDRIVE=
SET TARGET=\IMDISK\RUNISO32.CMD
for %%I in (C D E F G H I J K L M N O P Q R S T U V W X Y Z) do if exist %%I:%TARGET% set USBDRIVE=%%I:
If NOT “%USBDrive%”==”” echo Found %USBDRIVE%%TARGET%
IF “%USBdrive%”==”” (
echo ERROR – COULD NOT FIND %TARGET% on USB drive!
goto :EOF
)
pushd %USBDRIVE%\IMDISK
%USBDRIVE%%TARGET%
Save the file, close ALL Explorer windows and then type at the WAIK command prompt:
imagex /unmount /commit c:\MOUNT
11. Now repeat this step again using boot2.wim but this time add the following text to the end of startnet.cmd (the only difference is in line 3)
@echo off
SET USBDRIVE=
SET TARGET=\IMDISK\RUNISO64.CMD
for %%I in (C D E F G H I J K L M N O P Q R S T U V W X Y Z) do if exist %%I:%TARGET% set USBDRIVE=%%I:
If NOT “%USBDrive%”==”” echo Found %USBDRIVE%%TARGET%
IF “%USBdrive%”==”” (
echo ERROR – COULD NOT FIND %TARGET% on USB drive!
goto :EOF
)
pushd %USBDRIVE%\IMDISK
%USBDRIVE%%TARGET%
You should now have this folder structure (files included in the WINISO.ZIP download I supply are highlighted):
- \WINISO\bootmgr
- \WINISO\grldr
- \WINISO\Menu.lst
- \WINISO\sources\Boot1.wim
- \WINISO\sources\Boot2.wim
- \WINISO\boot\bc1
- \WINISO\boot\bc2
- \WINISO\boot\bcd
- \WINISO\boot\boot.sdi
- \WINISO\boot\bootfix.bin
- \WINISO\boot\bootsect.exe
- \WINISO\boot\en-us
- \WINISO\boot\etfsboot.com
- \WINISO\boot\fonts
- \WINISO\boot\memtest.efi
- \WINISO\boot\memtest.exe
- \WINISO\boot\en-us\bootsect.exe.mui
- \WINISO\boot\fonts\chs_boot.ttf
- \WINISO\boot\fonts\cht_boot.ttf
- \WINISO\boot\fonts\jpn_boot.ttf
- \WINISO\boot\fonts\kor_boot.ttf
- \WINISO\boot\fonts\wgl4_boot.ttf
- \WINISO\ImDisk\awealloc
- \WINISO\ImDisk\cli
- \WINISO\ImDisk\cpl
- \WINISO\ImDisk\gpl.txt
- \WINISO\ImDisk\imdisk.inf
- \WINISO\ImDisk\MountDrive.cmd
- \WINISO\ImDisk\readme.txt
- \WINISO\ImDisk\run64.exe
- \WINISO\ImDisk\RunISO32.cmd
- \WINISO\ImDisk\RunISO64.cmd
- \WINISO\ImDisk\SetupCDROM.CMD
- \WINISO\ImDisk\SetupImDisk.CMD
- \WINISO\ImDisk\svc
- \WINISO\ImDisk\sys
- \WINISO\ImDisk\awealloc\amd64
- \WINISO\ImDisk\awealloc\i386
- \WINISO\ImDisk\awealloc\ia64
- \WINISO\ImDisk\awealloc\amd64\awealloc.sys
- \WINISO\ImDisk\awealloc\i386\awealloc.sys
- \WINISO\ImDisk\awealloc\ia64\awealloc.sys
- \WINISO\ImDisk\cli\amd64
- \WINISO\ImDisk\cli\i386
- \WINISO\ImDisk\cli\ia64
- \WINISO\ImDisk\cli\amd64\imdisk.exe
- \WINISO\ImDisk\cli\i386\imdisk.exe
- \WINISO\ImDisk\cli\ia64\imdisk.exe
- \WINISO\ImDisk\cpl\amd64
- \WINISO\ImDisk\cpl\i386
- \WINISO\ImDisk\cpl\ia64
- \WINISO\ImDisk\cpl\amd64\imdisk.cpl
- \WINISO\ImDisk\cpl\i386\imdisk.cpl
- \WINISO\ImDisk\cpl\ia64\imdisk.cpl
- \WINISO\ImDisk\svc\amd64
- \WINISO\ImDisk\svc\i386
- \WINISO\ImDisk\svc\ia64
- \WINISO\ImDisk\svc\amd64\imdsksvc.exe
- \WINISO\ImDisk\svc\i386\imdsksvc.exe
- \WINISO\ImDisk\svc\ia64\imdsksvc.exe
- \WINISO\ImDisk\sys\amd64
- \WINISO\ImDisk\sys\i386
- \WINISO\ImDisk\sys\ia64
- \WINISO\ImDisk\sys\amd64\imdisk.sys
- \WINISO\ImDisk\sys\i386\imdisk.sys
- \WINISO\ImDisk\sys\ia64\imdisk.sys
12. Now add all your OS DVD ISO files. For instance, make a folder called C:\WINISO\ISO and place your .iso files in there.
Note that Windows XP is not yet implemented (but it should work in theory – you would need to mount the ISO file in the same way, but you will need to run i386\Winnt32.exe and not setup.exe, so you will need to make a new MountDriveXP.cmd which runs i386\Winnt32.exe and also pre-format the hard drive first using Diskpart and using the CRE PAR PRI ALIGN 16065 command and then running bootsect /nt52 D: or it will not reboot for the 2nd GUI setup stage – a command line like:
D:\i386\winnt32 /syspart:D: /tempdrive:D: /makelocalsource /unattend:g:\unattend_XP_ABC.txt would automate the install and you could use entries in your added unattend.txt to install to a different partition if you wish). If you don’t want fully automated installs, I would recommend you follow Tutorial #30 and simply add that to your menu.lst file.
13. Now you need to edit the C:\WINISO\ImDisk\RunISO32.cmd and C:\WINISO\ImDisk\RunISO64.cmd files to include the name of each of your ISO files and a menu entry for each of them:
- TITLE WINDOWS 32-BIT OS INSTALL
- @echo off
- cls
- echo.
- echo.
- echo A = Win 7 SP1 32-bit Enterprise
- echo B = Win 7 SP1 32-bit Starter\Home Premium\Professional\Ultimate
- REM add more here
- SET /P ANS=”Which ISO do you want? : “
- IF /I “%ANS%”==”A” SET MYISO=\ISO\en_windows_7_enterprise_with_sp1_x32_dvd_620201.iso
- IF /I “%ANS%”==”B” SET MYISO=\ISO\Win7SP1.iso
- call \imdisk\MountDrive.cmd %MYISO%
You should change the “echo A” and “echo B” lines and add more entries if you wish.
Then change the “If /I %ANS%..” lines so the correct ISO file is selected and add more to match the menu text.
Do this for both RunISOxx.cmd files so you have both 32-bit and 64-bit ISO menus.
14. Now you need to prepare a bootable USB drive. Simply use RMPrepUSB and select NTFS or FAT32 and Boot as HDD – option 5 should be set to the C:\WINISO folder. Once you have hit the Prepare Drive button and all the files have been copied across (may take a while!), run Install Grub4dos and choose the PBR option and allow it to copy over the grldr file.
If you have RMPrepUSB v2.1.618 or later, just press the F11 (QEMU) function key and make a 5GB raw hard disk drive when prompted and test it out in a virtual environment (USB drive will be read-only),
Now go try it for real on a real system!
You can add more ISOs at any time to the ISO folder. Note that if you want to be able to install ALL SKUs of Windows, you may need to delete the \sources\ei.cfg file from within each ISO image so all the images are listed. Any ammended ISO does not need to be bootable though, so you can extract the ISO and then save it as a non-bootable ISO.
If ImDisk does not load an ISO image, it is probably because the ISO file is not contiguous. Run WinContig on the file on the USB drive – or – re-run RMPrepUSB and copy all the ISO files over again in one go after a fresh format (often faster).
ADDENDUM – HOW TO QUICKLY ADD WINDOWS VISTA/7/SVR2K8 ISOS TO YOUR EXISTING USB BOOTABLE DRIVE
This is a quick and dirty method which does not provide any menu once you have started setup, so it requires some user know how! It has the advantage that it is VERY easy to add to a boot USB drive and each ISO has its own grub4dos entry.
1. Download the WINISO.ZIP and extract the contents to your USB drive. Do not overwrite your own menu.lst file! The menu.lst, boot\bc1 and boot\bc2 files in the ZIP download can be discarded\deleted.
2. Add your ISO files
3. Add some grub4dos menu.lst entries, one for each Windows install DVD ISO, like this:
- title Install Windows Vista 32-bit Spanish \nWhen Setup loads – type SHIFT+F10, find this USB drive and type \imdisk\MountDrive.cmd \iso\Vista32Spanish.iso
- find –set-root /iso/Vista32Spanish.iso
- map /iso/Vista32Spanish.iso (0xff)
- map (hd0) (hd1)
- map (hd1) (hd0)
- map –hook
- chainloader (0xff)
- title Install Windows 7 64-bit \nWhen Setup loads – type SHIFT+F10, find this USB drive and type \imdisk\MountDrive.cmd \iso\Win764.iso
- find –set-root /iso/Win764.iso
- map /iso/Win764.iso (0xff)
- map (hd0) (hd1)
- map (hd1) (hd0)
- map –hook
- chainloader (0xff)
etc. etc.
Thats it!
Now, to use these entries, this is what you need to do
1. Boot from the USB stick/drive and choose the new menu item – if the command fails, you probably need to run WinContig (RMPrepUSB CTRL+F2) on the ISO file to make it contiguous.
2. The Setup should start. Press SHIFT+F10 – a command prompt window should open. If it does not, just proceed to the next screen and try again. Keep doing this until you get a command prompt Window (some versions allow you to do this on the first screen, some do not!)
3. When you have a command prompt, find the drive letter of the USB drive. You can either do this by typing dir C: then dir D: then dir E: etc. – or you can type NOTEPAD and then use File – Open and use the notepad explorer pop-up to browser the drive letters until you can find which drive the USB boot drive is mapped to.
4. Now assuming the USB drive letter is D:, type:
D:
\imdisk\mountdrive \iso\Vista32Spanish.iso
where the second parameter is the path to your iso file. If a second instance of Setup starts, cancel it (you can prevent this by editing the \imdisk\mountdrive.cmd file and deleting the last line). Note: to saving having to type in the iso filename, you can just type \imdisk\mountdrive \iso\ and then hit the TAB key repeatedly to cycle through all the ISOs until you find the correct one, then press ENTER.
5. Now continue with the Windows Setup GUI. If Setup complains that it cannot find the source DVD and asks for a driver, just use Cancel which should take you back to the beginning of the Install and then try again and this time it should see the source DVD as you have now loaded it in step 4.
6. When Setup finishes, you need to remove the USB drive so that the system boots from the hard disk.