
Table of Contents
Install XP to hard disk from a USB flash drive in under 5 minutes (for text mode copy phase) using an NTFS USB flash drive! Almost twice as fast as a FAT16 USB stick.
INTRODUCTION
WinToFlash can copy the contents of a Windows Install ISO or CD/DVD to a USB flash drive so that you can boot from the USB drive and install Windows to a target system (e.g. a netbook).
In this Tutorial, I will just deal with Windows XP installations.
If you have already tried WinToFlash but got an ‘NTLDR is missing – Press any key to restart‘ error, or it would not boot correctly, or you find the installation of XP (1st stage copy files in text mode) verrrrry slow, you might like to try this method which greatly speeds up installation and may make it more reliable on a wider range of systems.
WinToFlash formats the USB stick as FAT32. When I tried to install XP from a WinToFlash USB stick on my Asus EeePC 904, the first copy files stage took over 79 minutes to copy the files from the USB drive to the internal hard disk!
Formatted using the WinToFlash FAT16LBA option took almost 8 minutes.
When I reformatted the same USB stick as NTFS however, the same stage took just over 4 minutes!
In all cases the target internal hard disk partition was quick formatted as NTFS.
To avoid BSOD 0x0000007B errors, if possible, change the BIOS hard disk options on the target system to IDE Legacy mode (not SATA – AHCI).
If you have a system that requires AHCI drivers or other Mass Storage Drivers that are not integrated into the XP install folder, you can use nLite to integrate the correct Mass Storage Drivers (.inf files).
How WinToFlash boots Windows XP Setup
The normal Windows XP boot process is explained here.
For WinToFlash however, the boot sequence is as follows:
The Master Boot Record (MBR = first sector on the disk) is read and the start of the active partition is found by looking at the MBR partition table values:
The Partition Boot Record (PBR) in the FAT32 volume of the USB drive produced by the WinToFlash format looks for and loads the file \NTLDR.
NTLDR parses the boot.ini entries and presents the menu to the user. The boot.ini file contains:
- [Boot Loader]
- Timeout=30
- Default=multi(0)disk(0)rdisk(1)partition(1)\WINDOWS
- [Operating Systems]
- C:\$WIN_NT$.~BT\BOOTSECT.DAT = “1st, text mode setup (Boot from flash again after finished)”
- multi(0)disk(0)rdisk(1)partition(1)\WINDOWS=”2nd, GUI mode setup, continue setup + 1st start of Windows” /fastdetect
- C:\ = “—> DEBUG, in case of HAL.DLL or NTOSKRNL.EXE not found errors <—“
- multi(0)disk(0)rdisk(1)partition(2)\WINDOWS=”Debug boot rDisk 1 partition 2″ /fastdetect
- multi(0)disk(0)rdisk(1)partition(3)\WINDOWS=”Debug boot rDisk 1 partition 3″ /fastdetect
- multi(0)disk(0)rdisk(1)partition(4)\WINDOWS=”Debug boot rDisk 1 partition 4″ /fastdetect
- multi(0)disk(0)rdisk(2)partition(1)\WINDOWS=”Debug boot rDisk 2 partition 1″ /fastdetect
- multi(0)disk(0)rdisk(2)partition(2)\WINDOWS=”Debug boot rDisk 2 partition 2″ /fastdetect
- multi(0)disk(0)rdisk(2)partition(3)\WINDOWS=”Debug boot rDisk 2 partition 3″ /fastdetect
- multi(0)disk(0)rdisk(2)partition(4)\WINDOWS=”Debug boot rDisk 2 partition 4″ /fastdetect
The first entry in boot.ini is
C:\$WIN_NT$.~BT\BOOTSECT.DAT = “1st, text mode setup (Boot from flash again after finished)”
BOOTSECT.DAT is an exact copy of the Partition Boot Record of the USB FAT32 partition (e.g. LBA 63), however, it has been patched to load the file $LDR$ instead of NTLDR. Note that the error message that is displayed if $LDR$ is not found is ‘NTLDR is missing Press any key to restart‘ and not ‘$LDR$ is missing – Press any key to restart’!
$LDR$ is a copy of setupldr.bin which starts the Stage 1 text mode Setup phase.
NTLDR is missing error
After preparing your USB flash drive using WinToFlash (if FAT32LBA), you may find that it does not boot on some systems and displays an ‘NTLDR is missing’ error.
This is believed to be due to the target system having a buggy, incompatible BIOS which does not use the standard 63 sectors per track and 255 heads per cylinder hard disk geometry.
The ‘NTLDR is missing error’ can be displayed at two stages of booting:
1. It is displayed when the code in the Partition Boot Record (PBR) runs and booting stops
2. If the PBR code works, ntldr will load and if the user chooses ‘1st’ from the boot.ini menu, the bootsect.dat file will be loaded and run. The bootsect.dat file contains the same code as the PBR and so may also fail with the same ‘NTLDR is missing error’ error message.
To fix these two stages, we can patch bytes E6-E9 with four 0x90 bytes:
00E0 66 60 66 3B 46 F8 0F 82 – 4A 00 66 6A 00 66 50 06 f`f;Fø.‚ J.fj.fP.
then becomes:
00E0 66 60 66 3B 46 F8 90 90 – 90 90 66 6A 00 66 50 06 f`f;Fø.‚ J.fj.fP.
Note that when RMPrepUSB is used to format a FAT32 USB drive, these bytes in the PBR are already patched.
Instead of patching the PBR, we can install grub4dos which uses it’s own boot loader and so we do not need to run the code in the PBR.
To patch the bytes in the bootsect.dat we can use dd in grub4dos (see menu below for details).
REQUIREMENTS
- Windows XP install files – this can be an ISO file which is mounted as a volume letter, or you can extract the files to a new folder on your hard disk using 7Zip or some other method.
- WinToFlash
- RMPrepUSB
- (optional) Easeus Home Partition Manager
METHOD
1. First use WinToFlash to make your USB drive. Note that the contents of the USB drive will be lost when you do this.
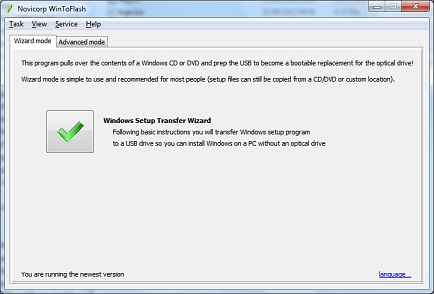
This is the free version – just click the wizard button…
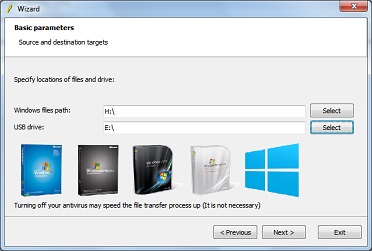
Now select the source (XP install CD or mounted ISO volume) and target (your USB Flash drive).
Tip: Select FAT16LBA in Advanced mode – it is much faster to install XP than the default setting of FAT32LBA.
Wait until WinToFlash has completed.
You now have a set of XP install files, however if you use these to install XP from a FAT32 Flash USB drive the install could be verrrrrrry slowwwwww…
If you are going to reformat the drive as NTFS (highly recommended as it is much faster!) then you can now skip steps 3 to 6 and jump to step 7.1.
The next steps (3-6) will help your USB drive to work on a wider range of systems but if it is FAT32, this will not fix the speed issue.
The first boot.ini menu option loads bootsect.dat which is a copy of the USB partition boot record which then tries to find and load ntldr. The code in this partition uses the disk geometry values embedded within it. This may match the actual disk geometry on the system that you are booting from or it may not – in which case you may get the ‘NTLDR is missing’ error message. To patch the code so that it does not use the embedded CHS parameters, you can manually edit the file with a hex file editor, boot directly to setupldr.bin or we can use grub4dos to patch the bootsect.dat file, as follows:
3. Install grub4dos using the Install grub4dos button in RMPrepUSB – make sure to choose MBR and press [Enter] to copy over the grldr file.
4. Add a file called menu.lst to the USB drive root – press F4 in RMPrepUSB and Notepad will create a new file for you. Cut and paste the following contents into Notepad and save the file. Ensure that the file is saved as menu.lst and not menu.lst.txt.
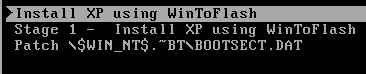
- title Install XP using WinToFlash\nStandard WinToFlash install\nSelect 1st, reboot to this menu again and select 2nd
- chainloader /ntldr
- title Stage 1 – Install XP using WinToFlash\nUse if first menu gives NTLDR IS MISSING error after selecting 1st.
- chainloader /$WIN_NT$.~BT/setupldr.bin
- title Patch \\$WIN_NT$.~BT\\BOOTSECT.DAT\nUse this if you get an NTLDR IS MISSING error after selecting 1st.
- set OS=
- set BT=
- # Note: this only works on FAT volumes as grub4dos cannot patch small <1K files on NTFS volumes!
- if exist (hd0,0)/$WIN_NT$.~BT/BOOTSECT.DAT set BT=(hd0,0)/$WIN_NT$.~BT/BOOTSECT.DAT
- if exist (hd1,0)/$WIN_NT$.~BT/BOOTSECT.DAT set BT=(hd1,0)/$WIN_NT$.~BT/BOOTSECT.DAT
- if exist (hd1,1)/$WIN_NT$.~BT/BOOTSECT.DAT set BT=(hd1,1)/$WIN_NT$.~BT/BOOTSECT.DAT
- if exist (hd1,2)/$WIN_NT$.~BT/BOOTSECT.DAT set BT=(hd1,2)/$WIN_NT$.~BT/BOOTSECT.DAT
- if “%BT%”==”” pause –wait=3 Cannot find /$WIN_NT$.~BT/BOOTSECT.DAT && configfile /menu.lst
- # detect OS
- cat –skip=3 –length=0x52 –locate=FAT32 %BT% > nul && set OS=FAT32
- cat –skip=3 –length=8 –locate=MSWIN4.1 %BT% > nul && set OS=FAT32
- cat –skip=3 –length=8 –locate=MSDOS5.0 %BT% > nul && set OS=FAT32
- if “%OS%”==”” pause –wait=3 Sorry – can’t determine OS of BOOTSECT.DAT && configfile /menu.lst
- echo FOUND %OS% at %BT%
- cat –hex –length=0xf0 %BT%
- set /p ASK=Press Y to patch file (Y/N):
- if not /i “%ASK%”==”Y” configfile /menu.lst || echo -e \n\r
- echo Patched file is now…
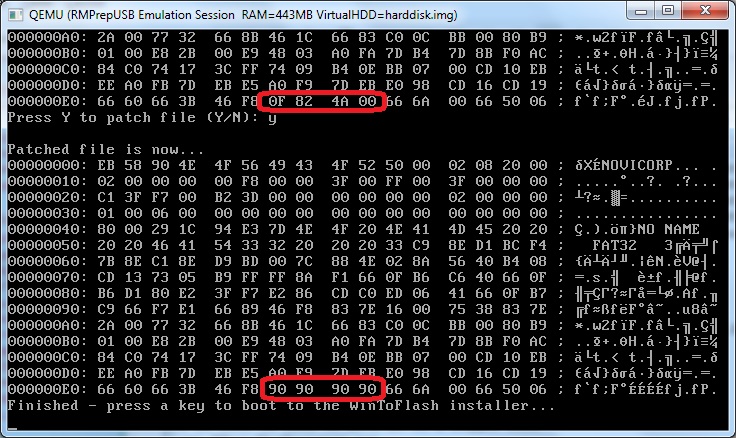
- if “%OS%”==”FAT32” cat –skip=0xe6 –locate=\x0f\x82\x4a\x00 –replace=\x90\x90\x90\x90 %BT% > nul
- cat –hex –length=0xf0 %BT%
- echo Finished – press a key to boot to the WinToFlash installer…
- pause
- chainloader /ntldr
5. Test that the USB drive will boot on a real system (NOT QEMU) – try the first option and then choose 1st, text mode – if that fails to run XP Setup, try the Stage 1 menu option instead.
6. The Stage 1 menu item can be used to start the first text setup\copyfiles stage in the event that the first Install XP using WinToFlash standard menu or the Patch menu does not work.
The first (ntldr) option may not work (‘NTLDR is missing’) unless if you patch the bootsect.dat file. To patch the bootsect.dat file…
Select Patch \$WIN_NT$.~BT\BOOTSECT.DAT to patch the BOOTSECT.DAT file – press Y when prompted – you should see the following bytes have been changed:
Note: You must use a real system for this, not QEMU or the patch may not be permanent.
6.1 . (Optional) – This also improves bootabilty on a wider range of systems:
Use Easeus Home Partition Master to reduce the size of the FAT32 partition on the USB drive by approx. 20MB. Now create a 2nd FAT32 PRIMARY partition at the end of the drive. It does not need to be formatted and you can Hide the partition if you wish using Easeus Home Partition Master.
Converting to NTFS
You can now use the USB drive to install Windows XP, however, to speed up the XP installation, we can reformat the USB drive to NTFS as follows:
7.1 Make a new folder on your hard disk and copy all the files (including hidden files) from the USB drive to the empty folder – e.g. C:\XP_TEMP
7.2 Reformat the USB drive using RMPrepUSB using the following settings
1. MAX
2. any volume name
3. XP/BartPE [NTLDR]
4. NTFS + Boot as HDD
5. tick the box and set the folder path that contains the original files) – e.g. C:\XP_TEMP
6. click Prepare Drive
The bootsect.dat file that is in the $WIN_NT$.~BT/ folder is however a FAT32 boot sector and so the USB drive will not work correctly if you choose 1st, text mode setup. To fix this we can boot directly to setupldr.bin as follows:
7.3. Install grub4dos using the Install grub4dos button in RMPrepUSB – make sure to press [Enter] to copy over the grldr file.
Press F4 in RMPrepUSB and delete the whole menu.lst contents (if one exists) and add just these four lines:
- title Stage 1 – XP install\nThis runs the first stage text mode setup
- chainloader /$WIN_NT$.~BT/setupldr.bin || chainloader /$LDR$
- title Stage 2 – XP install\nChoose the 2nd stage 2 GUI option
- chainloader /ntldr
Check USB contents:
- \boot.ini (required for stage 2)
- \ntldr (required for stage 2)
- \grldr
- \menu.lst
- \ntdetect.com (required for stage 1)
\$LDR$(this is not required)- \txtsetup.sif (required for stage 1)
- \$WIN_NT$.~LS folder
- \$WIN_NT$.~BT folder
You may wish to edit the boot.ini to shorten the timeout to 1 or 0 instead of the current 30 seconds (assuming you will always install XP to the first partition of the first hard disk):
Timeout=1Unsupported embed
USING WINTOFLASH TO INSTALL XP
1. Insert the USB drive into the target system and switch it on
2. Set the BIOS to boot from the USB drive …
(No grub4dos USB DRIVE) Select the first menu entry from the boot.ini menu (the second one will be selected by default), and check that Windows Setup starts.
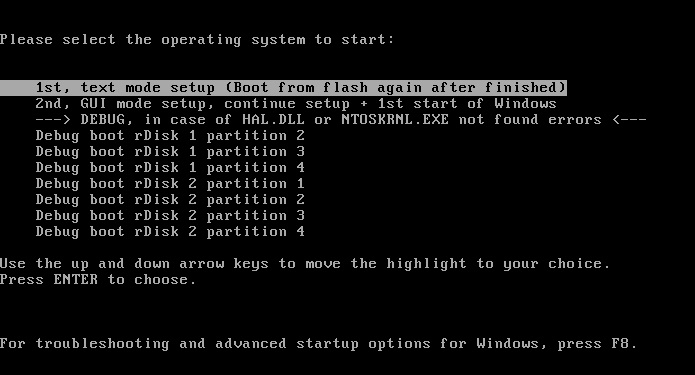
This is the boot.ini menu displayed when ntldr loads.
NTFS: If you have changed to NTFS and installed grub4dos, then select Stage 1 from the grub4dos menu.

The text mode setup phase will begin…
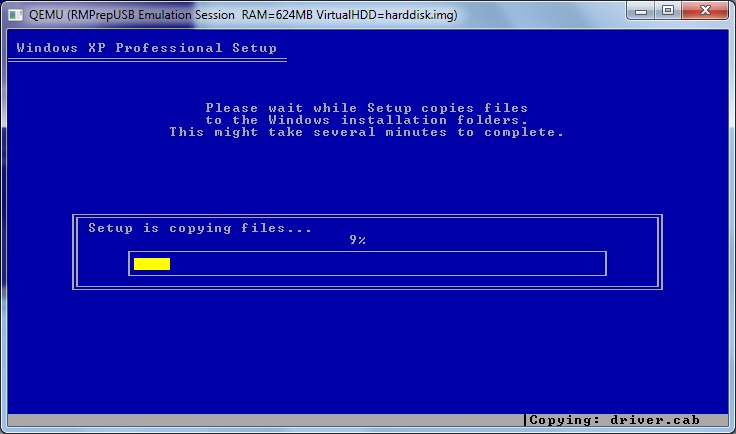
1st stage – text setup copyfiles stage…
3. After the files have been installed to the target hard disk, the system will automatically reboot.
If it reboots from the internal hard disk (or you have no boot.ini on the USB drive!) you will see this error:
Windows could not start because the following file is missing or corrupt:
<Windows root>\system32\hal.dll.
Please re-install a copy of the above file.
Ensure that you reboot from the USB drive again and choose Stage 2 you will see the same boot.ini menu again (see screenshot above).
4. Choose the 2nd, GUI mode setup entry (there is normally a 30 second timeout) and then continue to install Windows XP.
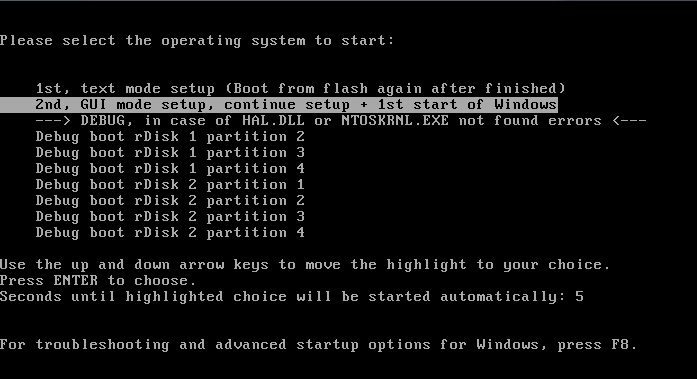
If you have installed XP to a different partitition or disk, you will need to choose one of the Debug boot options.
TROUBLESHOOTING
Stage 1 error message:
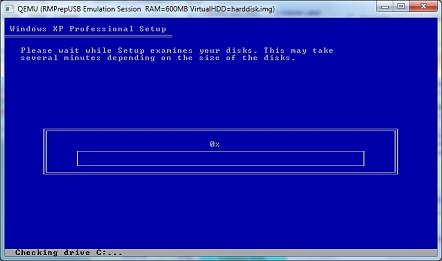
Setup cannot create the folder:
\Windows
Setup cannot continue until the folder is created.
Do you see this error?
after it starts a ‘Checking Drive C:’ screen…
This is usually because you have an automated install. Look at the contents of the \$WIN_NT$.~BT\winnt.sif file. Change the contents to this:
- [Data]
- floppyless = “1”
- msdosinitiated = “1”
- [GuiRunOnce]
- “SSA /UnrenameFolders /PendingDelete”
- [SetupParams]
- UserExecute = “SSA /RenameFolders /BootINIGenerate /Office2007ProblemFix”
If this fixes the problem, then you can try adding more lines from your original winnt.sif. Possible values can be found here.
Note: if the winnt.sif has an [Unattended] section (even if it is empty!), XP Setup will not prompt for the Recovery Console (R) or prompt for F8 to agree with the EULA or ask what partition you want to select. You will get the ‘Setup cannot create the folder \WINDOWS’ error if the target hard disk was not automatically formatted or already contains a \WINDOWS folder.
BOOT DIRECTLY TO THE XP RECOVERY CONSOLE
These files are required on the USB drive to boot directly to the XP Recovery Console:
- /CMDCONS folder (copied or renamed from $WIN_NT$.~BT)
- /grldr
- /menu.lst
- /ntdetect.com
any other files and folders may be present and should not affect booting to the Recovery Console.
You may delete some of the larger files in the /CMDCONS folder (any of the files that are larger than 2MB) – this will leave approx 6MB of files in the CMDCONS folder.
The menu.lst entry is:
- title XP Recovery Console
- chainloader /CMDCONS/SETUPLDR.BIN
- write 0x7C03 0x63646D63
- write 0x7C07 0x00736E6F