
Table of Contents
WHAT IS XBMCBUNTU?
XBMCbuntu is both a live Ubuntu based OS with XBox Media Center pre-configured to work directly out-of-the-box from a CD or USB drive without touching the users hard drive for demo purposes, and also a fully-fledged installer that allows the installation of the XBMC Media Center onto your empty local hard disk. Once booted, XBMCbuntu will give the user the option to either just run it as a demo from only the CD/USB (not touching your harddrive) or do a permanent installation of XBMC complete with embedded operating-system onto an 8GB (or larger) USB-flash-memory-stick or your internal harddrive for a dedicated set-top-box style installation of XBMC. Currently, Microsoft’s Windows MCE (Media Center Edition) Remote with USB IR-receiver receiver dongle is the default supported controller and is supported directly out-of-the-box.When installed onto a USB flash drive or hard disk drive XBMCbuntu has the ability to save settings and make updates to XBMC Media Center and the operating-system back onto the USB flash drive or hard disk drive that it is installed onto, this is not possible when running XBMCbuntu from a Live CD booting from a CD-ROM disc as they are read-only and any changes settings are only temporarily saved until the system is rebooted.Unsupported embed
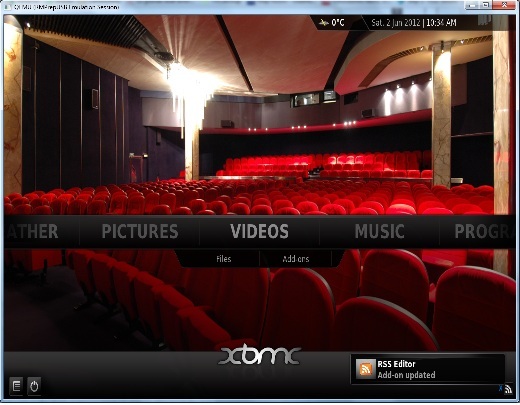
Fig.78.1 XBMCbuntu booted from a USB Flash drive with RMPrepUSB QEMU emulator session
INTRODUCTION
If you just wish to create a single purpose USB Flash drive with XMBCbuntu on it, I would recommend using UNetBootin.
However, in this tutorial we are going to assume that we already have a grub4dos multiboot/multipass USB drive and that we want to add XBMCbuntu to the USB drive. Unfortunately, XBMCbuntu does not currently have the necessary scripts and code to support booting directly from an ISO image on a USB drive, therefore it is necessary to extract the contents of the ISO and copy some of the contents to your USB multiboot drive.
New – it is possible to boot from an ISO of xmbcbuntu – see end of this Tutorial!
REQUIREMENTS
- A grub4dos bootable USB drive containing a menu.lst file
- Download the XBMCbunutu ISO file – currently xbmcbuntu-11.0.iso
- RMPrepUSB
METHOD
If you do not already have a bootable USB Flash drive using one of the other Tutorials on this site, make one now using RMPrepUSB (use FAT32) and install grub4dos using the Install grub4dos button, make sure you also copy over the grldr file when prompted. Press F4 in RMPrepUSB to create a menu.lst file on the USB drive and add the following text:
Now test that it boots correctly by pressing F11 in RMPrepUSB or clicking the QEMU button.
Now we can begin adding XBMCbuntu to our grub4dos bootable Flash drive…
1. Mount the XBMCbuntu ISO file using Imdisk or Virtual Clonedrive or any other application that will mount an ISO – or – extract the contents of the ISO to a temporary folder on your system hard drive using 7Zip, etc. The contents of the ISO or extracted folder should look like this:
title Reload grub4dos menu
configfile /menu.lstUnsupported embed
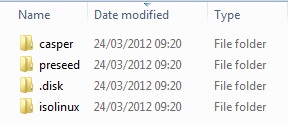
Contents of the XBMCbuntu ISO
2. Create a new, empty folder on the root of your target USB drive called xbmcbuntu using Windows Explorer
3. Copy the entire contentsof the casper folder to the new xbmcbuntu folder on the USB drive (do not copy the casper folder itself to the xbmcbuntu folder, just the files that are inside it)
4. Copy the .disk folder to the root of the USB drive. If there is already a file called .disk\info on your USB drive, then skip that file as it is not required. The casper-uuid-xxxxx file is required and must be under the .disk folder. Note that Windows Explorer does not allow you to create or rename a folder called .disk, but you can copy it directly from the mounted ISO using Windows copy and paste.
The preseed and isolinux folders are not required.
5. If you want persistency (i.e. you want XBMCbuntu to keep your changes) you now need to create an ext2 file. Use the Create Ext2 FS button on RMPrepUSB to create a large file called casper-rw on the root or the USB drive. Now move that file to the xbmcbuntu folder using Windows Explorer. Depending on your requirements you might need quite a large file (e.g. 2GB) but you can just make a 100MB one just for test purposes.
Note: if there is already a file at \casper-rw on your USB drive, then simply create a file called xbmc using RMPrepUSB and then move it to the xbmcbuntu folder and rename it to casper-rw.
The ext2 file path for XBMCbuntu must be:
\xbmcbuntu\casper-rw
6. Now cut and paste the following text to the bottom your existing menu.lst menu file on the USB drive (tip: press F4 in RMPrepUSB to load the menu.lst file into Notepad).
- title XbmcUbuntu Live (Not Persistent)\nTry xbmcbuntu without installing it
- kernel /xbmcbuntu/vmlinuz boot=casper live-media-path=/xbmcbuntu nopersistent quiet splash —
- initrd /xbmcbuntu/initrd.lz
- title XbmcUbuntu Live – Persistent\Try xbmcbuntu without installing and keep all changes
- kernel /xbmcbuntu/vmlinuz boot=casper live-media-path=/xbmcbuntu persistent persistent-path=/xbmcbuntu quiet splash —
- initrd /xbmcbuntu/initrd.lz
- title Install XBMCbuntu to HDD or another Flash drive\nInstall XBMCbuntu to an HDD or UFD
- kernel /xbmcbuntu/vmlinuz boot=casper live-media-path=/xbmcbuntu file=/cdrom/preseed/ubuntu.seed boot=casper only-ubiquity debug-ubiquity quiet splash —
- initrd /xbmcbuntu/initrd.lz
- title Install XBMCbuntu with fixed dpi (120×120)\nInstall XBMCbuntu to an HDD or UFD
- kernel /xbmcbuntu/vmlinuz boot=casper live-media-path=/xbmcbuntu file=/cdrom/preseed/ubuntu.seed boot=casper only-ubiquity xbmc=setdpi debug-ubiquity quiet splash —
- initrd /xbmcbuntu/initrd.lz
Note: if you wish to see the linux text output as XBMCbuntu boots, remove the words splash and quiet – this will help you to see what is wrong if it is not booting. You can also press the ESC key during booting to view any linux error messages, etc.
By using the live-media-path= and persistent persistent-path= switches, we can use XBMCbuntu on the same USB drive which also contains other Ubuntu and linux installs.
7. Check you folder structure looks like this (or similar if you are using a different version):
- .\disk
- casper-uuid-3.0.0-16-generic
- \xbmcbuntu
- filesystem.manifest
- filesystem.manifest-remove
- filesystem.size
- filesystem.squashfs
- initrd.lz
- vmlinuz
- casper-rw
8. Finally, check that it will work. I suggest you test it using the QEMU button in RMPrepUSB and select the first non-persistent menu item. As QEMU is quite slow, just check it gets as far as finding the squashfs (press ESC to see the linux boot messages).
TROUBLESHOOTING
If XBMCbuntu is not booting, try the following:
- Only use QEMU to initally check that the USB drive starts to boot OK, QEMU may crash if you try to actually use XBMC once it has booted! Instead – use a real system for all other testing
- Remove the quiet and splash text from the first menu entry (you can put it back later once it is working!)
- Always test using the first (non-persistent) menu
- Check the steps in this Tutorial again!
- Check spelling of files and folders!
- Use a USB 2.0 port
- Use the rear USB 2.0 port (and try to avoid using a USB extension cable)
- Use a different system, preferably one that is 2 – 5 years old – avoid using a very new system which may have an unsupported chipset (e.g. Intel SandyBridge or IvyBridge). I tested on an Asus EeePC which was OK, but a new Ivybrdge notebook was obviously having problems once it had booted!
- If your Flash drive was working with the Persistent boot option, but has stopped booting since then after a few reboots, try the first non-persistent menu option – if that works then your ext2 filesystem is probably corrupt. Delete the \xbmcbuntu\casper-rw file and remake it (see Step 5). Your previous settings will, of course, be lost! Make sure you always shutdown XBMCbuntu nicely each time!
Tip: If you want a dedicated XBMC system for less than £40, checkout the Raspberry Pi!
TRY XBMCBUNTU DIRECTLY FROM AN ISO!
If you already have a grub4dos multiboot USB drive, try this (note that the 4th partition entry on your USB boot drive must be free, as it will be destroyed by this menu!)
1. Create a \_ISO\Linux folder and place the ISO file in it – e.g. xbmcbuntu-12.00-RC1.Intel-NVIDIA.iso
2. Add the following entry to your grub4dos menu.lst file
- title Load xbmcbuntu-12.00-RC1.Intel-NVIDIA.iso
- debug 1
- # set the path and filename on this next line
- set ISO=/_ISO/Linux/xbmcbuntu-12.00-RC1.Intel-NVIDIA.iso
- # make empty table entry in 4th position in ptn table
- parttype (hd0,3) | set check=
- set check=%check:~-5,4%
- if “%check%”==”0x00” partnew (hd0,3) 0 0 0
- if not “%check%”==”0x00” echo ERROR: PTN TABLE ENTRY 4 IS ALREADY IN USE! && pause && configfile /menu.lst
- # check iso file is contiguous (optional section)…
- blocklist %ISO% | set check=
- set c=%check:~7,18%
- echo %c% > (md)2800+1
- #echo Checking for comma in && cat (md)2800+1
- cat –locatei=”,” (md)2800+1 > nul && echo WARNING: %ISO% is not contiguous – please run WinContig.exe on the drive! && pause
- # map the iso file to a partition
- ls %ISO% > nul && partnew (hd0,3) 0x00 %ISO% > nul
- map %ISO% (0xff) || echo WARNING: %ISO% is not contiguous – please run WinContig.exe on the drive! && configfile /menu.lst
- echo -e \r\n
- map –hook
- root (0xff)
- kernel /casper/vmlinuz boot=casper live-media-path=/casper nopersistent quiet splash —
- initrd /casper/initrd.lz
ALTERNATIVE MENU (NOT TESTED)
- # ISO file is in root of drive
- title Ubuntu 11.04 i386
- find –set-root /ubuntu-11.04-desktop-i386.iso
- map /ubuntu-11.04-desktop-i386.iso (0xff)
- map –hook
- root (0xff)
- kernel /casper/vmlinuz file=/cdrom/preseed/ubuntu.seed boot=casper iso-scan/filename=/ubuntu-11.04-desktop-i386.iso splash quiet —
- initrd /casper/initrd.lz
BOOT FROM ISO WITH PERSISTENCE
Persistence is optional – create the ext2 file if you want persistence.
Always use xbmcbuntu shutdown to shutdown or you may get a corrupt persistence file!
- # For persistence – create an ext2 file using RMPrepUSb called casper-rw
- # create \xbmcbuntu folder and move the file to \xbmcbuntu folder
- # xbmcbuntu login=xbmc password=(none)
- iftitle [if exist %MFOLDER%/Linux/xbmcbuntu-12.2.Intel-NVIDIA.iso] xbmcbuntu-12.2.Intel-NVIDIA.iso \n Requires partition 3&4 to be empty
- debug normal
- # set the path and filename on this next line
- set ISO=%MFOLDER%/Linux/xbmcbuntu-12.2.Intel-NVIDIA.iso
- set PFILE=/xbmcbuntu/casper-rw
- # check table entry in 3rd position in ptn table for persistent file
- parttype (hd0,2) | set check=
- set check=%check:~-5,4%
- if “%check%”==”0x00” partnew (hd0,2) 0 0 0
- if exist %PFILE% if not “%check%”==”0x00” echo ERROR: PTN TABLE ENTRY 3 IS ALREADY IN USE! && pause && configfile /menu.lst
- if exist %PFILE% partnew (hd0,2) 0x0 %PFILE% > nul
- set PER=nopersistent
- if exist %PFILE% set PER=live-media-path=/casper persistent
- if exist %PFILE% echo Using %PFILE% as persistent file…
- # map the iso file to a partition
- partnew (hd0,3) 0x00 %ISO% > nul
- map %ISO% (0xff) > nul
- pause –wait=3
- map –hook > nul
- root (0xff) > nul
- kernel /casper/vmlinuz boot=casper %PER% quiet splash —
- initrd /casper/initrd.lz
login as Other – xbmcbuntu – login=xbmc, password= (none)