
Table of Contents
INTRODUCTION
Using such tools as WinBuilder (e.g. ChrisR’s Win8.1SE project) we can make a 32-bit WinPE ISO that will boot from a UEFI system or from a traditional BIOS via MBR\CSM.
We can also make a 64-bit WinPE ISO which will boot on 64-bit MBR and 64-bit UEFI systems.
ChrisR’s Win10PESE project is here.
In this Tutorial, I will describe how to combine and transfer these OS’s to a FAT32 USB drive so that the USB drive will boot on any x86 system (i.e. 32-bit or 64-bit UEFI systems or 32-bit or 64-bit MBR BIOS systems).

ChrisR’s Win8.1SE WinBuilder Desktop
Note that Win8.1/10 PESE 64-bit includes WoW64 (sysWoW) and so can can run 32-bit applications from 64-bit WinPE!
Make a universal Windows Install USB disk
If you used a Fixed-Disk type of USB disk (one that appears as fixed/local disk in Windows Explorer), then you could create a second NTFS partition containing multiple Windows Installer ISOs and WinNTSetup.exe. You can then boot to WinPE, and use WinNTSetup to install from any ISO. This gives you a universal (MBR and UEFI) way to install Windows to any type of system!
REQUIREMENTS
1. 64-bit WinPE ISO (or USB drive) – e.g. from the Win8.1SE WinBuilder project – e.g. Win8.1SE_x64.ISO
2. 32-bit WinPE ISO (or USB drive) – e.g. from the Win8.1SE WinBuilder project – e.g. Win8.1SE_x86.ISO
3. BootIce from Pauly (see bottom of this page for a download if you have problems with the link)
4. 1GB+ FAT32 USB drive (preferably prepared using RMPrepUSB+ Boot as HDD + BOOTMGR + FAT32)
METHOD
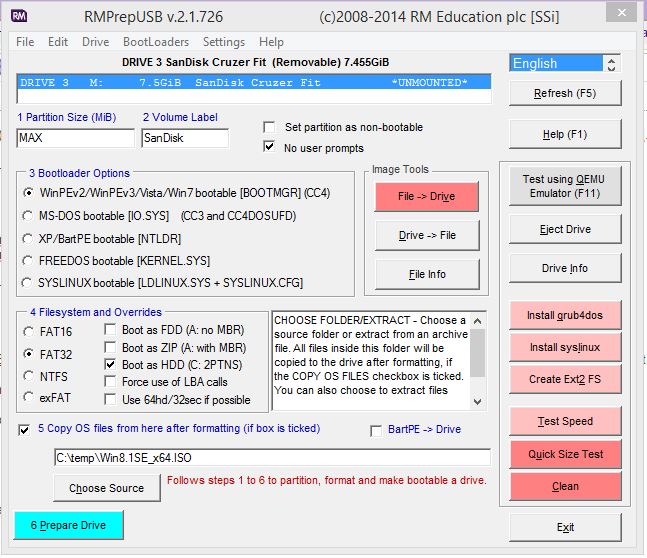
1. Partition and Format your FAT32 USB drive using RMPrepUSB or any other means you normally use (Windows format is OK). Note that if you format it using linux or Windows XP, you may also need to install grub4dos and a menu.lst so that it boots in MBR\CSM mode (see end of this page),
2. Open the 64-bit WinPE ISO using 7zip or any other means (if Win8 then just double-click on the ISO) – extract the entire contents onto your USB Flash drive
Note: If using RMPrepUSB (recommended) this can be done in one go: Tick the Boot as HDD (C:) option to ensure that it will MBR-boot on most systems (adding a 2nd partition ensures it is booted as a hard disk and not a floppy disk!).
3. Open the 32-bit ISO using 7zip or any other means (if Win8 then just double-click on the ISO) – copy the \sources\boot.wim to somewhere – rename it to bootx86.wim and then copy it to the USB drive \sources folder (so you should have boot.wim and bootx86.wim in the \sources folder now)
4. Copy the \efi\boot\bootia32.efi file from the 32-bit ISO to the \efi\boot folder on the USB drive
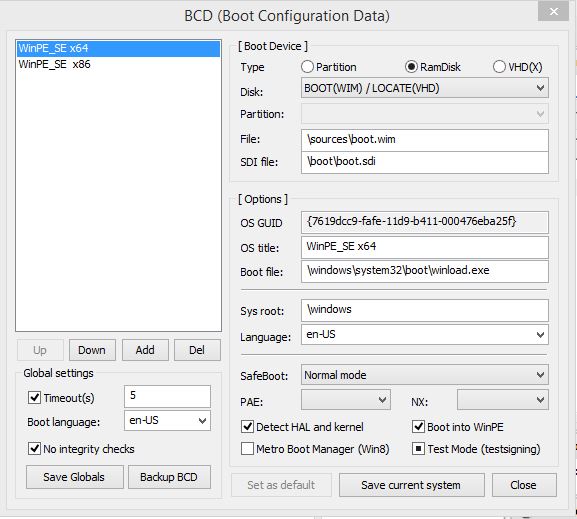
5. Run BootIce and click on the BCD Edit tab
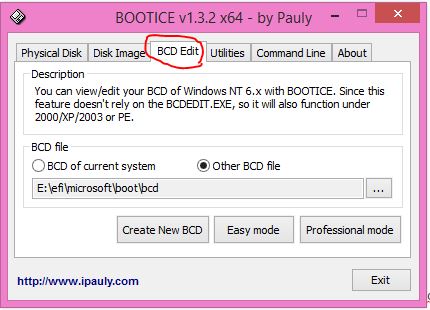
6. Click on the Other BCD file radio button (as shown) and then the … box and select the file \efi\microsoft\boot\bcd that is on your USB drive (as shown) – now click the Easy mode button.
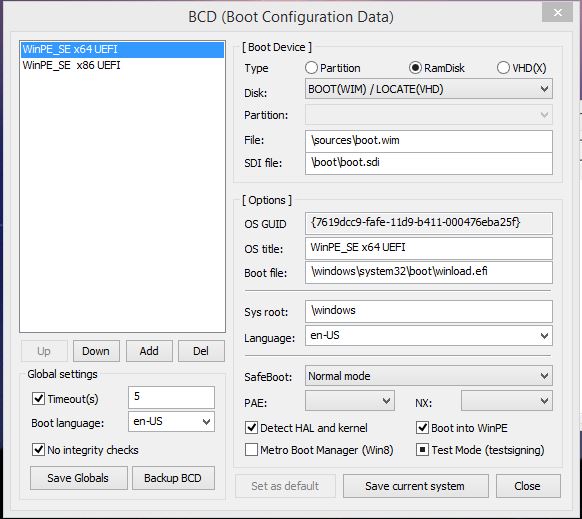
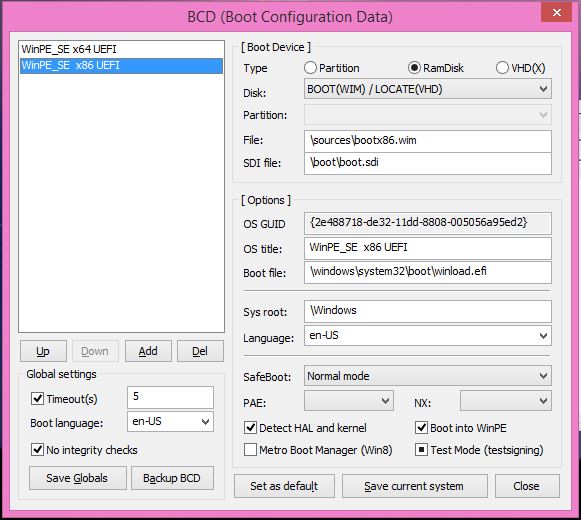
In the left-hand pane you should see the entry for the 64-bit boot,wim file already present – now use the Add button to add a new entry for your bootx86.wim file (see second screen below)
Note: A solid black checkbox indicates ‘not defined in BCD’.
Check that the File, SDI file, OS title and Detect HAL and Boot into WinPE selections are correct and then click on Save current system. Then click Close (tip: you may have trouble testing if you don’t click Close as the file may not be properly updated!)
For 32-bit booting, you need to point it at the \sources\bootx86.wim file, for 64-bit booting it should already be set to \sources\boot.wim.
7. Now use the … button to select the \boot\bcd file on the USB drive and again click Easy mode
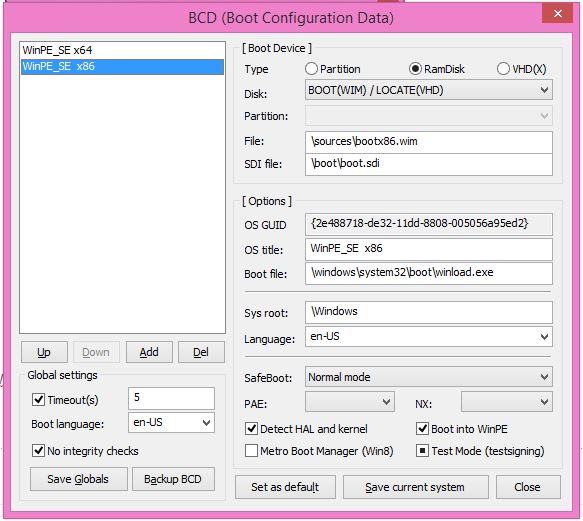
Now add in a new entry for the bootx86.wim file
You can change the default by using the Set as default button.
Check that the File, SDI file, OS title and Detect HAL and Boot into WinPE selections are correct and then click on Save current system. Then click Close
8. You should now find that you can boot to WinPE on any normal BIOS system or a UEFI system. You should get the bootmgr menu as shown below:
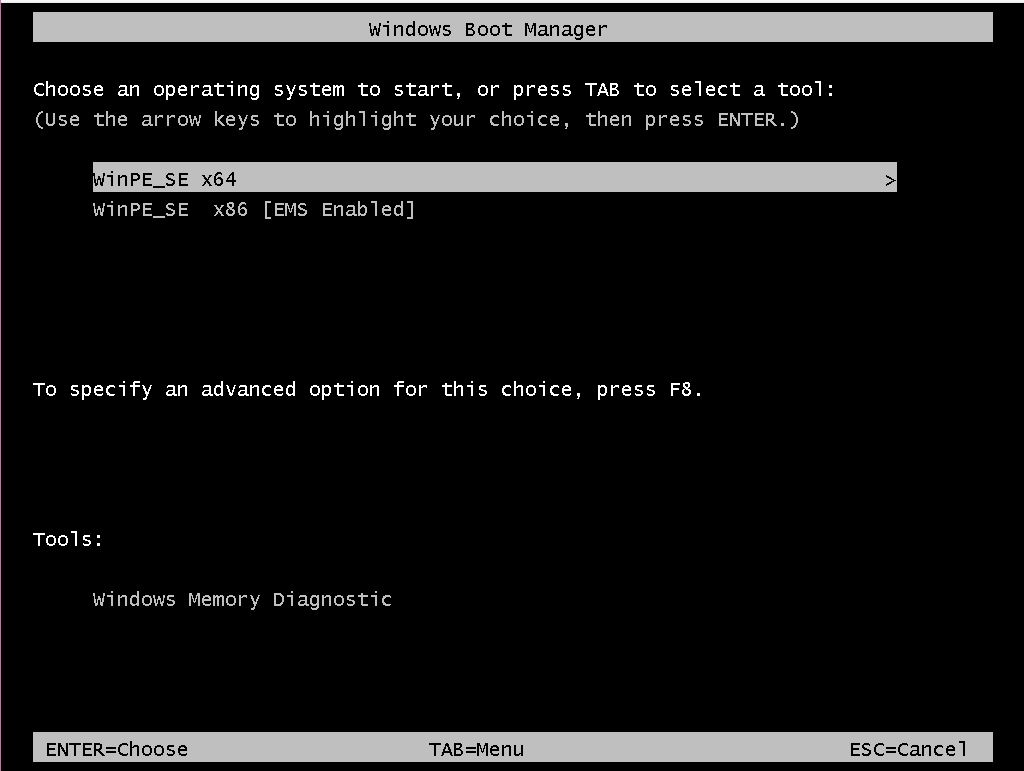
You can test this using VirtualBox for 32-bit UEFI, 64-bit UEFI or MBR booting.
Note: If you did not use RMPrepUSB to format the USB drive, you may find that it does not MBR boot (UEFI booting should work as long as WinPE is on the FIRST FAT32 partition on the drive).
In this case, you can either run Windows Bootsect from the Windows admin command line (e.g. bootsect /nt60 E: /MBR)
or
install grub4dos using RMPrepUSB – Install grub4dos and copy over the grldr file when prompted.
Now press F4 in RMPrepUSB to create a \menu.lst file and edit the contents to boot to bootmgr as follows:
title Boot to WinPE\n This should boot to WinPE in MBR mode
chainloader /bootmgr
Tip: If testing using Virtual Box – ensure you set 65MB or more for the graphics display memory setting – otherwise UEFI-booting may just show a black screen!
ADDING THE WINPE FILES TO EASY2BOOT
If your E2B USB drive is formatted as FAT32, you can simply copy all the files to the root of your E2B USB drive (preserve the folder structure). To boot in MBR mode, you will need to create a .mnu file to boot to \bootmgr (as in the menu.lst above).
e.g. \_ISO\MAINMENU\bootmgr.mnu
title Boot to WinPE\n This should boot to WinPE in MBR mode
chainloader /bootmgr
I do not recommend this however, because some systems will always UEFI-boot from the E2B drive if it contains valid EFI boot files – it will never boot to the E2B menu system!
I recommend you make a .imgPTN file from the dual-boot USB drive…
Drag-and-drop the drive icon\letter onto the MPI_FAT32 Desktop shortcut (after installing the MPI Tool Kit) to make a .imgPTN file and then add this file to your E2B USB drive.
e.g.
\_ISO\MAINMENU\WinPE32_64.imgPTN
If required, you can rename the file extension to .imgPTNLBAa23 so that partition 2 (and 3 if present) of your E2B USB disk will be accessible to Windows PE.
ADDING OTHER UEFI (.EFI) PAYLOADS
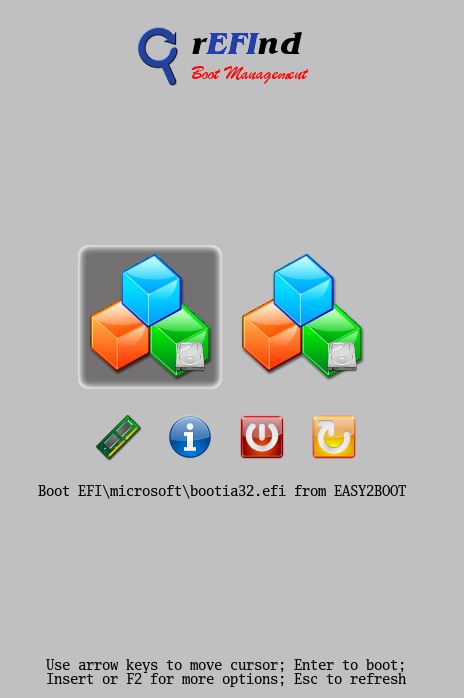
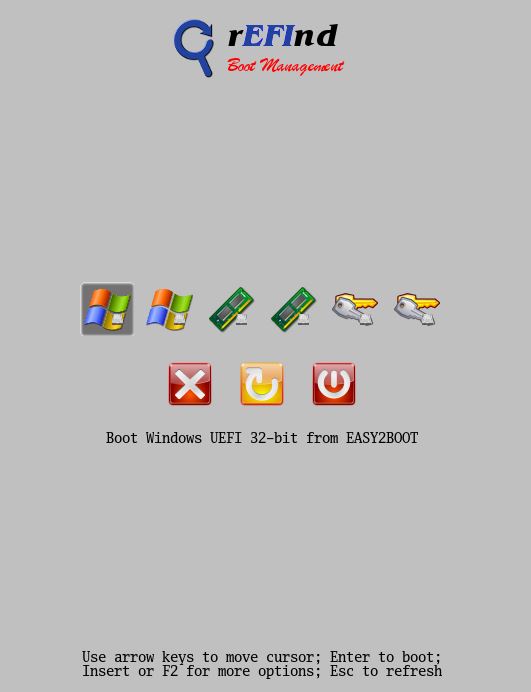
The easiest way to add other .EFI files such as KonBoot or Memtest86 is to add rEFInd to the USB drive and boot to rEFInd first. rEFInd will then find all .efi files and allow you to boot from any of them.
Note that this will ‘break’ Secure Booting however!
Unlike KonBoot or MemTest86, some EFI payloads comprise of many files and folders – you can add these to the USB drive but you must preserve the original folder structure (i.e. you cannot copy the files to different sub-folders under the root). In effect, this means you are limited to using payloads which use different files/folder names. If you use E2B and .imgPTN files however, you circumvent this limitation.
rEFInd will auto-detect any bootia32.efi and bootx64.efi files in any folder under the \EFI folder, so once we have added rEFInd, we just need to copy over any .efi files we want and rename them if required.
1. Move the existing Windows bootia32.efi and bootx64.efi files to the \EFI\microsoft folder
2. Download the rEFInd zip file from here and extract the contents of the refind folder to your USB drives’ \EFI\boot folder (i.e. U:\EFI\boot should now contain drivers_aaa, tools_aaa and icons folders)
3. Rename the \EFI\boot\refind_ia32.efi and refind_x64.efi files to \EFI\boot\bootia32.efi and \EFI\boot\bootx64.efi
You should now have:
- \efi\boot\ – contains refind files bootx64.efi and bootia32.efi (approx 157KB and 198KB) and drivers_aaa folders, icons and tools_aaa folders
- \efi\microsoft\ – contains Windows files bootx64.efi and bootia32.efi (approx 1.3MB and 1.6MB) as well as the boot folder
4. Now you can add any .efi payload files such as PassMark Memtest86 or KonBoot – keep the efi file names as bootx64.efi and bootia32.efi but just place them in a new folder – e.g.
- \efi\KONBOOT\bootx64.efi
- \efi\KONBOOT\bootia32,efi
- \efi\MEMTEST86\bootx64.efi
- \efi\MEMTEST86\bootia32.efi
5. If you prefer a text menu, simply delete or rename the \efi\boot\icons folder:
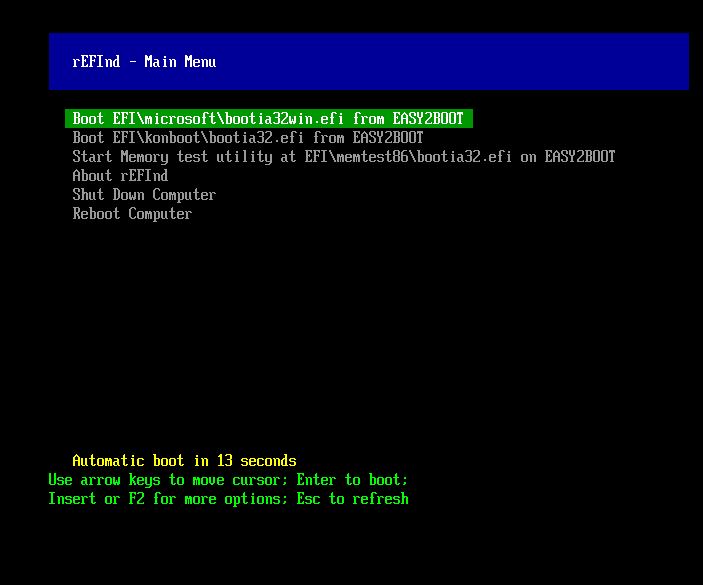
A text-mode rEFInd menu will be used when the Icons folder is not available.
Tweaks
The default timeout is 20 seconds. To change this, rename \efi\boot\refind.conf-sample to \efi\boot\refind.conf. Then edit it to change the timeout value.
The drivers_aaa and tools_aaa folders are not used on a FAT32 USB drive – you can save space by deleting them.
If you have other UEFI-enabled OS’s on the USB drive (e.g. Ubuntu on a separate partition), you can add a menu entry into the refind.conf file (see the bottom of the file for examples). You will need to delete the ‘disabled’ line for the menu option to be visible.
You could also add nicer menu entries for your Windows\memtest\KonBoot payloads and disable rEFInd from auto-detecting them.
This also allows you to choose which icon you want for each entry.
For more information on rEFInd – see here.
Example refind.conf
Note that both 32-bit and 64-bit options are shown – the user must pick the correct one or it won’t boot correctly!
- # set default timeout
- timeout 5
- # Use smaller icons for the first row
- big_icon_size 48
- # Uncomment the next line if you want a text menu instead of icons
- #textonly
- # show only these tools on 2nd line
- showtools exit, reboot, shutdown
- # Do not auto-detect .efi files
- scanfor manual
- # here are the menus
- menuentry “Windows UEFI 32-bit” {
- ostype windows
- icon \EFI\boot\icons\os_win.png
- loader \efi\microsoft\BOOTIA32.EFI
- }
- menuentry “Windows UEFI 64-bit” {
- ostype windows
- icon \EFI\boot\icons\os_win.png
- loader \efi\microsoft\BOOTx64.EFI
- }
- menuentry “Passmark MemTest86 32-bit” {
- icon \EFI\boot\icons\tool_memtest.png
- loader \efi\memtest86\BOOTIA32.EFI
- }
- menuentry “Passmark MemTest86 64-bit” {
- icon \EFI\boot\icons\tool_memtest.png
- loader \efi\memtest86\BOOTx64.EFI
- }
- menuentry “KonBoot 32-bit” {
- icon \EFI\boot\icons\tool_mok_tool.png
- loader \efi\konboot\BOOTIA32.EFI
- }
- menuentry “KonBoot 64-bit” {
- icon \EFI\boot\icons\tool_mok_tool.png
- loader \efi\konboot\BOOTx64.EFI
- }
Click here (OneDrive folder) if you cannot find any file mentioned in the articles on this site or Contact Me.