
Table of Contents
This tutorial is the equivalent of Tutorial 89 but it is for Windows 7 (64-bit) and Windows 8/10 (32-bit and 64-bit)
For UEFI Windows systems which use GPT partitioning.
OUTLINE
We can backup or restore Windows with just the press of a key!
The backup is kept on the same system, no external drive is required.
We will add two new GPT partitions to the Windows internal hard disk:
- 300MB FAT32 – Clonezilla
- (large) NTFS – Volume to store backup image(s)
We will then use EasyUEFI or BootIce to set the UEFI Firmware Non-Volatile RAM (NVRAM) BIOS setting to boot to the grub2 Clonezilla menu before booting to Windows.
As well as booting via the grub2 menu, you will still be able to boot directly to Windows using your BIOS firmware boot selection menu.
Note: The current scripts search disk 0 1 and 2 only for the backup folder (marked by backup.tag) and assume C: is the Windows drive to be backed up which is device sda under CloneZilla.
Note that Secure Boot must be disabled in the system’s BIOS options.
I have not tested this on a BitLocker-encrypted Windows volume. I believe CloneZilla uses dd on such volumes and so would require a backup volume that is at least as large as the Windows volume. The auto-restore function will not work if grub2 cannot access the C: drive, so you will need to use an alternative method if drive C: is encrypted (see notes at bottom).
Note that filenames and folder names are case-sensitive under grub2 – follow the Tutorial carefully!
You can modify the boot menu to password-protect some menu entries and you can change the grub2 menu heading too.
For non-English users, you can edit the grub.cfg file menu entries (but do not change the line set lang=eng).
A restore of an 18GB freshly-installed x64 UEFI Windows 10 system (SSD) takes about 5 minutes.
SETUP
You must disable Secure Boot in the BIOS settings before you begin.
1. First use the Windows Disk Management to shrink the current partition and create two new GPT partitions (Windows key+R – diskmgmt.msc):
300MB FAT32 – Name=Clonezilla
(large) NTFS – Name=Backup – Volume to store backup image(s)
The actual volume names are not important and can be changed to your own language.
The large Backup volume needs to be big enough to store a compressed image of your Windows partition.
e.g. To store all files from a minimal Windows 18GB volume (excluding pagefile) we need approx 10GB of space.
As a rough rule, to store just 1 backup image, the Backup partition should be 2/3 of the total Windows files excluding the \pagefile.sys file (e.g. Windows = 300GB of files, Backup volume size = 180GB)
If you want to store several different backups, you will obviously need a lot more space for the backup volume.
Tip: Create another NTFS partition called ‘Files’ and use this volume to store any files that you do not need to be backed up with the Windows OS.
For instance, any files which you have downloaded from the Internet or which also exist elsewhere (on another device or in the ‘Cloud’) do not need to be backed up with the Windows OS image.
2. Create a file called backup.tag in the root of the Backup volume and create a new Folder called images (lower case).
backup.tag
\images
NOTE: make sure it is not called backup.tag.txt by setting Explorer to show File Extensions!
3. Download the 2.5.2-31 CloneZilla .zip file.
This is v 2.5.2-31 amd64 (an old 2017 version). If you have problems with Secure Boot/TPM errors/failures, try Debian-based Clonezilla v3.1.2-22.
Note: Use a version of Clonezilla that has a \EFI\boot\grub.cfg file. Later versions may not work.
Extract the \live and \EFI folders directly to the root of the Clonezilla volume
\EFI
\live
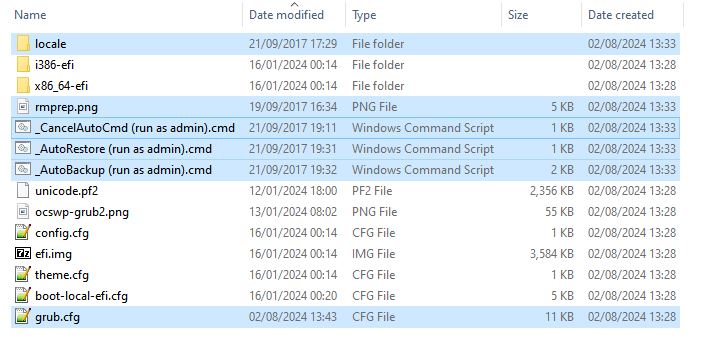
4. Download and extract the contents of the .zip file at the bottom of this page to the (Clonezilla volume) \EFI\boot folder.
grub.cfg is overwritten with the grub.cfg file in the download.
I have also included a rmprep.png wallpaper file which should also be placed in the same \EFI\boot folder.
Copy the three folders (locales, x86_64-efi and i386-efi)folder to the \EFI\boot folder:
New files/folders added should now be:
(files)
\EFI\boot\grub.cfg
\EFI\boot\rmprep.png
(folders)
\EFI\boot\locales\
\EFI\boot\x86_64-efi\
\EFI\boot\i386-efi\
The three _Autoxxxxxxxx.cmd files can be copied or moved to any convenient folder (e.g. Windows Desktop or the Backup or CloneZilla volumes)
They are only required if you want to run an unattended backup or unattended restore from Windows.
CloneZilla 3.1.2-9-amd64.zip version
This version requires some changes to the process…
- Copy three folders \boot, \EFI and \live from the Clonezilla download zip file to the empty Clonezilla partition on the Windows hard disk
- Extract from the Tut142_CloneZilla_UEFI_Restore.zip all files in the top root and the locale folder to the \boot\grub folder on the Clonezilla partition (grub.cfg will be overwritten) – i.e. do NOT copy the folders i386-efi and x86_64.efi.
- Copy the file \boot\grub\unicode.pf2 to the \EFI\boot folder
- Copy the rmprep.png file to \EFI\boot folder
- To avoid an error message, edit \boot\grub\grub.cfg and add a # symbol to the start of line 15 which contains the line insmod vbe (becomes #insmod vbe – or just delete the line). Below are the 3.1.2-9 files in the folder \boot\grub\ on the CloneZilla partition.
5. We need to modify the BIOS\Firmware Non-Volatile RAM so that it boots to grub2 first instead of the Windows Boot manager file….
Either:
5.1 Download and run BootIce… (no need to install)
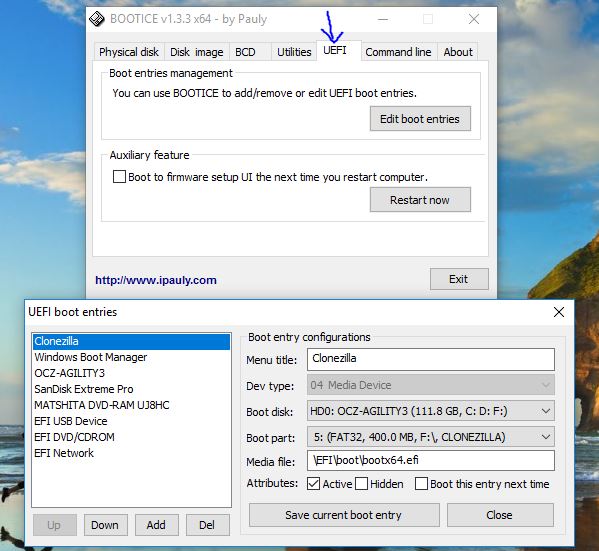
BootIce – UEFI – Add – (Clonezilla)\EFI\boot\bootx64.efi or bootia32.efi – (rename menu title to Clonezilla) – Save current boot entry
Ensure Clonezilla entry is at top of list using Up button.
– OR –
5.2 Download EasyUEFI (free) and run it to install it.
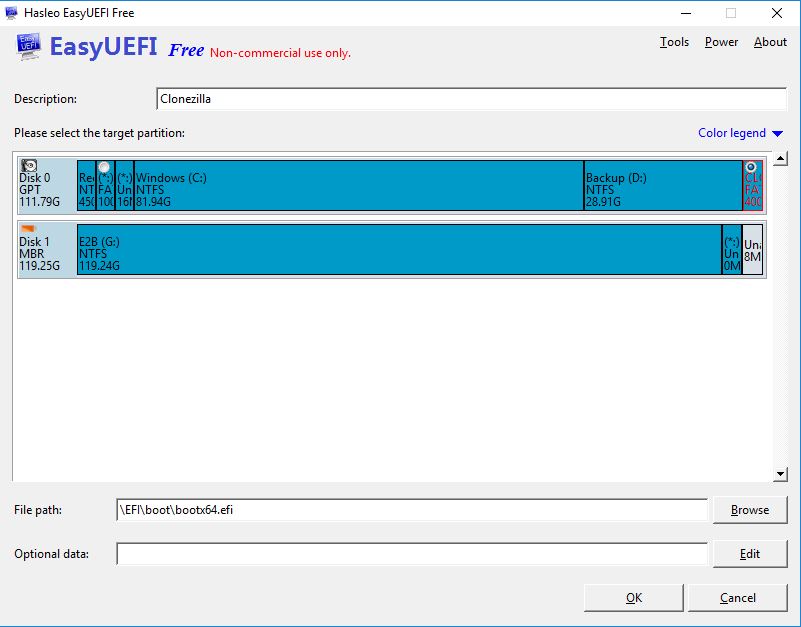
Use these options to add a new default UEFI boot option.
The NVRAM in the system (the same memory that holds the UEFI firmware and BIOS Settings) is programmed.
It will add a new entry and change the BIOS boot order of your system.
Manage EFI Boot Option –
Create a new entry – (click on Clonezilla partition which should turn red if it is FAT32) –
Type=Linux or other OS –
Description=Clonezilla –
File path=\EFI\boot\bootx64.efi (or bootia32.efi if a 32-bit UEFI system)
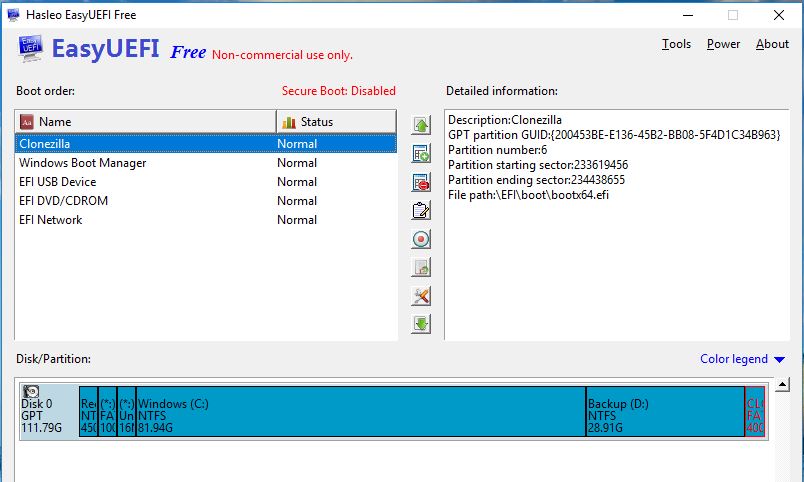
IMPORTANT: Ensure that the new Clonezilla entry is the TOP entry (use the green arrow to move it up)
6. Now test by rebooting.
You should find that the grub2 menu now appears with Windows as the default boot entry. Check it boots to Windows OK.
Note: If you use the BIOS Boot Selection Menu of your UEFI (e.g. press F10 or F12 or F2 or whatever), you should see a choice to boot Clonezilla or Windows Bootmgr (bootmgfw.efi).
If there is any problem with booting to Clonezilla and the grub2 menu, you can always use the BIOS Boot menu to boot to Windows.
eMMC/NVME and other types of drive
The grub.cfg menu assumes that your boot drive is a standard sata hard disk (/dev/sda). If your boot drive is a solid-state nvme drive (e.g. M.2) then you will need to change all occurrences of sda to nvme0n1p in the menu.
If you are unsure of the drive name or see an ERROR message, use the standard Clonezilla menu to find out what the device name is used for your hard drive 0.
MAKE A BACKUP
(the menu heading will be changed if you add the locales\en.mo file)
Check that the device names (sda4 and sda5) are correct for your system.
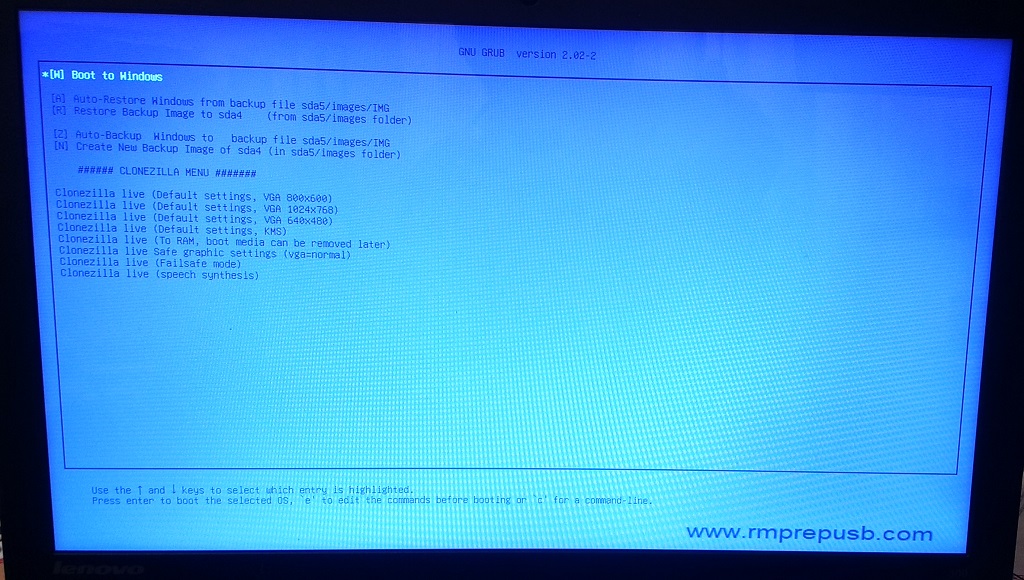
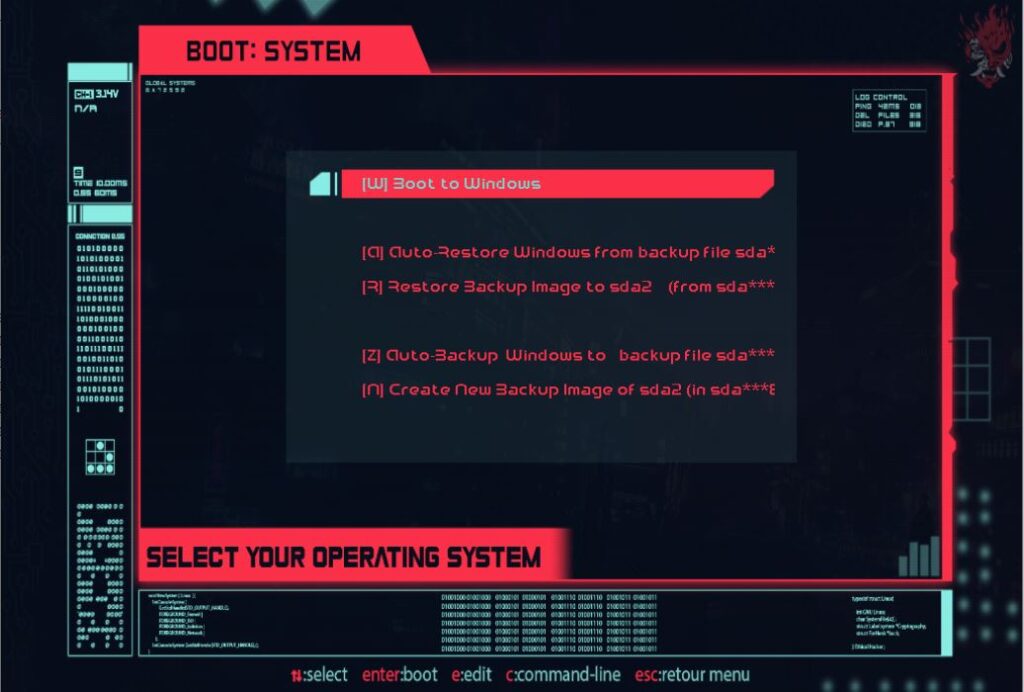
The Clonezilla menu options are:
- [W] Boot to Windows
- [A] Auto-Restore Windows from backup file
- [R] Restore Backup Image
- [Z] Auto-Backup Windows
- [N] Create New Backup Image
Most people will want just one backup image so they can restore it in case of emergency, so just press Z.
This will automatically make a backup called IMG to the \images\IMG folder on the Backup volume.
The user can restore it simply by booting to the Clonezilla menu and pressing A.
The R and N options will create/restore more backups.
The A option is fully automated with no user prompts. If you prefer more control, use the R menu entry (user will be prompted to choose a backup file).
You can edit the \EFI\grub\grub.cfg menu and delete any menu entries you do not want.
TROUBLESHOOTING
If it does not boot to the Clonezilla grub2 menu, check the EasyUEFI/BootIce settings again (tip: BootIce is actually easier to use).
If it fails to boot to either the Clonezilla grub2 menu or Windows, use the BIOS Setup menu to set the first boot option as Windows\bootmgfw.efi – boot to Windows and try again!
If at the grub2 console, try typing ls to list the drives and partitions seen by grub2. e.g.
grub> ls
(hd0) (hd0,gpt15) (hd0,gpt14) (hd0,gpt1)
grub>
Note that the grub.cfg file currently only searches drives hd0-2 and partitions gpt1-15. You may need to extend this in some cases.
You can check variables using the echo command, e.g. echo $BAKDRV or echo $WDRV or echo $CLZDIR or echo $BAKDIR or echo $root.
For VMs (and possibly some real UEFI-systems) you may not be able to boot to the Clonezilla menu – in this case, you will need to do this:
1. Run an Administrator Command shell
2. Type cmd to get to a cmd shell (in case you are running Powershell)
3. Type mountvol S: /s to mount the EFI volume as drive S:
4. Copy (Clonezilla files) \EFI\grub\*.EFI to S:\EFI\boot folder
5. Create a S:\EFI\boot\grub.cfg file and add this text:
- search –set -f /live/vmlinuz
- configfile /EFI/boot/grub.cfg
(I have not tested this! Let me know if it doesn’t work!)
The menu entries should indicate which drive it will back up (e.g. sda4) and which drive will be used to store the backups (e.g. sda5).
If either of these are missing, then check the \backup.tag file and that C:\Windows\Explorer.exe is present (your OS folder should be \Windows) and that only one volume with this file exists.
Ensure you have downloaded the current standard stable release of CloneZilla (do not use older ‘UEFI’ versions as they are not complete and do not detect NTFS volumes!).
If the $WDRV and $BAKDRV names are not correct, you may see a ‘BOOT FAILED’ message:
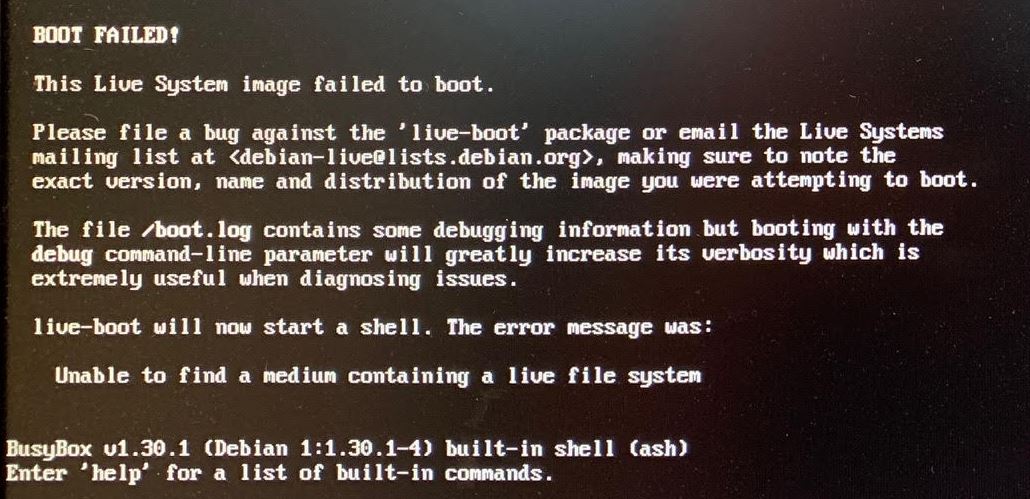
Check the device names (e.g. /dev/sda) are correct if you see this message when running a script!
If your Windows drive is not sda under CloneZilla, you will have to modify the grub.cfg menu (replace all occurrences of sda with the correct device name).
sda$BAKDRV is the backup drive and sda$WDRV is the Windows OS volume to image. If you want the \images folder on a different drive, change the sda$BAKDRV reference.
Sometimes, the BIOS setup utility will clear the CloneZilla UEFI BIOS boot entry or another UEFI tool may clear it.
It that case you will have to add it back in again manually by using the UEFI BIOS Setup menu!
CONFIGURING THE CLONEZILLA MENU
The grub.cfg file contains helpful info and URLs
- #http://clonezilla.org/fine-print-live-doc.php?path=clonezilla-live/doc/99_Misc/00_live-boot-parameters.doc
- #http://clonezilla.org/clonezilla-live/doc/02_Restore_disk_image/advanced/09-advanced-param.php
- #http://drbl.org/faq/fine-print.php?path=./2_System/88_mbr_related_options.faq
- #https://www.gnu.org/software/grub/manual/grub/grub.html
- # hint: cat /proc/cmdline – check clonezilla parameters
- # hint: user:user pass:live
- # Preseed codes (ocs = Opensource Clone System)
- # video=uvesafb:mode_option=1024×768-32
- # vga=788 – use video mode 788 (800-600) or 791=1024×768, 785=640×480, vga=normal (no frame buffer)
- # nosplash – does not show splash screen
- # quiet – reduce amount of boot messages
- # keyboard-layouts=fr -set french kbd or use NONE (=US) or uk
- # locales=en_US.UTF-8 – choices are de_DE.UTF-8 en_US.UTF-8 es_ES.UTF-8 fr_FR.UTF-8 it_IT.UTF-8 ja_JP.UTF-8 pt_BR.UTF-8 ru_RU.UTF-8 zh_CN.UTF-8 zh_TW.UTF-8
- # – use locale -a in shell to display available locales
- # noprompt – does not ask to eject CD
- # vga – vieo mode 791=1024×768 788=800×600
- # ocs_live_run ocs-sr parameters:
- # –batch – Automate run
- # -c – Asks user before completing action – Are you sure you want to continue ? (y/n)
- # -e1 auto – Automatically adjust filesystem geometry for a NTFS boot partition if exists
- # -t – Client does not restore the MBR (Master Boot Record)
- # -g auto – Reinstall grub in client disk MBR (only if grub config exists)
- # -e1 auto – Automatically adjust filesystem geometry for a NTFS boot partition if exists
- # -e2 – sfdisk uses CHS of hard drive from EDD (for non-grub boot loader)
- # -u – Asks the user for the image name (could be set in config too).
- # restoredisk or savedisk – Which mode to run, store, restore, partition or hard-drive
- # ask_user – requests name from user.
- # sdax – Which hard-drive should be written or read.
- # -q2 – Use “partclone”.
- # -z1p – Use gzip-compression (with multicore)
- # -i 2048 – Split filesize in megabyte (Split every 2GB a new file for the backup – use if FAT32 backup ptn.)
- # -sc – Suppress verify check after backup
- # -p poweroff – power off after successfully running the script. or reboot or choose
- # -rm-win-swap-hib Removes the page and hibernation files in Win if exists
You may want to change the keyboard layout or locale (language).
To prevent unattended operation add -c to the RUN1 parameters.
Note that if you add a parameter which requires double-quotes, you must precede each double-quote with a backslash \ symbol.
WALLPAPER AND TEXT COLOURS
You can change the 800×600 rmprep.png file if you wish to change the menu wallpaper.
UEFI usually uses 1024×768 screen resolution by default so you can use a 800×600 or 1024×768 .png file if you have a .jpg, convert to .png format (save using MS Paint).
grub.cfg (current menu)
- insmod png
- if background_image $pref/rmprep.png; then
- set color_normal=black/black
- set color_highlight=white/black
- else
- set color_normal=cyan/blue
- set color_highlight=white/blue
- fi
This menu will use the first colour scheme if the wallpaper file is successfully loaded, and the second scheme if it was not successfully loaded.
menu text colours can be changed by changing the colour pairs (text\background) lines such as::
set color_normal=gray/black
set color_highlight=red/blue

Use a black background for transparency to see the wallpaper beneath.
Note American spelling of color and gray.
TIPS
File names/Folder names are case sensitive under grub2.
Before taking a backup – ‘clean’ Drive C to remove any junk (C: – right-click – Properties – Disk Cleanup – Clean up System Files)
You can hide the Clonezilla volume and Backup volume from the user completely by using Diskpart:
(Admin cmd prompt) >
Diskpart
list vol
sel vol X (where X is desired volume)
ATT VOL SET HIDDEN
sel vol Y (where Y is desired volume)
ATT VOL SET HIDDEN
To unhide use ATT VOL CLEAR HIDDEN
Note that if you hide the Backup volume, the _Autoxxxx.cmd scripts will not work because the volume will not have a drive letter.
If you set the System attribute on the IMG folder, it will not be visible in Explorer – use this command in an Admin cmd shell – attrib d:\images +h +s /d /s
To list the drives seen by grub2, press ‘C’ in the Clonezilla menu and type
lsto list the drives in the system. Then try listing folders, e.g.
ls (hd0,gpt3)/Windows/NO MENU
To suppress the menu text but still show the wallpaper, add the line to grub.cfg:
set timeout_style=hiddenTo suppress the menu but show a countdown on the wallpaper, use:
set timeout_style=countdownIf this option is set to ‘countdown’ or ‘hidden’, then, before displaying the menu, grub2 will wait for the timeout set by timeout to expire. If ESC is pressed during that time, it will display the menu and wait for input. If a hotkey associated with a menu entry is pressed, it will boot the associated menu entry immediately. If the timeout expires before either of these happens, it will boot the default entry. In the ‘countdown’ case, it will show a one-line indication of the remaining time.
Change the timeout value to vary the length of time the wallpaper is displayed.
PASSWORD ACCESS
To prevent unauthorised access (or accidental access if the user presses ‘c’ or ‘e’) set a password (in grub.cfg file) by uncommenting the lines and editing:
- #prevent user from editing or reaching console by setting superuser (use set superuser= to prevent anyone from reaching console)
- insmod password
- set superusers=”easy2boot root”
- password easy2boot easy2boot
- password root root
- password doris passwd
With the above settings, to get access to the grub2 console (superusers only), press C and then enter a username of root and a password of root.
I have added –unrestricted to all the menu entries to allow any menu entry to be used without needing a password.
Change this to –users “” for any entry you want to allow superuser access only or –users “doris” if a password has been set for non-superuser doris. (e.g.add line password doris passwd to the password section)
Example – only root can run clonezilla menu:
menuentry "Clonezilla live (Default settings, VGA 800x600)" --users "root" {
search --set -f /live/vmlinuz
linux /live/vmlinuz boot=live union=overlay username=user config components quiet noswap edd=on nomodeset locales= keyboard-layouts= ocs_live_run="ocs-live-general" ocs_live_extra_param="" ocs_live_batch="no" vga=788 ip= net.ifnames=0 nosplash i915.blacklist=yes radeonhd.blacklist=yes nouveau.blacklist=yes vmwgfx.enable_fbdev=1
initrd /live/initrd.img
}
AUTOMATIC UNATTENDED BACKUP AND RESTORE
The three Windows .cmd scripts can be used to ensure that on the next reboot, an unattended backup or restore operation will take place.
This means you can use TeamViewer to remotely restore the users system (see Tutorial 89 for more details).
The three files provided can be copied to any folder (or the Desktop) and must be run with Administrator rights:
Two ‘tag’ files are used in the C: root folder:
- _AutoBackup (run as admin).cmd – deletes the current IMG image backup and writes C:\autobackup.tag
- _AutoRestore (run as admin).cmd – writes C:\autorestore.tag
- _CancelAutoCmd (run as admin).cmd – cancels any previously set backup or restore operation by deleting the .tag files – you should always run this after backup or restore has successfully completed
The logic in the grub.cfg menu works like this:
IF IMG exists and C:\autorestore.tag exists – the Restore menu will be selected and a 10 second timeout set
IF IMG does NOT exist and C:\autobackup.tag exists – the Backup menu will be selected and a 10 second timeout set
Note that if a restore is unsuccessful, the operation may loop infinitely (but you have 10 seconds to stop it).
Also, CloneZilla may not reboot on failure!
You could duplicate the menus and code to have a USER backup as well as a IMG backup image if you wish, but I’ll leave this up to you!
If you set a timeout value of 0, it will always immediately boot to Windows (unless you use the _Autoxxxxx.cmd scripts to start an operation).
CHANGE THE GRUB2 MENU HEADING
The grub2 heading is determined by the \EFI\boot\locale\en.mo language file
You can use a hex editor to modify the bytes in the en.mo file – OR –
You can use Easy2Boot to modify the file as follows:
1. Make a text file \_ISO\MAINMENU\PATCHENMO.mnu
title Patch EN.MO file\n Patch the en.mo grub2 language file
set GRUBHEAD=Windows Backup\\Restore Menu
# Modify grub2 file
cat --locate="ion %s\x00" /en.mo > nul
cat --skip=%?% --number=1 --locate=\x00 --replace="\x00%GRUBHEAD%\x00" /en.mo > nul
echo
cat --hex /en.mo
echo
pause
root ()
errorcheck off
boot
Change the 2nd line to whatever heading you want – note that \ must be written as \\
2. Copy the en.mo file to the root of the E2B USB drive
3. Boot to E2B (use a real system or VBOX_VMUB – do NOT use the TEST_QEMU.cmd script or VBox alone or the changes will not be permanent)
Select the Patch EN.MO file menu entry to patch the file.
4. Copy the \en.mo file to replace the one in the Clonezilla folder.
Note: the grub2 lang variable must be set to eng so that eng.mo is used. This is already done in the grub.cfg file.
An alternative is to use a grub2 theme (see below).
BITLOCKER ENCRYPTED DRIVE C:
If drive C: is encrypted you will have to use a saved environment variable for the auto-restore function.
Files cannot be stored on the encrypted C: drive because they are not accessible from grub2.
The new algorithm is:
if exist IMG backup file and if grubenv contains the variable RESTORE=1 then restore the IMG image.
To start an auto-restore, windows copies grubenv.rst to grubenv in the \boot\grub folder.
We then use in the grub.cfg file:
- set RESTORE=0
- load_env RESTORE
to obtain the RESTORE variable value (if grubenv exists)
and then use:
- if [ @$RESTORE@=@1@ and -d (hd0,gpt$BAKDRV)$BAKDIR/IMG ]; then set default=”2″ ; set timeout=”10″; fi
- if [ @$RESTORE@=@1@ and -d (hd1,gpt$BAKDRV)$BAKDIR/IMG ]; then set default=”2″ ; set timeout=”10″; fi
- if [ @$RESTORE@=@1@ and -d (hd2,gpt$BAKDRV)$BAKDIR/IMG ]; then set default=”2″ ; set timeout=”10″; fi
- if [ @$RESTORE@=@1@ ]; then set RESTORE=0 ; save_env RESTORE ; fi
to start the autorestore the file _AutoRestore (run as admin).cmd should be edited to replace the lines…
- echo restore > C:\autorestore.tag
- if not exist C:\autorestore.tag (color 4f & echo AUTORESTORE FAILED! Please run as Admin & pause & goto :EOF)
with …
- REM This assumes the .cmd file is on the clonezilla volume
- copy /Y \boot\grub\grubenv.rst \boot\grub\grubenv
- if not exist \boot\grub\grubenv (color 4f & echo AUTORESTORE FAILED! & pause & goto :EOF)
For the auto-backup function, instead of C:\autobackup.tag , the tag file can be kept on the same partition as clonezilla and grub2.
To use grubenv, you will need to add the 3 different loadenv.mod files (obtain them from loadenv_modules.zip file below or copy them from a Ubuntu ISO):
- \boot\grub\x86_64-efi\loadenv.mod
- \boot\grub\i386-pc\loadenv.mod
- \boot\grub\i386-efi\loadenv.mod
and then add the line
- insmod loadenv
to the top of the grub.cfg file.
Click here (OneDrive folder) if you cannot find any file mentioned in the articles on this site or Contact Me.
Adding a grub2 theme
It is not recommended to add a theme because most theme menus are too small to fit all the menu entry text into.
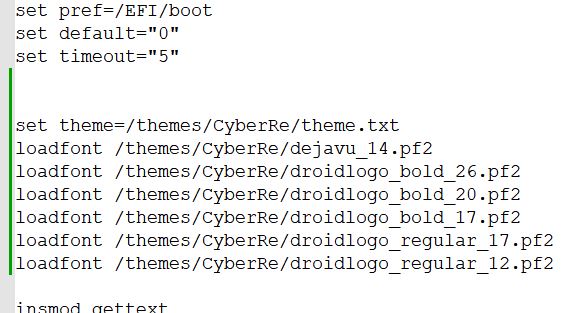
- Download your desired theme to a new \themes folder on the Clonezilla partition – e.g. \themes\CyberRe
I picked a random theme – https://www.gnome-look.org/p/1420727/ – more here. - To the grub.cfg add a variable theme which contains the path of the theme.txt file – e.g. set theme=\themes\CyberRE\theme,txt
- Some themes contain fonts which should also be loaded, so add loadfont lines for each font – e.g.
Note that fonts take time to load.
You will need to adjust the width of the menu and perhaps the height, etc. as require by changing the theme.txt file.
The screen resolution is set to ‘auto’ in the grub.cfg file which usually results in a screen of 1024×768. If you want to set a specific screen resolution then change set gfxmode=auto to a specific resolution – e.g. [xres]x[yres].
set gfxmode=1600×900
You can use the grub2 command videoinfo to list all supported video modes for the graphics adapter that is currently in use.
Tip: type set pager=1 to pause screen when scrolling.
SanDisk USB 3.1 Extreme Pro