
Table of Contents
INTRODUCTION
This article contains some brief notes on how to download, change and compile Ventoy so that it will work on E2B USB drives.
Ventoy v1.0.28 and later versions will only run on a USB drive which has been prepared by using the official Ventoy USB tool.
This means that official unmodified v1.0.28 and later versions will no longer work with E2B+agFM v2 so the source code has to be modified to allow it to work on drives with a different partition arrangement.
Instructions below tested on Ventoy v1.0.29, v1.0.31, v1.0.35, v1.0.42 successfully. Easy2Boot eBook #4 contains instructions for versions later than Ventoy 1.0.42.
Note that Ventoy and Easy2Boot expects a MBR+UEFI-bootable USB drive to have an MBR partition structure (for BIOS\Legacy booting):
- Partition 1 – formatted as NTFS for E2B (see here for options) – Ventoy expects all payload files here. Start Sector = 2048
- Partition 2 – formatted as FAT16 or FAT32 for E2B – Ventoy expects it’s boot files to be here.
- Partition 3 – may or may not exist and can be used by user.
- Partition 4 – E2B expects there to be no Partition 4.
The eBook ‘Getting started with Ventoy‘ also contains instructions on how to remove the Ventoy version string from the menu screen without needing to recompile Ventoy.
MAKE A CENTOS 7 VIRTUAL MACHINE
I used Virtual Box 5 on a Windows 10 system.
I created a new Ubuntu x64 VM with a 30GB dynamic vdi hard disk (20GB is a bit too small)..
I attached the CentOS 7 ISO to the VM as a virtual CD.
CentOS-7-x86_64-Everything-2009.iso
When installing CentOS, I added the Gnome desktop and some other libraries. I did not use a Minimal Install because I am not a linux guru and I find using the Desktop GUI easier!
Remember to enable networking during CentOS Setup (first screen).
I setup the root account with a password (toor), and a User account (Steve) with no password.
The Ventoy GitHub page gives more details here.
Installation Instructions – See https://www.ventoy.net/en/doc_start.html for detail
Compile Instructions – See BuildVentoyFromSource.txt
Ensure it boots to the CentOS Desktop.
Once the CentOS Desktop is running, click VBox – Devices – Insert Guest Additions CD and run the script when offered. Then restart CentOS. Now you can go to Applications – System Tools – Settings – Devices – Displays and set a more appropriate Monitor resolution.
Install Packages
Use the web browser (Firefox) inside CentOS to visit the Ventoy GitHub page and find section 1.2
Currently this says (it may change so don’t use this exact text!):..
yum install \ libXpm net-tools bzip2 wget vim gcc gcc-c++ samba dos2unix glibc-devel glibc.i686 glibc-devel.i686 \ mpfr.i686 mpfr-devel.i686 zlib.i686 rsync autogen autoconf automake libtool gettext* bison binutils \ flex device-mapper-devel SDL libpciaccess libusb freetype freetype-devel gnu-free-* qemu-* virt-* \ libvirt* vte* NetworkManager-bluetooth brlapi fuse-devel dejavu* gnu-efi* pesign shim \ iscsi-initiator-utils grub2-tools zip nasm acpica-tools glibc-static zlib-static
In CentOS – cut and paste the text from the BuildVentoyFromSource.txt file into the terminal and allow it to install all these packages.
I had to first run
su -
to get root permissions (you are prompted for the root password – in my case toor). Type whoami to make sure you are root.
Then type nautilus in the shell to run the file explorer so you have permission to write to the /home directory.
su -
nautilus
Expanding the vdi disk
I suggest 30GB for the root partition size in the VM, however, if you later find that you need more space, first clone the VM so that you have a backup and then increase the size of the vdi disk using Virtual Media Manager and then boot to Centos and use the following commands to expand into the unused space:
su -
lsblk
fdisk -l
parted ---pretend-input-tty /dev/sda resizepart 2 100%
partx -u /dev/sda; pvresize /dev/sda2
lvextend -r /dev/centos/root /dev/sda2
You may need to change the partition name and number depending on your volume and partition number.
DOWNLOAD VENTOY SOURCE FILES
Now follow step 2 on the Ventoy page or /DOC/BuildVentoyFromSource.txt file.
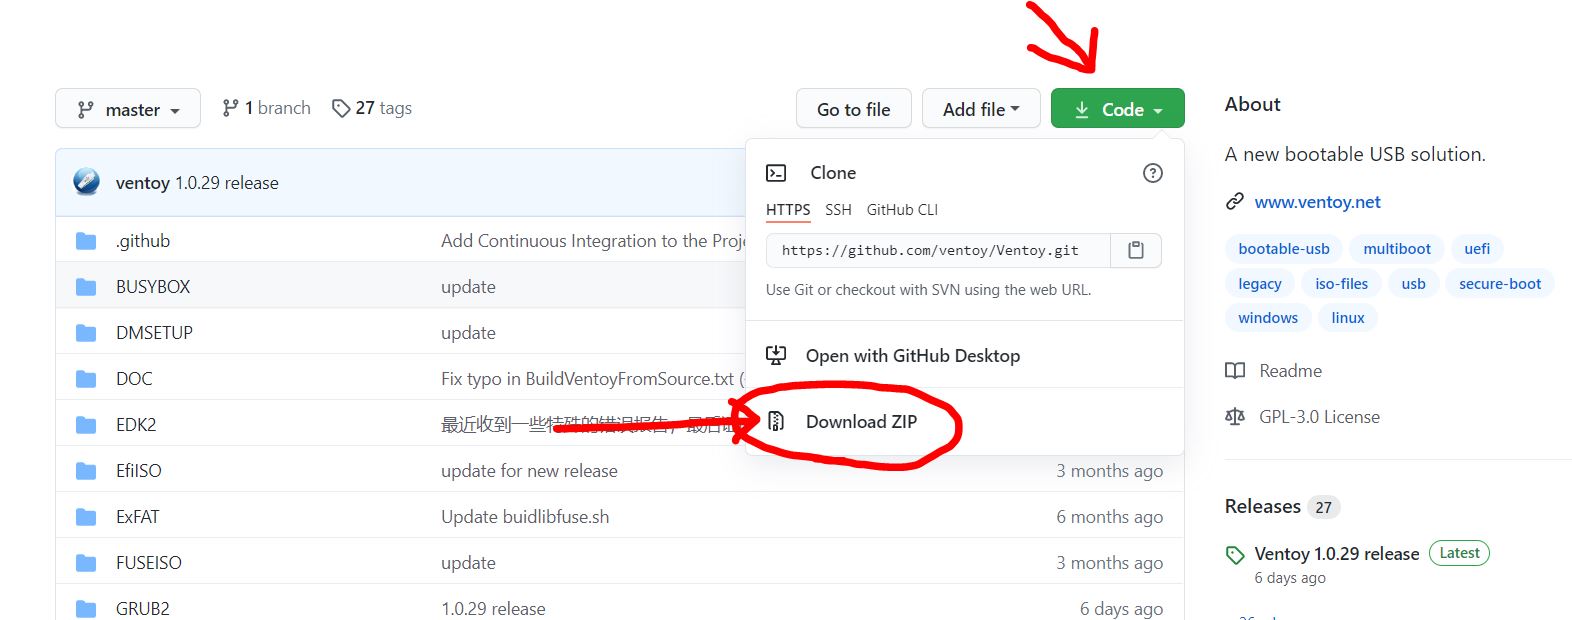
You will need to download Ventoy-1.xx.yy.zip and unzip the folder inside to /home/Ventoy-1.x.yy. Use latest version of FireFox or else the Code button on Github may not work – if so, uninstall and re-install Firefox.
Then rename the /home/ventoy-1.x.yy folder to /home/Ventoy-master.
You should now have folders called /home/Ventoy-master/GRUB2, /home/Ventoy-master/EDK2, etc. etc.
Make sure the Ventoy-master folder is located at /home (not your Home folder – which is at /home/steve in my case).
Currently the text on github says:
2.1 Download Ventoy source code from github and decompress it.
Next I assume that you have unzipped the code into the /home directory (check /home/Ventoy-master/README.md file for the directory level).
2.2 Download third-part source code (check on website – this list may change and be out of date!)
https://www.fefe.de/dietlibc/dietlibc-0.34.tar.xz ===> /home/Ventoy-master/DOC/dietlibc-0.34.tar.xz
https://musl.libc.org/releases/musl-1.2.1.tar.gz ===> /home/Ventoy-master/DOC/musl-1.2.1.tar.gz
https://ftp.gnu.org/gnu/grub/grub-2.04.tar.xz ===> /home/Ventoy-master/GRUB2/grub-2.04.tar.xz
https://codeload.github.com/tianocore/edk2/zip/edk2-stable201911 ===> /home/Ventoy-master/EDK2/edk2-edk2-stable201911.zip
https://codeload.github.com/relan/exfat/zip/v1.3.0 ===> /home/Ventoy-master/ExFAT/exfat-1.3.0.zip
https://codeload.github.com/libfuse/libfuse/zip/fuse-2.9.9 ===> /home/Ventoy-master/ExFAT/libfuse-fuse-2.9.9.zip
https://releases.linaro.org/components/toolchain/binaries/7.4-2019.02/aarch64-linux-gnu/gcc-linaro-7.4.1-2019.02-x86_64_aarch64-linux-gnu.tar.xz ===> /opt/gcc-linaro-7.4.1-2019.02-x86_64_aarch64-linux-gnu.tar.xz https://toolchains.bootlin.com/downloads/releases/toolchains/aarch64/tarballs/aarch64--uclibc--stable-2020.08-1.tar.bz2 ===> /opt/aarch64--uclibc--stable-2020.08-1.tar.bz2
You may need to use the su command if you get permission errors, e.g.
su –
mv filex /opt/filex
You will need to cut and paste each of the URLs listed and then copy each file to the locations shown in list 2.2 (the list shown above may change – so use the one on the GitHub page).
Tip: Highlight each link – right-click – Save Link As …
Other steps are also required – follow the Ventoy compile instructions for full details.
EDIT THE SOURCE FILES
Tip: Before you edit any files, try to compile it first – see COMPILE section below. Once it is compiling without errors, then try editing the source files. See section below for compile instructions.
If you have problems copying files due to permissions, after executing su – you can then run nautilus from the same terminal so you can write to /home directories, etc.
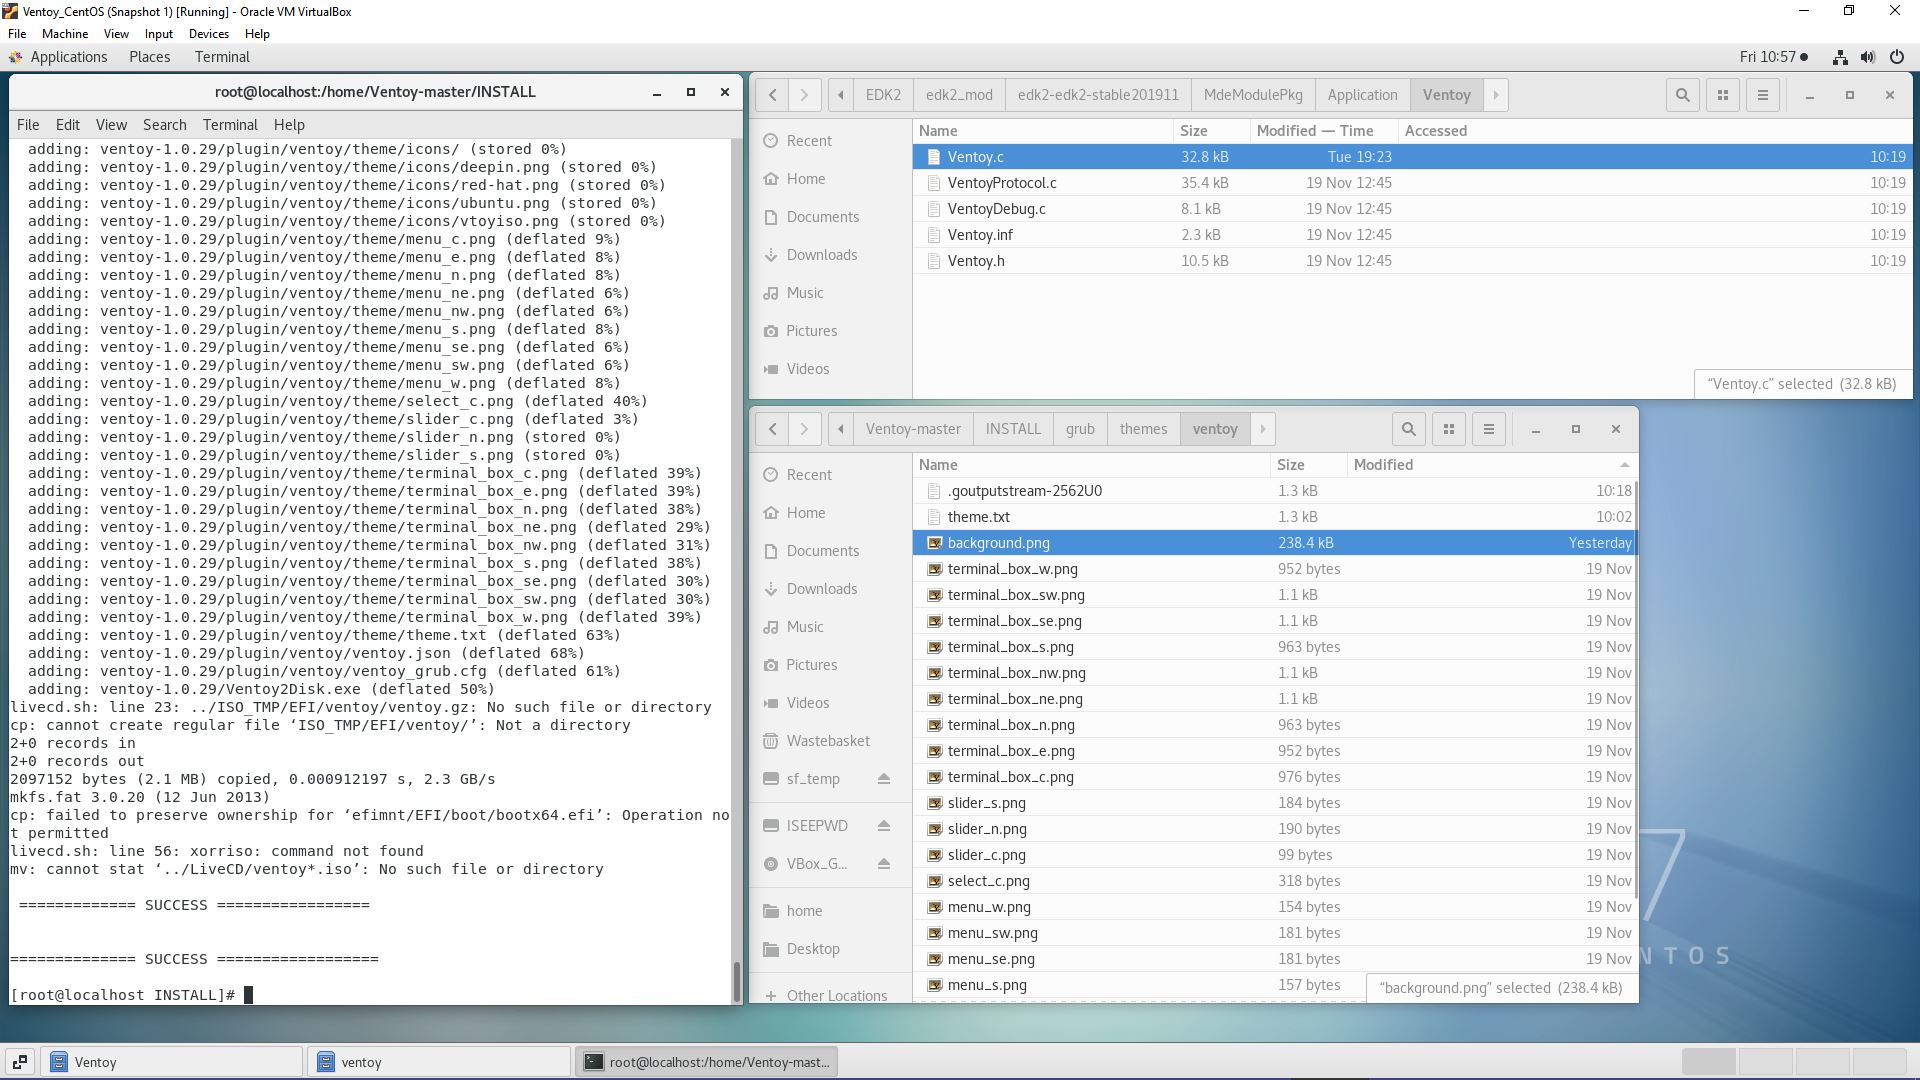
The background wallpaper is a 1024×768 .PNG file which can be changed or it can be edited using gimp:
/INSTALL/grub/themes/ventoy/background.png
There are two Ventoy.c code files which test for an ‘official’ Ventoy USB drive:
- GRUB2/MOD_SRC/grub-2.04/grub-core/ventoy/ventoy.c (approx. 105kb) – for MBR (later versions have code to patch in ventoy_cmd.c including two lines of VTOY_CMD_CHECK(1))
- EDK2/edk2_mod/edk2-edk2-stable201911/MdeModulePkg/Application/Ventoy/Ventoy.c (approx. 32.8kb) – for UEFI
Note: Be very careful to get the correct paths, especially for the EDK2 file as it can be quite confusing! if you edit the wrong Ventoy.c it may be overwritten by the source Ventoy.c when you compile! Look for ‘MOD’ in the top path section
You can remove the lines which are executed when a test fails or you can add in a line to return a 0 result.
For the grub-core version (screenshot 1 below) I just removed two lines – this caused an ‘Unofficial Ventoy’ to be displayed (presumably because the partition volume name was wrong).
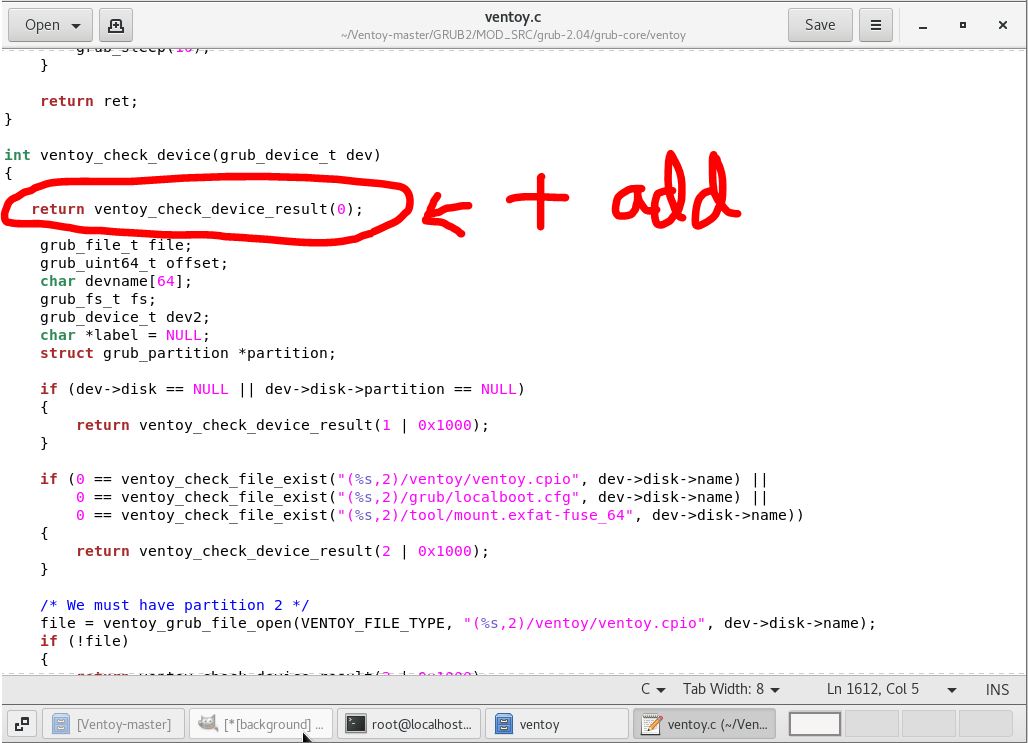
For the EDK2 EFI ventoy.c file, I added an extra line just below ventoy_check_device so it returned 0 (screenshot 3 below) – the effect was that no ‘Unofficial Ventoy’ message was displayed at all when UEFI64-booting.

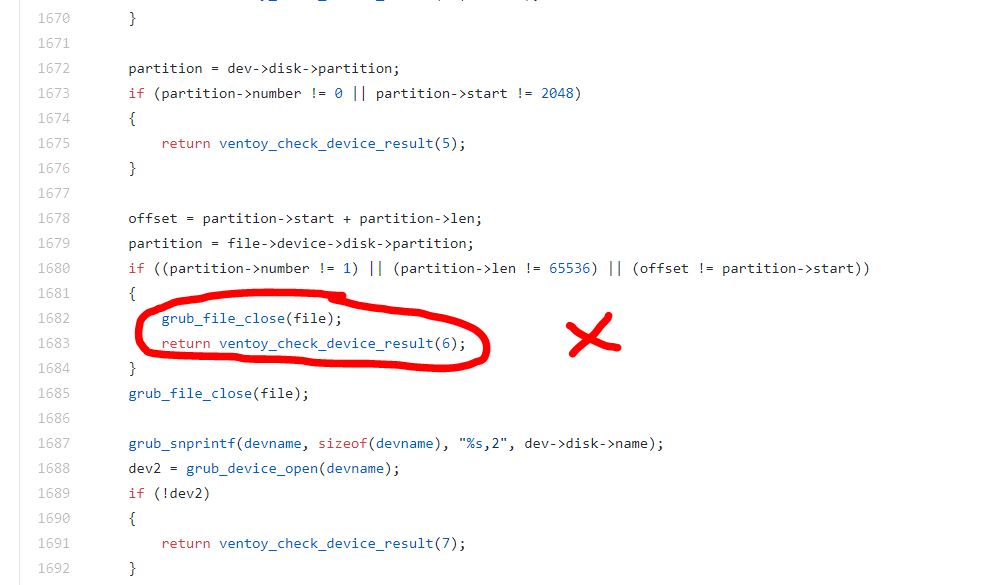
Instead just use // on the lines which return on error.
You can use // to comment out each line, e.g.
// this line will be ignored
VTOY_CHKDEV_RESULT_STRING should be ‘0’ or else an ‘Unofficial Ventoy’ string is displayed.
For versions later than 1.0.42, you can find special instructions at the end of Easy2Boot eBook #4 for agFM.
The version number text string of the Ventoy release is held in VTOY_TEXT_MENU_VER and is set in the file /home/Ventoy-master/INSTALL/grub/grub.cfg…
if [ "$grub_platform" = "pc" ]; then
set VTOY_TEXT_MENU_VER="Ventoy $VENTOY_VERSION BIOS www.ventoy.net"
else
set VTOY_TEXT_MENU_VER="Ventoy $VENTOY_VERSION UEFI www.ventoy.net"
fi
You may wish to change the website URL as this is displayed at the bottom of the Ventoy standard menu by the Ventoy theme (note: this only works for the text menu not for a gfxmenu/theme menu). See Tips also the section at end of page.
COMPILE
Once you have changed the two ventoy.c files and ventoy_cmd.c if present (and anything else you wish), you can compile as follows:
su -
cd /home/Ventoy-master/INSTALL
sh all-in-one.sh
Make sure that the su – command works or else you will get file permission errors!

During compilation (which takes a while!) you may be prompted to press A to continue…
Go and get a cup of coffee for 10-15 minutes…
WARNING: The compile script does not always stop on an error (e.g. the GRUB2 buildgrub.sh script) – if you see any error text in a red colour then stop the build and investigate! All warnings may be treated as errors. For example: if a variable in a function is defined but not used (because you have deleted that line) then you will get an error and it will not compile correctly!
Tip: Edit the all_in_one.sh script to add a line with the command read just after the GRUB2 buildgrub.sh line – that way you can check for errors easily or look at the log file afterwards at /DOC/build.log.
Check
Check the dates and timestamps on the new files. In particular, check the files:
- /ventoy/ventoy.cpio
- /ventoy/ventoy_x64.efi (made using EDK2)
- /EFI/BOOT/grubx64_real.efi (made from GRUB2)
If you also want the UEFI32 files, check for /ventoy/ventoy_ia32.efi and /EFI/BOOT/grubia32_real.efi (Ventoy 1.0.32 and later).
If the compilation just stops without any error message, check the github page to see how to compile just the failing portion. For instance, if the compile stops on grub2, then follow the grub2 section instructions:
4.1 == Build grub2 ==
cd /home/Ventoy-master/GRUB2
sh buildgrub.sh
Note that you may need to change the PATH before running some individual build scripts (see the all-in-one.sh script).
COPY FILES
If the .zip file was successfully generated, you should see a nice message after 10-20 minutes like this:
========= SUCCESS ============
Now use the Desktop File Manager to copy the following files to a USB drive. You can attach a USB drive to the VM via the Devices – USB tab in the VM window.
In Centos VM (e.g. VirtualBox):
- Attach USB drive using VBOX – device – USB tab
- Copy /home/Ventoy-master/INSTALL/grub/i386-pc/core.img to a USB drive folder (I used \e2b\Update agFM folder for convenience)
- Copy /home/Ventoy-master/INSTALL/ventoy-1.0.29-windows.zip to a USB drive folder
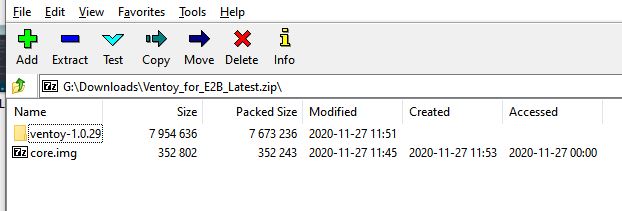
- Open the ZIP file on the USB drive using Centos Archive Master (double-click on file) and drag-and-drop in the core.img file (top level)
- Quit Archive Master
- Eject the USB drive using Centos File Explorer (large up-arrow in left border on USB volume) – IMPORTANT!
- Detach USB device from VBOX
The ‘Ventoy for Easy2Boot’ .ZIP file requires the addition of the core.img for Add_Ventoy.cmd to work correctly.
ADD VENTOY TO E2B USB DRIVE
To test your new version, go to the \e2b\Update agFM folder on the second FAT32 partition of your E2B USB drive and drag-and-drop the zip file onto the Add_Ventoy.cmd file in that folder – it should extract and copy the necessary files.
Note: if the Add_Ventoy.cmd script also downloads the latest (unpatched) version of core.img then it was not in the ZIP file and Legacy Booting may not work.
The files that are required to be on the E2B 2nd partition are (perhaps some others too?):
- \ventoy\ventoy.cpio
- \ventoy\core.img
- \ventoy\ventoy_x64.efi
- \ventoy\memdisk
- \ventoy\ipxe.krn
- \EFI\BOOT\ventoyx64.efi (this was grubx64_real.efi originally)
- Other folders: /grub for main grub files, and /tool folder
- /grub/grub.cfg is the main boot .cfg file for all versions.
TESTING
Ventoy will check for a ‘valid’ USB device when booting, when running the /grub/grub.cfg file AND when running payload (ISO) files. You will need to check that you can actually boot an ISO in both Legacy and UEFI64 mode (and UEFI32 if applicable).
Note: Make sure you always test booting of Linux ISOs such as Ubuntu or Parted Magic, etc. – these may not work if you have missed any code which checks for a Ventoy drive!
Tip: If Ventoy basically works after compiling, but you see an ‘Unofficial Ventoy’ string displayed at the bottom of the menu, try adding these lines to the /grub/grub.cfg file around the vt_load_part_table line:
- #Load Partition Table
- vt_load_part_table $vtoydev
- set VTOY_CHKDEV_RESULT_STRING=0
- export VTOY_CHKDEV_RESULT_STRING
You should not need to do this if you have patched the files correctly though.
TIPS
The file /home/Ventoy-master/INSTALL/grub/grub.cfg ends up on the USB drive as /grub/grub.cfg) and can be changed to set different defaults and modify the text displayed on the menu.
You can change the default mode to TreeView mode…
############################################################################################################################################################################################## Main Process #######################
###########################################################################################################################################################################
set VENTOY_VERSION="1.0.97"
#ACPI not compatible with Window7/8, so disable by default
set VTOY_PARAM_NO_ACPI=1
# Default menu display mode, you can change it as you want.
# 0: List mode
# 1: TreeView mode
set VTOY_DEFAULT_MENU_MODE=1
#set VTLE_CLR=#ffeedd00
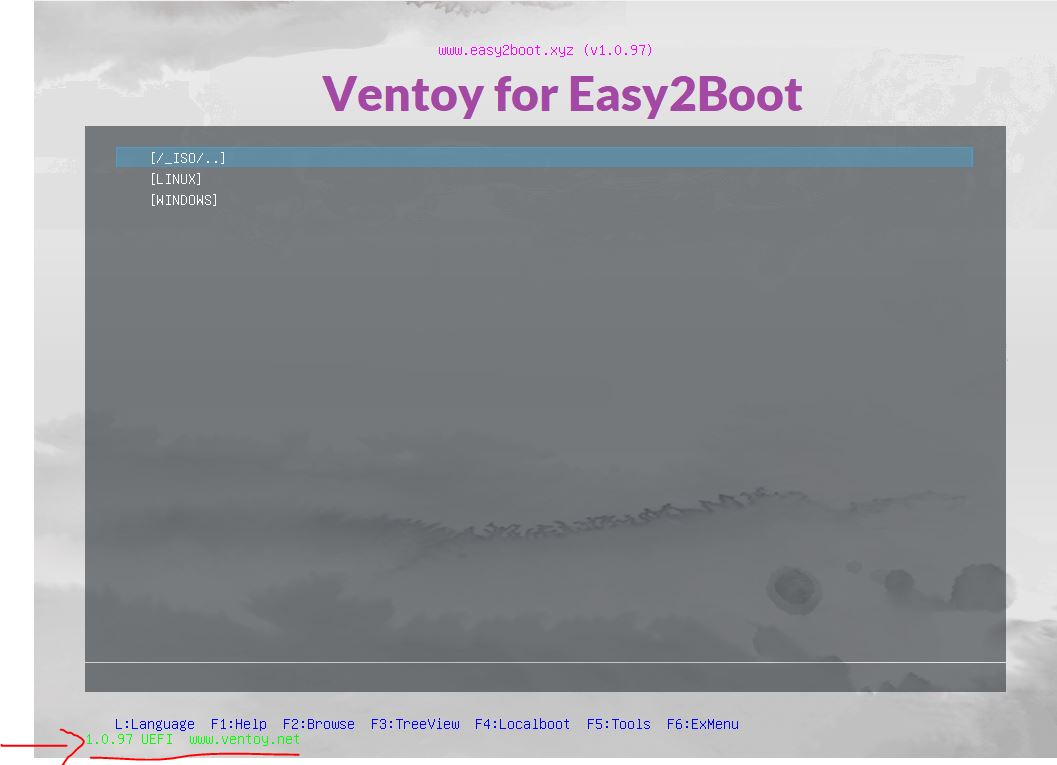
You can change the position and colour of the bottom left version info text that currently appears as:
‘1.0.97 UEFI www.ventoy.net‘
Using a ventoy.json setting – e.g. set as same colour as the background so it is invisible.
The eBook ‘Getting started with Ventoy‘ also contains instructions on how to remove the Ventoy version string from the menu screen without needing to recompile Ventoy or match background colours.
Tip: The Ventoy version string at the bottom of the grub2 menu (e.g. ‘1.0.97 UEFI www.ventoy.net’) is useful because it also tells you what mode you have booted in (e.g. UEFI, IA32 or BIOS mode).
Tip: If you get a ‘No files found’ error on the Ventoy menu – you have probably made a mistake in the grub.cfg file! Try the original \grub\grub.cfg file to see if that works.
Theme
The inbuilt Ventoy theme.txt file can be changed at /home/Ventoy-master/INSTALL/grub/themes/ventoy/theme.txt.
You can quickly test any changes to the grub.cfg file or the theme.txt file by editing those same files on the 2nd partition of the E2B USB drive and then booting to agFM and then Ventoy.
- /grub/grub.cfg
- ‘grub/themes/ventoy/theme.txt
Once they work OK, you can copy them to the correct folders in the CentOS Ventoy-master folder structure and recompile.
UPDATING TO A NEWER VERSION OF VENTOY
The new version may have many new changes to the Ventoy.c files and the other files such as grub.cfg and the theme files, so you cannot just overwrite the new file with the old modified version of the file.
Download the requires source .zip file in a browser under CentOS.
Before extracting the .zip source file, you should delete all files and folders under:
\home\Ventoy-master\GRUB2\MOD_SRC
\home\Ventoy-master\EDK2\edk2-mod (do not delete the \EDK2\edk2-edk2-stable201911.zip file).
Because you have to add a load of other files (.zip, .xz, .bz2 archives) into the source folder structure, the easiest way to update is to extract the new Ventoy sources files directly over the old source files in the \home\Ventoy-master folder (but first make a backup of the old modified folder for comparison).
If compilation fails, you may need to follow the instructions in the \DOC\BuildVentoyfromSource.txt file again in case new zip files or a different PATH is required.
Then I use the linux utility Meld to compare the two folders and update the new files. Meld is similar to WinMerge for Windows – it allows you compare and add/delete changed lines into the new source files. Tip: Run Meld as root so you can write/change to the files under the /home folder.
For versions later than 1.0.42, you can find instructions at the end of Easy2Boot eBook #4 for agFM.
Note: If you are updating the Ventoy-master folder with a newer version, you can usually just overwrite the old files with the new version. Check that IMG/cpio/ventoy folder is same as new version – if there are too many files in this folder then ventoy.cpio will be to large and may fail to boot! In later versions the tool and busybox folders should not be present.
Patch vtoyjump (required for Windows/WinPE ISOs)
When Ventoy loads a Windows ISO, it injects code into the X: boot image which automatically loads the ISO as a virtual DVD. This allows Windows Setup to access the \Sources\Install.wim or Install.esd file. Vtoyjump32.exe and Vtoyjump64.exe (located in the \ventoy folder of the VTOYEFI 32MB partition) are responsible for this.
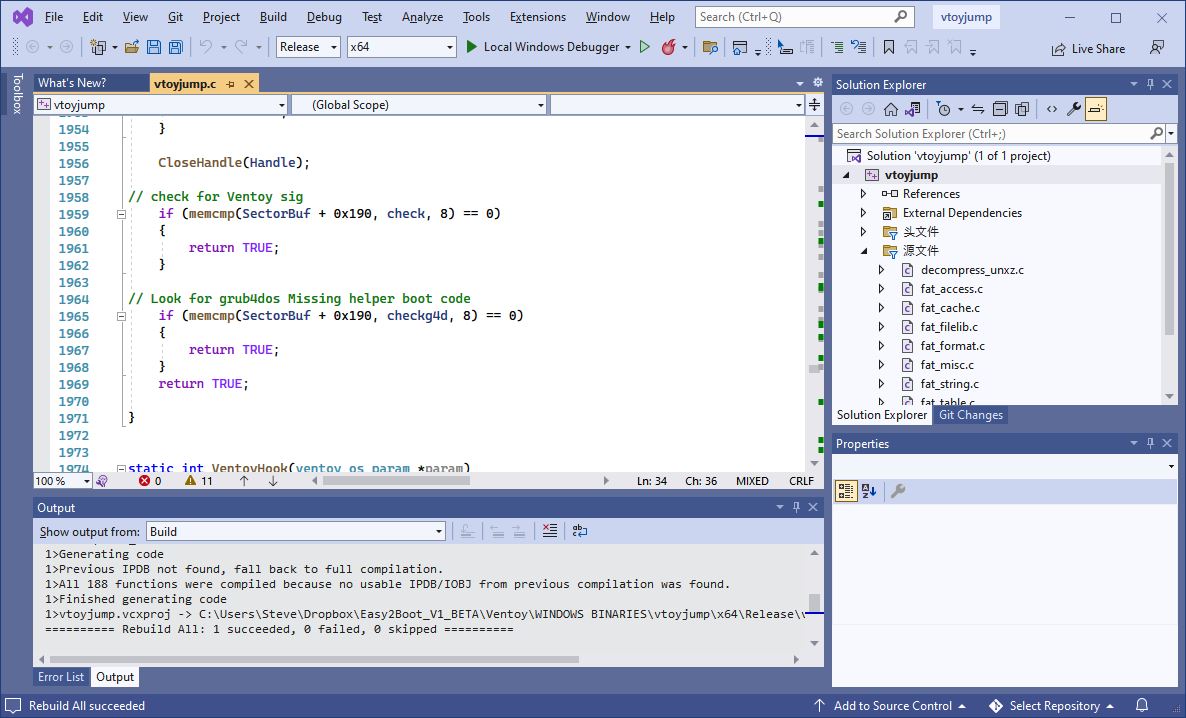
The Visual Studio C code in Ventoy-master\vtoyjump\vtoyjump\vtoyjump.c will check for a ventoy grub2 bootloader in the LBA0 of each disk. If the MBR boot code in your USB drive is not the official Ventoy code then you will need to edit the vtoyjump.c file and then recompile both .exe files:
- Edit the vtoyjump.c file – look for the CheckVentoyDisk code (I patched it to always return true)
static BOOL CheckVentoyDisk(DWORD DiskNum)
{
    DWORD dwSize = 0;
    CHAR PhyPath[128];
    UINT8 SectorBuf[512];
    HANDLE Handle;
    UINT8 check[8] = { 0x56, 0x54, 0x00, 0x47, 0x65, 0x00, 0x48, 0x44 };


    sprintf_s(PhyPath, sizeof(PhyPath), "\\\\.\\PhysicalDrive%d", DiskNum);
    Handle = CreateFileA(PhyPath, GENERIC_READ, FILE_SHARE_READ | FILE_SHARE_WRITE, 0, OPEN_EXISTING, 0, 0);
    if (Handle == INVALID_HANDLE_VALUE)
    {
        Log("Could not open the disk<%s>, error:%u", PhyPath, GetLastError());
        return FALSE;
    }

    if (!ReadFile(Handle, SectorBuf, sizeof(SectorBuf), &dwSize, NULL))
    {
        Log("ReadFile failed, dwSize:%u  error:%u", dwSize, GetLastError());
        CloseHandle(Handle);
        return FALSE;
    }

    CloseHandle(Handle);

// check for Ventoy sig
    if (memcmp(SectorBuf + 0x190, check, 8) == 0)
    {
        return TRUE;
    }


// return true even if not ventoy code in LBA0!
   return TRUE;
}
2. Recompile both Release versions of the two .exe files (just double-click the vtoyjump.sln file – change to Release – build both the x64 and Win32 versions).
3. To test, simply replace the two .exe files in the Ptn2 \ventoy folder with the new versions. Check that a Windows Install ISO will list all the Windows Editions correctly.
4. If you wish to re-pack the Ventoy download zip file, then copy the vtoyjump32.exe and vtoyjump64.exe files into the CentOS VM at .\Ventoy-master\INSTALL\ventoy. Then run the all_in_one.sh script (or maybe just the ventoy_pack.sh script if you have already compiled) to make a new ventoy-1.00.xx-windows.zip file.
Note: There appears to be several bugs in the FAT file handling code. Files with an extension of less than 3 characters are not found on FAT32/FAT16 volumes – e.g. 7za.xz is not found on partition 2 but 7za.exe is found! I needed to add a space “7za.xz ” when a non-standard Ventoy FAT32 Partition 2 was used.
If a file on the Ventoy FAT partition was not found or does not exist, a 0-length open file is created on drive X: when attempting to copy it using CopyFileFromFatDisk and this prevents the file from being overwritten afterwards. A test was added so a 0 size file would not create a destination file in CopyFileFromFatDisk.
You may need to patch these two sections if windows file injection does not work…
    if (0 == fl_attach_media(VentoyFatDiskRead, NULL))
    {
		if (g_system_bit == 64)
        {
            // bug in fat fs handler - extension must be 3 characters and use space as padding!  ZZZZZZZ
            CopyFileFromFatDisk("/ventoy/7z/64/7za.xz", "ventoy\\7za.xz");
            CopyFileFromFatDisk("/ventoy/7z/64/7za.xz ", "ventoy\\7za.xz"); // WORKS if file in caps or lc
        }
        else
        {
            CopyFileFromFatDisk("/ventoy/7z/32/7za.xz", "ventoy\\7za.xz");
            CopyFileFromFatDisk("/ventoy/7z/32/7za.xz ", "ventoy\\7za.xz");
        }


static int CopyFileFromFatDisk(const CHAR* SrcFile, const CHAR *DstFile)
{
	int rc = 1;
	int size = 0;
	char *buf = NULL;
	void *flfile = NULL;

	Log("CopyFileFromFatDisk (%s)==>(%s)", SrcFile, DstFile);

	flfile = fl_fopen(SrcFile, "rb");
	if (flfile)
	{
		fl_fseek(flfile, 0, SEEK_END);
		size = (int)fl_ftell(flfile);
		Log("CopyFileFromFatDisk size %d", size);
		fl_fseek(flfile, 0, SEEK_SET);

		buf = (char *)malloc(size);
		if (buf && size != 0)   // ZZZZZ  bugfix - make sure size not 0 = file not exist
		{
			fl_fread(buf, 1, size, flfile);
			rc = 0;
			SaveBuffer2File(DstFile, buf, size);
			free(buf);
		}
		fl_fclose(flfile);
	}

    Log("CopyFileFromFatDisk 0=OK size %d ret %u", size, rc);
	return rc;
}
A fix for the file extension bug in the fat_io_lib module is here…
Recompile VentoyPlugson.exe
The Windows app for configuring the ventoy.json file is VentoyPlugson.exe and it checks for a Ventoy drive. The Partition 1 must start at sector 2048 and it also checks the MBR boot code to make sure it is a Ventoy drive.
To work on a non-Ventoy drive such as E2B, we must change some lines and recompile it under Windows.
- Download the Microsoft Visual Studio 2022 Consumer edition
- Install it and use Modify and check the ‘Desktop development with C++’ components before continuing with the install
- Download the Ventoy github code source files (https://github.com/ventoy/Ventoy – green ‘Code’ icon)
- Extract the files to a temporary folder on your Windows drive and load the “\Ventoy-master\Plugson\vs\VentoyPlugson\VentoyPlugson.sln” file in Visual Studio.
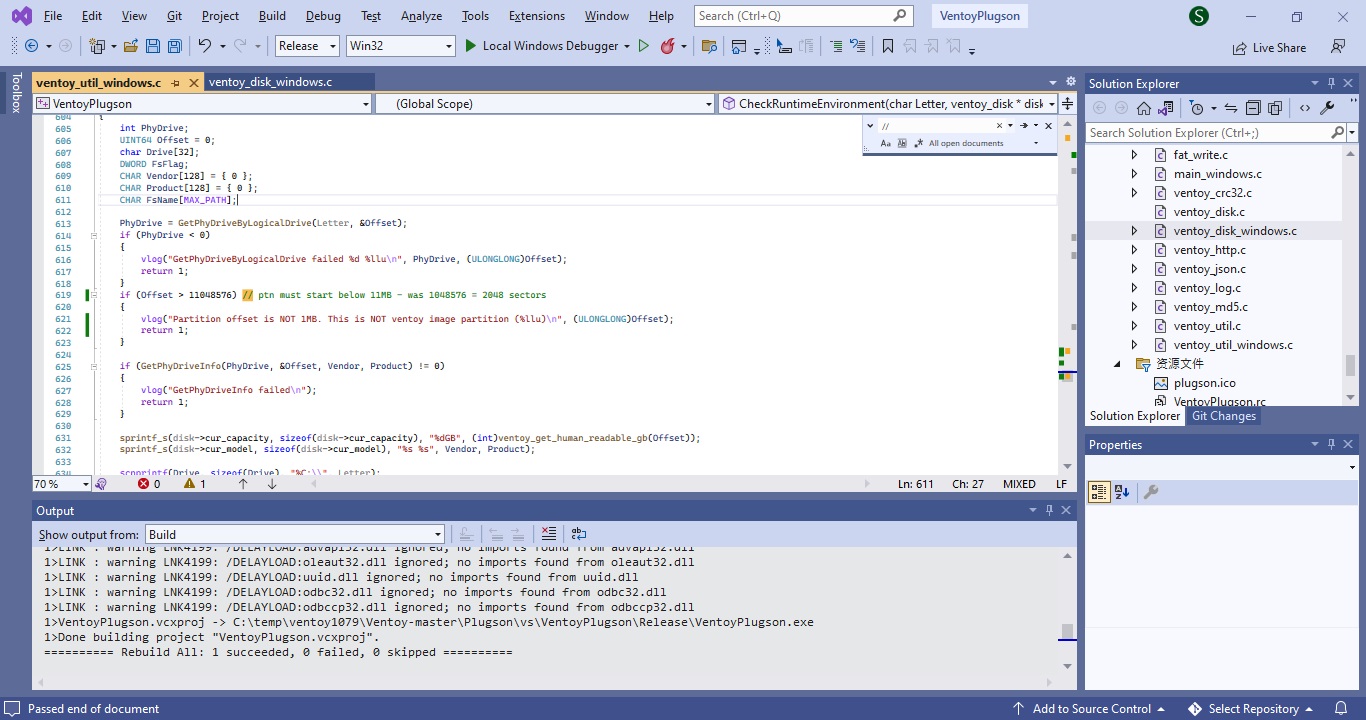
- Edit the \Ventoy-master\Plugson\src\Core\ventoy_util_windows.c as below, comment out a line and change some code where size is checked.
- Set the build to ‘Release’ not debug, click the Save floppy icon to save the edits and then Build All – the new VentoyPlugson.exe will be in the
\Ventoy-master\Plugson\vs\VentoyPlugson\Release folder (32-bit).
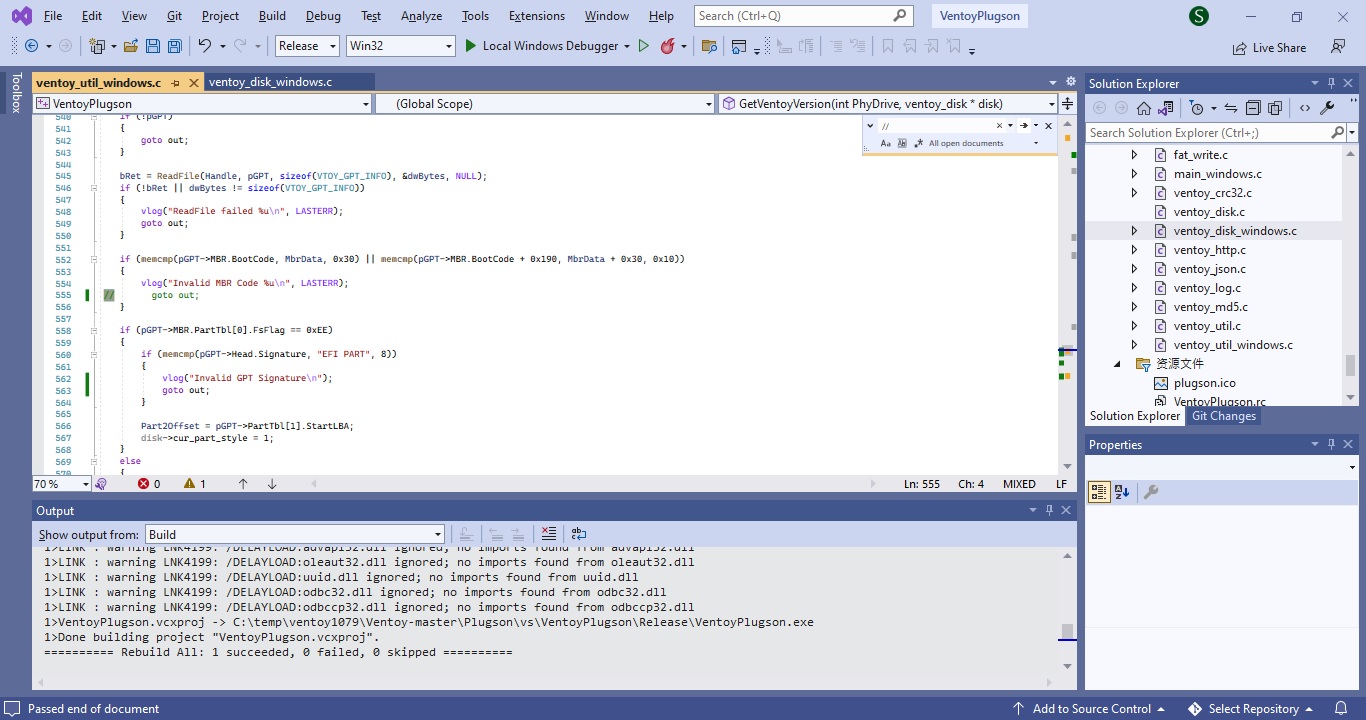
Change the offset number and the > sign in line 619 as shown…
RESOURCES
Public – Latest Betas folder https://1drv.ms/f/s!AqlrQcdsFA-KeES7GUgcjXrRvWY (inc. sample patch source files)
Easy2Boot blog https://rmprepusb.blogspot.com/