Table of Contents
If your system can be fitted with more than one hard disk, I recommend you buy and add a 512GB or larger SSD disk as DISK 0 and then install Windows to the SSD disk. You will still be able to use all 3TB+ of the second hard disk if you format it as GPT in the Disk Management console and your system will feel a LOT snappier (you wont need to upgrade for 5 more years)!
SSD drives contain no moving parts and do not need to be mounted\screwed\fixed. You can simply use sticky-sided Velcro and stick it to the case or just let it dangle from the SATA cable!
However, if you really need to use a 3TB+ drive on an old MBR\Legacy BIOS system, keep reading…
INTRODUCTION
If you have a PC which does not have a UEFI BIOS, you will normally only be able to boot from a hard disk of less than 2TB in capacity.
Windows will not allow you to format to >2TB and a Legacy BIOS cannot access sectors past 2GB (or in some cases 4TB).
This Tutorial allows you to boot from a single 3TB or larger hard disk to Windows 8 or 10 by using Clover on a bootable USB flash drive.
The second part allows you to boot in the normal BIOS\MBR boot mode but still have access to the full capacity of the drive, however there are serious Windows compatibility issues when you do this.
This article is based on experiments and research carried out by various members of reboot.pro.
REQUIREMENTS
- An IBM BIOS-compatible PC\notebook fitted with a single 3TB+ hard drive
- An Easy2Boot USB drive (to install Windows in UEFI-mode)
- A Windows 10 Installer ISO file
METHOD
I assume your system cannot UEFI-boot (your BIOS is not a UEFI BIOS) and your system has been fitted with a new single 3TB+ hard disk.
1. You need to partition and format the 3TB hard disk and install Windows 10 to it in UEFI-mode so that it makes a GPT disk.
You first need to make an Easy2Boot USB drive.
Then make a .imgPTN file from the Windows 8.1/10 Installer ISO using the Easy2Boot MPI Tool Kit (just drag-and-drop the ISO onto the MPI_FAT32 Desktop shortcut).
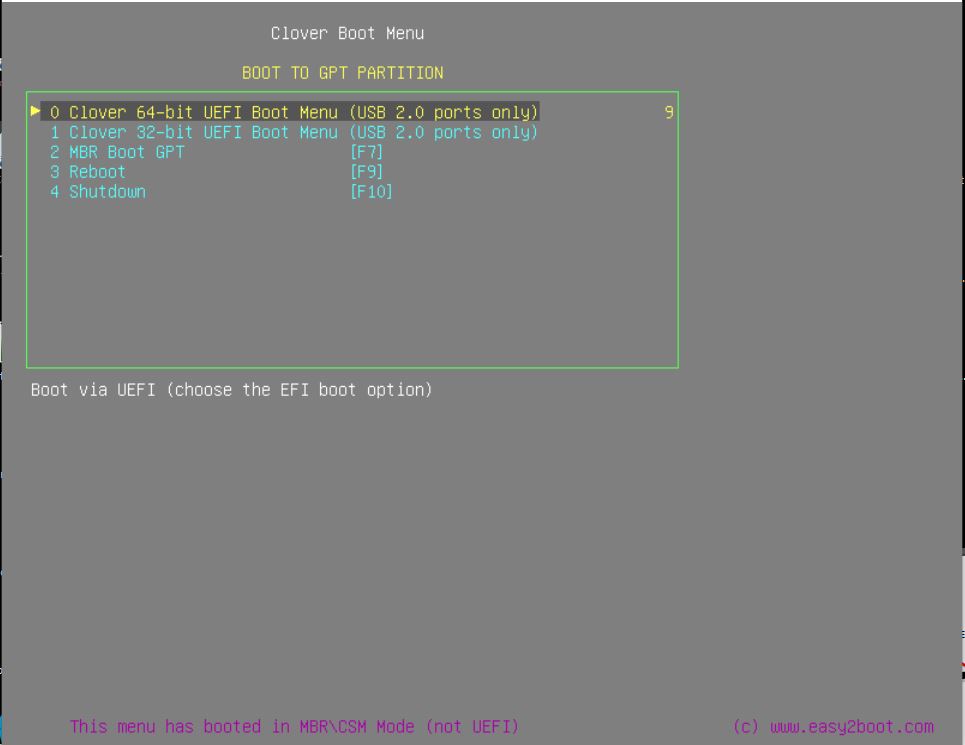
Then boot from the Easy2Boot drive, choose the Windows .imgPTN file and then choose the Clover boot option in the CSM menu to boot to Windows Setup and install Windows in UEFI-mode.
If you find that your system will not run Clover (e.g. cursor at top of blank screen only, be patient, it may take several minutes to load Clover!), then I suggest you put the 3TB hard disk into a different system that will run Clover or that does support UEFI-booting.
Do not activate Windows using a Product Key when on a different system or it will lock the Product Key to that system!
Windows 8/10 is very good about booting from a different system, so once you have complete the instructions below, you can put the 3TB hard disk into the MBR-only system.
Then you can install any extra drivers, etc. and activate Windows with the correct Product Key.
Tip: If Setup refuses to install to the hard disk, you may need to run Diskpart in the command console (SHIFT+F10) and use ‘clean’ and ‘convert GPT’ before you select the drive and start the installation.
Type these commands to erase the first hard disk and then continue running Windows Setup…
- Diskpart
- list disk
- select disk 0
- clean
- convert GPT
- exit
- exit
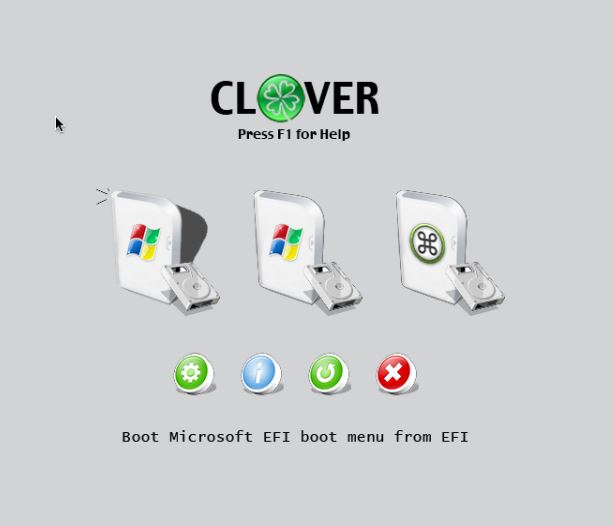
UEFI-boot using Clover again: choose ‘Boot Microsoft EFI boot menu from EFI‘ to boot to Windows and complete the installation.
2. Once Windows is installed, at this point, you could choose to always boot from USB and boot in UEFI-mode using Clover (recommended)
This would avoid the problem of Windows Updates and Hibernation not working.
However, there may still be other issues (such as Windows Recovery not working).
You can keep a small cheap USB drive plugged into a USB port on the system permanently and set the BIOS to always boot from it first.
To make a new USB boot drive, copy these files and folders from the E2B drive (keep same folder structure)
- \boot3,\boot6, \boot7, \menu.lst, \PBR.BIN, \glrdr
- \EFI\CLOVER folder
- \EFI\boot folder
- \e2b folder
- \Clover folder
Alternatively, just use the files in this download on a new USB drive for a cleaner menu:


Make a new USB boot drive using the CloverGPTFilesForUSBdrive.zip download.
To install grub4dos to the USB drive and make it bootable, run:
RMPrepUSB – Install grub4dos – Y=MBR to the new flash drive (do not overwrite \grldr file).
RMPrepUSB – Install grub4dos – N=PBR to the new flash drive (do not overwrite \grldr file).
Any of the three Clover icons will UEFI-boot to the hard disk.
The MBR Boot menu option will only be present if you installed the MBR boot code as detailed below (it is not required).
You can use any .bmp for .jpg file (800×600 exactly) as a background by changing the \menu.lst (look for the splashimage command)
You can remove the Clover 32-bit menu lines from \menu.lst if your system is a 64-bit Windows system.
You can modify the \menu.lst to change the headings and colours, etc.
To MBR-boot
You can MBR-boot directly from the internal hard disk, but beware of the disadvantages (some Windows Updates may not work, no Hibernation, no recovery)!
Note that configuring Windows in this way (MBR booting to a GPT partition) is not supported by Microsoft.
Windows Repair will not work (it may even make your drive more unbootable than before!) and some Windows Updates may not install.
Also, Hibernation may not work.
So only do this if you have no other option!
3. The E2B USB drive should be in the state where it boots to the CSM Menu (i.e. check there is a \e2b folder and a \boot folder, etc.)
Download the SingleHDD_GPT.zip file and extract the contents (\GPT folder) to the E2B USB drive so you now have a \GPT folder.
- \GPT\dobcd.cmd – Windows script to add BCD and boot files to the EFI system partition
- \GPT\gptmbr.g4b – grub4dos script to add MBR boot code to the hard disk
- \GPT\grldr – grub4dos
- \GPT\menu.lst – grub4dos menu file which boots to hard disk
- \GPT\umbr – grub4dos executable used by gptmbr.g4b (written by chenall)
4. Boot to Windows and check using WIN+R – Diskmgmt.msc that your hard disk has an EFI partition. If not then it does not have GPT partitions and is probably less than 2TB is size.
5. Right-click on the \GPT\dobcd.cmd file and choose Run as Administrator.
This will run Diskpart in an Admin console to give a drive letter of Z: for the EFI partition
It runs Command Prompt (Admin) – Diskpart – lis vol – sel vol N (where N is EFI volume number) – assign letter=Z – lis vol – exit
It will also copy some files to the EFI partition and install a MBR BCD using bcdboot C:\Windows /s Z: /f BIOS
Check the script completes without error.
5. Shutdown Windows
6. Boot from the E2B USB drive to the CSM menu.
- Press SHIFT+P and then enter the password of ‘easy2boot‘
- Press SHIFT+C to get to the grub4dos command console
- Type /GPT/gptmbr.g4b to install the MBR boot code to the GPT disk
The hard disk should now be able to UEFI-boot and BIOS-boot.
8. Now try booting from the USB drive on your target system using MBR booting (set the BIOS boot options to boot from the internal HDD)
Notes for MBR-mode booting
Hibernate will not work.
Windows Recovery/Repair will not work and repairing your system using the Install ISO will not work,
Windows Update may fail on some updates – you may need to boot in UEFI-mode using Clover to get them to install!
I strongly advise you to shrink the C: partition using Disk Management Console to approx 1.5TB or less. Then create a second partition on the hard disk using the remaining space.
You can then use the space for backups in case of catastrophe!
Keep a Clover USB boot drive handy – this will allow Windows Update to complete correctly if you use Clover to boot each time.
Click here (OneDrive folder) if you cannot find any file mentioned in the articles on this site or Contact Me.
