
Table of Contents
You can also try Easy2Boot multiboot USB drive – just rename the ISO to .isowinv and most Hirens functions should work!
For full Hirens functionality (with DOS apps, etc.), convert the ISO to a FAT32 .imgPTN file.
Please note: a more recent Windows 10 PE-based version (HBCD-PE x64) is now available here which supports both UEFI and legacy booting to mini-windows and includes many useful utilities.
Hiren’s Boot CD is a heavily modified and illegal version of Microsoft Windows XP and contains some software which is not copyright free or distribution-right free (considered Warez). However, it is very prevalent on the internet and the ISO file can be easily downloaded. If you have a licence to run Windows XP on your computer (e.g. if your computer has a Windows XP, Windows Vista Business or Ultimate or Windows 7 Professional or Ultimate Certificate Of Authenticity label on it) then you can legally run XP (but only on that computer). As for the Warez software, I leave that up to your own conscience but strictly speaking it would be illegal to use that software.
Hiren’s Boot CD 13.1 and later now even includes RMPrepUSB v2.1.617 (v13.2 includes RMPrepUSB v2.1.620), even though no permission was asked and the software is copyrighted and distribution is forbidden! However, in this case I will regard it as a form of flattery!
This tutorial describes how to include the HBCD ISO file on your grub4dos multi-boot USB drive so you can boot to a mini-XP on most PCs and Notebooks directly from the ISO file. For more information on what utilities are contained on HBCD please visit the web site here.
Note: If you want to extract the contents of the HBCD ISO file to your USB pen (i.e. format the USB drive, copy the files within the ISO onto it and then install grub4dos) you can simply add this menu entry to your existing grub4dos multiboot \menu.lst file, which will then use the /HBCD/menu.lst file that will be on the USB drive after you copy the HBCD contents over:
- title Hiren’s BootCD 15.2
- find –set-root /HBCD/menu.lst
- configfile /HBCD/menu.lst
You can download the ZIP file for HBCD v15.2 or the latest version from here.
See Tutorial 36 for details of this method of using the extracted files from HBCD.
See reboot.pro if you want to cut the size of the ISO down and boot from ISO.
Instructions for booting Hiren’s Boot CD 15.2 from an ISO file
STEP 1 – PREPARE YOUR USB DRIVE
I assume that you already have a USB Flash memory drive or USB Hard disk. This drive should be prepared using RMPrepUSB and have grub4dos already installed. You should also have an existing menu.lst file. If you do not have such a drive already prepared, use RMPrepUSB to wipe it and make partition of 1GB or more using these RMPrepUSB settings:
- 1 – MAX
- 2 – HIRENS (or any volume name you like)
- 3 – MSDOS
- 4 – FAT16 + Boot as HDD (or FAT32 + Boot as HDD if the drive is over 2GB)
- 5 – leave unticked
- 6 – click Prepare Drive
then use the Install grub4dos button to install grub4dos and copy over the grldr file.
STEP 2 – DOWNLOAD THE HIREN’S BOOT CD ISO FILE
- Download the ZIP file for HBCD v15.2 or the latest version from here. Click on the download link for the ZIP file (located 3/4 of the way down the page).
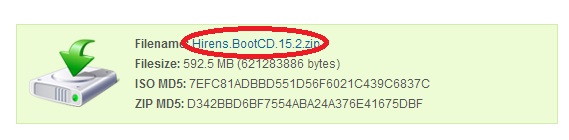
- (check the file size is correct after you have downloaded it).
- Now extract the contents of the ZIP file using 7Zip or your favourite unzip program. You should see a file called Hiren’s.BootCD.15.2.iso.
- Copy this file to your USB drive to a folder named \ISO and rename the iso file to Hiren’sBootCD.iso. Please Note there is an apostrophe (single quote) after the n in Hiren’s!
- \ISO\Hiren’sBootCD.iso
- Check the MD5 checksum of the file ON THE USB DRIVE is correct (use Ctrl-C in RMPrepUSB). Ensure the ISO file is contiguous (press CTRL+F2 in RMPrepUSB to run WinContig).
STEP 3 – ADD YOUR MENU.LST ENTRY
You need to create or add the following menu entries to your menu.lst file (press F4 in RMPrepUSB):
- title Hirens Boot CD 15.2\nISO file must be contiguous
- map /ISO/Hiren’sBootCD.iso (0xff)
- map –mem /winvblock.img.gz (fd0)
- map –mem /winvblock.img.gz (fd1)
- map –hook
- root (0xff)
- chainloader (0xff)
- #Alternative if you have plenty of system memory (excutes faster once loaded into memory)
- title Hirens Boot CD 15.2 in memory\nISO file must be contiguous
- map –mem /ISO/Hiren’sBootCD.iso (0xff)
- map –hook
- root (0xff)
- chainloader (0xff)
STEP 4 – BOOT TO MINI XP
The USB drive should have the following files:
- \grldr
- \menu.lst
- \ISO\Hiren’sBootCD.iso
- \winvblock.img.gz (downloaded from here)
You can test that this boots using the F11 key in RMPrepUSB to run it under QEMU – note that not all the DOS and other utilities will work yet.
You can also try booting from the USB drive by using a real system and changing the BIOS boot order so that it boots from the USB drive. You should see your grub4dos menu. Use the cursor keys to select the Hirens Boot CD entry and press Enter. A little later you should see the Hirens Boot CD main menu, as shown below:
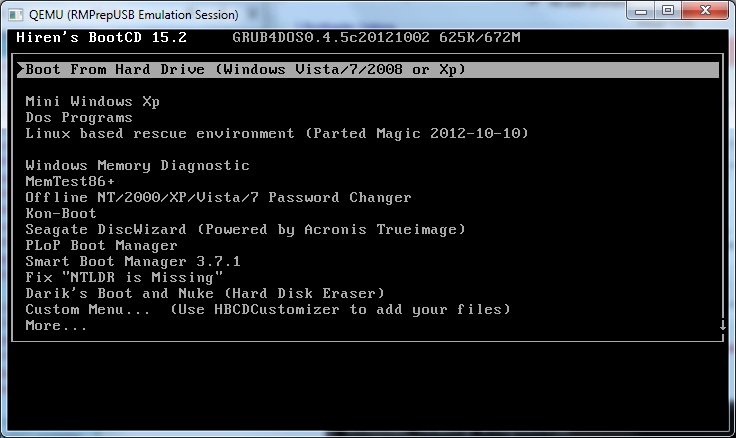
Fig 29.1 Hirens 15.2 grub4dos main menu
Choose the Mini Windows XP option, and a little later you should see the Hirens Boot CD Windows XP desktop (fully populated) as below:
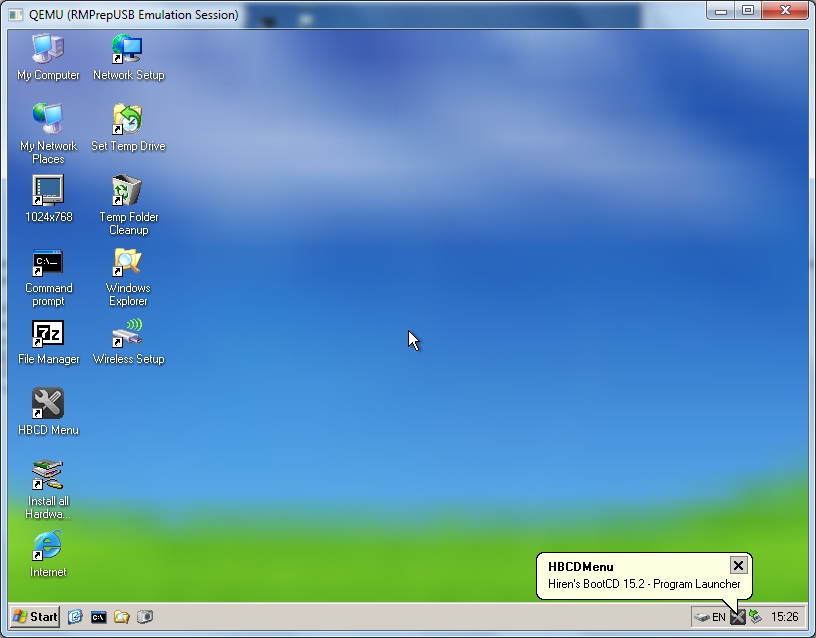
Fig. 29.2 Hirens 15.2 MiniXP Desktop (the ISO must be located at /ISO/Hiren’sBootCD.iso on the USB drive for the desktop to be fully populated with icons)
- To set up networking, click on the Network Setup desktop icon.
- For wireless connectivity, first run Install all Hardware (HWPnP) and then run the Wireless Setup link.
- You can then run Opera by clicking on the blue Internet icon on the desktop.
- Click on the HBCD Menu icon and use the Programs menu bar to install and run various XP tools.
- If required, to access the USB drive that you booted HBCD from, unplug it and re-insert it.
- Click on the EN icon in the system tray to change keyboard layout.
STEP 5 – GETTING THE OTHER UTILITIES (LINUX/PMAGIC/PASSWORD CHANGER, ETC.) TO WORK
Other utilities may still not work correctly from just an ISO file (depends on what version of Hirens you have). To fix this you will need to copy the files from inside the ISO to the USB boot drive as follows:
1. Copy or extract the \HBCD\Boot folder to the USB boot drive \HBCD\BOOT folder using 7Zip – you should now have a folder on the USB drive called \HBCD\BOOT and inside it will be about 16 files and the pmagic folder.
You can now test this works using RMPrepUSB QEMU or by booting from a real system.
If you just want to get the HBCDMenu working in MiniXP, locate the ISO file in Hirens XP Windows Explorer – right-click – select ‘Mount as ImDisk Virtual Disk’. Then run the HBCDMenu.cmd file in the root of the new virtual CD by double-clicking on it. You can also copy the entire \HBCD folder to the root of the USB drive (F:\HBCD) so that is is automatically detected next time.
2. KonBoot may not work because it is booting from the USB drive instead of the CD (if it prints ‘2 HDD SWAP’ then it should work), so HDD0 will be the USB drive and not the internal hard disk. To fix this, find the \HBCD\Menu.lst file and the KonBoot menu.
Directly under the KonBoot menu entry, add the line in red
- title Kon-Boot\nWindows (any/blank password) and Linux (kon-usr) Login Without a Password
- set kon=konboot.gz
- find –set-root /HBCD/Boot/konboot.gz | set iscd=
- find –set-root /HBCD/Boot/konbootp.gz && set kon=konbootp.gz
- map –mem /HBCD/Boot/%kon% (fd0)
- set iscd=1
- map –hook
- chainloader (fd0)+1
- if not “%iscd%”==”(cd)” pause –wait=2 HDD SWAP
- if not “%iscd%”==”(cd)” map (hd1) (hd0)
- map –hook
- rootnoverify (fd0)
- map –floppies=1
STEP 6 – GETTING THE DOS UTILITIES TO WORK WITH AN NTFS DRIVE
Note: This step is NOT necessary for a FAT32 USB drive – If your USB drive is NTFS and not FAT32, then you may need to follow these steps (but try a DOS Program first to check!).
In order for the Hirens DOS Programs menu to work correctly, we may need to make and copy a DOS image file to the \HBCD\BOOT folder on your USB boot drive. Hiren as made this easy however as you can create this image file and copy it within mini Windows XP as follows:
Note: This MUST be done a real system booted to Hiren’s Mini XP and NOT under emulator or VM that does not allow writes to the USB drive (or use QEMU in RMPrepUSB v2.1.709 or later which enables USB writes or use DavidB’s Virtual Machine USB Boot utility+Oracle Vbox (see Tutorial #4 for details)).
1. Boot to Mini Windows XP on a REAL SYSTEM!
2. Double-Click the My Computer icon on the Desktop and find the USB disk volume.
3. Now find and run \HBCD\Dos\dosimg.cmd by double-clicking on it
4. Press Enter when prompted (several times)
5. Ensure the new file is at
C:\HBCD\BOOT\dos.img
6. Close all Explorer Windows and reboot and try out some of the the DOS Programs menu.
To save space, you can delete the entire USB \HBCD\DOS folder as it is no longer required.