
Table of Contents
REQUIREMENTS
- A bootable .dmg install file with FAT and HFS partitions
- An Easy2Boot v1.A1 or later multiboot USB drive
- A windows system with 7Zip and E2B MPI Tool Kit installed
DOWNLOAD
I used Hackintosh Zone High Sierra with Intel+AMD Support
https://www.hackintoshzone.com/files/file/1044-hackintosh-high-sierra/?do=download&confirm=1
INSTRUCTIONS
1. Download High Sierra AMD and then extract Hackintosh Zone High Sierra Installer.dmg and open it with 7zip

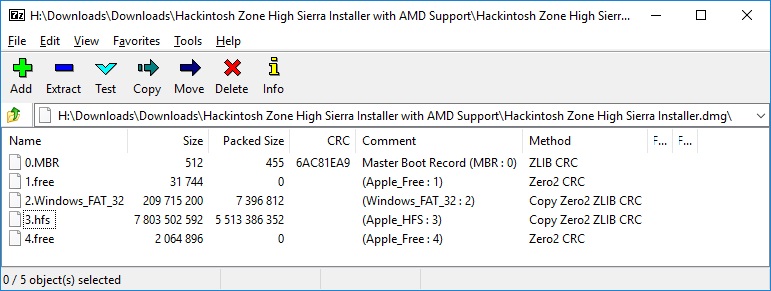
2. Use 7zip to extract 3.hfs (as a single large file).
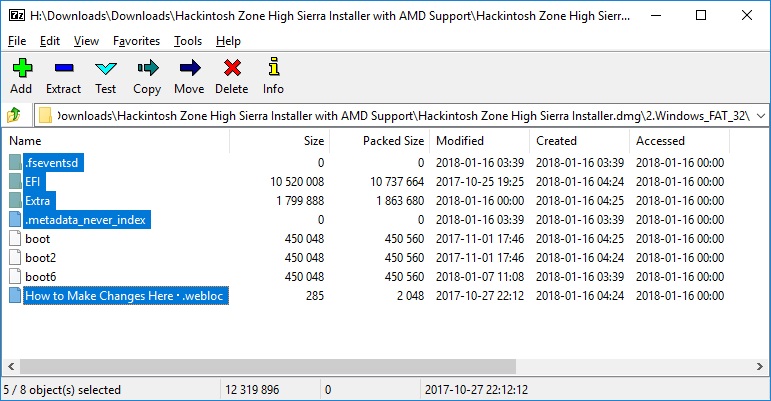
3. Use 7zip to extract the CONTENTS of Windows_FAT_32 to a folder called HSFAT so we can copy these files later.
Do NOT select the boot, boot2 or boot6 files.
4. Drag-and-drop an empty folder onto MPI_FAT32 Desktop shortcut to make a new HS.imgPTN file, make sure you set SIZE=100MB and not the default of 38MB.
Tip: The MPI_FAT32 shortcut will have been created after you have installed the Easy2Boot MPI Tool Kit and run the ‘CreateDesktopShortcuts.cmd‘ file.
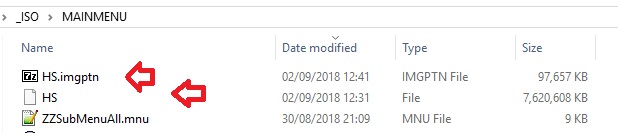
5. Copy HS.imgPTN and 3.hfs to E2B USB \_ISO\MAINMENU folder.
6. Rename 3.hfs to HS
- \_ISO\MAINMENU\HS.imgPTN (100MB FAT32)
- \_ISO\MAINMENU\HS (7620MB)
7. Switch to new partitions using \_ISO\Switch_E2B.exe
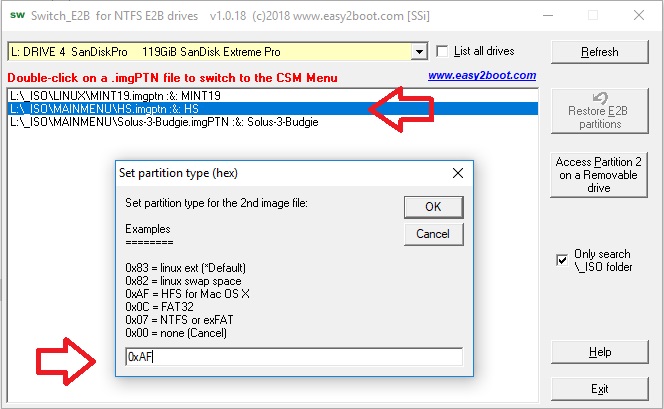
When prompted for a partition type for the second image file, use 0xAF.
Ensure the E2B drive partition now contains a \EFI folder indicating that the new partition image has been switched in.
8. Rename the folder on the USB drive from \EFI\Clover to \EFI\Clover_e2b (or delete it)
9. Copy all files and folders (EXCEPT the files \boot, \boot2 and \boot6) from the HSFAT folder to the root of the E2B USB drive
10. Edit the \menu.lst file and add this line
parttype (hd0,2) 0xAF
e.g.
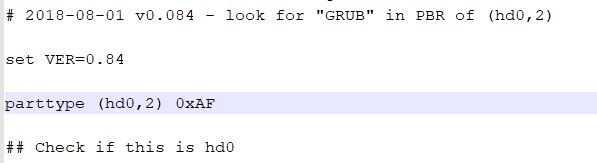
We do this because if the partition hd0,2 type (3rd partition) is not 0xAF then the boot process will stop half-way through and probably will crash!
This line is required if you switch to the .imgPTN image using an MBR-boot.
USAGE
Use E2B v1.A1 or later.
Summary of Hackintosh BIOS Settings
- Reset your BIOS or Load Optimized Default.
- Disable Secure Boot Mode
- Disable CFG-Lock
- Disable VT-d
- Enable XHCI Handoff
- Set OS Type to Other OS
- Disable Serial Port
- Disable Max CPUID Value Limit
- Enable Execute Disable Bit / XD Function
- Enable HPET
- Set HPET to 64 bit Mode
- Disable CSM (for install and/or OS boot)
- Set SATA Mode to AHCI
1. IMPORTANT: MBR-boot to the E2B USB drive and the CSM menu (at least once).
OR – if SWITCH_E2B asks you for the partition type of the second image, use 0xAF.
If it loads the E2B Main menu, then select the HS menu entry to switch partitions and load the CSM menu.
- Note that it is necessary load the CSM menu first before you can directly UEFI-boot from the E2B drive.
- Use a recent 2021+ version of SWITCH_E2B.exe. If you are using an older version of SWITCH_E2B.exe then you cannot use SWITCH_E2B.exe to switch in the new partitions and then immediately UEFI-boot from the E2B drive, you must MBR-boot to the CSM menu first unless you set the partition type to 0xAF.
- You MUST MBR-boot to the CSM menu first (each time you switch in the images) so that the HFS partition is set to type 0xAF – otherwise UEFI-booting will not work.
The CSM menu sets the partition type of the HFS partition to type 0xAF. If you later restore the E2B partition, the 0xAF HFS partition will be removed.
If you want to try installing onto a new blank partition on the hard disk of the target system, you will need to create one first before you boot to the Installer.
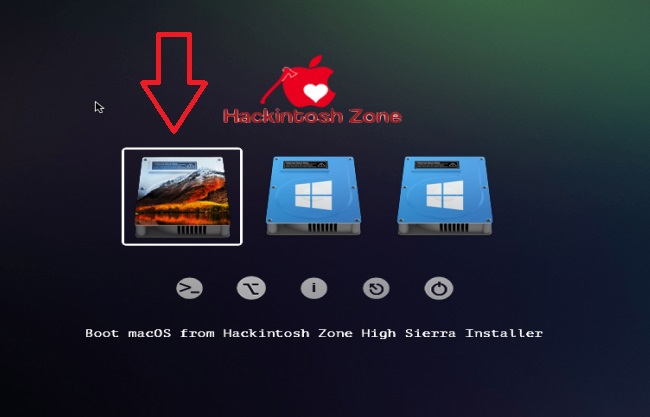
2. You can now boot using Clover from the CSM menu or directly boot via UEFI.
To UEFI-boot the .imgPTN file must be located on the USB drive before the HS. file. SWITCH_E2B.exe will attempt to re-position the two files if they are in the wrong position. If the two files are not in the correct order, you will not be able to UEFI-boot from the USB drive as it will not be recognised as a valid drive.
If Clover- or UEFI-booting just results in a blank screen with no boot messages seen at all, you probably did not MBR-boot to the E2B CSM menu first!
Follow the appropriate instructions in the guide to install a Hackintosh version to a blank partition or hard disk.
If you are installing to a disk which already contains a Windows partition, be aware that this process may make it unbootable!
For best results, I suggest you select the entire hard disk (top level) and choose Erase + Mac OS Extended (Journaled).
In particular, notice that when you click on the drive/partition icon that you want to be the target drive, a ‘Customize‘ button will appear.
IMPORTANT: Click on the Customize’ button and add the Hackintosh Zone options (add in Network, also audio, High Sierra USB Fixes – Generic USBXHCI and Laptop drivers – touchpad may be useful).
If you have a compatible Graphics card, unselect “Backup Graphic Kexts.” (If you are using nVidia Maxwell or Pascal card you may need nVidia Webdriver)
Tip: Make a careful note of what Zone options you select. You may need to repeat the installation again and add or delete some of the Zone options depending on whether drivers are missing or if it crashes/reboots during installation. For instance, adding an option may cause it to crash.
<< Click on this picture to view the animated GIF.
e.g. for Hackintosh\Niresh High Sierra Guide see here.
Note that Hackintosh builds are very hardware specific/fussy – it may just crash!
After installing to a empty partition on my Windows hard drive of an IdeaPad 300, the installation seemed to stop just before the very end, but a few key presses and mouse clicks seemed to spur it back into action again and it completed and rebooted.
It then only booted to a blank screen. 🙁
However, if I booted to Clover using the E2B USB drive, I could then boot to the OS X partition on the hard disk and get to the High Sierra desktop.
I suspect that if I had installed to a blank hard disk instead of to an MBR Primary partition, then the notebook would have booted correctly. The Clover Standard option is also needed for MBR-booting.
If possible, set your BIOS boot options to UEFI-boot from the hard disk.
I found that the notebook touchpad and keyboard would not work and so had to connect USB kbd+mouse!
This may have been because I did not, at first, use the Customize button to add in the notebook touchpad drivers, so I re-installed with the notebook driver option ticked and this time it worked! I now have my IdeaPad 300 running Hackintosh High Sierra with touchpad, keyboard, bluetooth and Ethernet.
Tip: If Clover stops at a ‘Scanning’ message before it displays the boot drive icons, reboot and select the Clover boot entry in the CSM menu, then press 6 just after the screen is blanked and Clover is loaded (you should briefly see the number 6 at the top-left of the screen instead of the usual number 7).