
Table of Contents
Note: This method does not seem to work for many versions of Win10/Win8 (‘Windows cannot find the Microsoft Software Licence Terms“) – it looks inside the Install.wim for these. I suggest you boot from a Win10 PE and run WinNTSetup.exe instead. See here for details of Easy2Boot+WinNTSetup.
INTRODUCTION
WARNING: This method probably won’t work now! See above!
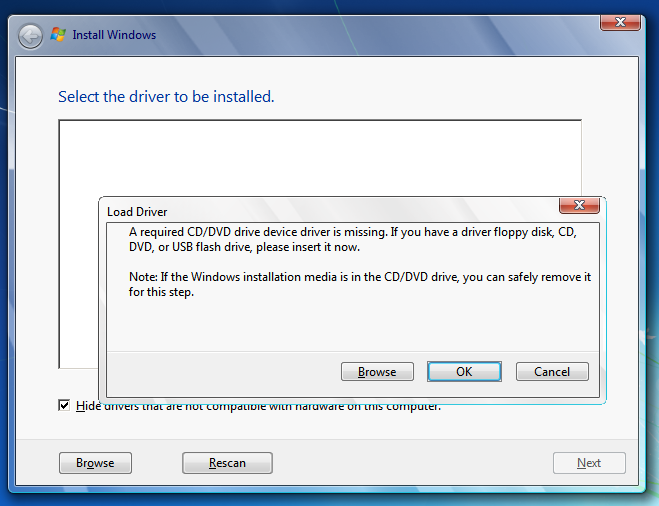
The Windows 7 ISO does not contain drivers for USB 3.0 controllers or drivers for some of the more recent USB 2.0 controllers.
If you make a bootable USB drive containing Windows 7, you may find that you get a ‘required CD\DVD driver is missing’ error message because it cannot find the USB drive once Windows WinPE has loaded.
Tip: If your system only has USB 3 ports, one trick you can try is to try using a USB 2.0 drive (not USB 3) or connect your USB 3 drive to the USB 3 ports using a USB 2.0 extension cable – sometimes the Win7 USB driver will work, if you are lucky!
One alternative for installing Windows 7 via USB 3, would be to run WinNTSetup.exe from a Windows 10 WinPE USB drive and then load and install the Windows 7 ISO using WinNTSetup.
Alternatively, it is possible to add Windows 7 USB 3.0 drivers to the Win7 installer files.
You can also use the Asus EZ Installer to create a modified ISO (mount the Win7 original ISO as a virtual drive first).
The alternative method below does not add USB 3.0 drivers to the installed Windows 7 OS, so you may need Network and/or Windows 7 USB drivers on a CD\DVD once you have installed Windows 7.
REQUIREMENTS
- 8GB+ USB Flash drive (USB 3.x or USB 2.0)
- Windows 7 ISO
- Windows 10 ISO (latest version you can find from Microsoft – do not use a dual 32-bit+64-bit version)
IMPORTANT: The two ISOs (7 & 10) should have same CPU type (i.e. Win7 32-bit + Win10 32-bit, or Win7 64-bit + Win10 64-bit)
This method assumes you are using PS/2 ports for the keyboard and mouse, otherwise, once you have booted to Windows 7, you will not be able to use the USB keyboard and mouse ports.
If this is a problem, you will need to first add the USB 3 drivers to the install.wim file first, before installing Win7.
METHOD
We will make a bootable Win7 USB drive, but then add the Windows 10 boot.wim file and Setup.exe files.
1. Run RMPrepUSB – select BOOTMGR option + NTFS + Boot as HDD
Add Windows 7 ISO in Copy Files box
Click Prepare to format USB drive
This should make a bootable, Windows 7 installer USB drive – check it boots OK (at least to the start of Setup).
2. Copy \Sources\Setup.exe and \Sources\boot.wim from a Windows 10 ISO (use 7Zip or Windows 10 Explorer) ==> USB:\Sources\ folder.
Overwrite the files if prompted.
3. Delete the USB:\Sources\EI.cfg file so that you will be given all choices from the Windows 7 install.wim file (optional)
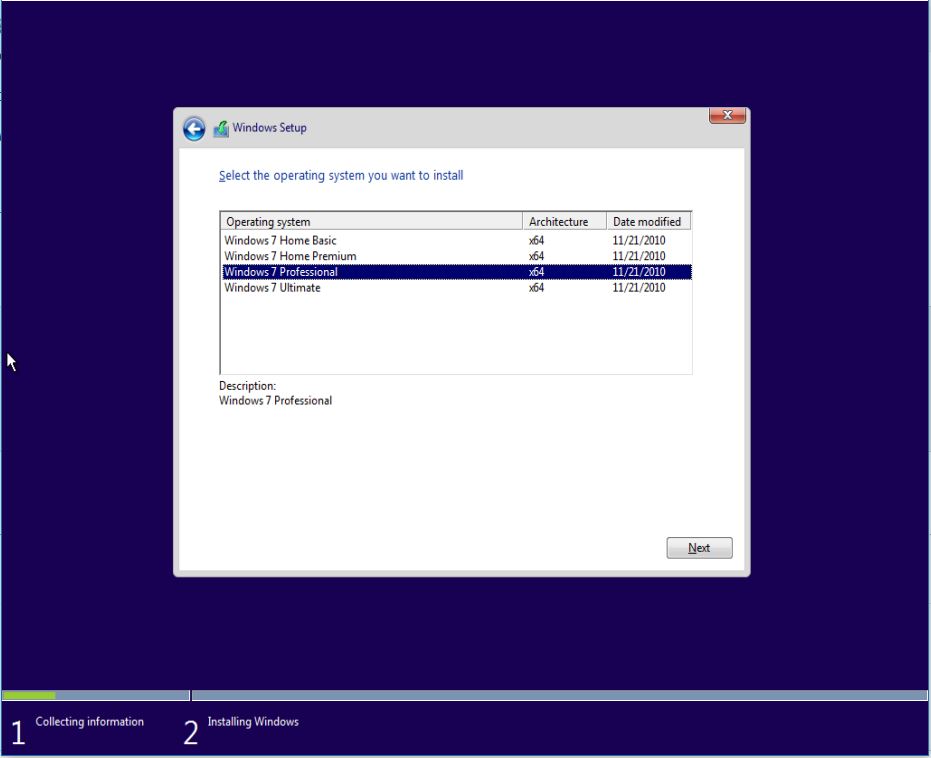
4. Now you should be able to boot from the USB drive to Windows 10 Setup, but install Windows 7. Use ‘I don’t have a Product Key’ to skip that screen.
You may need to create a \Sources\EI.cfg with the following contents (assume not a Volume License version):
- [EditionID]
- [Channel]
- OEM
- [VL]
- 0
If your internal hard disk previously contained a GPT partitioned disk, you will have to wipe the disk as follows:
1. In Windows Setup, press SHIFT+F10
2. At the command shell, type DISKPART
3. Find the internal hard disk that you want to install Windows 7 onto by typing LIST DISK
4. SELECT DISK n (where n is the disk number)
5. CLEAN
6. CONVERT MBR
7. EXIT
AFTER INSTALLATION
You will not be able to access the USB 3 ports when running Windows 7 until you install the correct Windows 7 USB 3.0 drivers.
These drivers can be obtained from the internet (if you have suitable network drivers installed!) or from the manufacturers driver CD\DVD disk (if you have a SATA DVD\CD drive fitted).
Tip: Boot from the USB drive once again after installation, and use the SHIFT+F10 feature to copy the correct USB 3.0 and Network (Ethernet + WiFI) drivers from the USB drive to the hard disk once Windows 7 has been installed, then boot to Windows 7 to install them from the hard disk.
You can use the command line to copy the files, or run Notepad from the command line and then use the NotePad – File Open dialog box to copy files by using right-click operations.
This assumes you are using a laptop+trackpad or a PS/2 keyboard and mouse. If you have a USB keyboard, you may need to inject the USB 3 drivers into the install.wim file first!
EASY2BOOT
To add this to Easy2Boot, run MakePartImage.cmd (from the MPI Tool Kit) and choose the USB drive as the source path to make a .imgPTN file.
To support UEFI-booting, you will need to also add \EFI\boot\bootx64.efi from the Win10 ISO (untested).
Note: If you convert the USB drive to an ISO, and try to use the ISO with Easy2Boot it probably won’t work!