
Table of Contents
Ophcrack is a free Windows password cracker based on Slitaz linux and using ophcrack with modified ‘rainbow tables’. It comes with a Graphical User Interface and runs on multiple platforms. Once you have made the bootable USB flash drive, just boot from it and ophcrack will automatically run and display a nice table of all your Windows users and their passwords (if set and if crackable). Slitaz runs entirely in RAM and does not change any files on your target computer (i.e. non-invasive).
The free XP cracker is usually 99.9% successful. The free Vista/Win7 password cracker is less successful and depends on the strength of the user passwords that have been set by the user. If they have used up to an 8 character alphanumeric password, it should crack it, if however, they have used a longer password or special characters (e.g. #, <space> or % or * etc.) then you will need to purchase the additional Vista tables (which are large and quite expensive!).
NEW (December 2012)! You can also boot and run Ophcrack directly from just an ISO file. So you can download the XP and Vista Live ISO files and add them to your grub4dos boot drive. See tutorial 93 for details. The only problem is you will need to type a few linux commands once Ophcrack has booted in order to mount the ISO and allow Ophcrack to see the \tables folder. If you use the tutorial below (13) then you do not need to type any commands and it will just boot and start to crack the Windows passwords immediately!
See Easy2Boot for instructions on making a simple MultiBoot USB drive quickly and easily – E2B now includes an automated UtilMan hack which allows you to create an Admin account on any unencrypted Windows drive and PassPass which allows you to gain access to any password-protected local account.
INTRODUCTION
There are two versions of ISO file for Ophcrack, one for Vista/Win 7 and one for XP – they are essentially the same but contain different rainbow hash tables. This tutorial describes how to prepare a bootable USB drive using the ISO files of these two Ophcrack Live CDs and combine them. When the linux OS boots, it looks for the rainbow tables (table0.bin, etc.) in the \tables folder on all mounted volumes. For this reason the \tables folder from inside each ISO file must be extracted to the USB drive. This means that over 800Mb of files are in the \tables folder and also in the iso files. For this reason, although it is perfectly possible to boot from the ISO files via grub4dos, this tutorial uses the contents of the ISO files to save space on your USB drive as the /tables folder must be in the root of an accessible drive anyway (but see Tutorial 93 for a way to use just the ISO files).
See how easy it is to crack your own PC – maybe you will start using stronger passwords now!
METHOD
The following instructions assumes you know your way around extracting the contents of ISO files, etc. A bootable USB hard disk will load and run ophcrack faster than a slow USB Flash drive…
- For version 3.4.0 download the 46MB without tables liveCD ISO from here and then download the separate free tables for Vista and XP from the Tables tab on the website and unzip them. Make sure you check that the size of the ISO file is correct after downloading and check the MD5 hash is correct (tip: use RMPrepUSB CTRL.C to check the MD5 value).
- IMPORTANT: if the folders and files under \tables will appear as all uppercase (e.g. 3.4.0 has \TABLES\XP_FREE_\TABLE0.BIN, etc.) if you use an iso mount utility like imdisk or clonedrive, you must change them all to lowercase filenames (e.g. table0.bin). This must be done for the \tables folder and ALL files under the \tables folder – otherwise Ophcrack will not find the tables! For this reason I suggest you use 7zip to extract files from an iso OR download the ophcrack-notables-livecd-3.4.0.iso and then download the XP and Vista free tables zip files (see Tables tab on website) – the tables in the zip files have all lowercase names but the files in the full LiveCD ISOs are all uppercase if you mount the iso as a volume and so will not work. Always use 7zip or check that you have lower case filenames.
- Using WinImage or 7Zip, extract the contents of the ISO. Unzip the free table zip files to folders on your system hard disk as follows:
- C:\ophcrack\ophcrack\boot – copy \boot folder from ISO (only the bzimage and rootfs.gz files are needed)
- C:\ophcrack\tables\xp_free_small – copy \tables\xp_free_small from XP free tables zip file
- C:\ophcrack\tables\vista_free – copy \tables\vista_free from Vista free tables zip file
- Create a file in C:\ophcrack called menu.lst using Notepad (press F4 in RMPrepUSB) with the following contents:
- title OphCrack Password Cracker LOWRAM (lowram – slower on Vista/Win7 systems)
- find –set-root /ophcrack/boot/bzImage
- kernel /ophcrack/boot/bzImage rw root=/dev/null vga=normal kmap=uk ophcrack=lowram screen=1024x768x16 autologin
- initrd /ophcrack/boot/rootfs.gz
- title OphCrack Password Cracker FAST (for more than 512MB RAM systems)
- find –set-root /ophcrack/boot/bzImage
- kernel /ophcrack/boot/bzImage rw root=/dev/null vga=normal kmap=uk screen=1024x768x16 autologin
- initrd /ophcrack/boot/rootfs.gz
- you can change kmap=uk to us or de or whatever (though you should not need a keyboard). The login password is ‘root’ (if required).
- Run RMPrepUSB and use the following settings on a 1GB or larger USB Flash drive or USB HDD:
- 1. MAX, 2=OphCrack, 3=MSDOS, 4=FAT32+HDD, 5=C:\ophcrack + tick Copy Files –> then click 6 Prepare Drive
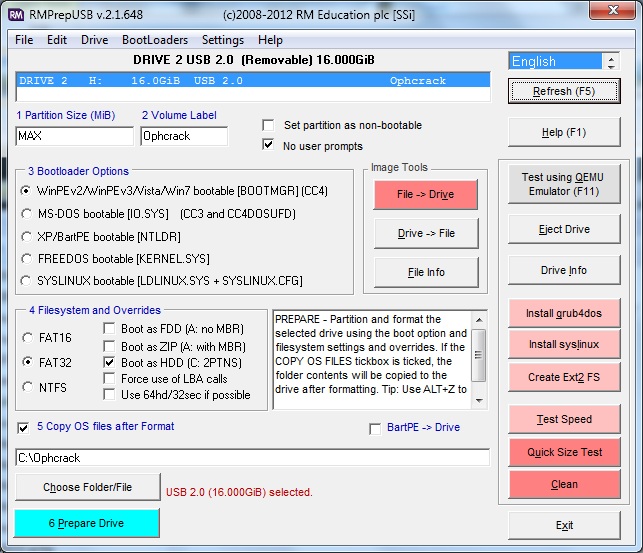
- Click on Install grub4dos and if prompted use No=PBR. Then hit[ Enter] to copy grldr when prompted (note: do NOT click on the Windows shell close icon, you must press Enter or the grldr file will not be copied).
- Check you now have a USB drive with this contents:
- \ophcrack folder
- \tables folder NOTE: This should contain a folder which contains the tables – e.g. \tables\xp_free_small\table0.bin, \tables\vista_free_\table0.bin
- \grldr file
- \menu.lst file
- Click on Eject Drive in RMPrepUSB (or use the SystemTray icon).
Now go try it! If you are cracking an XP system, the Vista free tables are not needed – you can move them to another folder temporarily or stop Ophcrack once it starts and deselect the vista table.
If you are cracking a Vista/Win7 system, move the XPfree folder or deselect it in Ophcrack to speed up cracking. Renaming the table0.bin file to TABLE0.BIN will also prevent Ophcrack from loading the tables in that folder.
If you are cracking passwords on a system with 1GB of RAM or less, use the first lowram menu option (can take over twice as long). If the system has more than 1GB, use the second faster menu option.
PROBLEMS?
Some FAQs are here.
If you get a tables not found error message then linux cannot find your \tables folder on the USB drive (or anywhere else!). Make sure you have named the folder tables and not TABLES or Tables and make sure that there is a subfolder under the \tables folder that contains the actual table files – these must be named table0.bin in lowercase letters.
If the OphCrack GUI (see last screenshot below) runs but then you get an error during loading of the tables,
e.g. line 100: 1352 Segmentation fault Killed ophcrack -d / -t $TABLES_INLINE -w $FOUND/ -n “numcpu -o /tmp/ophcrack.txt $opts
the passwords have been saved in /tmp/ophcrack.txt
Press a key to exit…
Try the lowram entry instead (much slower on Vista/Win7)
You can type cat /tmp/ophcrack.txt in a console window to see what passwords may have been recovered.
It may be that you do not have enough memory (RAM) in your system to load all the tables. You can avoid this by only loading one set of tables. For instance if you are trying to crack an XP password:
1. Press Enter but say ‘n’ to the ‘Shutdown’ question as you don’t want to shutdown
2. Run a command shell (click on the black window system tray icon)
3. Type ‘ophcrack‘
4. Click on the Tables icon, select the Vista_free table entry and click on the yellow radio button to disable that table
5. Click on the Load icon and then choose the Encrypted SAM entry – now point to the correct folder (e.g. /mnt/sda1/WINDOWS/system32/config) and click Choose
6. Now click on the Crack icon to begin cracking.
See here for more details.
To speed up the loading of tables and fix the error above, only include the table folder for the target system you are cracking – e.g. if you are trying to crack a Windows XP password, move the \tables\vista_free folder temporarily to the root of the USB drive before you boot from the USB drive, so it is not loaded.
Tip: To speed up the testing of your own system, try moving the \tables folder from your USB drive to your hard drive, linux will be able to load the files faster from the hard drive. You can also put the very large (up to 134GB if you pay for them!!!) tables or extra free table in the C:\tables or D:\tables folder of your hard disk.
The xp_free takes about 2 minutes to crack passwords (XP only – it cannot crack Vista/Win7 with this table).
The xp_free_fast (separate download) takes about 20 seconds but requires a system with 1Gb or more memory (again XP only).
The xp_free will work on systems with less than 512MB RAM.
There is no point in running both the xp_free and the xp_free_fast (it will just waste time).
You can use the vista_free tables to crack XP passwords but it takes around 3 to 20 minutes to complete (but usually finds simple XP passwords after about 50 seconds).
Similarly, if you want to crack Vista/7 passwords only, remove or disable the XP table(s) as these tables won’t work on Vista/7 systems anyway.
SCREENSHOTS
Here are some screenshots – normally the whole process is automatic and no user interaction is required. If your Vista/Win7 passwords are not cracked, you will need to purchase the extra ‘rainbow’ tables. If they are cracked – set stronger passwords next time!
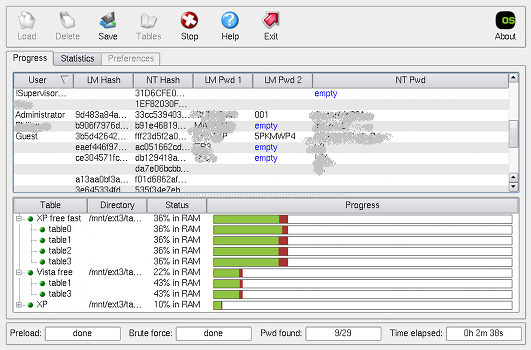
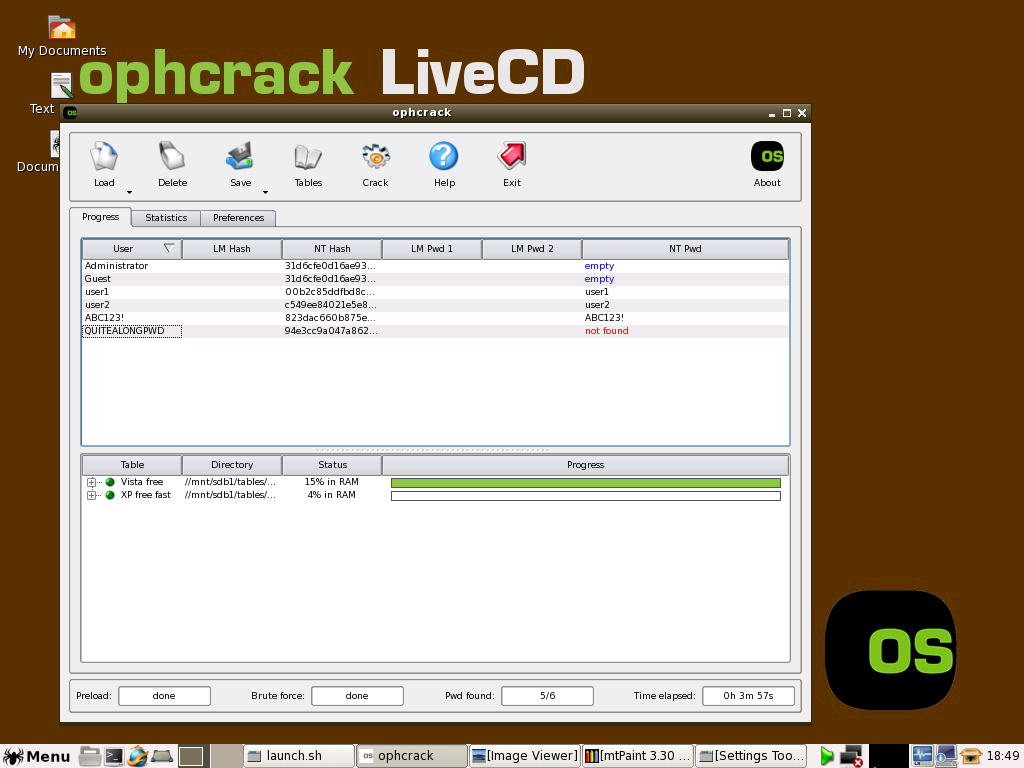
Ophcrack successfully completed a run! (click to enlarge)
WIN7 – ophcrack can crack some Win7 passwords but not a long password (pwds set to same as user account names in this example)
TROUBLESHOOTING
No partition containing hashes found
First – try booting to Windows and then shutting it down nicely – sometimes this error is caused by a bad shutdown of Windows.
This means it cannot find any encrypted Windows passwords on a hard disk.
There are a few reasons while you could get this message from the launch.sh script. But first you should determine which partitions are mapped to your Windows partition. On Linux, harddisks are mapped to /dev/hda, /dev/hdb, … for IDE disks or /dev/sda, /dev/sdb, … for SCSI or SATA disks. Then you should add a number after in order to get the “path” to your partition. There you could get something like /dev/hda2 for the second partition on the first IDE drive, or /dev/sdc5 for the fifth partition of the third SATA drive.
- One way to determine on which partition is your Windows partition (if you don’t know) is to enter the command “fdisk -l”. It will return the list of drives and partitions of your computer and their type. Look for a bootable FAT32 or NTFS partition usually. Then determine if this partition has already been mounted by Linux at start. It generally creates a corresponding directory in /mnt, i.e. /dev/sdc5 is mounted in /mnt/sdc5. You can enter the command “df” to see if you partition appears in the list which means that it is mounted.
- If your partition is already mounted, it means that ophcrack was not able to find your Windows directory. So start ophcrack by entering the command “ophcrack” and use the “Load from encrypted SAM” menu entry to navigate to your /mnt/…/*Windows directory*/system32/config directory.
- If you partition is not mounted, enter the following commands: su (the password is root)
- mkdir /mnt/ntfs
- mount /dev/aaa /mnt/ntfs (where aaa correponds to the partition that you found in the previous steps)
- If you get an error message saying that you partition is unclean, reboot Windows and shut it down correctly. You can also try to enter this command instead:
- mount -o force -t ntfs-3g /dev/aaa /mnt/ntfs ( where aaa corresponds to your partition like before)
Then launch ophcrack as explained before and load the hashes from the encrypted partition. Alternatively you can save the hash tables.Unsupported embed