
Table of Contents
It is quite easy to boot to the Ultimate Boot CD for Windows XP from a USB flash drive.
This method also works with most XP based ISO files.
For UBCD (DOS version) please see Tutorial #87.
Tip: To add the UBCD4WinBuilder.iso file to your Easy2Boot multiboot USB drive, rename the file extension to .isowinv.
It is made even easier by using UBCD4WINv360.exe to make the boot files.
This tutorial is in three parts:
PART 1 – creating a UBCD4WIN installation
PART 2 – making a bootable USB flash drive that boots directly from UBCD4WIN BartPE files (i.e. not using an iso file)
PART 3 – adding the UBCD4WIN ISO file to your favourite grub4dos bootable USB drive
Requirements
- Your normal Windows PC/notebook to carry out these instructions – Win XP/Vista/7 (32 or 64-bit).
- You will need a genuine Microsoft XP SP2 or SP3 install CD (Home or Professional). Note that OEM XP CDs may not work.
- Download UBCD4WINv360.exe from here.
- Download RMPrepUSB from this website.
- A 1GB+ USB drive
- (PART3 only) firadisk.gz from Beta Downloads section of this website
- (PART3 only) 7Zip to compress an iso to a .gz file (optional)
Note: It is assumed that you are legally licensed to use a copy of Windows XP. The system that you use it on should be legally licensed for the same version of Windows XP. You cannot legally distribute or sell the full UBCD4Win OS!
References
PART 1 – CREATING A UBCD4WIN INSTALLATION
The following instructions are based on using a Windows XP SP2 Microsoft install CD and v3.60 of the UBCD4Win.
-
-
Create a folder on your hard drive called C:\XPCD and copy the entire contents of your Windows XP CD to this folder.
-
Download and run the UBCD4WINV360.exe file. Accept the defaults so that a C:\UBCD4WIN folder is created.
-
If UBCD4WIN runs – Cancel it. Then right-click on the UBCD4Win shortcut – Properties – Compatibility Mode – check the Compatibility mode for Windows XP (SP3) box. This should fix the PreLogon error (see below) when using Vista/Windows 7 systems.
-
Do not allow it to search for your XP files (say ‘No’) and then set the Builder Source path to C:\XPCD
-
Set the Media output to ‘Create ISO image’ by clicking the radio button as shown below:
-
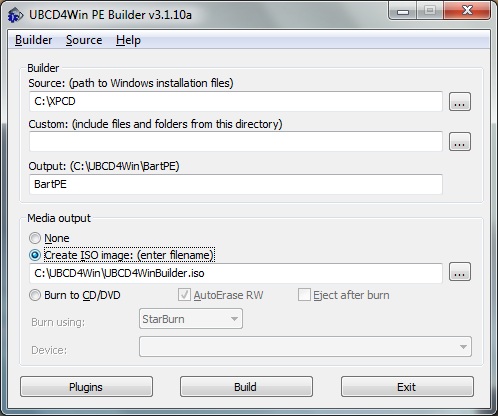
Click the Plugins button and check add any extra plugins that you want. I would suggest you do not add any for your first build.
Click the Build button and wait for the build to finish.
You should now have an iso file in C:\UBCD4WIN\UBCD4WinBuilder.iso
and also a C:\UBCD4WIN\BartPE folder, which should have the following contents (or similar)
-
autorun.inf
-
BCDW
-
BOOTSECT.BIN
-
dban-Grub4dos.ini
-
I386
-
images
-
isolinux
-
menu.lst
-
PROGRAMS
-
syslinux
-
WIN51IP
-
WIN51IP.SP2
You now have the ‘flat files’ and the ISO file which you can use to make a bootable USB drive. Click on Exit to close the application as we are done for now!
PART 2 – MAKE A BOOTABLE USB FLASH DRIVE THAT BOOTS DIRECTLY FROM UBCD4WIN (BARTPE) FLAT FILES (I.E. NOT USING AN ISO FILE)
The next step will format a USB drive and wipe all it’s contents. You will need a 1GB USB drive or larger.
-
-
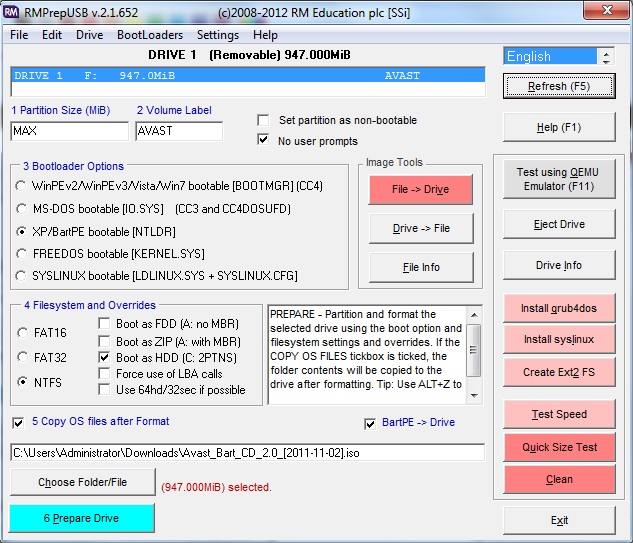
Run RMPrepUSB.exe and set the options as shown in the picture below:
-
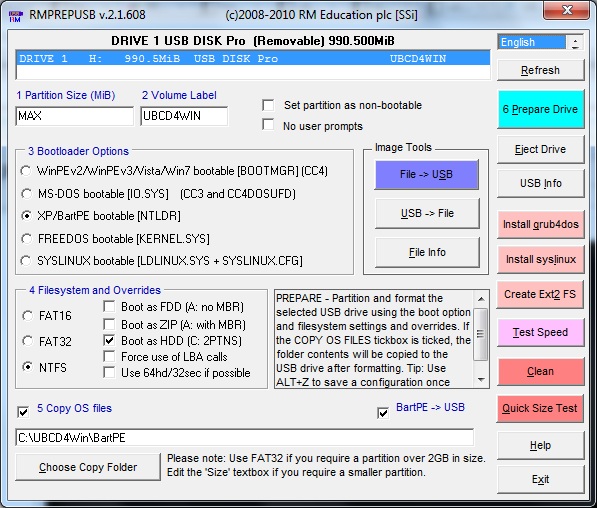
Note: the BartPE -> USB checkbox must be ticked!
-
-
Now click on the 6 Prepare Drive button and follow the prompts. The RMPrepUSBXP script should automatically run after the file copy stage to convert the files to a USB bootable file structure.
-
If the Windows system you are preparing this on is running Vista or Win7 or XP 64-bit, you also need to do the following tweak/fix. If you do not, when you try to boot from the USB drive you will see the following message:
-
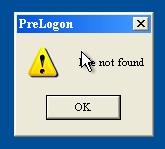
You will get this PreLogon error if you have used a Windows Vista/7 system to prepare the USB drive.
To fix this problem before you find it:
Create a folder on your USB drive under \MININT called \Registration (i.e. \MININT\Registration)
Copy the file C:\Windows\Registration\R000000000001.clb from your Windows Vista/7 hard disk to make the file \MININT\Registration\R000000000001.clb on your USB drive.
Note: Jim Nealand reported that he only had R000000000005.clb and R000000000006.clb files, so he copied these and it fixed the problem, so maybe just copying all of these will work?.
Tip: to avoid having to do this in future, create a MININT\Registration folder under the folder PEtoUSB which is located under the RMPrepUSB installation folder (press F3 in RMPrepUSB to find it) and copy the R000000000001.clb file from your hard disk into that folder – e.g. if you installed RMPrepUSB.exe to C:\RMPrepUSB then place the file at C:\RMPrepUSB\PEtoUSB\MININT\Registration\R000000000001.clb. This means that whenever you make a new USB drive using RMPrepUSB and tick the BartPE->USB checkbox, the R000000000001.clb file will automatically be copied over.
(Optional) – if you wish to use this USB drive to boot other operating systems or images in addition to UBCD4WIN by adding them to the USB drive at a later date, you can also install grub4dos by simply clicking on the ‘Install grub4dos‘ button in RMPrepUSB – say ‘Yes’ to copy over the grldr file. Note that a menu.lst menu file is already present on the USB drive!
Click on the Eject button and go test your new bootable drive!
Error: ISO is not made
If you have a 64-bit Windows 7/8 system, mkisofs may fail to make an ISO file. In this case overwrite the mkisofs.exe file in the main UBCD4Win folder with a newer version (see below for the file).
Another example
To simply convert a BartPE\WinPE v1\XP based ISO file into a bootable USB drive, you can just set options 1 to 5 below and click 6 Prepare Drive.
TROUBLESHOOTING BSOD 7B ERRORS
Blue Screen of Death 0x0000007B error
If you get this error when booting from some PCs (e.g. Dell PC or Acer TravelMate laptop) using any XP based USB bootable drive, the problem is usually caused by the WinPE/BartPE OS not being able to access the files on the USB drive. This is usually because of one of two reasons:
1. The version of NTDETECT.COM you are using is resetting the USB controller and thus the USB drive is no longer present. This may well be the problem if UBCD boots when emulated under QEMU but not on some real systems.
FIX: 1a: Use a modified version of NTDETECT.COM which does not reset the USB controller – download from here
– OR –
2. You do not have the correct Mass Storage Drivers present in your XP/BartPE image files and so it cannot detect the USB drive when it switches to protected mode.
2a: Try changing the BIOS Menu Hard Disk access mode from ‘Enhanced – AHCI’ to ‘Legacy’ or ‘Compatible’ (mainly a fix for non-USB drive booting though!)
2b: Add mass storage drivers to your XP installation (UBCD4Win v3.60 does this automatically when you use the default build)
2c: Load the XP/BartPE ISO file into a ramdrive and use firadisk.gz. This requires more RAM but avoids the mass storage driver problems – though you may not be able to access all hard drives or USB drives in your system once you have booted to BartPE. See Part 3 below for details.
PART 3 – ADDING THE UBCD4WIN ISO FILE TO YOUR FAVOURITE GRUB4DOS MULTI-BOOT USB DRIVE
Tip: To add the UBCD4WinBuilder.iso file to your Easy2Boot multiboot USB drive, rename the file extension to .isowinv.
Let us assume that you already have a grub4dos multiboot USB drive which already has some bootable ISOs on it. There are several ways in which you can add UBCD4WIN to this drive. The first way is to simply copy the files from your USB drive made in PART 2 of this tutorial to your USB multiboot drive. Then add an entry into your menu.lst as follows:
title UBCD4WIN

find --set-root /ntldr

chainloader /ntldr

root ()
Note: you could also chainload from /MININT/SETUPLDR.BIN instead of NTLDR.
However, you may already have XP or BartPE files on your USB drive or you may just want to boot from an ISO file. This can be done as follows:
Boot WinPE/BartPE from an ISO file
-
-
Download firadisk.gz from the Beta Downloads Tutorial section of this website.
-
Copy firadisk.gz to the root of your multiboot USB drive.
-
Copy the iso file from C:\UBCD4WIN\UBCD4WinBuilder.iso to the root of your USB multiboot drive.
-
Add the following menu item to your existing menu.lst file:
-
title UBCD4WIN from ISO file using firadisk
find --set-root --ignore-floppies --ignore-cd /UBCD4WinBuilder.iso

map --mem /firadisk.gz (fd0)
#map --top --mem /firadisk.gz (fd0)
map --mem /UBCD4WinBuilder.iso (0xff)
#map --mem --top /UBCD4WinBuilder.iso (0xff)

map --hook
root (0xff)
chainloader (0xff)
Now go try it! (later versions of grub4dos may also need --top adding as well as the --mem parameter - see commented lines)
Note; this may not work on later versions of UBCD4Win!
Tip: You can compress the iso file using 7zip to a GZip file (.gz extension). This achieves an almost 50% reduction in size and so takes up less space on your USB drive (you could then use a 512MB USB flash drive). Just copy over the compressed file /UBCD4WinBuilder.iso.gz in place of /UBCD4WinBuilder.iso and change the menu.lst entries.
Note: Regardless of if you use an .iso file or a .gz file, because the whole contents of the iso file is loaded into and runs from memory (RAM); you will still need a system with 1GB of memory (or more) and the amount of free memory once UBCD4Win has booted will be reduced by the same size as the files (i.e. 600+MB of files), so on a 1GB RAM system you may only have 200MB of RAM once UBCD4Win has booted.
You can use the same technique with any XP/BartPE based ISO image. Note that you must use –mem to load the ISO file or you will get a BSOD 0x0000007B error.
For example, for the Avast BartPE ISO you can use a menu entry similar to:
title avast_bart_cd_2.0_20111102.iso

map --mem /avast_bart_cd_2.0_20111102.iso (0xff)

map --mem /firadisk.gz (fd0)

map --hook

root (0xff)

chainloader (0xff)
XP REPAIR ISO
Repair ISOs may confuse the USB drive with the internal hard disk. This is because when you boot from a USB drive, it is HD0 and the internal HDD will be HD1.
It is often necessary to swap over HD0 and HD1 using grub4dos before we boot to the WinPE environment so that HD0 is the Windows drive that we need to repair.
To boot an XP ISO image (e.g. repair or recovery) try this menu entry:
title xprec iso

map --mem /xp_rec_con.iso (0xff)

# swap over hd0 and hd1

map (hd0) (hd1)

map (hd1) (hd0)

map --mem /firadisk_xp_inst.gz (fd0)

map --mem /firadisk_xp_inst.gz (fd1)

map --hook

# hd0 is not the internal hard disk

root (0xff)

chainloader /i386/setupldr.bin
XP WINPE BOOTING FROM USB
-
-
Copy the folder \I386 from the XP PE ISO onto the memory stick and rename it to \minint
-
Copy the file \minint\NTDETECT.COM to the root folder of the memory stick (or used patched version)
-
Copy the file \minint\SETUPLDR.BIN to the root folder and rename it to NTLDR (without an extension)
-
If necessary add extra Windows drivers. e.g. copy the files from the driver support DVD, found in \Drivers\LAN\Atheros\Win2k (or XP) into the memory stick folders \minint\INF and \minint\SYSTEM32\DRIVERS to add LAN drivers.
-