
Table of Contents
SUMMARY
This procedure describes how to clone (copy) a fully-functioning Windows XP hard drive to a USB drive. You can then boot full Windows XP from the USB drive.
It is best to use a system with a clean new installation of XP on a real system. This is what I used with success for this process.
I had problems when using a Virtual Machine, so I advise against using a VM until you have had success using a real system for the preparation of the XP USB drive.
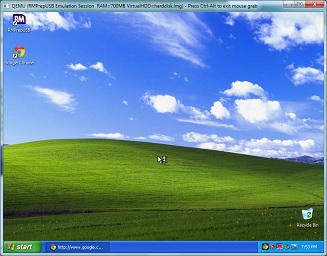
Windows XP booted from a USB drive under QEMU emulator
Once you have made the XP USB drive (USB HDD or USB Flash drive) you can simply boot from the USB drive straight to a fully-functioning Windows XP OS!
An internal hard disk is not required, so if you have an old system with a dead internal hard disk, you can plug in your USB drive and run full Windows XP.
If you are using a flash drive, I would suggest that you do not enable paging in order to avoid excessive wear (paging is disabled by default).
Auf Deutsche – article from German com! magazine here.
INTRODUCTION
I will describe the steps that I took to make my USB flash drive boot to XP in this tutorial.
It should be possible to install XP to a virtual hard disk (e.g. using VMWare) and then follow this procedure to make a bootable USB XP drive in the same way, however I have not successfuly tested this.
If you intend to use the USB drive on a specific notebook/system, then it is preferable to use a freshly installed XP OS and add all the correct drivers for that system. If you use a virtual machine to prepare the XP OS, you will need to install the drivers after it has booted on the final target system.
REQUIREMENTS
- A working ‘spare’ Windows XP Professional 32-bit ‘system’ – this can be a netbook which has been installed with XP and all drivers (highly recommended), or it could be a virtual machine image of Windows XP (but all my testing was unsuccessful using a VM!). Note that XP Home and XP Windows Media Center will not work – if possible use a standard Windows XP Pro SP3 installation. If you wish you can activate it and install all Windows Updates.
- A USB drive on which to install the Windows XP OS – note that this should be a ‘clean’ system formatted as FAT32 or NTFS.
- USBoot – download it from here.
Note: Do not do this on your main ‘office’ XP system as it will permanently alter the OS and install various drivers, etc. Use a spare system that has a fresh XP Pro installation on it. I recommend you do not use a Virtual Machine for your first attempt. This procedure was tested using a real system on real hardware!
Someone has made a YouTube video here of this process.
PROCEDURE
The USBoot ReadMe.txt file (from the download) can be viewed here.
Note: USBoot will only run from an XP environment.
USBoot phase-iii may not work if running in a Virtual Machine.
1. Prepare your Windows XP Professional system (the one that you want to clone). Delete all unwanted files and folders and clear the recycle bin. A freshly installed system is best. Activate Windows and if you wish, install any Windows Updates and any required applications (though this will increase the size of the image). You may also wish to add a drivers folder. Remember that the more files you add, the larger the USB drive you will need and the longer it will take to prepare the image!
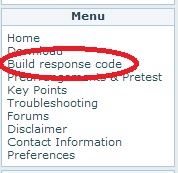
2. Go to the USBoot website at http://www.usboot.org and register – this is necessary. Confirm your registration, login and ensure that you can now see Build response code listed in the menu on the website (see below). We will need this later at the start of phase-i.
3. Download USBoot from http://www.usboot.org and unpack the files to your C: drive on the XP Pro system that you want to clone. e.g. C:\USBoot.
4. Prepare your target USB drive (the one that you want to place the XP OS onto). It should be freshly formatted under XP and empty of files.
Use RMPrepUSB to format it as either FAT32 or NTFS. I recommend NTFS for USB HDDs, but only use NTFS for USB flash drives if you are not going to be running Windows for a long time. The NTFS filesystem may wear out flash memory if used for many months as a Windows operating system volume.
For a minimal XP Pro SP3 OS (no updates, no extra applications), you will need at least a clean 2GB volume. I would recommend an 8GB minimum flash drive – the larger the better!
For test purposes, I used a 2GB NTFS USB drive and later I repeated phase-iii using an 8GB FAT32 drive – both were successful.
If you are using RMPrepUSB to prepare the drive, make sure you select XP/BartPE [NTLDR] as the bootloader.
Alternatively, you can CLEAN the USB drive using RMPrepUSB and then format it using XP Format (recommended).
Insert the formatted USB drive into a USB port on your Windows XP Professional system and check it is recognised correctly. Leave the USB drive connected.
5. Double-click on C:\USBoot\cmd_here – this should open up a black Windows command shell console.
6. Now type:
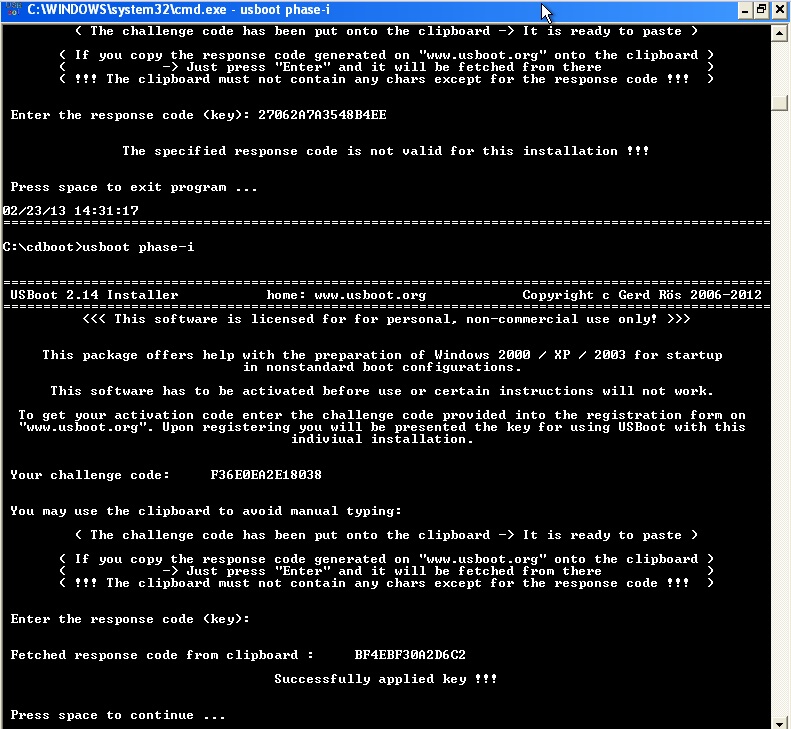
usboot phase-i
This will start the first phase. Follow the instructions. I simple pressed the SPACE BAR for each choice (except I skipped the Restore point creation step).
You will need to get a ‘Response code’ at the start of the build. Launch Internet Explorer and hit Ctrl-V to paste in the Challenge code (which should already be on the clipboard – see screenshot below). When the Response code is generated, switch back to the USBoot command shell and hit the [Enter] key – this should automatically add the response code. If you have any problems, then just type the response code in manually. You can use another PC for this but you will have to type in the Challenge and Response codes manually.
7. Once phase-i has completed, I would suggest you reboot XP.
8. Double-click on C:\USBoot\cmd_here and type
usboot phase-ii
This will start the second phase of the installation.
In step XI, relating to the USB driver select [a] as this is usually the better choice.
Again follow all prompts (I pressed the SPACE BAR for all answers).
In step XV select [!] to save space on the flash drive.
A reboot will be requested at the end of this phase.
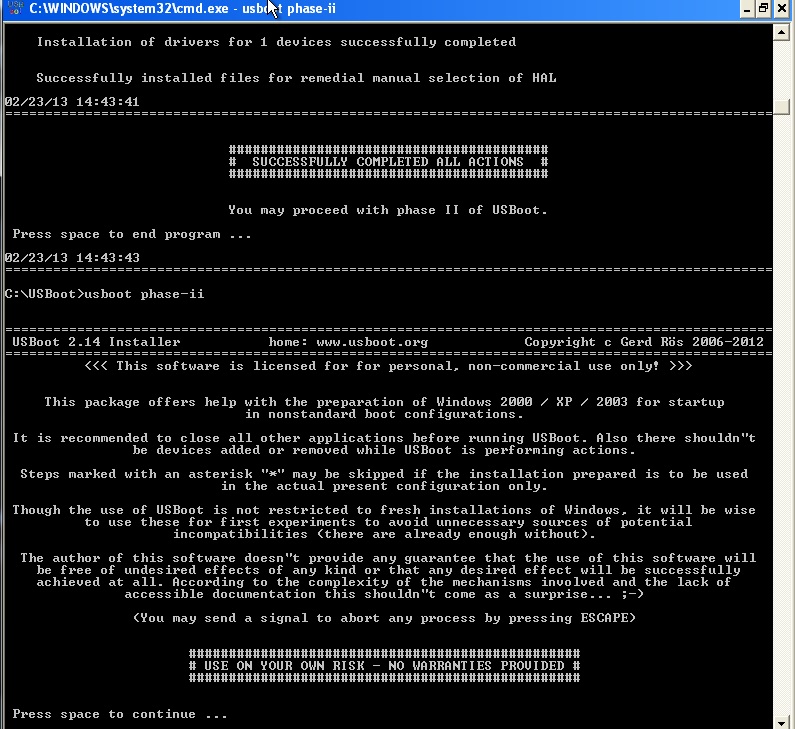
This phase can be quite long – so get a cup of coffee!
9. After rebooting back to XP again as prompted, double-click on C:\USBoot\cmd_here and type
usboot phase-iii
This will start the file copy to your USB drive. It first starts the Volume Shadow Copy service (which is why it needs to be XP Pro!), to make a copy of the working XP OS files. It will then copy the files across to your USB drive. Again this may take a while!
You should now have a working, bootable copy of XP on your USB drive!
Note: The partition needs to be marked as Active (bootable). Use XP Diskpart – LIS DIS – SEL DIS 1 – SEL PAR 1 – ACT – EXIT.
If you have another USB drive that you want to install XP to, just re-run Phase-iii (you will get an identical copy of the original image).
If the USB drive boots correctly, use RMPrepUSB to make an image of the drive as follows:
1. Use Easeus Home Partition Master to shrink the USB drive volume as much as possible
2. Use RMPrepUSB (Drive->File) to make an image of the USB drive
3. ZIP up the image file and delete the original image file to save disk space
You can now place this image on any other USB drive as follows:
1. In RMPrepUSB – use File->Drive and select the XP image ZIP file when prompted.
2. When the image has been restored, use Easeus Home Partition Master to expand the volume to fit the full size of the USB drive.
TROUBLESHOOTING
The USB drive should boot on a real system or you can test it by using the RMPrepUSB – Test using QEMU Emulator button.
When the USB drive first boots, you should see the following menu (with a 5 second timeout):
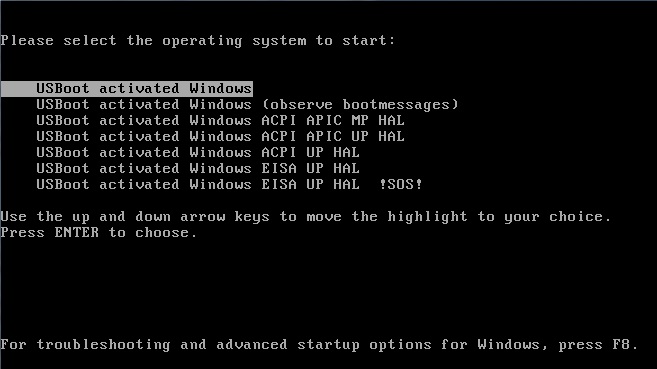
Choose the first (default) option. If this fails to boot XP (Blue Screen of Death) then try some of the other options.
If you do not see this screen, but instead see some other error message, it may be that you do not have the correct boot code.
To fix this, use RMPrepUSB – Install grub4dos and install grub4dos to the MBR of the USB drive. Now press F4 and create a new menu.lst file on the USB drive. Add the following line
chainloader (bd)/ntldr
and save the file.
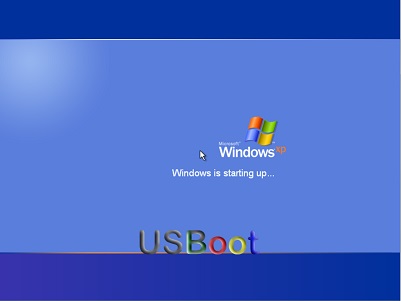
Windows XP should boot from USB as shown below (note the modified splash screen and the USBoot logo on startup)…
A USBoot forum exists here for any questions or problems you may have.
Tip: You will need to disable Standby in Control Panel – Power options as you cannot wake it from Standby!
If you install USB-3 drivers, you may be able to boot it from a USB 3.0 port (if your system supports USB 3 booting). Using a USB 3 drive + enabling paging would give you good performance and usability!
BOOTING THE USB DRIVE ON A DIFFERENT SYSTEM
If you try to boot the USB on a different system, then the drivers will not be correct. The XP OS will try to autodetect and auto-install any required drivers, however you may need to uninstall some previous drivers or add new drivers in order to achieve full functionality.
TWEAKS AND TIPS
From zoso from reboot.pro:
Install the Microsoft Enhanced Write Filter (EWF) – optional -> virtually protects partitions from write operations if enabled by caching writes in RAM – may help to extend the lifetime of flash devices especially when formatted with NTFS and speeds up the system response – copy “ewf.sys” and “ewfmgr.exe” from XP embedded SP2 (or newer) into folder “ewf” BEFORE you start running USBoot phase-ii.
To obtain the ewf files from XP embedded SP2 – download XPEFFI.exe and run it – select only the Windows Embedded XP SP1 Tools and the Windows XP Embedded SP2 options (257.0MB + 7.1MB) and click Start Download Now. Find the tools.cab and disk1.cab files in C:\Users\<username>\AppData\Local\Temp. Unpack the cab files using 7zip to obtain WINDOWS XP EMBEDDED TOOLS SP1.MSI and run it – the required serial number is in the other disk1.cab in \DISK1\productkey.txt file. Choose Typical – This computer and allow the files to be extracted. Run C:\Program Files (x86)\Windows Embedded\Installer\disk3\xpesp2.exe and note the destination as it extracts the files. When the installer finished unpacking the files and prompts you with a ‘Database backup’ prompt and to install the update do not proceed and do not quit – just change to the destination folder (e.g. F:\156faf84abfcb14773606e07da11\rep\{67c85615-b0c5-42ea-8b8a-e8ab47db2b1d}) and copy all 6 files beginning with ewf to a temporary folder. Now quit the xpesp2 install. To remove the XP Embedded SP2 files, re-run the WINDOWS XP EMBEDDED TOOLS SP1.MSI and click Remove. You may also need to delete the C:\Program Files (x86)\Windows Embedded folder manually. Easy eh?!!!
Use QEMU and a .raw disk image to prepare XP. When phase-ii finishes you should be able to simply copy over all the files from inside the raw disk image to a flash drive.
If you slipstream an XP with RVM integrator and the driverpacks Keep The Drivers option then install that and then use USBOOT you will have a universal XP that automatically loads any drivers you need.
I also use IMDisk, Firadisk, WinVblock, to boot in ram too and used Sha0s HAL tutorial so that I have several options for booting. heres my boot.ini:
- [boot loader]
- timeout=0
- default=multi(0)disk(0)rdisk(0)partition(1)\WINDOWS
- [operating systems]
- C:\grldr=”Grub4Dos”
- multi(0)disk(0)rdisk(0)partition(1)\WINDOWS=”Last Config” /sos /fastdetect /noexecute=optin
- multi(0)disk(0)rdisk(0)partition(1)\WINDOWS=”(ACPI PC) for most compatability” /sos /kernel=ntkrup.exe /hal=halacpi.dll /fastdetect /noexecute=optin
- multi(0)disk(0)rdisk(0)partition(1)\WINDOWS=”ACPI APIC MP HAL” /sos /kernel=ntkrnlmp.exe /hal=halmacpi.dll /fastdetect /noexecute=optin
- multi(0)disk(0)rdisk(0)partition(1)\WINDOWS=”ACPI APIC UP HAL” /sos /kernel=ntkrnl.exe /hal=halaacpi.dll /fastdetect /noexecute=optin
- multi(0)disk(0)rdisk(0)partition(1)\WINDOWS=”ACPI UP HAL” /sos /kernel=ntkrnl.exe /hal=halacpi.dll /fastdetect /noexecute=optin
- multi(0)disk(0)rdisk(0)partition(1)\WINDOWS=”EISA UP HAL” /sos /kernel=ntkrnl.exe /hal=haleisa.dll /fastdetect /noexecute=optin
- multi(0)disk(0)rdisk(0)partition(1)\WINDOWS=”UP HALSTAN” /sos /kernel=ntkrnlup.exe /hal=halstan.dll /fastdetect /noexecute=optin
- multi(0)disk(0)rdisk(0)partition(1)\WINDOWS=”UP HALAACPI” /sos /kernel=ntkrnlup.exe /hal=halaacpi.dll /fastdetect /noexecute=optin
- multi(0)disk(0)rdisk(0)partition(1)\WINDOWS=”UP HALMPS” /sos /kernel=ntkrnlup.exe /hal=halmps.dll /fastdetect /noexecute=optin
- multi(0)disk(0)rdisk(0)partition(1)\WINDOWS=”MP HALMPS” /sos /kernel=ntkrnlmp.exe /hal=halmps.dll /fastdetect /noexecute=optin
- multi(0)disk(0)rdisk(0)partition(1)\WINDOWS=”MP HALSP” /sos /kernel=ntkrnlmp.exe /hal=halsp.dll /fastdetect /noexecute=optin
- multi(0)disk(0)rdisk(0)partition(1)\WINDOWS=”UP HALACPI” /sos /kernel=ntkrnlup.exe /hal=halacpi.dll /fastdetect /noexecute=optin
- multi(0)disk(0)rdisk(0)partition(1)\WINDOWS=”(MPS Unipro PC) for singlecore Xeons” /sos /kernel=ntkrup.exe /hal=halapic.dll /fastdetect /noexecute=optin
- multi(0)disk(0)rdisk(0)partition(1)\WINDOWS=”(ACPI Multipro PC) multicoreHyperthr” /sos /kernel=ntkrmp.exe /hal=halmacpi.dll /fastdetect /noexecute=optin
- multi(0)disk(0)rdisk(0)partition(1)\WINDOWS=”(ACPI Unipro PC) singlecore, nohyper” /sos /kernel=ntkrup.exe /hal=halaacpi.dll /fastdetect /noexecute=optin
- multi(0)disk(0)rdisk(0)partition(1)\WINDOWS=”(MPS Multipro PC) multi-core Xeons” /sos /kernel=ntkrmp.exe /hal=halmps.dll /fastdetect /noexecute=optin
- multi(0)disk(0)rdisk(0)partition(1)\WINDOWS=”(Compaq SystemPro Multiprocessor PC)” /sos /kernel=ntkrmp.exe /hal=halsp.dll /fastdetect /noexecute=optin
More about EWF
To switch write-protect on and off as desired, install the EWF Manager (free, http://infosys.beckhoff.com/content/1031/CX1000_SW/SAMPLES/BEWFMgr.zip). Then reboot and start the program. “Enable EWF” activates the write protection, “Disable EWF” disables it. In both cases, a restart is required. Press “Commit changes” to write any changes if you are in write-protect mode (EWF enabled).
ALTERNATIVE: PREPARING THE USB DRIVE USING A VIRTUAL MACHINE
Note: I have not had success using a VM!
Suggested procedure:
Phase-i and Phase-ii can be run from within a virtual XP environment.
Phase-iii can be run from a separate XP environment – note that phase-iii will not work from a WinPE v2/3/4 or Vista or later environment – phase-iii must be run from an XP Pro (SP2/3) environment.
1: Install Windows XP inside the VM
2. Run phases I and II of USBoot inside the VM and complete all required reboots as the software is asking for. Now try phase-iii – if it does not work – proceed to the next step…
3. Shutdown your XP VM
4. Using the VM Virtual Box – File – Virtual Media Manager – Copy menu, copy the VDI virtual disk. Then add it to your VM Setup as a 2nd virtual hard disk. DO NOT just copy the VDI file in Explorer because it will have the same disk signature and the VM will refuse to mount both virtual hard disks on the same Virtual Machine!
5. Boot to your original VDI virtual disk with the VM and attach your USB drive to the VM (it should be cleanly formatted for an NTLDR bootloader)
6. Start USBoot phase III from the virtual disks drive and select the USB disk as target drive and the 2nd virtual disk as the Source.
Note: When I tried this, phase-iii failed complaining that the ‘Installation of source drive appears to be incomplete’!
If phase-iii also fails, then simply select all the files and folders on the 2nd copy (make sure you change the View Folder options so you can see hidden and system files) and copy all files and folders (except the Recycler and System Volume Information folders and the pagefile.sys file) to the attached, USB drive.
If you are already running XP, you could try mounting the VDI disk image as a virtual drive and running phase-iii on your real XP system but choose the virtual hard disk volume as the Source drive letter. Be warned however, that this might affect your XP system!
Phase-iii checks for XP and so you cannot run phase-iii from a WinPE v2/3/4 or Vista/7/8 OS.
Downloads
Click here (OneDrive folder) if you cannot find any file mentioned in the articles on this site or Contact Me.