
Finnix is a self-contained, bootable Linux CD distribution (“LiveCD”) for system administrators, based on Debian. You can mount and manipulate hard drives and partitions, monitor networks, rebuild boot records, install other operating systems, and much more. Finnix includes the latest technology for system administrators, with Linux kernel 2.6, LVM2, encrypted partitions, etc. And above all, Finnix is small; currently the entire distribution is over 300MiB, but is dynamically compressed into a small bootable image – the v101 iso is 130MB. Finnix is not intended for the average desktop user and does not include any desktops, productivity tools or sound support, in order to keep the distribution size low.
Finnix is ideal for making bootable image recovery CDs or USB image recovery flash drives. This is because it automatically mounts the CD or USB device as /cdrom which makes all files on the CD\USB accessible. All the tools for making and restoring images are already present (e.g. dd, partimage, etc.) and you can easily add a script and extra files to the CD/USB without needing to recompile the kernel. The simplest way to modify Finnix is to add a file on the CD/USB at /FINNIX/finnix.sh (for v101). Place any commands you wish to run in this script file, and they will be executed just before a shell is given in Finnix, after all other commands. The closest analogy is /etc/rc.local on Red Hat-based systems. See here for more info.
This means you can edit and test out your scripts using a bootable UFD and then burn a CD or DVD once you have it all working. An example backup/restore script is provided (finnix.sh). You can use UltraIso to change the contents of the Finnix ISO and add your scripts and image files.
FINNIX 107
You can follow the Finnix 101 method below to make a flat file UFD.
OR
You can also boot Finnix 107 directly from the Finnix ISO using the following menu
- title finnix 107 (32-bit)
- map /finnix-107.iso (0xff)
- map –hook
- root (0xff)
- kernel /boot/x86/linux vga=791 quiet findiso=/finnix-107.iso
- initrd /boot/x86/initrd.xz
The USB will be accessible from Finnix as /media/sda1/
The start-up script has moved in version 107 and should now be placed at /finnix/arch/indep/rc/yourname.sh, however if placed on the UFD it does not seem to be run, you may need to include this file inside the iso file.
Don’t forget to use chmod +x to make the file executable. You also will need to make the UFD r/w by using the command mount -o,remount /media/sda1 in order to use the chmod command.
FINNIX 101
This tutorial describes how to prepare Finnix 101 to make a bootable USB Flash drive (you can use unetbootin instead, but this does not produce a nice graphical menu)..
1. Download Finnix 101 from here.
2. Mount the ISO file (e.g. using SlySoft Virtual CloneDrive) or extract the contents to a folder on your hard disk using WinZip or WinImage.
3. Insert a USB flash drive and run RMPrepUSB v2.1.618 or later
5. Set these settings:
1. MAX size
2. Volume Name = Finnix
3. Syslinux bootable
4. FAT32 + Boot as HDD + Use 64hd/32sec
5. Copy OS files – browse to the Finnix ISO drive or folder and tick the copy files box
6. Click on Prepare Drive
After the files have been copied to the USB drive, answer the syslinux prompts using Yes to raidand type \isolinux for the install folder
Check that the USB drive now has the Finnix and Isolinux folders only (press F2 to view the files).
6. Rename the isolinux folder to syslinux
7. Rename the \syslinux\isolinux.cfg file to syslinux.cfg (i.e. \syslinux\syslinux.cfg)
The USB drive should now contain 2 folders:
\syslinux (with approx 20 files including ldlinux.sys and syslinux.cfg)
\FINNIX (1 arch.amp file + arch folder)
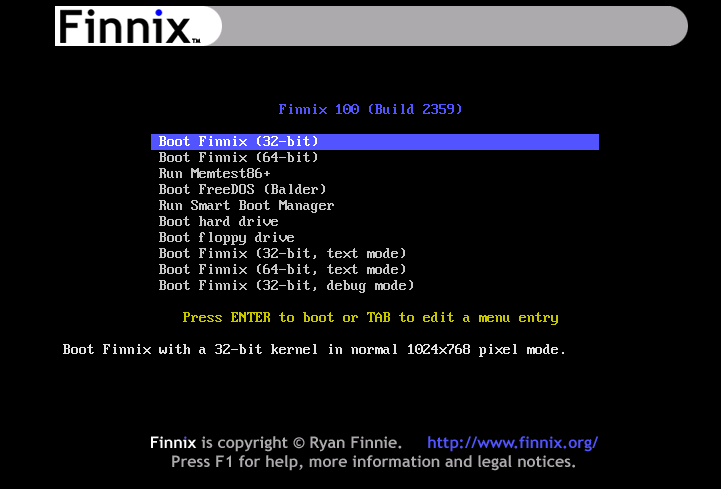
Now go try it (press F11 in RMPrepUSB to launch QEMU). You should see a menu similar to that below (if you get a blank screen and no boot menu at all, read the note at the bottom of the page). To list all the commands available, type the TAB key twice.
For an example finnix.sh shell script which is suitable to use as basis for a Recovery CD or USB flash drive script, please add the finnix.sh file to the \FINNIX folder. You will need to alter the script to suit your own particular hard disk image and you will need to add the image and MBR files to the root of your CD\USB.
NOTE: When you format the USB pen using RMPrepUSB, it uses syslinux.exe to place boot code on the USB pen. Syslinux.exe is included in the RMPrepUSB download. If you replace syslinux.exe with the latest 4.03 version in the RMPrepUSB folder, you should use the vesamenu.c32 file from the \isolinux folder instead of the one in my FinnixExtra.zip download (or path it in syslinux.cfg to /isolinux/vesamenu.c32). If you don’t get a menu displayed but just get a blank black screen instead, you have a mismatch between vesamenu.c32 and the version of syslinux.exe used.
RMPrepUSB v2.1.604 and later use sysylinux v4.03 so you shouldn’t need to change the vesamenu.c32 file.