
Table of Contents
NEWS! The ZM-VE350 USB 3.0 version is now available which I would recommend if you are going to buy one, as it should be much faster even on a USB 2 port!
MORE NEWS! The ZM-VE400 USB 3.0 version with disk encryption is now available! This prevents anyone from accessing the files on your drive and so is ideal for use by field service engineers who may have sensitive files on it (such as OEM BIOSes or proprietary software).
I recommend the IODD 2531 for quality and reliablity rather than the equivalent Zalman.
StarTech S2510BU3ISO will boot one of three selectable ISOs and is only $23.
Reboot.pro Forum on Zalman ZMs – look here for interesting things on the Zalman VE300 (including using .disk and .vmdk images!)
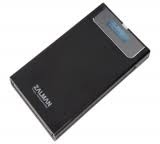
Fig. 1 The ZM VE200 in black.
Note: When new, there is a thin transparent protective film on the LCD display which can be peeled off.
The Zalman ZM VE200 is a 2.5″ SATA Hard Disk drive caddy with a difference. If you place any ISO file in the _ISO folder in the first partition of the hard drive, it can be made to emulate a CD/DVD drive just as if you had a USB CD/DVD drive attached to your computer instead of a USB hard drive. It also allows you to simultaneously emulate up to four .IMA or .RMD images (floppy images or full Hard Disk images!) too. There is also a small write-protect switch at the top of the drive (tip: use the USB connector plug end to move it if you have short fingernails!). It also has an eSATA interface as well as a USB interface (eSATA is for storage/file transfer only, not drive emulation).
The IODD is a predecessor of the VE200. Many of the features of the older IODD still apply to the VE200 (see .chm manual here) – for instance the power saving settings held in the file _iso\_iodd.ini also work on the VE200. By adding an _iodd.ini file you can tell the VE200 to power down after a set period and thus save power and prevent the drive from getting too hot when it is not being accessed. Look here for details. You can even use IODD firmware on the VE200!
IODD firmware and utility files can be found here or here.
If you want a USB Flash drive version of the Zalman ZM, see here for details of a new bit of kit (ISOSTICK) currently being developed (or just use Easy2Boot for free!).
Transfer rates on the VE200 are OK but not impressive via USB 2. Read (24-30MB/s depending on computer) and Writes (22-24MB/s); compared this to a Patriot Rage quad channel 32GB flash stick which can do 30MB/s read and 27MB/s write. It is also slow in practise when booting from it (comparable with a standard inexpensive and slow USB flash drive).
When emulating a bootable install DVD using a Windows 7 SP1 iso, Windows Setup took a very long time to scan it (at the early partition/format hard disk Install\Custom-Advanced screen stage). If I then unplugged the VE200, Windows setup instantly stopped waiting (the blue circle for ‘waiting/not responding’ disappeared) so it was definitely the VE200 that Windows Setup did not like. If however you left it for 5 minutes or so, Windows Setup eventually stops waiting and I could carry on and format my PC hard drive and install Windows 7 as normal. This problem did not happen when set to ODD Only (not dual) mode. For this reason I recommend setting it to ODD only mode (hold the jog switch wheel UP and then connect the USB cable) and not Dual Mode when using it to boot from an OS install ISO (especially Windows).
You can easily select and boot from any ISO file just by using the jog wheel to select an ISO file (when an ISO file is mapped into the virtual DVD/CD drive the double-ring (CD) icon appears on the LCD display).

LCD icons, and jog wheel positions when connecting the USB cable
e.g. To power on the VE200 in Dual Mode, push in the jog switch and then connect the USB cable so that it powers up with the jog switch pressed in.
To connect in ODD mode, push up the jog switch and connect USB cable (recommended for OS installs from an ISO).
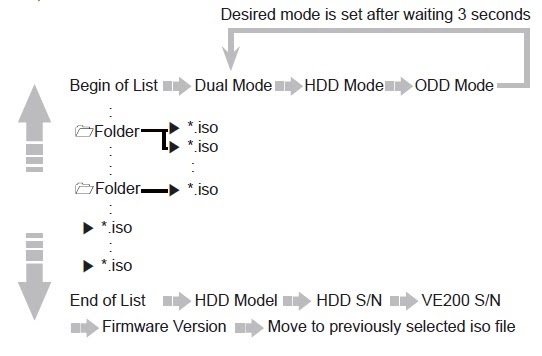
Jog Wheel usage: e.g. to select HDD Mode, jog the wheel up to the Begin of List, then press in the jog wheel twice to get ‘HDD Mode’ then wait 3 seconds.

Another icon indicates IMA/RMD/DSK drive emulation mode (just left of the 27oC).
The icon to the left of the file shows it is being emulated as a Removable (flash) disk.
If emulated as a Fixed HDD, you get a square with a circle in the middle.
There are some reviews here and here and here and a YouTube advert here https://www.youtube.com/embed/OxvzSNp-tPM
Instructional video
When I got mine I had a few ‘issues’, so I just wanted to help those of you who have similar difficulties.
(To cut a long story short though – wipe all partitions, format with the first partition as Primary NTFS, create a _ISO folder and store your .iso files in there – up to a limit of 32 objects per folder – but you can make subfolders).
Important Note: New firmware version 61F supports FAT and exFAT but NOT NTFS. If you change the firmware the VE200 will not be able to access the first partition and you will have to reformat the first partition to a format that the new firmware can read. e.g. If you currently have the NTFS firmware version, if you download and update with the new 61F version, it will give a ‘Partition: FF’ error and will not be able to load any ISO files on the NTFS partition. You will need to copy all the files from the USB drive to an empty folder on your PC hard disk, reformat the VE200 as FAT or ExFat and then copy all the files back to the VE200 again!
First, what should happen when you plug it in to a USB port with a correctly formatted hard disk in the Zalman caddy is that is should display either ‘NO _ISO‘ or the name of an ISO file (or folder) that you have placed in the _ISO folder on the hard disk. The VE200 reads the NTFS disk filesystem on power up and looks for a _ISO or a _iso folder (not case sensitive) on the drive. Instead, what you might see instead is:
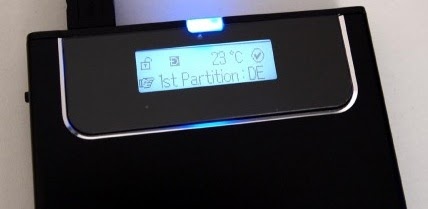
This display is showing an error – the first partition is of type DE and so is not suitable for emulating ISO or other files as it cannot be read by the VE200 firmware
ERROR MESSAGES (VE200 57N firmware)
- Error 23 I have no idea what this means but it displayed it even when a valid hard disk was connected that worked fine on a friends VE200!. Try a reset (see below)
- 1st Partition: XX where XX is a number such as 6, B, C, 83, F etc. (the number means ‘the partition type of the 1st partition is type XX and I DON’T LIKE IT!‘)
- 1st Partition: FF Either 1st partition type is FF or I cannot read/understand the partition (volume) format (e.g. type 7 NTFS partition but it is formatted as exFAT for instance)
- 1st Partition: 0 drive is not partitioned
- NO – DISC the VE200 has found the _ISO folder 🙂 but it contains no valid files with a valid extension (e.g. .iso, .ima, .dsk, .rmd)
- TOO Many FILES you have more than 32 objects (files + folders) in the _ISO folder or in the user selected folder which is under the _ISO folder. (>32 FILES+FOLDERS! would have been a better message!)
- ALREADY HIT you have already selected this file for emulation and it is already loaded and being emulated
- vDISK LIMIT the VE200 can emulate a max of 4 virtual disks only at the same time
- NO ISO the VE200 can read the 1st partition OK but it cannot find any folder called ISO or _iso
An ISO can be loaded (or unloaded) by selecting it and pressing in the jog wheel.
If you have copied an .iso file to the _ISO folder but the VE200 does not list it on it’s LCD display when using the jog wheel, that indicates the file is corrupt or the wrong format.
The VE200 can also load up to FOUR .IMA images as four virtual read/write floppy drives (thanks TheHive for the heads-up on this!) or virtual Hard Disk images (thanks to Maximus57 on Reboot.pro for this discovery!). If a floppy image is loaded, drives will appear in Windows Explorer as A:, B:, and then two spare drive letters like J: and K:. You can also load an ISO file at the same time. Once an IMA file is loaded, the VE200 will no longer be in DUAL MODE and the hard disk volume will disappear from Explorer. Also, the VE200 will remember and auto-load these virtual disk files each time it is powered up! To make it forget this and to reset it back to DUAL MODE, unplug it – press and hold in the jog wheel and then plug it in again whilst still holding in the jog wheel.
The VE200 also supports .DSK and .RMD files too (.dsk – fixed disk, .rmd = removable disk).
As far as I can make out while experimenting with different formats, it ONLY seems to be able to mount iso files if you format the drive as NTFS (or exFAT if you use the latest firmware). The _ISO folder must be in the first NTFS primary partition. You can have other partitions, but to make use of the iso/ima mount feature, the first one needs to be a primary NTFS partition. If you have done this and you still cannot get the ‘NO _ISO’ message to appear, do not despair. I had a brand new VE200 and could not get the *3^&ing* thing to work. A colleague also had a working one, so we first changed my hard disk for his hard disk -> still got an error on my caddy (so it looked like my controller was faulty). Then we put his controller on my hard disk and that did not work either! So I concluded that my controller was faulty. We tried reformatting my disk and mucked about for about an hour but could not get my Zalman controller to work with any of 3 different hard disks – even though the hard disks worked with his Zalman controller when wiped and reformatted using his controller!
I was just about to send it back when I did the following reset procedure and ever since, my controller has worked fine…
Reset
First reset the VE200 back to DUAL MODE as follows:
Unplug USB – Press and hold in Jog button in the centre position – Reconnect USB cable.
This causes any mounted/emulated images to be unmounted.
If this does not work, try:
1. Under Windows 7 run DISKPART, then type LIS DIS and then SEL DIS 1 (assuming disk 1 is your VE200 drive), then type LIS DIS and make sure the * is against the VE200 drive and then type CONVERT MBR and then CLEAN to completely erase the hard disk partitions.
2. Unplug the VE200 and then wait for 20 seconds – then re-connect it whilst pressing in the jog wheel in the centre position
3. Now partition and format the VE200 hard disk as NTFS PRIMARY.
4. Now use ‘Safely Remove Hardware’ systray icon to eject it and unplug and re-connect it whilst pressing in the jog wheel in the centre position
With luck, it should power up and say “NO _ISO”. If not try again or try RMPrepUSB CLEAN function instead of step 1 above and then in step 3 use RMPrepUSB to format it as an NTFS partition. Once I got it working, I cannot get it to now fail in the same way as before, so I cannot be sure exactly how I cleared the problem!
If the VE200 appears to be stuck in Read-Only mode and you cannot write any files to it, it is probably because you have selected a .ima, .dsk or .rmd file. It does not seem possible to unselect them though (!), so reset it – unplug the VE200, push in the jog-wheel (keep centre position) and the re-connect the USB cable. This should unmount all mounted images
Power
I have noticed that some notebooks do not seem to be able to provide sufficient power for my caddy+HDD combination. So I use a USB Y-Cable which gives me two USB plugs to use on the notebook, – this works fine. So I highly recommend purchasing a USB Y-cable.
If you experience the USB drives appearing and disappearing and then re-appearing, etc, in Explorer and Windows keeps losing and re-detecting them, use a Y-cable for extra power.
If you still have problems when using a PC, try the rear USB ports instead of the front USB ports.
Firmware
You can also obtain a firmware update for this controller (if you press in the jog button a few times it displays the firmware revision so you can check it – once updated mine says ZMVE200-v1.00.00-57N). Once you have the “NO _ISO” message, download the firmware update iso file and then copy it to a folder named _ISO on the VE200 hard disk. Unplug the drive and plug it in again and you should see the name of the ISO file in the LCD display. Press the jog button to select it and the firmware should update. Once you have done this you can delete the firmware update ISO file.
UPDATING FIRMWARE
The IODD 2531 is equivalent to the Zalman ZM-VE300.
The IODD 2541 is equivalent to the Zalman ZM-VE400.
You can use the iodd firmware update tool to update the Zalman firmware, but you will need to ‘hack’ the utility to enable the ‘Update’ button which will be greyed-out if only the Zalman is detected.

1. Run the iodd firmware updater tool (e.g. iODD_2531_user_fw_writer_04(R1558N)_x86.EXE )
2. Run the eda_preview270.exe as Admin, click on ‘Modify Window’ tab
3. Left-click-down on the CD icon (bottom right) and drag the cursor to the button you want to enable on the iodd fw form (in this case ‘Update’) – release the mouse button.
4. On eda form, untick the WS_DISABLED check box and click on ‘set the windows text’ button – the Update button should now be enabled.
5. Now you can click on the Update button in the iodd fw utility to update the firmware.
I tested this under Win10 x64 and it seemed to enable the button, but I don’t have an equivalent Zalman to actually run an update.
See reboot.pro thread for more details.https://www.youtube.com/embed/2Wot1qAViac
IODD\ZALMAN NOT READY
If you find that your PC\Notebook\ChromeBook boots too fast and the IODD\Zalman does not have time to power up and load the ISO as a virtual CD, then you need will need to warm reboot (e.g. press Ctlr-Alt-Del) or press the Reset button.
If this is not possible, you will need to power the IODD\Zalman before you switch in the computer. To do this, use a USB 3 (or USB 2.0) Y-cable (or USB dock) and a portable USB power-bank battery pack/charger pack.
- ChromeBook ————————— IODD\Zalman
- I
- Battery Pack ———–>I
Click here (OneDrive folder) if you cannot find any file mentioned in the articles on this site or Contact Me.